

New to 928S - it arrives tomorrow!
 10-16-2020, 06:52 AM
#31
Racer
Join Date: Nov 2008
Location: The Netherlands, Zwolle
Posts: 286
Likes: 0
Received 3 Likes
on
3 Posts
The S is a great car  I have one for 10 years now and am in Holland. Been doing simple jobs myself too. The way I do them: Look in the workshop manual for the official step by step instructions. Then check if someone on youtube did it already. Maybe look at parts in the PET catalogue for more pictures and part numbers to order. And for questions, search for threads on this forum or post a new one. There are most likely step by step instructions with photos on this forum too.
I have one for 10 years now and am in Holland. Been doing simple jobs myself too. The way I do them: Look in the workshop manual for the official step by step instructions. Then check if someone on youtube did it already. Maybe look at parts in the PET catalogue for more pictures and part numbers to order. And for questions, search for threads on this forum or post a new one. There are most likely step by step instructions with photos on this forum too.
Last edited by concor; 10-16-2020 at 07:07 AM.
 10-16-2020, 07:41 AM
#32
Instructor
Thread Starter
The S is a great car I have one for 10 years now and am in Holland. Been doing simple jobs myself too. The way I do them: Look in the workshop manual for the official step by step instructions. Then check if someone on youtube did it already. Maybe look at parts in the PET catalogue for more pictures and part numbers to order. And for questions, search for threads on this forum or post a new one. There are most likely step by step instructions with photos on this forum too.
I have one for 10 years now and am in Holland. Been doing simple jobs myself too. The way I do them: Look in the workshop manual for the official step by step instructions. Then check if someone on youtube did it already. Maybe look at parts in the PET catalogue for more pictures and part numbers to order. And for questions, search for threads on this forum or post a new one. There are most likely step by step instructions with photos on this forum too.I've been staring in bewilderment of where to start as there is a lot I want to do, and a lot that needs to be done before I consider it safe. I'll make a list, as short as possible this weekend and get it all organised.
The manuals are going to be a massive help!

Your car looks great in your avatar, hoping to get mine shining like that!
10-16-2020, 03:52 PM
#33
Nordschleife Master
Not bothering to quote everything...
"The Tank" - We often refer to these cars as "Sharks", so this little asylum is often called the "Shark Tank". Shortened to the "tank". It's probably the most active section of the whole forum. Lots of folks who know and love these cars, and who are willing to share their experience and knowledge.
Shop manual - There's a link in the New Visitor sticky to a downloadable copy. "Ligeti" or something like that is the site. The copy is pretty complete, there's a couple pages missing and a few out of order, but it's useable. There is a 5 CD-ROM set available from Roger at 928s R Us, called the "Moorehouse" set. Full copies of the WSM, PET, Tech Specs, updates, and on and on. Well worth the money. They aren't listed on his site, so e-mail him about them.
I would also suggesting downloading a copy of the "PET" parts catalog. Available from the Porsche site for free (under the 'classic' tab). It has exploded views of every assembly and part. I use it as often if not more so than the actual shop manuals.
Fuel lines - All the underhood lines should be replaced. Period. They are hard plastic inside a rubber sheathing. There's no way to inspect them for condition. They look just fine, until they burst. Greg Brown of Precision Motorwerks makes the best replacements available. Not cheap, but guaranteed for life.
TB/WP - If you can follow directions and have some experience turning wrenches, this job is not all that hard. Fairly involved, and there are a few pitfalls and 'gotcha' type items, but there are several very good writeups on it, and many of us have done it.
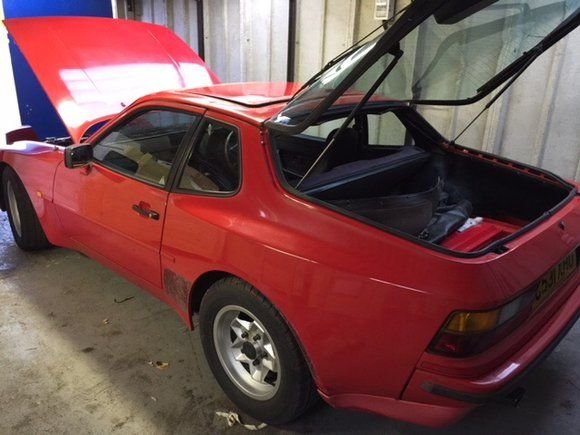
Is that a K&N air filter? Those are generally not considered a good idea, for a few different reasons. Original is best.
Jump post cap & cover - There should be a boxy cover over the 14 pin connector (main engine wiring harness) and a cap on the hot post. The cover protects the wiring from water dripping in and the cap covers the post that is 12v hot, wired directly to the battery. Both are good to have, cheap to acquire, and often missing.
Nice looking car. I can't remember if that red is single stage or clear coated. If it's single stage (and I want to remember that it is), then a good polish will do wonders. A decent repaint is a very involved and expensive undertaking. For now, I'd see what you can do and perhaps find a good quality detailer who is experienced with this type of paint. A quality paint correction can take you a loooooong way back to 'nice'.
"The Tank" - We often refer to these cars as "Sharks", so this little asylum is often called the "Shark Tank". Shortened to the "tank". It's probably the most active section of the whole forum. Lots of folks who know and love these cars, and who are willing to share their experience and knowledge.
Shop manual - There's a link in the New Visitor sticky to a downloadable copy. "Ligeti" or something like that is the site. The copy is pretty complete, there's a couple pages missing and a few out of order, but it's useable. There is a 5 CD-ROM set available from Roger at 928s R Us, called the "Moorehouse" set. Full copies of the WSM, PET, Tech Specs, updates, and on and on. Well worth the money. They aren't listed on his site, so e-mail him about them.
I would also suggesting downloading a copy of the "PET" parts catalog. Available from the Porsche site for free (under the 'classic' tab). It has exploded views of every assembly and part. I use it as often if not more so than the actual shop manuals.
Fuel lines - All the underhood lines should be replaced. Period. They are hard plastic inside a rubber sheathing. There's no way to inspect them for condition. They look just fine, until they burst. Greg Brown of Precision Motorwerks makes the best replacements available. Not cheap, but guaranteed for life.
TB/WP - If you can follow directions and have some experience turning wrenches, this job is not all that hard. Fairly involved, and there are a few pitfalls and 'gotcha' type items, but there are several very good writeups on it, and many of us have done it.
Is that a K&N air filter? Those are generally not considered a good idea, for a few different reasons. Original is best.
Jump post cap & cover - There should be a boxy cover over the 14 pin connector (main engine wiring harness) and a cap on the hot post. The cover protects the wiring from water dripping in and the cap covers the post that is 12v hot, wired directly to the battery. Both are good to have, cheap to acquire, and often missing.
Nice looking car. I can't remember if that red is single stage or clear coated. If it's single stage (and I want to remember that it is), then a good polish will do wonders. A decent repaint is a very involved and expensive undertaking. For now, I'd see what you can do and perhaps find a good quality detailer who is experienced with this type of paint. A quality paint correction can take you a loooooong way back to 'nice'.
10-17-2020, 03:35 AM
#34
Instructor
Thread Starter
@Wisconsin Joe Thanks for the reply mate! A very kind forum member sent the manuals unprompted, very grateful for that, and I'll be sure to get the PET catalogue.
Yes, K&N filter in the boot (which I can't open yet and don't want to bust the one and only key in trying) left by the previous owner. I hear things about these filters too so I concur.
I read about the jump post location - will check that out this weekend.
TB WP - being done next, and fuel hoses. I intend to do as much as I can myself, keeps the costs down of course and there's huge satisfaction in it. I'm going to hand off these to my local indie on this occasion due to time and work commitments and I just want to drive the thing for a bit so I figure I'll spend the money and get it moving, then take care of the rest myself.
It certainly is single stage paint, the bonnet is very faded but has some sheen to it, I rubbed a small section by hand with cutting compound very carefully to see what comes off and what's beneath but am thinking that it might be too aggressive so I may go with my lighter Meg's finishing polish so I don't burn through. I'm no experienced detailer but I am very careful!
Then it's wheels are coming off in a bit for a full under-arch clean up all round, this will never have been done so I am looking forward to peeling back the layers, hopefully not too many horrors await!
This morning when it gets light I'll be out documenting each panel to record it's current state, then will do a few 'after' shots another day when I've polished everything.
Thanks again for taking the time to comment, I really appreciate it.
10-17-2020, 05:18 AM
#35
Rennlist Member
Join Date: Oct 2003
Location: Saco, Maine/ Scarborough, Maine
Posts: 1,986
Received 591 Likes
on
218 Posts
Yes, if original paint, it should be single stage. If “red” comes off when you polish, then it confirms single stage. A good random orbital machine with polish should bring back the top surfaces to shine again! A random orbital machine will save you much time and give a very uniform finish vs hand polishing. I did my red GT when I got it and brought back the shine really nice....yes red cars are faster!
good luck, nice 928!
good luck, nice 928!
 10-19-2020, 07:01 AM
#38
Instructor
Thread Starter
Thanks for the replies chaps, I've been busy over the weekend documenting every panel and interior part, working out how to bring this beauty back to life. I've taken hundreds of pics of every nook and cranny so I can refer back to them to remind me of how crap it was, when I need some encouragement!
The single stage paint - it's oxidised beyond belief! I've bought a DA polisher and tried a very gentle polish and a bit of a cut on s test section on the hood - I haven't gone very far, I believe I need to test the paint thickness really so I've a gauge coming today so before I go any further I'll test it and see what I'm dealing with. I'm looking for advice for a beginner on doing this if anyone has any. There's millions of videos on cutting/polishing modern clearcoat paints but not much on these older finishes. I can afford to repaint but I'd rather not because I like things to be original and don't mind a bit of 'patina'.
I managed to work the boot lock with some lube so it opens, the servo release is whirring but not releasing but will get to that later on. I did manage to remove the crappy old cd changer that was screwed to the back of the back seat - now in the bin!
Overall, I am really pleased with this car so far, great to see some signs of life coming back, can't wait to get the paint looking good again!
10-19-2020, 08:35 AM
#39
Rennlist Member
Thanks for the replies chaps, I've been busy over the weekend documenting every panel and interior part, working out how to bring this beauty back to life. I've taken hundreds of pics of every nook and cranny so I can refer back to them to remind me of how crap it was, when I need some encouragement!
The single stage paint - it's oxidised beyond belief! I've bought a DA polisher and tried a very gentle polish and a bit of a cut on s test section on the hood - I haven't gone very far, I believe I need to test the paint thickness really so I've a gauge coming today so before I go any further I'll test it and see what I'm dealing with. I'm looking for advice for a beginner on doing this if anyone has any. There's millions of videos on cutting/polishing modern clearcoat paints but not much on these older finishes. I can afford to repaint but I'd rather not because I like things to be original and don't mind a bit of 'patina'.
I managed to work the boot lock with some lube so it opens, the servo release is whirring but not releasing but will get to that later on. I did manage to remove the crappy old cd changer that was screwed to the back of the back seat - now in the bin!
Overall, I am really pleased with this car so far, great to see some signs of life coming back, can't wait to get the paint looking good again!
The single stage paint - it's oxidised beyond belief! I've bought a DA polisher and tried a very gentle polish and a bit of a cut on s test section on the hood - I haven't gone very far, I believe I need to test the paint thickness really so I've a gauge coming today so before I go any further I'll test it and see what I'm dealing with. I'm looking for advice for a beginner on doing this if anyone has any. There's millions of videos on cutting/polishing modern clearcoat paints but not much on these older finishes. I can afford to repaint but I'd rather not because I like things to be original and don't mind a bit of 'patina'.
I managed to work the boot lock with some lube so it opens, the servo release is whirring but not releasing but will get to that later on. I did manage to remove the crappy old cd changer that was screwed to the back of the back seat - now in the bin!
Overall, I am really pleased with this car so far, great to see some signs of life coming back, can't wait to get the paint looking good again!
Just start somewhere no one ever sees like the bottom of the front bumper line- using a rubbing compound you could even try a few square inches "manually" to start with just to get a feel for what is possible and what it looks like. If the paint were truly buggered then nothing you can do will make it any worse but I would be very surprised if that is the case. The beauty of red is when you do get it right it really pops as did my late 90S4 until some tw*t on a mobile phone clipped me and sent me careering into the barriers- a beautiful unmarked immaculate car totally wrecked because of said plonker.
Needless to say Cobalt Blue is a far more mature colour .
Your engine bay is not too bad at first glance- get that grot out in front of the radiator and clean it up with a rattle can of something and there will be a 100% visual improvement for just a couple of hours worth of effort. Eventually [hopefully?] you will end up with something like this [just to motivate you]

The following users liked this post:
freddyuk (10-19-2020)
10-19-2020, 09:44 AM
#40
Burning Brakes


Here is a 944 I used to own before clean and polish with T cut red colour restore then wax. Of course I can't find the after photo when I need it but it came up like new..will post if I find it
D
Edit - found the "after" photo. Same car just a good wash, colour restore and wax..
Last edited by C531XHO; 10-19-2020 at 08:11 PM.
10-19-2020, 11:33 AM
#41

Thanks for the replies chaps, I've been busy over the weekend documenting every panel and interior part, working out how to bring this beauty back to life. I've taken hundreds of pics of every nook and cranny so I can refer back to them to remind me of how crap it was, when I need some encouragement!
The single stage paint - it's oxidised beyond belief! I've bought a DA polisher and tried a very gentle polish and a bit of a cut on s test section on the hood - I haven't gone very far, I believe I need to test the paint thickness really so I've a gauge coming today so before I go any further I'll test it and see what I'm dealing with. I'm looking for advice for a beginner on doing this if anyone has any. There's millions of videos on cutting/polishing modern clearcoat paints but not much on these older finishes. I can afford to repaint but I'd rather not because I like things to be original and don't mind a bit ...
The single stage paint - it's oxidised beyond belief! I've bought a DA polisher and tried a very gentle polish and a bit of a cut on s test section on the hood - I haven't gone very far, I believe I need to test the paint thickness really so I've a gauge coming today so before I go any further I'll test it and see what I'm dealing with. I'm looking for advice for a beginner on doing this if anyone has any. There's millions of videos on cutting/polishing modern clearcoat paints but not much on these older finishes. I can afford to repaint but I'd rather not because I like things to be original and don't mind a bit ...
You are on the right track... Watch the attached video and consider using the Meguiar�s Ultimate Compound. The video shows a guy using it by hand on a heavily oxidized red 944, but if you have a DA I highly recommend that you use that. Don�t be concerned if you need to make multiple applications to get the results you desire, the Meguiar�s UC is quite safe.
BTW, if it says �Ultimate� on the label it�s the very best product for a given purpose that Meguiar�s makes.
10-19-2020, 01:17 PM
#42
Instructor
Thread Starter
Cor blimey! Makes mine not look quite so oxidised! Would love to see the after pic if you find it mate, I love 944s, was looking for one and got sidetracked when I realised there were 928s in my price range, just about! 944 is still on the list...
10-19-2020, 01:23 PM
#43
Instructor
Thread Starter
@FredR Thanks, good to know, I should have my paint gauge tonight - that will clear a few things up. The bonnet is the worst bit, so I've been testing on that, the most visible part of the car! I figure that I can't make it much worse.
Engine bay isn't too bad yep, yours looks flipping amazing, am inspired! I'll be getting into that for sure. The viscous fan is not working at all, the PO rigged up a contraption with the stat attached to the main cooling hose which makes the air con fan run in order to cool that main rad, which does the job as the is A/C foobar anyway... Don't worry it won't stay like that for long!
Engine bay isn't too bad yep, yours looks flipping amazing, am inspired! I'll be getting into that for sure. The viscous fan is not working at all, the PO rigged up a contraption with the stat attached to the main cooling hose which makes the air con fan run in order to cool that main rad, which does the job as the is A/C foobar anyway... Don't worry it won't stay like that for long!
10-19-2020, 01:48 PM
#44
Instructor
Thread Starter
@Shark2626 I think that's what I have - I've got 105 and 205 in the garage and I think it's one of them. Will check that video out, thank you!
I've just done a few measurements and it's between 4 and 8 mil on average, there's one door that I was told had been painted and that is 16-18, so that adds up. The front bit between windscreen and sun roof is shockingly coming up at 0! Which is obvs incorrect as it is painted, which casts doubt over the cheapo Chinese gauge's accuracy, nontheless I'll tread very carefully - this is an area that the PO could easily get at with the Tcut he was using for a while...
I'll record all these properly when I get a moment. The bonnet though is looking like 8mil so it would indicate that there's plenty to go at. Fingers crossed...
10-19-2020, 01:48 PM
#45
Rennlist Member
@FredR Thanks, good to know, I should have my paint gauge tonight - that will clear a few things up. The bonnet is the worst bit, so I've been testing on that, the most visible part of the car! I figure that I can't make it much worse.
Engine bay isn't too bad yep, yours looks flipping amazing, am inspired! I'll be getting into that for sure. The viscous fan is not working at all, the PO rigged up a contraption with the stat attached to the main cooling hose which makes the air con fan run in order to cool that main rad, which does the job as the is A/C foobar anyway... Don't worry it won't stay like that for long!
Engine bay isn't too bad yep, yours looks flipping amazing, am inspired! I'll be getting into that for sure. The viscous fan is not working at all, the PO rigged up a contraption with the stat attached to the main cooling hose which makes the air con fan run in order to cool that main rad, which does the job as the is A/C foobar anyway... Don't worry it won't stay like that for long!