When you click on links to various merchants on this site and make a purchase, this can result in this site earning a commission. Affiliate programs and affiliations include, but are not limited to, the eBay Partner Network.
My reply seems to have disappeared..by bash plate I meant those protective plates (I got the extended ones from 928 Motorsports) that protect the alternator, etc from hitting on the ground). In any case, your method definitely sounds better. I will try that!
Also noted the part about not using a jack. I guess that was an oops. I did have a counterholding wrench with a block wedged between it and the car so it hopefully didn't rotate...but I won't do that again. Didn't work anyway!
Well, I have both sizes of stands. The 3t have a base of about 6" on a side, and, when all the way down are 11" tall. The 6t go 10.5" base and 16" tall.
Before liftbars, I would routinely use the front mount point of the LCAs for the stands. I think that's what you mean by 'where the bash plates mount. I always figured that if it was strong enough for the front suspension (or at least the lower part of it), it was ok for the stand. No issues.
I'm going to guess you already know this, but liftbars are an amazing thing. Next best thing to an actual lift. Easy to get the car up, 4 stands at (arguably) the best possible spots, you even get an extra inch or so from the bars themselves.
I cannot emphasize how nice they are.
PLUS...
I just got the latest HF magazine. Says "Prices SMASHED" on the front. Page 5 has a coupon for 6t stands at $29.99.
The weight of the car is transferred via the spring assembly to the fenderwall. I don't assume that the front LCA carrier is suitable for supporting the car. It might be, but isn't designed or designated for that duty. It's also at the forward end of the front structure, so getting the actual lift pads up to stand height means the front of the car will be higher than supporting out at the ends. My thinking anyway. Supporting at the ends may make the overturning less of a concern, but not by much really. The broader base on the bigger stands helps a lot more. My two cents.
FWIW here is how I jack up a car ,
use the jack on front tow pad to lift the car so the jackstand can placed under the front jack pad at the front rocker.
Then set the jack stand.
NOTE if the car is low and the jack wont fit use the front jack pad to lift the car up,
and set two 10 inch 2X4s under the tire then lower the car.
Reposition the jack to the cross member with a 8 inch 2X4 on the jack pad.
lift the car up and then set two 6 ton jack stands under the front chassis lift points.
you can use two or three notches up on the jack stands.
NOTE if your lifting up an S4 with belly pans then use the tow hook pad to lift the and then set a jack stand at the front jack pad.
then go to the other side and set the other jack stand,
then get under the car and remove the belly pans then proceed as before by jacking up the front cross member.
Then go to the back of the car with the 8 inch 2X4 put the jack pad under the rear cross member with the wood.
jack the car up till its a a few inches higher than the front set your stands ,
Then jack up the front to where you want it then jack up the rear till its level..
To lower lift the rear up and lower the rear stands till they are seated then lower the car to this.
Then go to the front and lower the front to the lowest stand height ,
Go to the rear and jack and remove the stands then do the same for the fronts
this process takes about 5 mins to get the car securely set.
Let's be optimistic and assume I manage to get the tie rods replaced. If I can find the ball joint separator I definitely bought last month, I will do the upper ball joint boots as well. But now I'm sitting here with the suspension partially disconnected... Am I saving much time and effort if I do front shocks? Or do I need to remove the wheel hub and brakes for that?
Let's be optimistic and assume I manage to get the tie rods replaced. If I can find the ball joint separator I definitely bought last month, I will do the upper ball joint boots as well. But now I'm sitting here with the suspension partially disconnected... Am I saving much time and effort if I do front shocks? Or do I need to remove the wheel hub and brakes for that?
You can remove the front shocks with the upper control arms with the wheel carrier/caliper still mounted to the lower ball joint. Getting the nuts undone that hold the UCA working from jack stands was a bit of a struggle and although some said it could be done without removing anything I found I had to remove the a/c compressor from its carrier [hoses remain connected/pressurised] and I also dropped the alternator and moved the power steering pump console out of the way [still connected].
The nuts for the passenger side UCA bolts could be got at with a half inch square drive breaker bar and same for the forward most nut on the driver's side all accessed from under the car. For the rearward driver side nut I had to take that from above using an offset closed spanner- the longer the better! I got the impression the factory used some kind of locking compound on those nuts [oh joy!]- that or it was dried out anti seize compound.
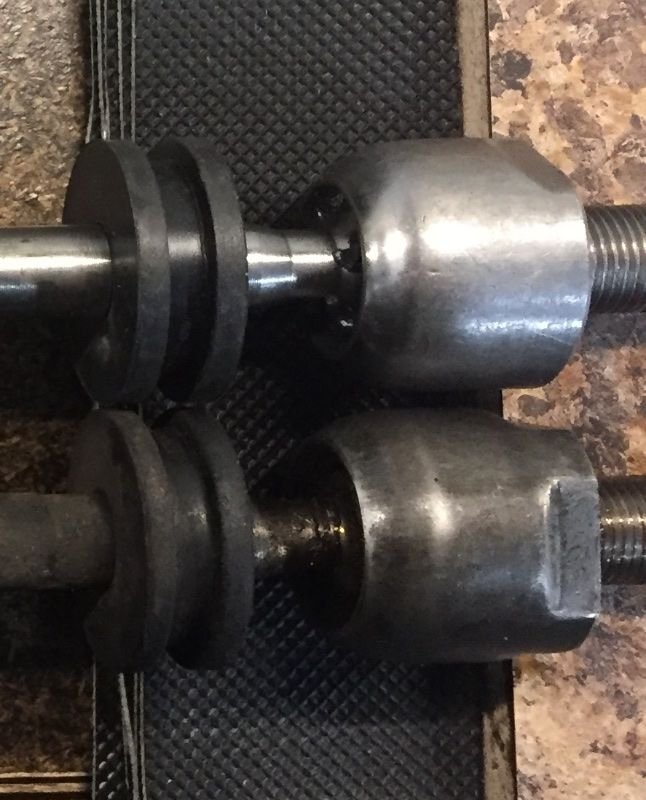
I changed out my tie-rods recently. They must have been designed by an intern, someone's nephew. For those viewing this thread in anticipation of their own challenge, the difficulty is the narrow flat on the inner end. Sean's idea of grinding a normal wrench down to make a big bicycle "crank wrench" is excellent. It's as if the nephew had no experience other than with bicycles. On the other hand, the new rods had even narrower flats.
I recall buying a set of larger wrenches for the rack flats. I'm sure I looked at my tractor-sized vise-grips for the rod ends, but did I stoop to that? Don't remember.
Well that sounds more like what my original impression of a front shock job was like. Then I saw this: https://rennlist.com/how-tos/a/porsc...sorbers-384024
No mention of removing any UCA, wheel, etc. I'm guessing they left out a few steps?
Originally Posted by FredR
You can remove the front shocks with the upper control arms with the wheel carrier/caliper still mounted to the lower ball joint. Getting the nuts undone that hold the UCA working from jack stands was a bit of a struggle and although some said it could be done without removing anything I found I had to remove the a/c compressor from its carrier [hoses remain connected/pressurised] and I also dropped the alternator and moved the power steering pump console out of the way [still connected].
The nuts for the passenger side UCA bolts could be got at with a half inch square drive breaker bar and same for the forward most nut on the driver's side all accessed from under the car. For the rearward driver side nut I had to take that from above using an offset closed spanner- the longer the better! I got the impression the factory used some kind of locking compound on those nuts [oh joy!]- that or it was dried out anti seize compound.
Well that sounds more like what my original impression of a front shock job was like. Then I saw this: https://rennlist.com/how-tos/a/porsc...sorbers-384024
No mention of removing any UCA, wheel, etc. I'm guessing they left out a few steps?
Jeff,
I incorrectly read your post as though your intent was to remove the UCA's. FWIW if you have not replaced the bushes on the UCA's then invariably they are probably shot by now and if so a good time to replace. If you can move the UCA up and down with your hand then chances are they are shot. FYI- If you undo the bolts either end of the central shaft the arm will move up and down freely [i.e. with no resistance]. Whilst the UCA joints are undone it is a good time to carefully check whether they are still in good nick [or likely not]. When the suspension is assembled I find it hard to determine if this joint is viable. In my case one joint was shot, the other was still viable.
I get the impression the bushes on the LCA's are much more resilient so less of an issue possibly.
So I've officially declared defeat here and sent the car off to a shop. A friend has used this shop for his 911 and so I had him ask if he knew 928s. His reply: "Yes I know how to work on them. No you don't want one"😂
My friend gave me some grief for that, but I spoke to the mechanic and he does have a couple that he maintains regularly and he seems quite familiar. So I gave him a list and my box of parts and said a temporary farewell to my baby:
thats a good idea you have , to send it to a mechanic.
Hopefully the rack has not been damaged by the force the jack imparted.
FWIW I would suggest to see if the rack spacers can move inwards,
take a wide face screwdriver and a hammer and tap the side of the spacer,
this will move it off the inner tie rod wrench slot so you dont need to grind down a wrench.
I have a set of thin wrenches that fit those flats pretty well. The only thing is they're not very long, so I made handle extensions, but I never did get my long ones to fit (car just wasn't high enough).
I'm holding out hope that I didn't screw up the rack, but we'll see...

 08-29-2018, 02:40 PM


 That nut just flops the whole wheel hub around