

My first timing belt/water pump/PK-Tensioner job. Worklog. 92 GTS.
 02-09-2018 | 11:47 AM
#61
Thread Starter
Pro
Joined: Oct 2007
Posts: 653
Likes: 71
From: Norway
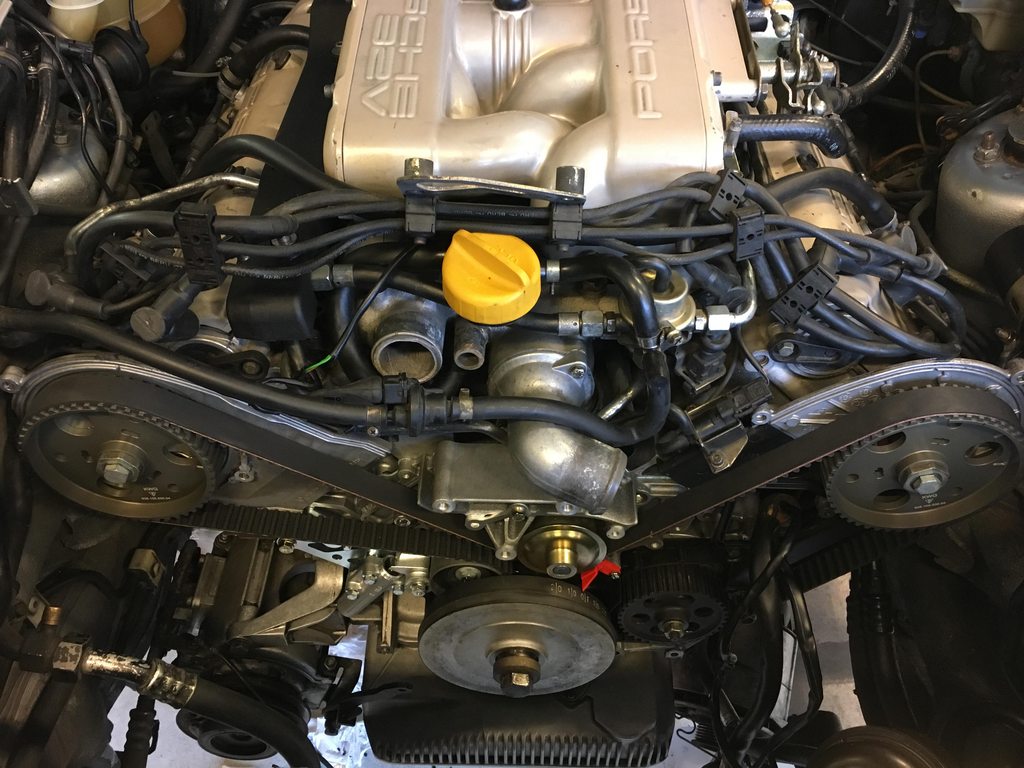
This is where I'm at. New hall sensor and cam sprockets installed, Installed belt and tensioner. Removed flywheel lock and turned engine several times. Everything looks good at TDC. Measured PKT-S opening to around 2.3mm, which is within new belt spec of 1mm-7mm.
However the PKT-S manual says remove fuel pump fuse and run engine a couple of times, then measure opening. I suspect I should not do that at this time, with nothing connected at all?
Photo is a tiny bit from TDC, I am aware.
However the PKT-S manual says remove fuel pump fuse and run engine a couple of times, then measure opening. I suspect I should not do that at this time, with nothing connected at all?
Photo is a tiny bit from TDC, I am aware.
02-09-2018 | 12:39 PM
#62
Nordschleife Master
Joined: Jan 2013
Posts: 5,926
Likes: 304
From: Kaukauna Wisconsin
The timing belt is properly strung, right?
You've turned it over by hand, right?
What the PKT manual says to do is pull the fuel pump fuse (so the engine gets no fuel at all) and then use the starter to crank the engine over a few times.
This is essentially what you are doing when you turn it over by hand, just more and faster.
Yes, it's pretty nerve wracking. No way around that.
What I did was have a helper turn the key while I stood there and watched. The helper had very clear instructions that if my hand went up, to release the key immediately.
It was actually pretty satifying to watch the engine crank, and the belt and all it's strung around turn smoothly and correctly.
It made the actual firing up of the engine a bit less scary (not totally, just some).
02-09-2018 | 12:58 PM
#63
Thread Starter
Pro
Joined: Oct 2007
Posts: 653
Likes: 71
From: Norway
02-09-2018 | 01:05 PM
#64
Nordschleife Master
Joined: Jan 2013
Posts: 5,926
Likes: 304
From: Kaukauna Wisconsin
Ahhh. Got it.
When I did mine, I left all that connected, just pulled the ground strap at the "butterfly", where it connects to the chassis.
Hooked it back up to crank the motor over, disconnected it once I was happy with the belt and tensioner.
When I did mine, I left all that connected, just pulled the ground strap at the "butterfly", where it connects to the chassis.
Hooked it back up to crank the motor over, disconnected it once I was happy with the belt and tensioner.
02-09-2018 | 01:15 PM
#65
Thread Starter
Pro
Joined: Oct 2007
Posts: 653
Likes: 71
From: Norway
Aha, in other words you didn't change the belt at the same time 
But I guess I can just reconnect the hot post connectors now and then give it a try? Nothing else that I'm missing that I need to reconnect at this point?
But I guess I can just reconnect the hot post connectors now and then give it a try? Nothing else that I'm missing that I need to reconnect at this point?
02-09-2018 | 01:34 PM
#66
Nordschleife Master
Joined: Jan 2013
Posts: 5,926
Likes: 304
From: Kaukauna Wisconsin
Not sure what you mean by that.
First off, I have an S2, which is a 16v. Somewhat different.
Second off, I changed the belt, cam gears & tensioner. I was in there doing the cam seals and ended up changing a lot of other stuff.
In doing that, the only real electrical disconnections were the tension warning and the spark plug/coil wires (removed distributors). I didn't unhook anything at the hot post. Does the 32v motor require disconnecting that?
02-09-2018 | 01:53 PM
#67
Team Owner
Joined: May 2004
Posts: 28,637
Likes: 2,665
From: Philly PA
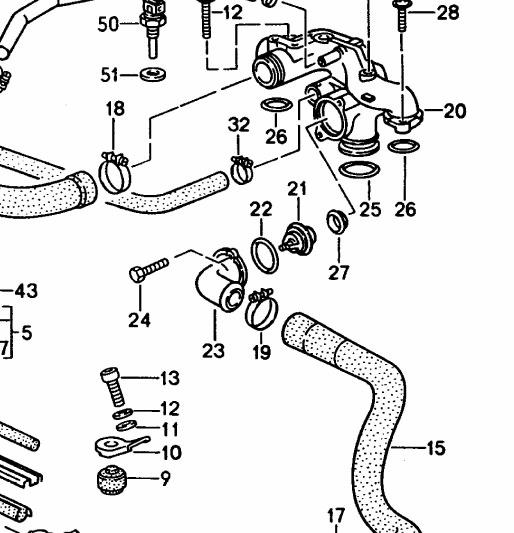
Not sure if this was done but now is the time to replace the T stat and the seal behind it as well as the O ring that seals it.
NOTE cranking the engine over without the oil cooler lines connected will make a big mess.
NOTE the vent line thats looping over the T stat outlet should be routed under the oullet.
NOTE to crank the engine over you can use the hot post and pin 14 ,
just make sure the trans is in park or neutral,
touch the #14 pin to the hot post and the engine will crank.
NOTE you dont need to mess with any fuses or relays or computers.
search for hot post 14 pin, pin diagram.
JOE the S4 requires the hot post stud be removed to move the engine harness and the ABS wire through the T belt.
OP NOTE the ABS wire is hot all the time make sure its properly routed and attached before connecting the battery
02-09-2018 | 01:57 PM
#68
Thread Starter
Pro
Joined: Oct 2007
Posts: 653
Likes: 71
From: Norway
Okay - then it is different to 32v. Wiring loom needs to be disconnectet at hot post, then mated behind and under cam sprocket backing plate, to the front area, to be able to remove/install belt.
02-09-2018 | 02:07 PM
#69
Thread Starter
Pro
Joined: Oct 2007
Posts: 653
Likes: 71
From: Norway
Not sure if this was done but now is the time to replace the T stat and the seal behind it as well as the O ring that seals it.
Thanks for the tip, I think that have to wait until next time, I haven't planned to do more orders this round(done too many already). It is working as it should as of now.
NOTE cranking the engine over without the oil cooler lines connected will make a big mess.
I don't think I have touched any oil cooler lines. Or have I?
 Not sure. Not common thing to do at this job?
NOTE the vent line thats looping over the T stat outlet should be routed under the oullet.
Yes I just put it there to clear the area behind.
NOTE to crank the engine over you can use the hot post and pin 14 ,
just make sure the trans is in park or neutral,
touch the #14 pin to the hot post and the engine will crank.
NOTE you dont need to mess with any fuses or relays or computers.
search for hot post 14 pin, pin diagram.
Thanks, great tip.
OP NOTE the ABS wire is hot all the time make sure its properly routed and attached before connecting the battery
Thanks
02-09-2018 | 02:59 PM
#71
Team Owner
Joined: May 2004
Posts: 28,637
Likes: 2,665
From: Philly PA
no better time to replace the T stat then with an empty block and nothing infront of the housing SRSLY
Otherwise its a major PITA as the block has to be drained,
draining the rad will still leave coolant in the block
or coolant goes all over your new tensioner and crank seals and belt
Otherwise its a major PITA as the block has to be drained,
draining the rad will still leave coolant in the block
or coolant goes all over your new tensioner and crank seals and belt
02-09-2018 | 03:10 PM
#72
Thread Starter
Pro
Joined: Oct 2007
Posts: 653
Likes: 71
From: Norway
no better time to replace the T stat then with an empty block and nothing infront of the housing SRSLY
Otherwise its a major PITA as the block has to be drained,
draining the rad will still leave coolant in the block
or coolant goes all over your new tensioner and crank seals and belt
Otherwise its a major PITA as the block has to be drained,
draining the rad will still leave coolant in the block
or coolant goes all over your new tensioner and crank seals and belt
Ahh. You have me. Lol. So is it 22, 21 and 27 I need? No gasket for the front housing?
 02-09-2018 | 04:00 PM
#73
Team Owner
Joined: May 2004
Posts: 28,637
Likes: 2,665
From: Philly PA
REPLACE 21, 22, 27.
unless you have a reason to remove the water bridge due to a leaking center O ring 25 or head flange gasket 26 leave it alone.
NOTE put a rag into the area under the rear seal 27 while your removing so it doesnt fall into the block.
unless you have a reason to remove the water bridge due to a leaking center O ring 25 or head flange gasket 26 leave it alone.
NOTE put a rag into the area under the rear seal 27 while your removing so it doesnt fall into the block.
02-10-2018 | 06:04 AM
#74
Thread Starter
Pro
Joined: Oct 2007
Posts: 653
Likes: 71
From: Norway
Hm. I haven't looked very closely yet but probably it isn't dry as new....Is the water bridge removable without removing intake or something else? I am planning an intake refresh some time in the future, but maybe water bridge is smart to take now while coolant is drained, if it is accessible.