
My DIY Dash thread (zillions of pics 56k beware)
 04-07-2008 | 12:37 AM
#16
Three Wheelin'
Joined: Jun 2007
Posts: 1,619
Likes: 1
From: Chico, California
Good luck. It's a serious pain in the *** to get all of the templates to lay nicely. Then once stitched together, it's an even bigger pain to wrap the dash. We went through 2 covers before the final results, which still is no where near as nice as Rob's dash cover option.
I will say it was a fun experiment though. If I had to do it all again, I'd either:
A. Save my pennies, and send a dash to Rob for his treatment.
B. Go the SEM route.
I will say it was a fun experiment though. If I had to do it all again, I'd either:
A. Save my pennies, and send a dash to Rob for his treatment.
B. Go the SEM route.
Do you have more pictures of that sewn dash. I'm also doing my own, and would just like to see how yours turned out.
04-07-2008 | 12:54 AM
#18
Thread Starter
Rainman
Rennlist Member
Rennlist Member
Joined: Jan 2007
Posts: 45,599
Likes: 670
From: Nashville, TN
my original plan was to just sand down the original vinyl to get the cracks flush and then put another layer of foam and then the new vinyl but it would be really thick so i decided to strip it.
04-07-2008 | 12:56 AM
#19
Three Wheelin'
Joined: May 2003
Posts: 1,423
Likes: 0
From: Houston and Austin
04-07-2008 | 12:21 PM
#22
Thread Starter
Rainman
Rennlist Member
Rennlist Member
Joined: Jan 2007
Posts: 45,599
Likes: 670
From: Nashville, TN
still debating on that, i tried to form some spare vinyl yesterday and it was absolutely noncompliant, but then again this was spare stuff from recovering some chairs lol.
id looovvvee to have the french seams because they look so nice and my seats have them so they'd kind of match. i spent most of yesterday making some pretty accurate templates out of paper and cardboard and ill make a preliminary dash cover out of extra marine vinyl (i have tons of the stuff) to see how well my sewing is and how well it fits and adjust accordingly with the real stuff.
id looovvvee to have the french seams because they look so nice and my seats have them so they'd kind of match. i spent most of yesterday making some pretty accurate templates out of paper and cardboard and ill make a preliminary dash cover out of extra marine vinyl (i have tons of the stuff) to see how well my sewing is and how well it fits and adjust accordingly with the real stuff.
04-07-2008 | 06:56 PM
#23

Pro
Joined: Jul 2003
Posts: 743
Likes: 1
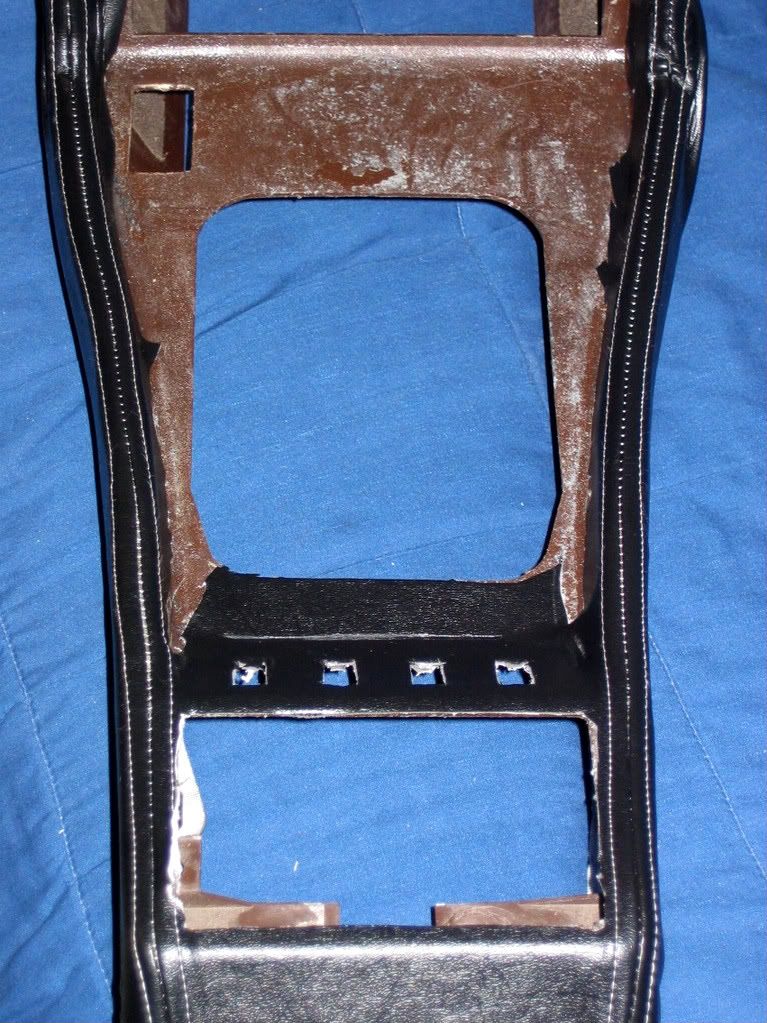
You might also notice, we did the same treatment to the center console

It's not the best looking, but hey, it only cost about $30 to do this.
04-07-2008 | 09:40 PM
#24
Three Wheelin'
Joined: Jun 2007
Posts: 1,619
Likes: 1
From: Chico, California
 The second picture shows where the turn is, (red lines)
 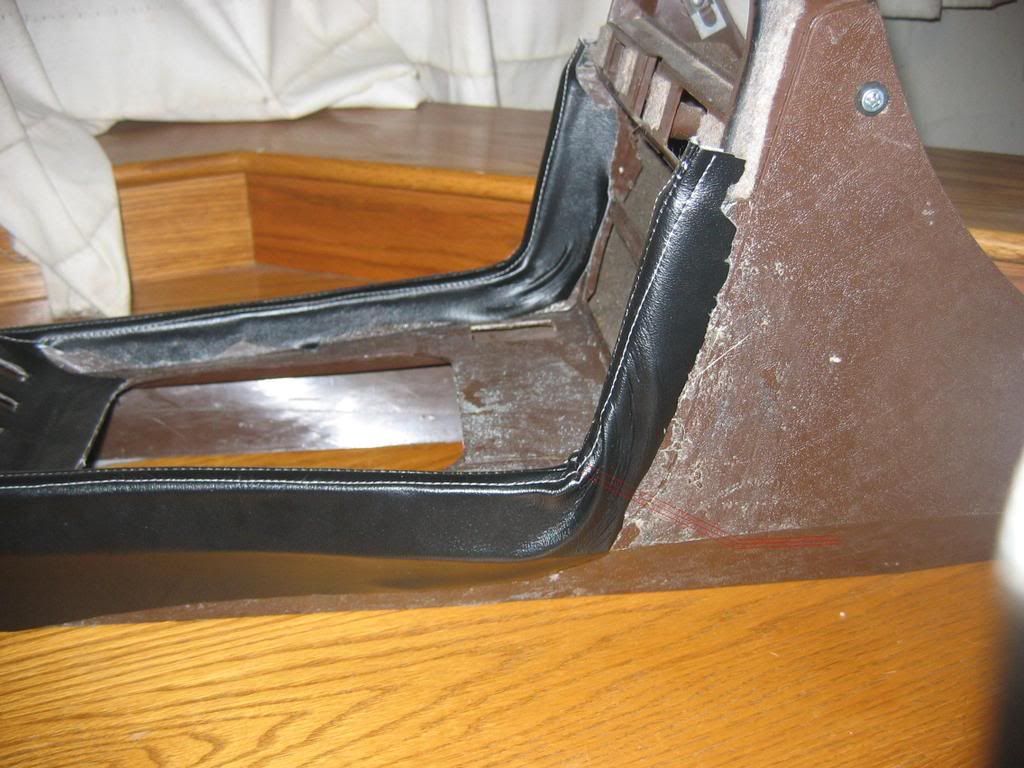 04-07-2008 | 10:41 PM
#25
Pro
Joined: Jul 2003
Posts: 743
Likes: 1
The two pieces of vinyl were cut in a 7 shape, that flowed with the console, then they were stitched together, to where it only took minimal stretching to get it to flow right.
With what I'm seeing in your image, you might be able to work the wrinkles out with heat. But otherwise, it looks like you took a relatively straight piece, and attempted to make the bend.
When mine was loose, it rested on the console, and only required minimal stretching.
As to the dash, we made the attempt twice, before you see the results above. The toughest part was the layout and getting it to rest correctly in a relaxed state so that it only took minimal stretching. The part that was actually the toughest was the driver's side between the cluster and the edge of the dash. The rest of the dash was a cake walk.
I don't know how you plan on finishing the console you have there, but my thought to mine would be to cut out a piece of ABS plastic to fit the shifter area. Wrap that in vinyl, and make it a tight fit, holding down the wrapped vinyl. The shifter bezel would attach to that piece, and should give the whole area a nicely finished appearance. I originally just tried laying a piece of vinyl in there and gluing it down, but I wasn't happy with the final appearance, that's when I came up with the idea of an extra piece that fits in there.
04-07-2008 | 11:51 PM
#26
Official Rennlist
Borat Impersonator
Rennlist Member
Borat Impersonator
Rennlist Member
Joined: Sep 2003
Posts: 5,002
Likes: 32
From: St Augustine, FL
04-08-2008 | 12:38 AM
#27
Three Wheelin'
Joined: Jun 2007
Posts: 1,619
Likes: 1
From: Chico, California
The two pieces of vinyl were cut in a 7 shape, that flowed with the console, then they were stitched together, to where it only took minimal stretching to get it to flow right.
With what I'm seeing in your image, you might be able to work the wrinkles out with heat. But otherwise, it looks like you took a relatively straight piece, and attempted to make the bend.
When mine was loose, it rested on the console, and only required minimal stretching.
As to the dash, we made the attempt twice, before you see the results above. The toughest part was the layout and getting it to rest correctly in a relaxed state so that it only took minimal stretching. The part that was actually the toughest was the driver's side between the cluster and the edge of the dash. The rest of the dash was a cake walk.
I don't know how you plan on finishing the console you have there, but my thought to mine would be to cut out a piece of ABS plastic to fit the shifter area. Wrap that in vinyl, and make it a tight fit, holding down the wrapped vinyl. The shifter bezel would attach to that piece, and should give the whole area a nicely finished appearance. I originally just tried laying a piece of vinyl in there and gluing it down, but I wasn't happy with the final appearance, that's when I came up with the idea of an extra piece that fits in there.
With what I'm seeing in your image, you might be able to work the wrinkles out with heat. But otherwise, it looks like you took a relatively straight piece, and attempted to make the bend.
When mine was loose, it rested on the console, and only required minimal stretching.
As to the dash, we made the attempt twice, before you see the results above. The toughest part was the layout and getting it to rest correctly in a relaxed state so that it only took minimal stretching. The part that was actually the toughest was the driver's side between the cluster and the edge of the dash. The rest of the dash was a cake walk.
I don't know how you plan on finishing the console you have there, but my thought to mine would be to cut out a piece of ABS plastic to fit the shifter area. Wrap that in vinyl, and make it a tight fit, holding down the wrapped vinyl. The shifter bezel would attach to that piece, and should give the whole area a nicely finished appearance. I originally just tried laying a piece of vinyl in there and gluing it down, but I wasn't happy with the final appearance, that's when I came up with the idea of an extra piece that fits in there.
04-08-2008 | 01:07 AM
#28
Thread Starter
Rainman
Rennlist Member
Rennlist Member
Joined: Jan 2007
Posts: 45,599
Likes: 670
From: Nashville, TN