When you click on links to various merchants on this site and make a purchase, this can result in this site earning a commission. Affiliate programs and affiliations include, but are not limited to, the eBay Partner Network.
Just as an aside, I did decide to use the Optional step Spencer suggests and removed the fans to improve clearance. It was a project in itself on the S2 and I ended up almost having to remove the lower air dam to get the fans out. It does make access to the front of the engine much better, but I'd say (as a first timer) it probably took me 45 minutes all by itself and I'm not at all sure I can get it back in...
I think it would have been a piece of cake if I'd also removed the alternator.
cam gear needs to come off so replace the rotor screws with some longer fasteners to lock the cam timing when removing the cog.
Thomas -
I'm unclear on this. The WSM does say to use 3 M5x20 bolts to hold the cam timing, but if I do that it looks like I won't be able to get the cam gear off to replace the rear cam cover? How long would the fasteners need to be to hold timing and still get the gear off?
Or did I get that backwards? Pull the gear then put in a few M5x20 or longer to hold the cam? I suppose that makes more sense. Sorry for the confusion.
Regards,
Last edited by Otto Mechanic; 03-27-2018 at 08:59 PM.
the spider, the part behind the cam sprocket is keyed to the cam. the cam sprocket or cog is not keyed to allow timing adjustment. when you take the cheese head bolt off and remove the assembly locked together as a unit, your cam timing will remain intact.
20mm might be a bit short so I would buy 45mm and trim to what length you need or run a nut to lock it from the bolt head side.
I'm certainly not getting this.
I have the front cover off, the belt is still in place and the flywheel is locked. All the alignment marks are in the correct position on the cam gear and the flywheel.
After removing the distributor and rotor, the three places I can set bolts go through the cam gear. If I release the cheese head bolt to removed the cam gear, the three bolts running through the holes the rotor mounts to will prevent me from removing the gear near as I can tell. Are there other fasteners that allow me to remove the gear and spider as a unit? I can't locate them on this car or on the drawings. Could it be an S2 variation?
I've also tried using Clarks to remove the timing belt tensioner without luck. I've consulted the PET (89-91) and it doesn't help me removing the tensioner either. I've watched
and he makes it look easy, but I'm darned if I can find all three of the bolts, I thought the third bolt (lower left on the PET) went through the idler sprocket on the tensioner, but I believe I may have screwed that up; I tried removing the bolt (17mm) that runs through the sprocket into what I thought was the block and after loosening it it just spins, haven't been able to get it to come out. Now I can't get it to go back in either.
I'm concerned that a fit of ignorance has caused me to create whole new problems. I was only trying to release tension on the belt, but seem to have completely messed myself up in the process. The drawings don't seem to match what I have.
I found two nuts/washers where the drawings said they should be (13mm each, above and below the spring) and took them off, but it looked like the third (lower left on the PET) went through a sprocket so I loosened that but it just spins after its loose and now I can't get it to re-seat. I'm very concerned I've managed to screw the pooch on this.
Last edited by Otto Mechanic; 03-28-2018 at 02:23 AM.
the spider, the part behind the cam sprocket is keyed to the cam. the cam sprocket or cog is not keyed to allow timing adjustment. when you take the cheese head bolt off and remove the assembly locked together as a unit, your cam timing will remain intact.
20mm might be a bit short so I would buy 45mm and trim to what length you need or run a nut to lock it from the bolt head side.
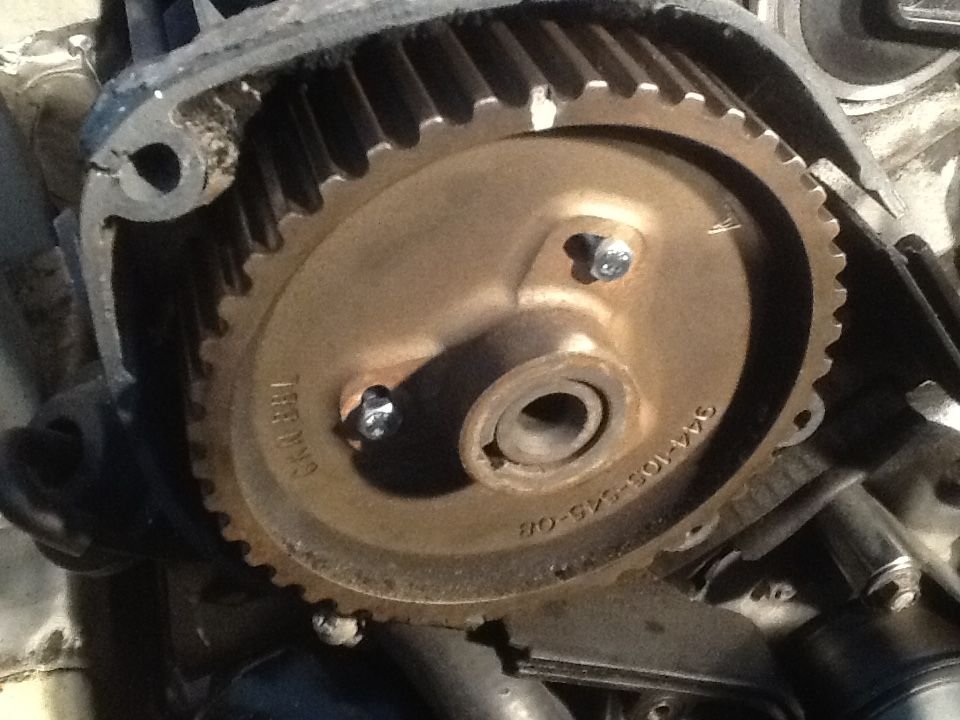
Maybe a picture would help? This is what I've done to secure the cam gear:
Last edited by Otto Mechanic; 03-27-2018 at 11:52 PM.
Or maybe I'm making this more complicated than it is?
If, by placing the three M5 bolts, I lock the cam to the "spider" you mention behind the cam gear, and the spider is what's keyed to the cam, the entire unit comes off the cam, leaving it in place, the cam doesn't move? So I'm not really locking the cam. I'm just locking the cam gear to the "spider", thereby keying it to the cam?
Still trying to work my way towards understanding this procedure before dropping something on my foot.
don't remove the cheese head until the spider and cog/sprocket are locked together with the 5x20 or 25s. if the cog moves relative to the sprocket, the cam timing is fubar.
don't remove the cheese head until the spider and cog/sprocket are locked together with the 5x20 or 25s. if the cog moves relative to the sprocket, the cam timing is fubar.
Got it, and I think that answers my question. Bolting the sprocket fixes it to the keyed spider behind it, but the sprocket comes off with the spider, so the bolts don't need to be removed to get it off. I was thinking the bolts were holding it on.
I've finished getting the tensioner out after removing the front air dam as suggested in the video above, then the balance belt drive gear from the crankshaft to reveal the "hidden" third bolt holding the tensioner. Removing the air dam is important on the S2 and should be part of the procedure. It would have made getting the fans out much easier and should make getting them back in simple.
Now I'm faced with getting the cam gear off. There doesn't seem to be clearance between the rear cover and the gear to get a puller in:
The gear is fixed in place with 3 M5x20 bolts and hasn't moved at all since I took out the cam bolt, but the belt was still on before I did that. I did have quite a bit of trouble getting the belt off because I neglected to compress the spring on the tensioner and lock it before removing the belt, instead holding the tensioner with my right hand while removing the belt with my left. If I hadn't had my nifty new Arnnworx tensioner holding tool I probably would have figured out how to do it right by compressing the spring, locking it, then taking off the belt. Live and learn.
But now I need some tooling/procedure advice for getting this cam sprocket out. I've sprayed it with PB-Blaster, tried wiggling it by hand then prying at it with a big screwdriver but it doesn't want to budge. I had to use a gear puller to get the balance gear off the crankshaft but that doesn't seem to be an option on this one.
Unfortunately it means replacing the cam bolt, removing the three bolts keying the cam gear and replacing them with longer bolts that will fit a different puller. But it looks like it will work. I may try the punch method first.
make a 50/50 mix of acetone and mineral oil 'old school' ATF....type A or type F is ideal but for the amount you need, just pull some out of your steering fluid reservoir with your thumb over the end of a straw.
you might try tapping the woodruff key with a ten penny nail through the slot. in theory, that is the only thing holding it on.
I actually have a batch of that stuff made up but I didn't use it. I have a 5 gallon bucket of ATF (I also own a 928, so that should explain it). I used the PBB just because it has one of those straws on the can that lets me spray it in where I want it.
I'll try "waking the key" before I drive into town for that tool...
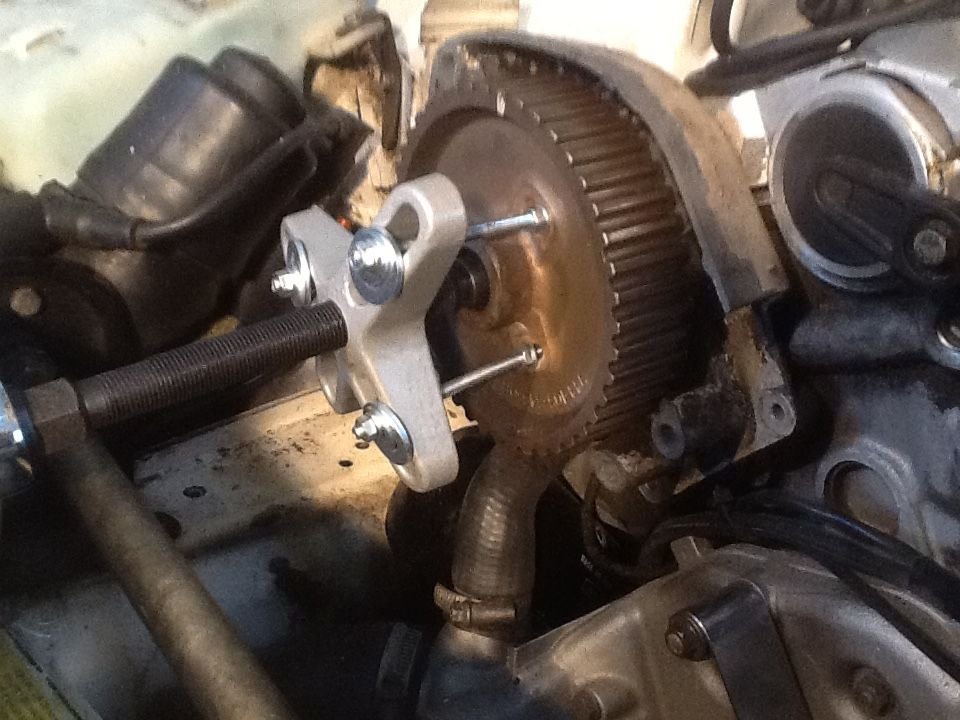
Well, to conclude the tear down portion of this adventure, here's a photo of the rig I ended up using to get the cam gear off:
It turns out this was overkill and I almost figured that out while I was setting up the pins I attached to the flywheel puller.
I used 3 M5x80 all thread rods plus 6 M5 nuts and assorted washers. I threaded the rods in then locked them with M5 nuts and removed the central cam bolt and thrust washer. While I was tightening the nuts I noticed I couldn't get them tight for some reason. The rod didn't seem to be spinning, but I couldn't get the nuts to lock. I decided to put the puller on and get the gear off and it came out without any fuss.
After I got it off, I saw what was happening. The rods were slowly advancing into the gear as I turned the lock nuts and had begun to push the gear off the cam spindle. If I'd just kept going, rotating around the gear from one rod to the next, I'm pretty sure I could have driven the gear off without the puller.
The downside of this is that I never got a positive lock on the spider. When I finished pulling the gear, the spider just slipped anyway.
The good news is twofold; first, there was enough grime on the spider and gear (along with corrosion marks around the area where the rotor bolts up to the gear), that I won't have any trouble re-locating the gear on the cam shaft when it comes time to re-assemble. The second part is the spider on my car is keyed to the cam shaft also, it can only go on in the correct position. I don't think it posses a real threat to cam timing.
But it gets much worse.
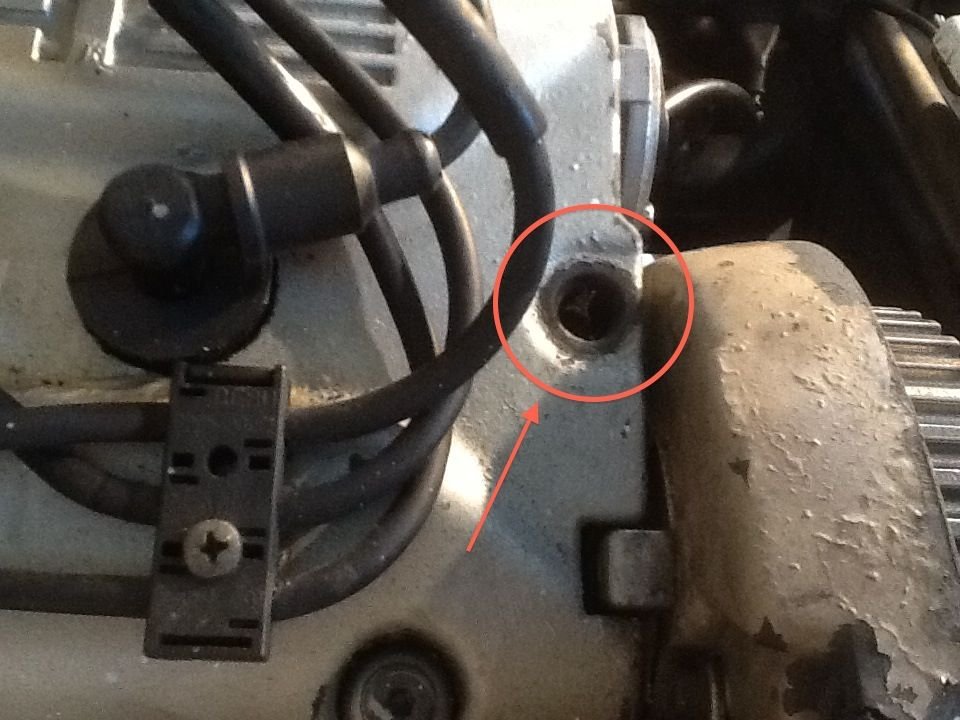
While I was pulling the Hall Sensor off the back of the old rear cam cover, I noticed this for the first time. I have no idea why I hadn't seen it before:
Apparently the front cam cover bolt has been missing since before I bought the car. A friend of mine drove it from Florida to California like this. I haven't put many miles on the car, probably less than 100 since I got it, and I've never seen oil in the engine bay. There aren't any signs of oil on top of the cam either. No idea how something like this could just work silently without some sort of leak showing.
So now the possibility I might not open the cams up "while I'm in there" and inspect the chains and pads has pretty much flown out the window. It looks like I'll be spending April taking off the cover, replacing all the front seals, and replacing the chain pads. So much for starting the spring race season with this car.
 03-23-2018, 09:33 PM