When you click on links to various merchants on this site and make a purchase, this can result in this site earning a commission. Affiliate programs and affiliations include, but are not limited to, the eBay Partner Network.
It has the stock canister attached. The smell seemed to come from the engine bay although today the smell is almost gone. The car only ran for a few minutes from the Reliable transporter to my garage. Haven't started it since. Will investigate more soon - after I am done tearing out the crazy a/c!
replace all rubber fuel hoses (esp. the hard to reach ones next to the tank under the car) with new rubber, correctly pressure rated, and rated for ethanol mixes
replace brown/yellow hard fuel vapor hoses - do not use regular PVC
the carbon canister is good until it bursts open as long as no liquid fuel got in there (I verified this with Calif.s CARB agency)
replace all rubber brake hoses with new rubber ones from the dealer (they should be TUV rated); flush old brake fluid out completely
-repeat the above hose replacements every 10 to 15 years
^ prior owner had a shop replace a lot of fuel hoses and brake lines but I will inspect further. Don't think any of the tank hoses were replaced though. I was hoping to toss the canister since it is ugly and would save a couple pounds but I am gathering it has a use.
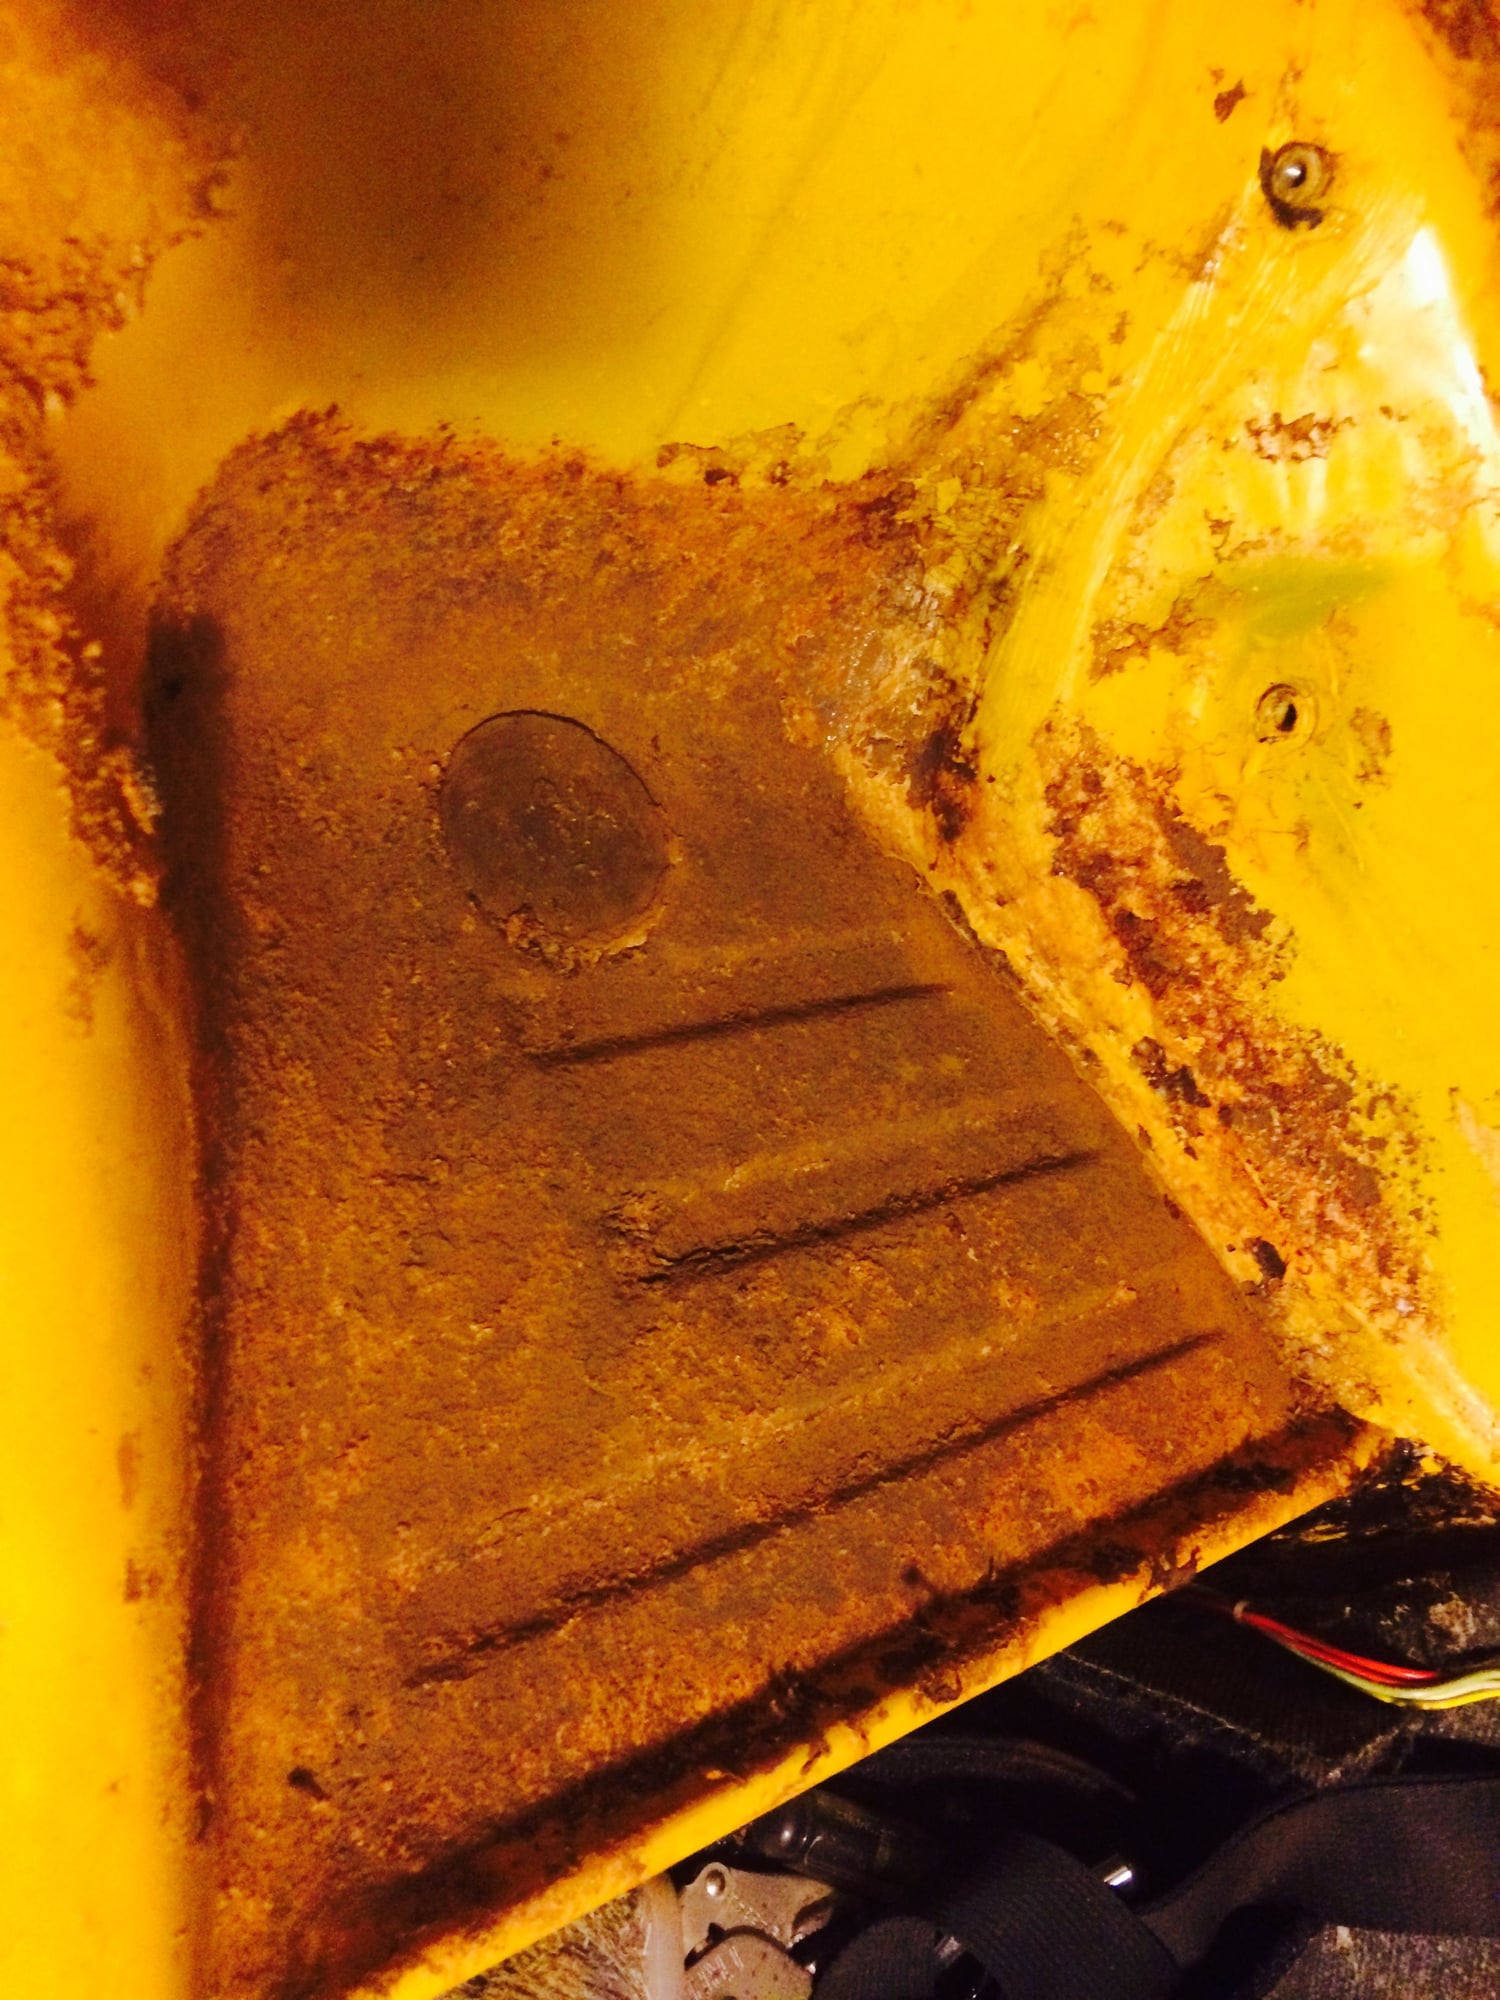
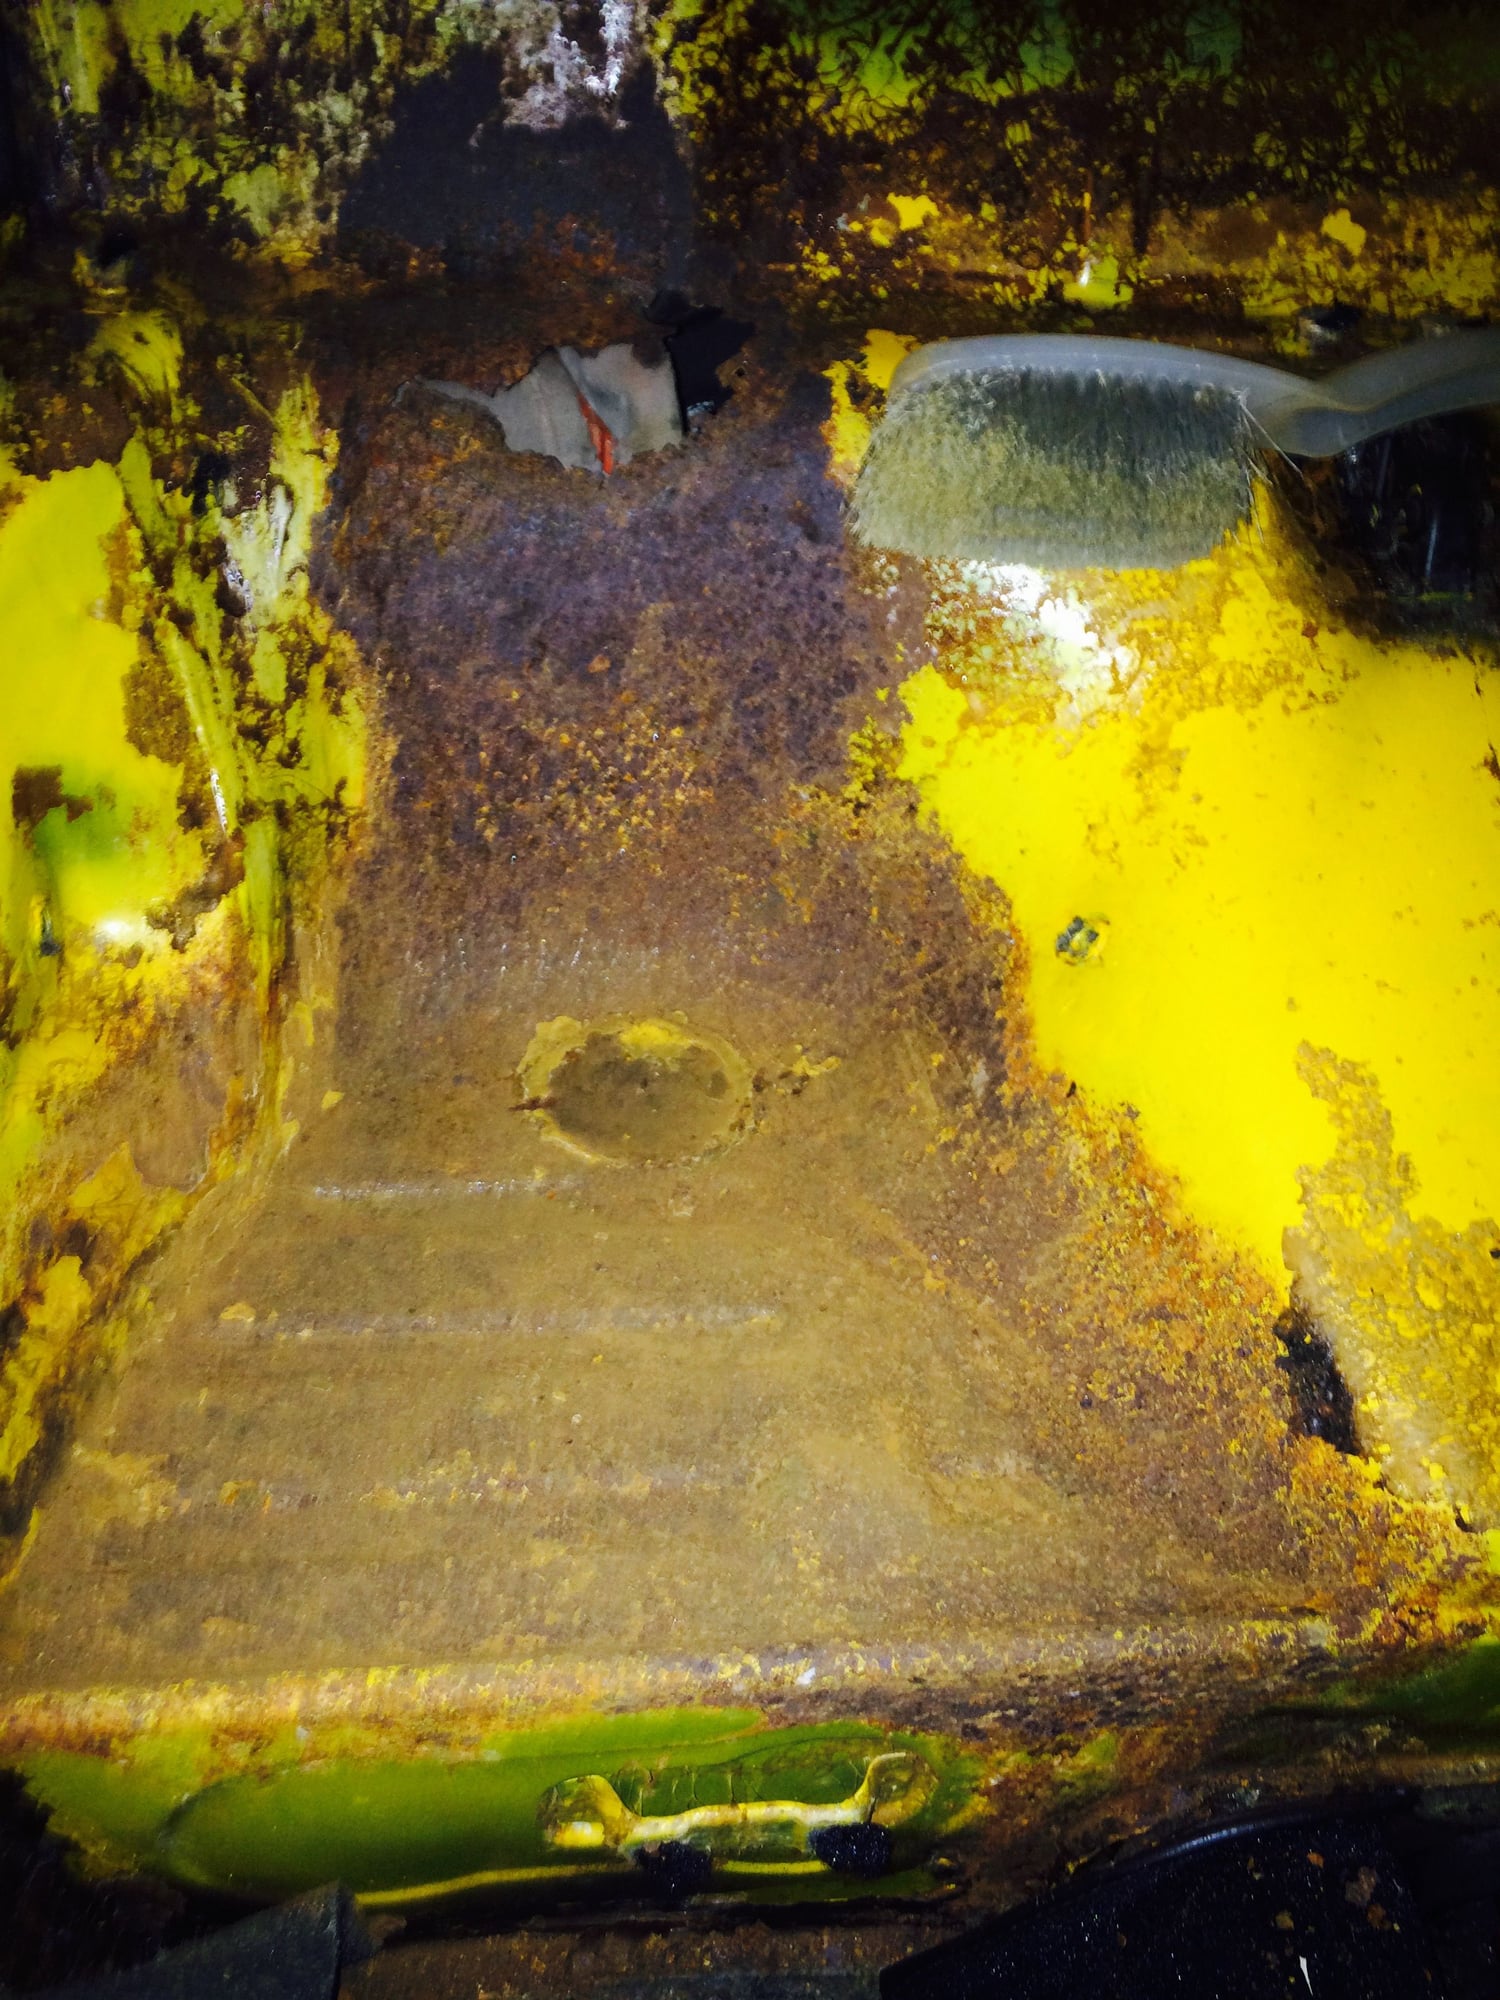
Well, I was on a mission for more weight savings today - removed the rear seats backs and bottoms, the side panels, the rear parcel shelf and the asphalt sound deadening panels underneath. I think this is a weight savings of 50 pounds or so BUT, unfortunately, I found rust. I knew I would find areas of rust on an old longhood, in fact there were a couple areas I knew there were rust. There was evidence of some rust on the parcel shelf that was identified prior to purchase by inspecting through the engine bay - so I was prepared for some work there. It looks like the window seal leak that caused some rust areas on the parcel shelf was worse than I expected, as it leaked down into both seat bottoms. Keep in mind there were no visible issues from under the car, and the rear seats/panels/parcel are almost perfect in this car - almost like no one ever sat in them. After removing them, everything still looked perfect - until I tore up the asphalt sound deadening materials. Clearly the water leaked through the window seal and stuck behind this material and the carpet and caused the rust. It all rusted from the inside of the car. I know this is fairly common for these cars, but I was still shocked with how perfect everything looked until I tore up the sound deadening. So the seat bottoms appear to be surface rust and may be salvageable. I will hit them with a wheel/wire brush and see, but scraping with a screwdriver seems to indicate they may be ok to cleanup and treat with POR-15 (the pics of the seat bottoms look worse than actual - a lot of the dark areas is actually glue residue). However, if you look at the second pick below you will see the passenger side rear and above the seat bottom is a hole! The hole looks straight at the heater flapper/box. This tore open when removing the sound deadening. Interestingly, I did a quick google search and found other examples of this exact issue (hole/major rust in same spot above seat bottom). Anyway, these areas will be addressed once I am ready for body work and paint - but does present some issues with how I planned to work this project. I wasn't planning on body work for quite a while - I wanted to start with mechanicals - now I have to fix a hole to prevent CO poisoning....hmmm.
I apologize if this build thread is quickly becoming a let down.
Hey, welcome to the rust club! Don't be too discouraged...everything is fixable.
Ha thanks. Rust club for sure. I set my expectations for this kind of stuff with this car. Your YouTube channel definitely proves everything is fixable!
So just a quick update. I had some time tonight to use an angle grinder to see how bad the rust was in the seat bottoms. There weren't any holes and the steel doesn't feel thin, however both bottoms are pitted pretty bad. The passenger side with the hole is going to need repairs at some point anyway (I think I will just do a fiberglass patch for now to close the hole so I can still drive the car) so I am not sure if it is worth putting much more effort into salvaging the seat bottoms or just replace them when I get to that point. I will seek the opinions of others on the pitting.
I may move on from this and start working under the car, starting with the rear suspension and brakes.
what part of OC are you in? I have a few of the same cars and would be keen to see this one.
Cheers,
Ryan in Huntington Beach
Hey, Ryan - looks like we might be neighbors. I am also in HB - actually, tperazzo is also in HB, so the last 3 guys to chime in on this thread (including me) are in HB. You are welcome to come by and check it out sometime - feel free to PM me.
Ok so I removed the armrests and door cards last night. Then the carpet and Vitaloni mirrors today (I don't like these but sold them quick on Pelican). Most of the interior has been removed at this point. The interior pieces are in excellent condition - I have listed them on Pelican to help fund my hot rodding. I inspected the interior of the doors and they are rust free and in great shape. Also appear to be original to the car as they have the factory Signal Yellow overspray. No other rust surprises after tearing out the rest of the interior. I also removed the old alarm system and stereo. The alarm had an install sticker with a 1983 date on it.
This car was actually a great driver when I got it. I drove it to get it registered today and it was actually the first time I have really driven a longhood - what a blast!! However, it now looks destroyed - my wife thinks I have lost my mind and asked me "what happened to that cute car" as she rode with me to get it registered with virtually no interior including no window cranks or door handles .now it looks destroyed!
One more interesting thing I got to see today was the production number stamped into the dash. This car has an early '72 VIN and shows July 1971 on the VIN Sticker. The production number of 314 on the dash also shows a fairly early '72 build.


 10-29-2018, 11:15 PM


 .now it looks destroyed!