

Center Console Reconfiguration (FINAL) [sTUpiD Long]
 10-09-2007, 10:13 PM
#1
Addict
Rennlist Member
Rennlist Member
Thread Starter
I am past due on posting this thread. I have had the unit installed and for the most part everything complete and running since the early summer. I have just been too busy to wrap it all up with final trim details until recently.
So if you missed the two previous threads...
https://rennlist.com/forums/showthre...center+console
https://rennlist.com/forums/showthre...center+console
here is the short of it.
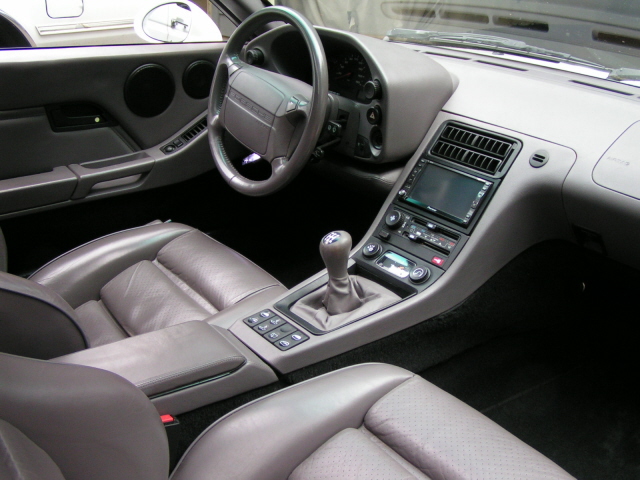
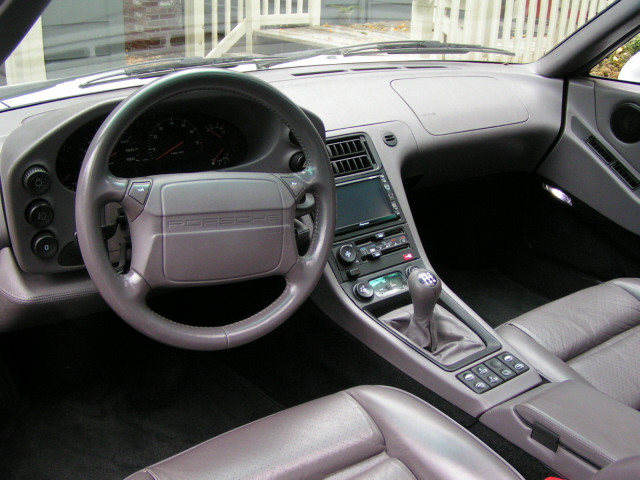
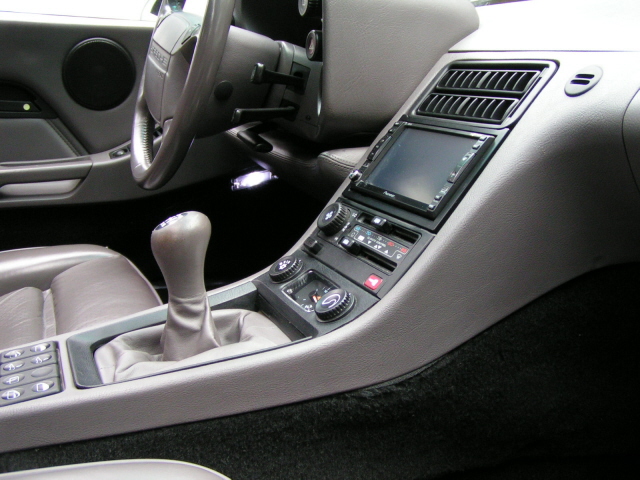
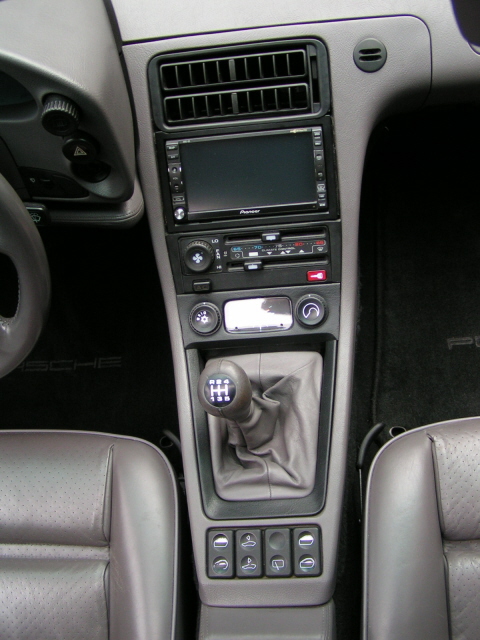
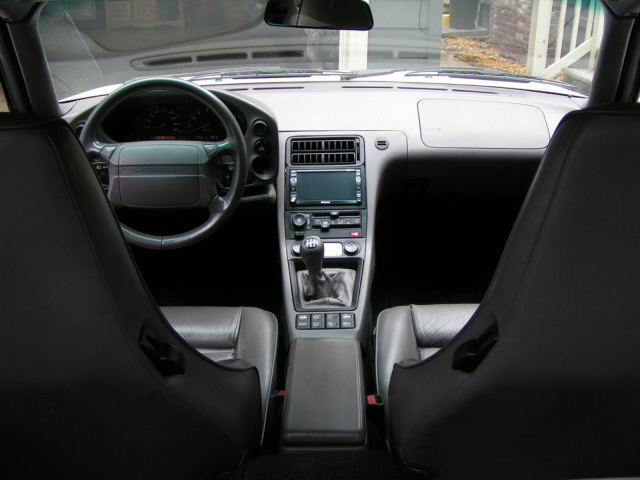
I had acquired a Pioneer AVIC-D2 earlier this year and was determined to install it in the GTS. Easy in theory, though not simple in task. When reconfiguring something of this nature, many questions come to mind and several unforeseen items need to be addressed. Before I go any further, I want to thank again, all who have contributed to the previous threads with your ideas, opinions and comments. They have guided me to what I have ended up with. The main focus from the start, was to keep the console simple, within the realm of what Porsche might have done, give it an updated look and all of this without screwing up what ever value existed with the car.
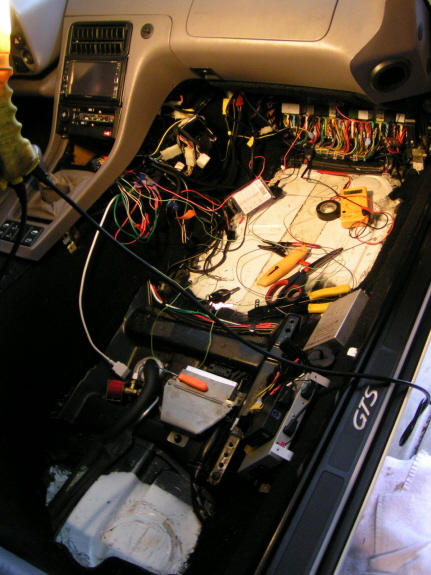
I stripped the components from the console for the most part with the idea that I wanted the AVIC as high as I could get it in the console, which meant it would be located just under the center vent. After measuring the unit, I found it was physically impossible to stuff this behemoth of a component in the space I wanted. Being at the point of no return by now, I had decided there must be a way to make this work. I don’t know where the idea came from, but I looked at the rear AC and saw that it was flush mounted, rather than recessed like our consoles. If I could mount all of the units flush with the console edges, this might give me the added depth I needed, then maybe this would work, but that route would require A LOT of reconfiguring. So I went for it.
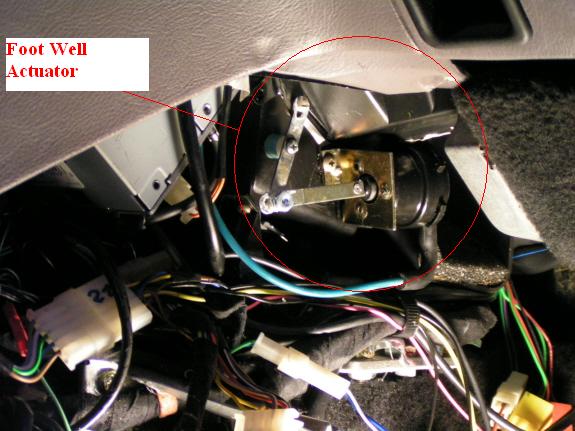
The first (AND BIGGEST) issue to address was the actuator pot for the foot well flap. After much thought, I ended up relocating it on the passenger side of the air box. I had to fabricate parts to work in the opposite direction of how the original location functioned. (what a friggin job THAT was! ) Arriving at this location for mounting wasn’t plain to see in the beginning either. I had to move other wires and plugs around to make room as well as extending the vacuum line. It works flawlessly I am happy to report.
So I had to do a lot of cutting of the console itself to allow fitment of the components in their new locations and then fabricate mounting blocks for the mounting ears of each component. I had basically gotten rid of the ashtray and chopped up the existing trim to fit in the places I wanted. I was overjoyed to find that the clock/rear AC section, fit perfectly with the sweep of the lower console. Some items mounted on the hump behind the console had to be moved to make room for the lowered components.
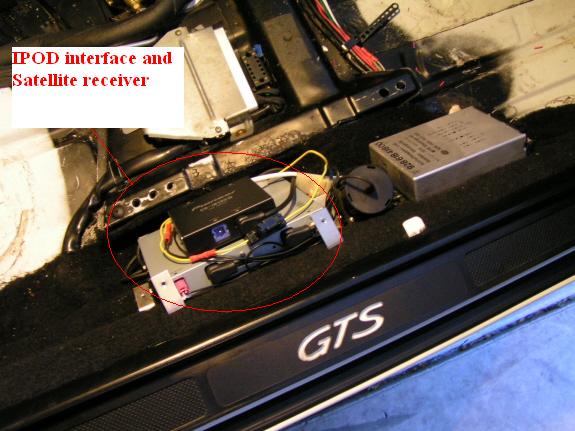
After all that nonsense was sorted, the fun part of wiring was in order. The AVIC-D2 is a Navigation-AM/FM-XM/SIRIUS-DVD-CD-IPOD-TV-VIDEO-JUICEMAKER-MICROWAVE……. you get the idea. I had removed the CD carousel from the rear of the car as well as the power amp located adjacent to the passenger seat. There is where I had located the XM receiver unit along with the IPOD interface unit. To say there were a few connections and wires to be run is putting it lightly.
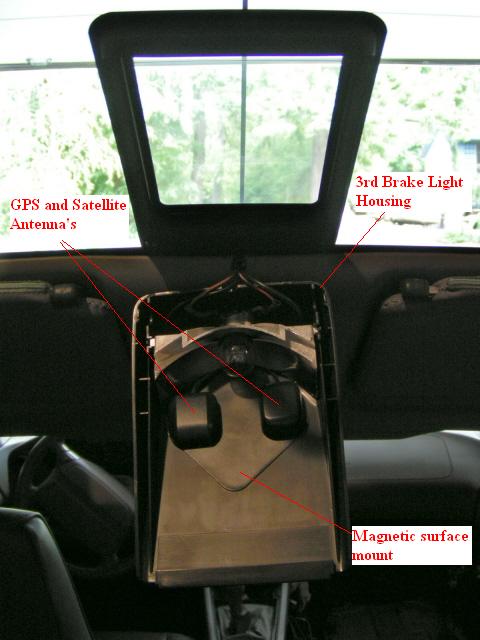
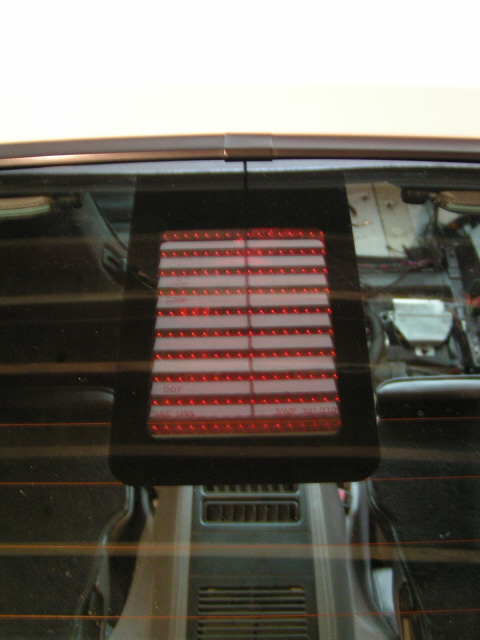
Another BIG issue that weighed on my mind was antenna location. Not only was there the existing Martian antenna on the roof, but I had a satellite radio antenna and a navigation antenna to locate outside of the car. I had looked into multi function antennas, but they just aren’t that good and I could not find the 3 frequencies that I needed all in one antenna unit. I got to thinking and came up with a great solution. I have a NAVMANN hand held/windshield mount navigation unit that works perfectly fine inside the vehicle with out the need for an external antenna, so it had to be OK to mount them inside the car. Bingo!...the 3rd brake light housing! I ran wires up the A pillars, over the headliner and followed the harness to the 3rd brake light and there was a lot of room to fit/conceal these things. Let me say now they work like a charm and my reception is perfect for all units all of the time….and I live in a mountainess, tree heavy area. There are times I lose reception, but that has nothing to do with my gear….they are from “black out “areas.
Another tricky thing was making the AVIC unit behave the way I wanted it to. I found a website that allow me to “hack” the hardware so that the unit will fully function while in motion…watch DVD’s or external rear or front mounted camera’s too. Oh yea, there was the question way back when about the 30 degree angle limit noted by Pioneer for what ever reason. NO issues what so ever! As a matter of fact, since I have had everything hooked up, it all works fantastically well and I wonder how I had ever lived without it. The capabilities of this particular Pioneer unit is fantastic. You can also hack the software to change out the background and add wall paper….like ghost 928’s in the background.
The trim was something of concern but I ended up using all of the trim pieces that came with the car. I had originally thought I was going to have to make a complete custom trim piece. I just did some precision cutting and fitting to work for what now existed. Everything was raised up to flush fit and I had to do this with the shifter area as well. I raised the boot and trim up and it all fit rather well.
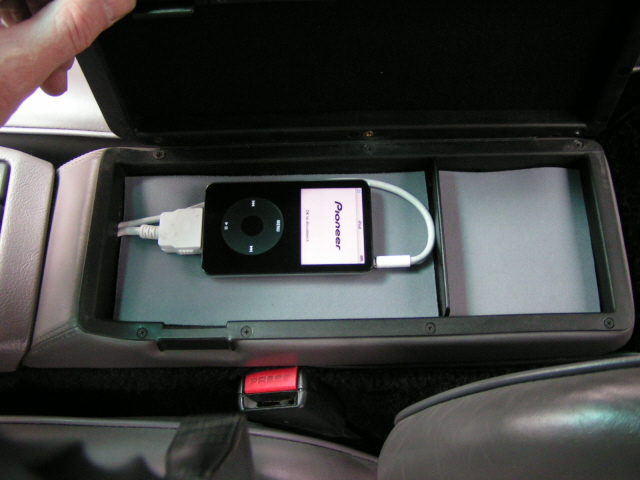
The IPOD is located in the center armrest. I ran wiring into this area and the base of the compartment is covered with mouse pad material for padding. The IPOD is controlled by the Pioneer head unit. It is not as versatile as the IPOD features themselves, but functions well for all that I would ever need it for.
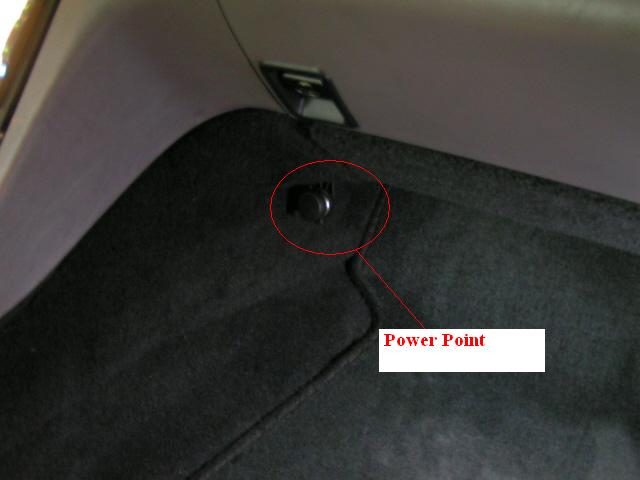
I had also installed a power point in the passenger area on the console carpet panel for cell phone charging. The two wire leads clip on and off for easy panel removal.
I had hardwired in my Valentine One located above the rearview mirror to a switched terminal…works wonderfully and is a great location for it.
All in all, everything is at my fingertips, I can easily touch or adjust things with my wrist resting on the shifter in most cases. The AVIC is mostly touch screen. The only time I have any glare on the screen is sometimes when the sunroof is open. I thought about making a visor for the AVIC, but haven’t felt the need to really do that yet. I much better prefer the HVAC controls in the new location.
The look now seems to fit better with the interior concept. I think I achieved what I was shooting for. If I had it to do all over again, I wouldn’t do it. I only say this because there are easier ways to achieve this concept. The next one (LOL ) will just be a flat panel touch screen in the console with a harness running back to a computer based CPU that will allow one to access the internet, send emails and do way more than what I already have…for much less! It may or may not be going into a 928, but the next vehicle will no doubt get the hook up!
Lastly, I have changed over all of the interior and component lighting to LED. This alone is a thread unto itself. The look is quite contemporary, LED’s last 10 longer than incandescent, the color is more vivid and you can read everything 10 times more clearly. I will come back and post a link to that thread when I complete it.
As usual, comments, questions and tomatoes are welcomed! (Yes, I know..the carpet is sagging below the console in a few pics...already fixed.)


So if you missed the two previous threads...
https://rennlist.com/forums/showthre...center+console
https://rennlist.com/forums/showthre...center+console
here is the short of it.
I had acquired a Pioneer AVIC-D2 earlier this year and was determined to install it in the GTS. Easy in theory, though not simple in task. When reconfiguring something of this nature, many questions come to mind and several unforeseen items need to be addressed. Before I go any further, I want to thank again, all who have contributed to the previous threads with your ideas, opinions and comments. They have guided me to what I have ended up with. The main focus from the start, was to keep the console simple, within the realm of what Porsche might have done, give it an updated look and all of this without screwing up what ever value existed with the car.
I stripped the components from the console for the most part with the idea that I wanted the AVIC as high as I could get it in the console, which meant it would be located just under the center vent. After measuring the unit, I found it was physically impossible to stuff this behemoth of a component in the space I wanted. Being at the point of no return by now, I had decided there must be a way to make this work. I don’t know where the idea came from, but I looked at the rear AC and saw that it was flush mounted, rather than recessed like our consoles. If I could mount all of the units flush with the console edges, this might give me the added depth I needed, then maybe this would work, but that route would require A LOT of reconfiguring. So I went for it.
The first (AND BIGGEST) issue to address was the actuator pot for the foot well flap. After much thought, I ended up relocating it on the passenger side of the air box. I had to fabricate parts to work in the opposite direction of how the original location functioned. (what a friggin job THAT was!
) Arriving at this location for mounting wasn’t plain to see in the beginning either. I had to move other wires and plugs around to make room as well as extending the vacuum line. It works flawlessly I am happy to report.So I had to do a lot of cutting of the console itself to allow fitment of the components in their new locations and then fabricate mounting blocks for the mounting ears of each component. I had basically gotten rid of the ashtray and chopped up the existing trim to fit in the places I wanted. I was overjoyed to find that the clock/rear AC section, fit perfectly with the sweep of the lower console. Some items mounted on the hump behind the console had to be moved to make room for the lowered components.
After all that nonsense was sorted, the fun part of wiring was in order. The AVIC-D2 is a Navigation-AM/FM-XM/SIRIUS-DVD-CD-IPOD-TV-VIDEO-JUICEMAKER-MICROWAVE……. you get the idea.
I had removed the CD carousel from the rear of the car as well as the power amp located adjacent to the passenger seat. There is where I had located the XM receiver unit along with the IPOD interface unit. To say there were a few connections and wires to be run is putting it lightly.Another BIG issue that weighed on my mind was antenna location. Not only was there the existing Martian antenna on the roof, but I had a satellite radio antenna and a navigation antenna to locate outside of the car. I had looked into multi function antennas, but they just aren’t that good and I could not find the 3 frequencies that I needed all in one antenna unit. I got to thinking and came up with a great solution. I have a NAVMANN hand held/windshield mount navigation unit that works perfectly fine inside the vehicle with out the need for an external antenna, so it had to be OK to mount them inside the car. Bingo!...the 3rd brake light housing! I ran wires up the A pillars, over the headliner and followed the harness to the 3rd brake light and there was a lot of room to fit/conceal these things. Let me say now they work like a charm and my reception is perfect for all units all of the time….and I live in a mountainess, tree heavy area. There are times I lose reception, but that has nothing to do with my gear….they are from “black out “areas.
Another tricky thing was making the AVIC unit behave the way I wanted it to. I found a website that allow me to “hack” the hardware so that the unit will fully function while in motion…watch DVD’s or external rear or front mounted camera’s too. Oh yea, there was the question way back when about the 30 degree angle limit noted by Pioneer for what ever reason. NO issues what so ever! As a matter of fact, since I have had everything hooked up, it all works fantastically well and I wonder how I had ever lived without it. The capabilities of this particular Pioneer unit is fantastic. You can also hack the software to change out the background and add wall paper….like ghost 928’s in the background.
The trim was something of concern but I ended up using all of the trim pieces that came with the car. I had originally thought I was going to have to make a complete custom trim piece. I just did some precision cutting and fitting to work for what now existed. Everything was raised up to flush fit and I had to do this with the shifter area as well. I raised the boot and trim up and it all fit rather well.
The IPOD is located in the center armrest. I ran wiring into this area and the base of the compartment is covered with mouse pad material for padding. The IPOD is controlled by the Pioneer head unit. It is not as versatile as the IPOD features themselves, but functions well for all that I would ever need it for.
I had also installed a power point in the passenger area on the console carpet panel for cell phone charging. The two wire leads clip on and off for easy panel removal.
I had hardwired in my Valentine One located above the rearview mirror to a switched terminal…works wonderfully and is a great location for it.
All in all, everything is at my fingertips, I can easily touch or adjust things with my wrist resting on the shifter in most cases. The AVIC is mostly touch screen. The only time I have any glare on the screen is sometimes when the sunroof is open. I thought about making a visor for the AVIC, but haven’t felt the need to really do that yet. I much better prefer the HVAC controls in the new location.
The look now seems to fit better with the interior concept. I think I achieved what I was shooting for. If I had it to do all over again, I wouldn’t do it. I only say this because there are easier ways to achieve this concept. The next one (LOL
) will just be a flat panel touch screen in the console with a harness running back to a computer based CPU that will allow one to access the internet, send emails and do way more than what I already have…for much less! It may or may not be going into a 928, but the next vehicle will no doubt get the hook up! Lastly, I have changed over all of the interior and component lighting to LED. This alone is a thread unto itself. The look is quite contemporary, LED’s last 10 longer than incandescent, the color is more vivid and you can read everything 10 times more clearly. I will come back and post a link to that thread when I complete it.
As usual, comments, questions and tomatoes are welcomed! (Yes, I know..the carpet is sagging below the console in a few pics...already fixed.
)

 10-09-2007, 10:42 PM
#3
Owns the Streets
Needs Camber
Lifetime Rennlist
Member
Needs Camber
Lifetime Rennlist
Member
Like it came from the factory. Wow. 
Wonder if there's room for a small rear view camera to hide in the 3rd brake light looking back and down . . .
Very cool area to hide the antennae.
Wonder if there's room for a small rear view camera to hide in the 3rd brake light looking back and down . . .
Very cool area to hide the antennae.
Trending Topics
 10-09-2007, 11:47 PM
#9
Addict
Rennlist Member
Rennlist Member
Thread Starter
Thanks, glad you guys like it.
Ron- I never planned to get rid of it before any of this, but doing work on a car doesn't mean you need to keep it either. It's all part of the fun.
Ernest- Not sure if you would get any reflection in there. I thought about getting a camera and hooking up a video recorder to it...might be fun..who know. I would want the camera primarily for parking. No matter how careful I am, I still bump the spoiler and lower grill slat on concrete parking lot dogs. Ther rear would help for parallel parking too.
Brian- of course! Thats why I posted the pic of the lens...you can't see the antenna's...even when lit. You would have never known they were in there if I hadn't told you.
Andrew- wasn't the toughest or most dreaded job I have done, just the one that took the most thought of design and weighing whether I should do "this" or "that"...you know, all those items discussed in the previous two threads. I could probably do the job in way less time having already figured it out.
10-10-2007, 12:18 AM
#10
Addict
Rennlist Member
Rennlist Member
Well, the install looks pretty clean...BUT....Is that wear on the down part of your driver's side window switch? I remember when you used to pay attention to details. Pretty tacky, Keith! 

 10-10-2007, 12:25 AM
#12
Addict
Rennlist Member
Rennlist Member

Join Date: May 2003
Posts: 1,118
Likes: 0
Received 0 Likes
on
0 Posts
A few Portland 928s gathered for a run to Louie Ott's place a couple of weeks ago. I had the pleasure to check out the results of Keith's modification work up close and personal. It is certainly top notch work. Good job Keith!
10-10-2007, 12:34 AM
#13
Rennlist Member
Wow.
>The next one (LOL ) will just be a flat panel touch screen in the console with a harness running back to a computer based CPU that will allow one to access the internet, send emails and do way more than what I already have�for much less! It may or may not be going into a 928, but the next vehicle will no doubt get the hook up!
Wow. wow. wow. wow....
>The next one (LOL ) will just be a flat panel touch screen in the console with a harness running back to a computer based CPU that will allow one to access the internet, send emails and do way more than what I already have�for much less! It may or may not be going into a 928, but the next vehicle will no doubt get the hook up!
Wow
. wow. wow. wow....
10-10-2007, 12:44 AM
#14
Nordschleife Master
The first (AND BIGGEST) issue to address was the actuator pot for the foot well flap. After much thought, I ended up relocating it on the passenger side of the air box.
Another BIG issue that weighed on my mind was antenna location. Not only was there the existing Martian antenna on the roof, but I had a satellite radio antenna and a navigation antenna to locate outside of the car.
Another BIG issue that weighed on my mind was antenna location. Not only was there the existing Martian antenna on the roof, but I had a satellite radio antenna and a navigation antenna to locate outside of the car.
 )
)The antenna location is neat too, very subtle and doesn't involve making holes in the roof which appeals (I've been thinking about a fin-style antenna to combine radio/gps).
10-10-2007, 12:56 AM
#15
Electron Wrangler
Lifetime Rennlist
Member
Lifetime Rennlist
Member
Keith - nice job! impressive execution... but I told you up front it would take a while... turned out very well though!
I have been looking at the HVAC for months and it is actually feasible to change the control electronics. I know you asked about this at the beginning and I was skeptical - I do know how I would approach this now. I think a modern design would have 3 rotary ***** for on/off/fan speed , temp & vent positions and then individual buttons for the rest...
I'm thinking about it... pretty sure it would require a flush front (wider) console finish as you have implemented... and that opens the questions of navigation etc. I know now I'd integrate the temp control of the rear system to the front and link the fan control modes too - then you just need a rear on/off control - much simpler.
I appreciate your great example - looking for a center console to start experimenting on...
BTW - ingenious antenna mount (LED in there too...?)
Alan
turned out very well though!I have been looking at the HVAC for months and it is actually feasible to change the control electronics. I know you asked about this at the beginning and I was skeptical - I do know how I would approach this now. I think a modern design would have 3 rotary ***** for on/off/fan speed , temp & vent positions and then individual buttons for the rest...
I'm thinking about it... pretty sure it would require a flush front (wider) console finish as you have implemented... and that opens the questions of navigation etc. I know now I'd integrate the temp control of the rear system to the front and link the fan control modes too - then you just need a rear on/off control - much simpler.
I appreciate your great example - looking for a center console to start experimenting on...
BTW - ingenious antenna mount (LED in there too...?)
Alan