

Dropped the engine over the weekend w/pics

 03-25-2011, 12:32 AM
#63
Noodle Jr.
Rennlist Member
Rennlist Member

 03-25-2011, 04:44 PM
#66
Drifting
 03-29-2011, 07:39 PM
#67
Burning Brakes
Thread Starter
Thanks for all the encouragement guys. I haven't had as much time as I wanted to be able to knock things out but I was able to knock some items out last weekend. Ed Hughes and NickyP stopped over on Sat. morning to check things out. Ed brought his 911 Targa which was pretty sweet...definitely a focused weekend canyon carver/track toy! And, then Nick arrives with his college aged son who was driving his '73 911S...it was immaculate...I've talked with him a lot in the past about the car but have never seen it...he was giving me all the details as we walked around the car but I don't really think I remember much as I was enjoying looking at the car too much! After we chatted Porsches for a while it was soon time for me to head off to pick up an engine stand one of the local PCA memebers was going to let me borrow.
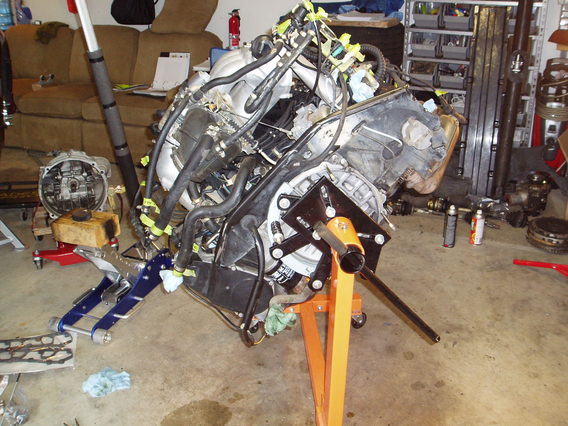
Here is the engine ready to go. A 993 engine in full dress is over 500 lbs I believe...without clutch pack, exhaust, heater ducting, etc. I was thinking it was well under 400. Cgfen and I did a test lift earler in the week just to see if two strong guys could move it...we did...about two inches off the lift. So, I figured 3-4 guys could lift it to the stand safely. Nick stopped by again and then called in his son and his friend for a total of 4. It went pretty smoothly...could just lift with the legs and keep the arms straight and were at the perfect height for the stand. It was a heavy SOB though! So, I didn't really get working on anything until the early evening...where did the day go!?!?!?
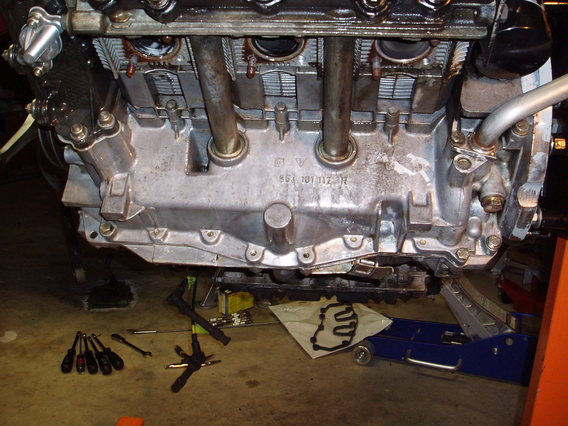
I tackled the lifters...a slow process for sure. I didn't want to rush and drop anything because then I'd have to clean it thoroughly and oil it up again...I didn't drop one despite them being slippery little suckers! I pulled the lifters out with some pliers and this was my method of popping the new ones in...some came out easy while others were stuck pretty good. An important note for those that do this...you need to be sure you seat things properly...it takes two "pops" and it would be easy to think you have it after the first one. You need to reference the metal ring around the lifter as it should be just above the rocker sleeve. I was curious as to whether any of mine were bad since I had not heard any knocking. None of mine had collapsed so that was accurate with what I didn't hear. All the seals were very brittle and all broke taking them out. Another important note on this job...these are hydraulic lifters...they need oil pressure to work properly...that means you should build this pressure up before the first time you fire the engine so pull the DME and crank until you have pressure. Oh, I almost forgot, I think I may have found a new favorite smell...the smell of the rocker bolts after taking them out was intoxicating to me...right up there with the smell of a bunch of 2-stroke dirt bikes in the pits getting warmed up before a race!!!

This engine stand thing is awesome! I was able to rotate things just right so I could easily access the underside for proper cleaning
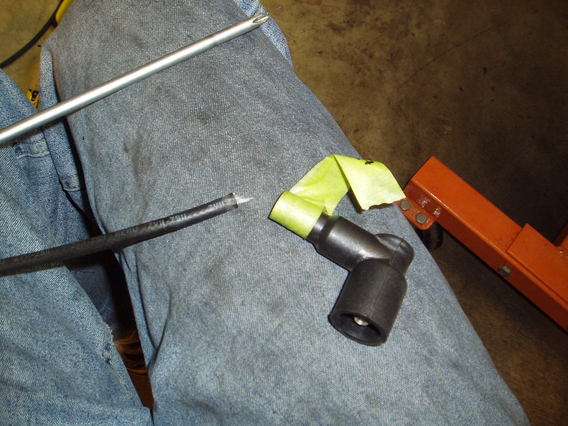
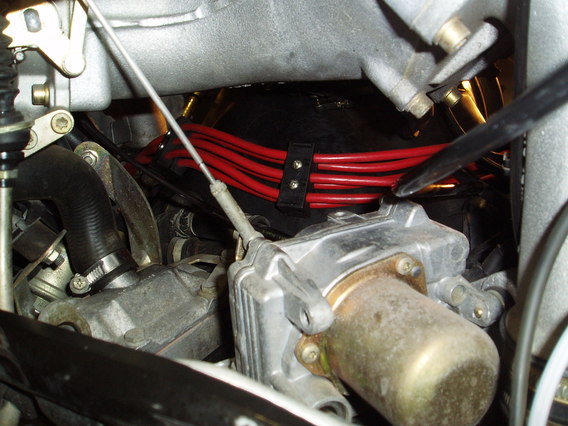
After the lifters and valve cover gaskets I tackled the the dist. caps/rotors/plug wires. I was kind of putting this off because I knew it would be a challenge. Well, I can now offically say that even with the engine out of the car this might be one of my the most painful jobs I've done on a 993! And, in the middle of the whole thing this happens!!! CRAP! I need to reuse that damn boot and now the connector is stuck inside. The right sized screw driver allowed me to screw the connector out so it was loose; however it was royally stuck inside the rubber neck. It laughed at my attempt to use pliers on it...and my attempt to use a tap to "thread" the inside of the fitting. Frustrated, I turned to what we all think of when in a jam...lube! This allowed me to pull the whole plastic assembly out of the boot quite easily...whew...boot saved!
What I thought was being halfway there turned out to be a lesson in frustration...stringing the new wires and rebuilding the loom using the plastic clips was the worst job I've done in this entire engine drop!!! And, I had full access to the backside of the engine! Bottom line, I got it and it looks great but my hands still hurt from the contorted things I had to do to them!
Cyl. 123 were easy and I kept looking over there for motivation to finish the other side!
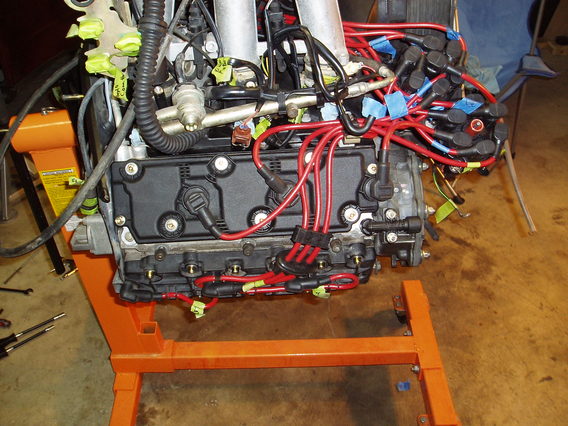
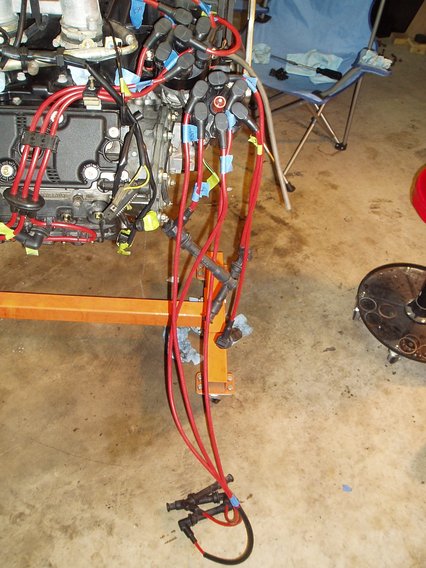
What a maze of wires! I'm digging the red and glad I made that choice. As a side note, I tested all the connectors and only one failed...one of the dist. coil connectors...it passed the voltmeter but visually it was full of crud and corrosion. I ordered a new one for $5.
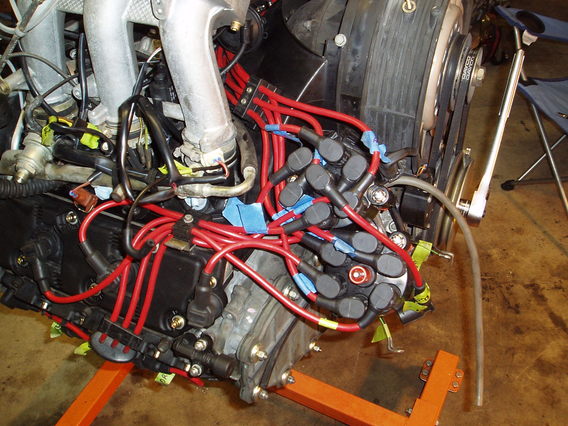
This is the PITA part I was talking about...building this loom just right on the car really made me realize that the $500 for a new harness doesn't sound so bad because you get to avoid all this. I paid $130 for my wires so still the better way to go for me being on a budget. Through all this I did find an easy way to gauge someone's mechanical ability if they rebuilt their own wire set...just ask them if they were able to get all the factory wire looms back in place without taking off the v-ram! If they answer yes and the engine was in the car...they are a god...if it was out of the car they have my sincere respect! Next time, I'm taking the v-ram off....
Success...I did it!!!
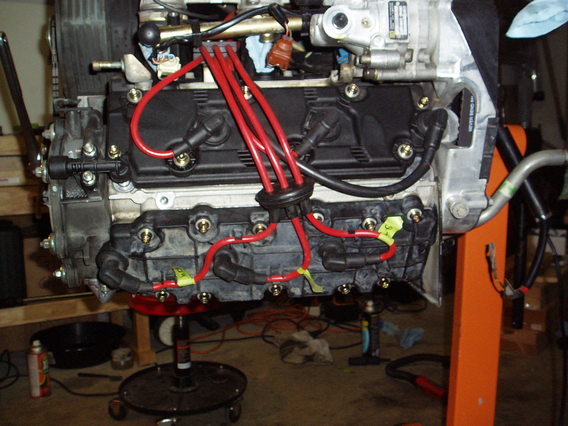
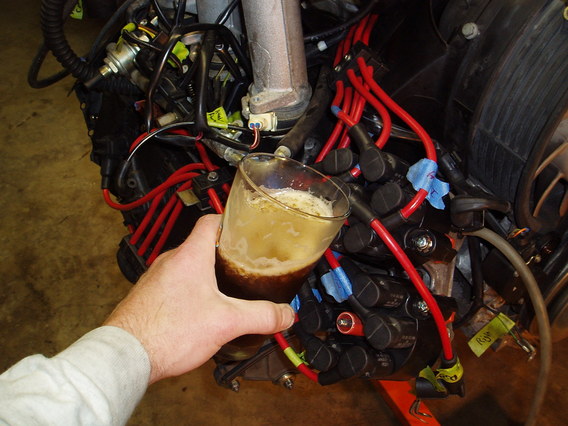
Part of what made this job such a PITA was that I obstained from having beer so I could be mentally focused to keep track of the wires. With a long job out of the way and since there was no one else there to share in my joy, I reluctantly cheersed the damn thing that caused me so much pain
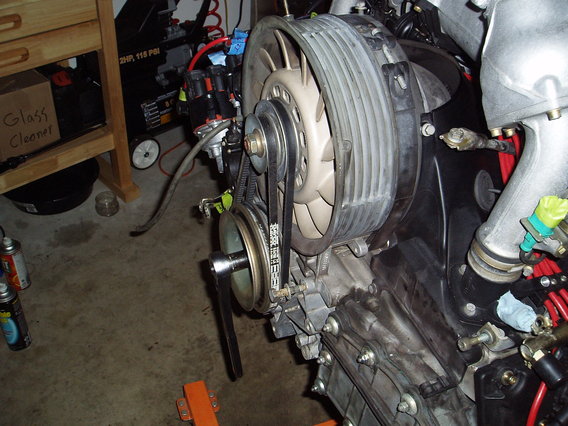
Last thing I tackled for the weekend was the v-belts...what a nice walk in the park after the plug wires!!!
Other items I knocked out were the fuel filter, clutch slave cyl. and new hose...and of course a bunch of cleaning in between. I still have lots of work to do so stay tuned!!!
Here is the engine ready to go. A 993 engine in full dress is over 500 lbs I believe...without clutch pack, exhaust, heater ducting, etc. I was thinking it was well under 400. Cgfen and I did a test lift earler in the week just to see if two strong guys could move it...we did...about two inches off the lift. So, I figured 3-4 guys could lift it to the stand safely. Nick stopped by again and then called in his son and his friend for a total of 4. It went pretty smoothly...could just lift with the legs and keep the arms straight and were at the perfect height for the stand. It was a heavy SOB though! So, I didn't really get working on anything until the early evening...where did the day go!?!?!?
I tackled the lifters...a slow process for sure. I didn't want to rush and drop anything because then I'd have to clean it thoroughly and oil it up again...I didn't drop one despite them being slippery little suckers! I pulled the lifters out with some pliers and this was my method of popping the new ones in...some came out easy while others were stuck pretty good. An important note for those that do this...you need to be sure you seat things properly...it takes two "pops" and it would be easy to think you have it after the first one. You need to reference the metal ring around the lifter as it should be just above the rocker sleeve. I was curious as to whether any of mine were bad since I had not heard any knocking. None of mine had collapsed so that was accurate with what I didn't hear. All the seals were very brittle and all broke taking them out. Another important note on this job...these are hydraulic lifters...they need oil pressure to work properly...that means you should build this pressure up before the first time you fire the engine so pull the DME and crank until you have pressure. Oh, I almost forgot, I think I may have found a new favorite smell...the smell of the rocker bolts after taking them out was intoxicating to me...right up there with the smell of a bunch of 2-stroke dirt bikes in the pits getting warmed up before a race!!!
This engine stand thing is awesome! I was able to rotate things just right so I could easily access the underside for proper cleaning
After the lifters and valve cover gaskets I tackled the the dist. caps/rotors/plug wires. I was kind of putting this off because I knew it would be a challenge. Well, I can now offically say that even with the engine out of the car this might be one of my the most painful jobs I've done on a 993! And, in the middle of the whole thing this happens!!! CRAP! I need to reuse that damn boot and now the connector is stuck inside. The right sized screw driver allowed me to screw the connector out so it was loose; however it was royally stuck inside the rubber neck. It laughed at my attempt to use pliers on it...and my attempt to use a tap to "thread" the inside of the fitting. Frustrated, I turned to what we all think of when in a jam...lube! This allowed me to pull the whole plastic assembly out of the boot quite easily...whew...boot saved!
What I thought was being halfway there turned out to be a lesson in frustration...stringing the new wires and rebuilding the loom using the plastic clips was the worst job I've done in this entire engine drop!!! And, I had full access to the backside of the engine! Bottom line, I got it and it looks great but my hands still hurt from the contorted things I had to do to them!
Cyl. 123 were easy and I kept looking over there for motivation to finish the other side!
What a maze of wires! I'm digging the red and glad I made that choice. As a side note, I tested all the connectors and only one failed...one of the dist. coil connectors...it passed the voltmeter but visually it was full of crud and corrosion. I ordered a new one for $5.
This is the PITA part I was talking about...building this loom just right on the car really made me realize that the $500 for a new harness doesn't sound so bad because you get to avoid all this. I paid $130 for my wires so still the better way to go for me being on a budget. Through all this I did find an easy way to gauge someone's mechanical ability if they rebuilt their own wire set...just ask them if they were able to get all the factory wire looms back in place without taking off the v-ram! If they answer yes and the engine was in the car...they are a god...if it was out of the car they have my sincere respect! Next time, I'm taking the v-ram off....
Success...I did it!!!
Part of what made this job such a PITA was that I obstained from having beer so I could be mentally focused to keep track of the wires. With a long job out of the way and since there was no one else there to share in my joy, I reluctantly cheersed the damn thing that caused me so much pain
Last thing I tackled for the weekend was the v-belts...what a nice walk in the park after the plug wires!!!
Other items I knocked out were the fuel filter, clutch slave cyl. and new hose...and of course a bunch of cleaning in between. I still have lots of work to do so stay tuned!!!
Last edited by flatsixforme; 03-30-2011 at 01:17 PM.
03-29-2011, 09:16 PM
#70
Nordschleife Master
LOL! Yea, the plug wires are a PITA, & $500 for new ones is worth every penny! Now just hope you got them all in the right place. You don't have to remove the V-ram, just unbolt it all @ the head, then pop it up about 6-8in, way better access, & it only takes about 10min to bolt it back down.
While everything is apart you should have done the RS pulley. One less belt to worry about, & one less bearing that can fail.
While everything is apart you should have done the RS pulley. One less belt to worry about, & one less bearing that can fail.
03-30-2011, 12:16 AM
#71
Rennlist Member
Good work! I see you made the civilian engine mount on that stand work. I should've brought by the real Porsche yoke that goes directly into the stand. But, no harm, no foul. So, what's the latest ETA on re-installation?
03-30-2011, 12:48 AM
#72
Addict
Rennlist
Lifetime Member
Rennlist
Lifetime Member
 It's one of the cheap Porsche/VW adapter rings made by Mainely attached to the flat plate of the cheapo Harbor Freight rolling engine stand. As long as you space out the ring from the flat backing plate far enough, you can still turn the engine over without interfering with anything. The P201 yoke is a nice piece, but pricey for a casual user like me.
TT
03-30-2011, 10:23 AM
#73
Rennlist Member
Ya, Ed, it's my stand that Adam borrowed, and it is the cheapest possible setup, given my Scottish ancestry. It's one of the cheap Porsche/VW adapter rings made by Mainely attached to the flat plate of the cheapo Harbor Freight rolling engine stand. As long as you space out the ring from the flat backing plate far enough, you can still turn the engine over without interfering with anything. The P201 yoke is a nice piece, but pricey for a casual user like me.
TT
It's one of the cheap Porsche/VW adapter rings made by Mainely attached to the flat plate of the cheapo Harbor Freight rolling engine stand. As long as you space out the ring from the flat backing plate far enough, you can still turn the engine over without interfering with anything. The P201 yoke is a nice piece, but pricey for a casual user like me. TT
03-30-2011, 12:43 PM
#74
Burning Brakes
Thread Starter
Ya, Ed, it's my stand that Adam borrowed, and it is the cheapest possible setup, given my Scottish ancestry. It's one of the cheap Porsche/VW adapter rings made by Mainely attached to the flat plate of the cheapo Harbor Freight rolling engine stand. As long as you space out the ring from the flat backing plate far enough, you can still turn the engine over without interfering with anything. The P201 yoke is a nice piece, but pricey for a casual user like me.
TT
It's one of the cheap Porsche/VW adapter rings made by Mainely attached to the flat plate of the cheapo Harbor Freight rolling engine stand. As long as you space out the ring from the flat backing plate far enough, you can still turn the engine over without interfering with anything. The P201 yoke is a nice piece, but pricey for a casual user like me. TT
03-30-2011, 12:51 PM
#75
Burning Brakes
Thread Starter
LOL! Yea, the plug wires are a PITA, & $500 for new ones is worth every penny! Now just hope you got them all in the right place. You don't have to remove the V-ram, just unbolt it all @ the head, then pop it up about 6-8in, way better access, & it only takes about 10min to bolt it back down.
While everything is apart you should have done the RS pulley. One less belt to worry about, & one less bearing that can fail.
While everything is apart you should have done the RS pulley. One less belt to worry about, & one less bearing that can fail.
Good to know about the v-ram...I was "almost" finished and only had the two back looms to go so I figured I would just fight through it instead of taking more stuff apart. You know how that goes!
The RS pulley was on the "maybe" list but it didn't make the cut...these projects can really get away from you in terms of $$$ so I've tried to focus on the important and necessary things that are needed while the engine is out. The RS pulley is easy with the engine in if I ever decide to do that. Thanks for the ideas...keep them coming all as i'm sure I have not thought of everything!