Notices
Spyder/Cayman R Discussions about the 987 Spyder/Cayman R (2011-2012)

987 Spyder - a new owner’s perspective.

Thread Tools
 
Search this Thread
 
Old 11-12-2019 | 03:41 PM
  #226  
John McM's Avatar
John McM
Thread Starter
Rennlist Member
 
Joined: May 2001
Posts: 13,315
Likes: 652
From: Auckland, New Zealand.
Default

At some stage I will get the silver accent moldings repainted. Is the color generic or Porsche specific to the Spyder?
Old 11-13-2019 | 02:47 PM
  #227  
John McM's Avatar
John McM
Thread Starter
Rennlist Member
 
Joined: May 2001
Posts: 13,315
Likes: 652
From: Auckland, New Zealand.
Default

Originally Posted by Marine Blue
If you do decide to mount the grill after installing the bumper I would recommend using painters tap to protect the surroundings. The edges of my grille are sharp and any contact would leave a scratch on the trim.
I’m going to a local shop to see if I can find some black rubber channel to put around the edges to make them scratch proof.
Old 11-13-2019 | 03:02 PM
  #228  
Marine Blue's Avatar
Marine Blue
Addict
Rennlist Member
 
Joined: Jul 2004
Posts: 16,020
Likes: 808
From: Temecula, CA
Default

Originally Posted by John McM
I’m going to a local shop to see if I can find some black rubber channel to put around the edges to make them scratch proof.
Let me know what you find as I wouldn’t mind doing the same.

Regarding the silver, I’m not sure on the color but I have a new set sitting on the shelf which I will eventually install when mine look tired.
Old 11-13-2019 | 03:49 PM
  #229  
John McM's Avatar
John McM
Thread Starter
Rennlist Member
 
Joined: May 2001
Posts: 13,315
Likes: 652
From: Auckland, New Zealand.
Default

Originally Posted by Marine Blue
Let me know what you find as I wouldn’t mind doing the same.

Regarding the silver, I’m not sure on the color but I have a new set sitting on the shelf which I will eventually install when mine look tired.
Will do. When I have a final install I’m happy with I will post the results and a template. The Rennline 987.2 Boxster S version looks very nice but it’s not Spyder specific and it’s USD 300. I have spent USD 30 so far plus some fixings. Those should arrive next Monday. The Bluetooth device arrived but my car is in the air so I haven’t tried it yet. I may look at some new silver trim. Likely expensive but cheaper than painting.

Edit: Some of those Spyder specific part numbers are difficult to locate. I'll take them off the parts and add them to the FAQ thread

Last edited by John McM; 11-13-2019 at 04:20 PM.
Old 11-13-2019 | 03:54 PM
  #230  
John McM's Avatar
John McM
Thread Starter
Rennlist Member
 
Joined: May 2001
Posts: 13,315
Likes: 652
From: Auckland, New Zealand.
Default

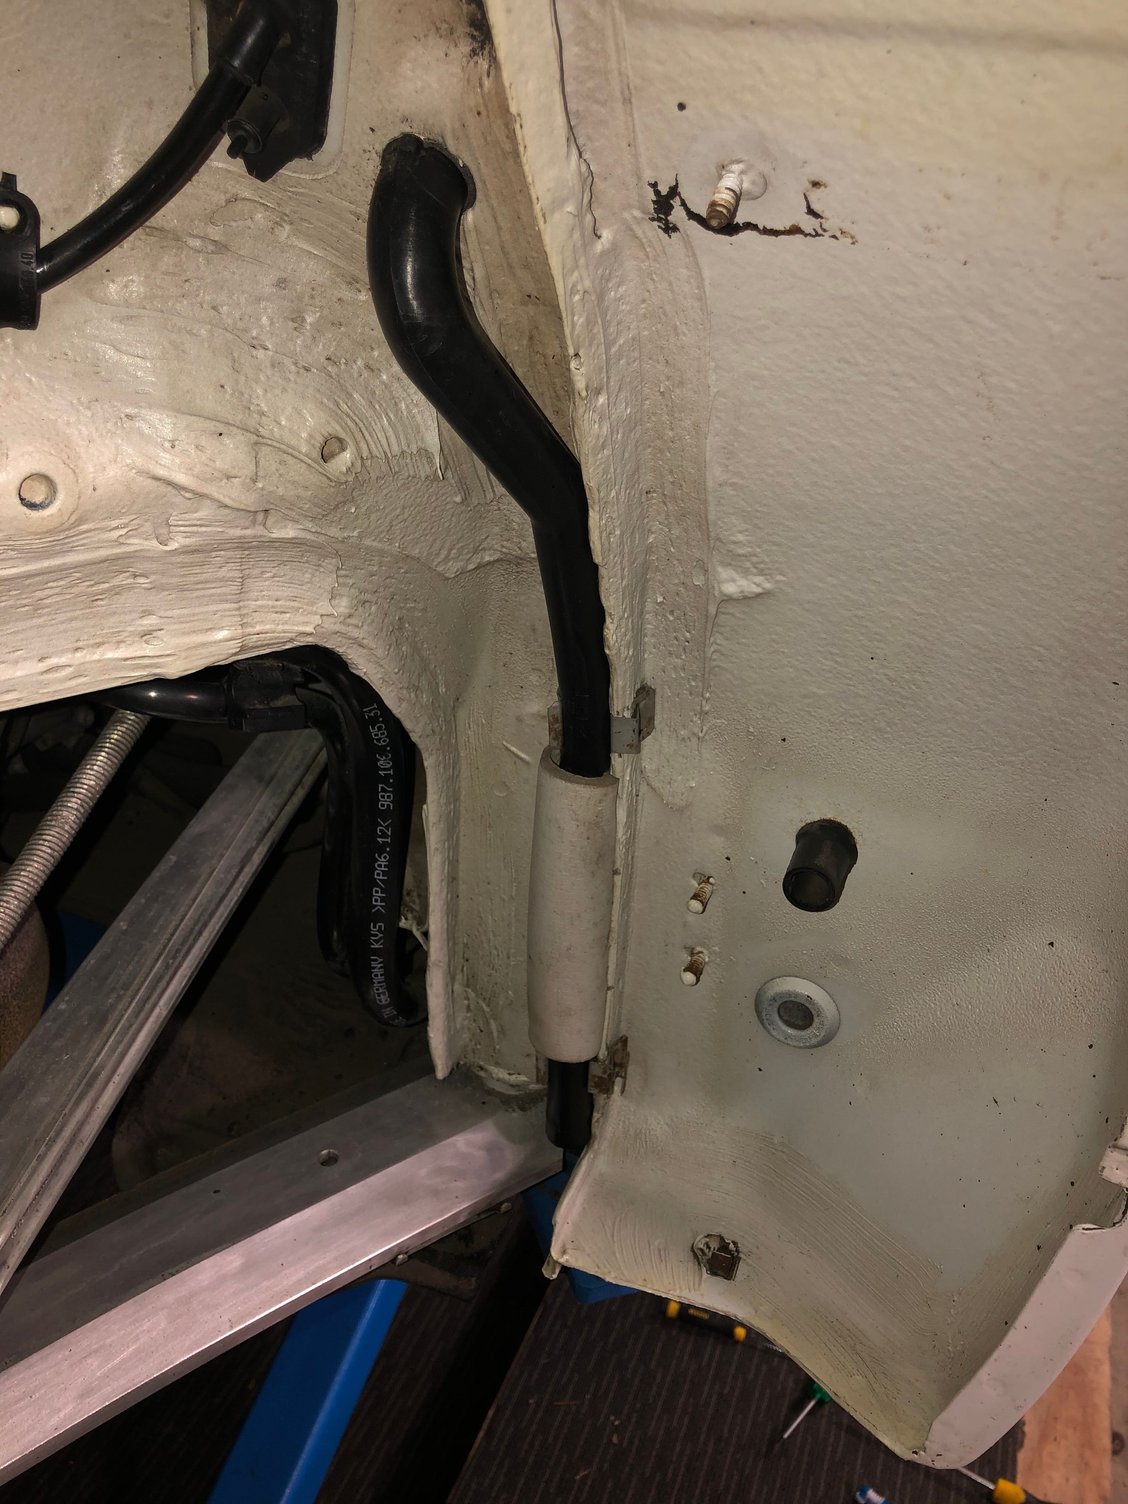
Cleaning wheel arches is dull dirty work but it’s given me a clear baseline. There was quite a lot of dirt behind the drain pipe and some stud fixing had started to corrode. All sorted with some rust converter.
Old 11-13-2019 | 04:30 PM
  #231  
Marine Blue's Avatar
Marine Blue
Addict
Rennlist Member
 
Joined: Jul 2004
Posts: 16,020
Likes: 808
From: Temecula, CA
Default

Originally Posted by John McM
Will do. When I have a final install I’m happy with I will post the results and a template. The Rennline 987.2 Boxster S version looks very nice but it’s not Spyder specific and it’s USD 300. I have spent USD 30 so far plus some fixings. Those should arrive next Monday. The Bluetooth device arrived but my car is in the air so I haven’t tried it yet. I may look at some new silver trim. Likely expensive but cheaper than painting.

Edit: Some of those Spyder specific part numbers are difficult to locate. I'll take them off the parts and add them to the FAQ thread
I’ll do the same on the parts as I have had to return multiple parts due to dealer errors. My next purchase are the two black trim pieces that surrounds the DRL’s, those have been difficult to identify so I pulled mine off again and captured the part numbers.
Old 11-14-2019 | 01:46 AM
  #232  
John McM's Avatar
John McM
Thread Starter
Rennlist Member
 
Joined: May 2001
Posts: 13,315
Likes: 652
From: Auckland, New Zealand.
Default

Part numbers for front bumper inserts

Large frame holding each side
987.505.553.09 Left
987.505.554.09 Right

Titanium coloured outer frame USD91 each
987.505.564.00 Right
987.505.563.00 Left

Cover for day running light
987.505.525.02 Left
987.505.526.02 Right

Last edited by John McM; 11-14-2019 at 05:01 AM.
Old 11-14-2019 | 05:04 AM
  #233  
John McM's Avatar
John McM
Thread Starter
Rennlist Member
 
Joined: May 2001
Posts: 13,315
Likes: 652
From: Auckland, New Zealand.
Default

I’m almost there on the wheel arch cleaning. What a mission. The good news is that aside from the wheel surprise the car is absolutely original. No hits.
Old 11-15-2019 | 12:34 AM
  #234  
WAILN6's Avatar
WAILN6
Racer
 
Joined: Oct 2014
Posts: 314
Likes: 99
Default Edge banding

Here’s one example of welting to go around the grill. They offer lots of different sizes too. https://www.outwater.com/products/pe-0125/

Other options-


https://www.amazon.com/Black-Channel-Edge-Trim-Seal/dp/B07DG5DQ3D/ref=asc_df_B07DG5DQ3D/?tag=hyprod-20&linkCode=df0&hvadid=282952333184&hvpos=1o1&hvnetw=g&hvrand=10935142310609269494&hvpone=&hvptwo=&hvqmt=&hvdev=m&hvdvcmdl=&hvlocint=&hvlocphy=1014226&hvtargid=pla-535075482411&psc=1 https://www.amazon.com/Black-Channel-Edge-Trim-Seal/dp/B07DG5DQ3D/ref=asc_df_B07DG5DQ3D/?tag=hyprod-20&linkCode=df0&hvadid=282952333184&hvpos=1o1&hvnetw=g&hvrand=10935142310609269494&hvpone=&hvptwo=&hvqmt=&hvdev=m&hvdvcmdl=&hvlocint=&hvlocphy=1014226&hvtargid=pla-535075482411&psc=1

and-

https://www.amazon.com/gp/aw/d/B00N9VGGPU/ref=sspa_mw_detail_2?ie=UTF8&psc=1 https://www.amazon.com/gp/aw/d/B00N9VGGPU/ref=sspa_mw_detail_2?ie=UTF8&psc=1

I would try to find one in rubber that’s no more than .25” tall though. .5 is just going to look chunky I think.
Old 11-15-2019 | 12:59 AM
  #235  
John McM's Avatar
John McM
Thread Starter
Rennlist Member
 
Joined: May 2001
Posts: 13,315
Likes: 652
From: Auckland, New Zealand.
Default

Originally Posted by WAILN6
Here’s one example of welting to go around the grill. They offer lots of different sizes too. https://www.outwater.com/products/pe-0125/

Other options-


https://www.amazon.com/Black-Channel...75482411&psc=1

and-

https://www.amazon.com/gp/aw/d/B00N9...?ie=UTF8&psc=1

I would try to find one in rubber that’s no more than .25” tall though. .5 is just going to look chunky I think.
I am going shopping locally tomorrow. Meanwhile the other items arrived.
Old 11-15-2019 | 04:54 PM
  #236  
John McM's Avatar
John McM
Thread Starter
Rennlist Member
 
Joined: May 2001
Posts: 13,315
Likes: 652
From: Auckland, New Zealand.
Default

Radiators cleaned as best I can do it. I’m not going to obsess over the fins that aren’t straight.


Old 11-15-2019 | 05:11 PM
  #237  
MattUF's Avatar
MattUF
Racer
 
Joined: Mar 2010
Posts: 410
Likes: 79
From: SATX
Default

Is there any sort of guide you followed to take off the front bumper, or is it pretty intuitive? I'm interested in taking mine off to make up some radiator grills, but don't want to mess anything up.

EDIT: Did 60 seconds of painstaking searching via Google and found a how-to https://www.pelicanparts.com/techart...er_Removal.htm

Last edited by MattUF; 11-15-2019 at 05:36 PM.
Old 11-15-2019 | 08:24 PM
  #238  
John McM's Avatar
John McM
Thread Starter
Rennlist Member
 
Joined: May 2001
Posts: 13,315
Likes: 652
From: Auckland, New Zealand.
Default

Originally Posted by MattUF
Is there any sort of guide you followed to take off the front bumper, or is it pretty intuitive? I'm interested in taking mine off to make up some radiator grills, but don't want to mess anything up.

EDIT: Did 60 seconds of painstaking searching via Google and found a how-to https://www.pelicanparts.com/techart...er_Removal.htm
i had trouble with the pins that you hook and pull. One would just not come out until I realised that the hanging weight of the bumper was putting the inside of the pin inside a recess. I would do the pins first then all of the various screws.
The following users liked this post:
MattUF (11-15-2019)
Old 11-16-2019 | 06:03 PM
  #239  
John McM's Avatar
John McM
Thread Starter
Rennlist Member
 
Joined: May 2001
Posts: 13,315
Likes: 652
From: Auckland, New Zealand.
Default


It’s a labour of love. I think I only have one concours in me. I’ve had to stop work while I wait for a shipment of new speednuts and body screws. Some have signs of corrosion which I loathe in cars. Overall, this is a great way to baseline my car’s condition, which is clearly original.
Old 11-16-2019 | 06:29 PM
  #240  
Marine Blue's Avatar
Marine Blue
Addict
Rennlist Member
 
Joined: Jul 2004
Posts: 16,020
Likes: 808
From: Temecula, CA
Default

Originally Posted by John McM

It’s a labour of love. I think I only have one concours in me. I’ve had to stop work while I wait for a shipment of new speednuts and body screws. Some have signs of corrosion which I loathe in cars. Overall, this is a great way to baseline my car’s condition, which is clearly original.
Nice job! It is absolutely a labor of love and every year I say the same thing, I’m not doing this again next year! But when its all done and you finish the final wipe down on the concours field you realize you’re staring at a perfect car. I’m going to swap between my two cars from here on out if only for the purpose of continued improvement and baselining as you said. That is truly my primary goal from a concours, put a critical eye on the car and address any issues to make it perfect.


Quick Reply: 987 Spyder - a new owner’s perspective.


All times are GMT -3. The time now is 07:21 AM.