When you click on links to various merchants on this site and make a purchase, this can result in this site earning a commission. Affiliate programs and affiliations include, but are not limited to, the eBay Partner Network.
Maybe try putting some pillows in the trunk until the glass sits on the pillow, then keep adding until the pillows lift the glass off the hatch. Get it so that the pillows only allow the glass to just sit off the frame - this will be trial and error of course but then add the sealant to the frame and tap down as required. If the glass lifts up maybe add books (or similar) to weigh it back down? Just some thoughts, I have not done this yet, but I'm trying to think through how I will.
As for removing the urethane from the rail, do you intend to remove all of it or leave 1-2mm?
Do you guys trust these things?
I was imagining that one guy would lay inside the hatch and support it, while another (or two) outside could guide the glass into place.
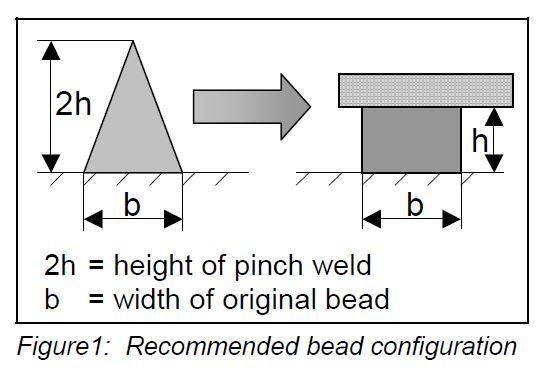
Given the stiffness and quantity of polyurethane used, I'm not expecting it to squeeze out. In the Sika documentation they strongly recommend using a triangular bead to avoid trapped air. The point of the triangle should compress down evenly as the glass is applied, and settle to a 'square' bead (or so they claim). With a windshield replacement, I'm guessing that the pinch weld would ultimately limit how deep the glass could go.
That's a good question. For windshield replacement, they would have a good amount of old urethane bonded near the pinch weld. I can imagine that to remove this would be time consuming and cause more problems (damage to paint, etc) than it would solve - since the polyurethane bonds so strongly to itself anyway.
I'm not worried about scratching the frame (pretty scratched up from cutting out glass already), but I am worried about using a compatible paint on the frame.
Last edited by KVDR; 09-23-2016 at 06:52 PM.
Reason: pic
This is taking longer than I thought (stripped screws in the frame, being super thorough in cleaning the glass). But I'm close to the final adhesive-and-seal step.
To answer the question about where to put the glass on the frame: from what I can tell the frame is going to need to sit high up on the frame with a minimal gap, if any, at the top. This will leave a significant gap at the bottom, which is required to clear the screw holes in the frame needed to reattach the wing. You also don't want to completely seal the screw holes... I think I am going to take some wood dowels, wrap them in teflon tape, and insert them in the frame wing holes before sealing. The dowels will hopefully also serve to support the glass within the frame to get the spacing right. I'm not going to clamp, just let the weight of the glass seat itself.
In terms of frame prep- for normal windshield replacement they do recommend leaving a small amount of urethane on the body for the new stuff to adhere to. That said, my removal job (putty knife, rubber mallet, and heat gun) left a pretty banged up "bead". So I stripped the frame sealing surface down to bare aluminum with a dremel and several sanding heads. I will prime the bare aluminum before sealing. I got comfortable with this approach since it mirrors the "Complete Adhesive Removal" (3.5) and "Aluminum Pinchweld" (3.7) sections of the Sika AGR technician's manual.
KVDR: there is a "gasket" below the hinge plates. Part number is 944-512-413.
...
In terms of frame prep- for normal windshield replacement they do recommend leaving a small amount of urethane on the body for the new stuff to adhere to. That said, my removal job (putty knife, rubber mallet, and heat gun) left a pretty banged up "bead". So I stripped the frame sealing surface down to bare aluminum with a dremel and several sanding heads. I will prime the bare aluminum before sealing. I got comfortable with this approach since it mirrors the "Complete Adhesive Removal" (3.5) and "Aluminum Pinchweld" (3.7) sections of the Sika AGR technician's manual.
KVDR: there is a "gasket" below the hinge plates. Part number is 944-512-413.
Thanks for the part number! I suppose the gasket is necessary as a barrier between the aluminum frame and the steel body - preventing galvanic corrosion. I'll probably just make one out of some gasket material I have laying around.
What type of primer are you using on the frame? I read somewhere in the Sika manual that 'etching primer' should be used on aluminum. I'm planning on using urethane based paint for the frame, which should be compatible rather than acrylic which is water based and likely isn't compatible.
...which is required to clear the screw holes in the frame needed to reattach the wing. You also don't want to completely seal the screw holes... I think I am going to take some wood dowels, wrap them in teflon tape, and insert them in the frame wing holes before sealing. The dowels will hopefully also serve to support the glass within the frame to get the spacing right. I'm not going to clamp, just let the weight of the glass seat itself.
Someone mentioned using short lengths of drinking straws to keep the holes clear.
Edit - Also, thanks for taking the lead on this Sika Titan P2G re-seal. I think my schedule will conveniently lag yours, so please share all the lessons learned!
Thanks for the part number! I suppose the gasket is necessary as a barrier between the aluminum frame and the steel body - preventing galvanic corrosion. I'll probably just make one out of some gasket material I have laying around.
What type of primer are you using on the frame? I read somewhere in the Sika manual that 'etching primer' should be used on aluminum. I'm planning on using urethane based paint for the frame, which should be compatible rather than acrylic which is water based and likely isn't compatible.
No problem. Any thin gasket material should be a fine replacement for the stock material. I'm using the Sika 207 primer.
Oh, and as for moving the glass around- I bought two of these from Harbor Freight, and they've worked great. I used them to take the glass off the car, as well as flip it over a couple of times on the stand. http://www.harborfreight.com/aluminu...ter-92825.html
I just wanted to re-seal the top portion that always separates so I could use the struts and not have any leaks. I tried window weld and dow u- 428, both failed after one week. Did some researching and came up with LoctitePL Fast grab construction adhesive and its been holding for a couple months even with the very rough road conditions in my town. It only comes in a dull grayish color, but at this point I don't care, I can paint later if needs be.
Why not leave the old urethane so the new urethane can bond to it? Isn't that what Sika recommends?
I'm going to use the Sika Primer 206 P+G (207 can work here too I think) on any bare metal. I know the Sika Titan (cold applied) product does not need a primer for glass, but I wonder if will still work if I prime the glass with the 206 like you would if you were using the hot applied urethane from Sika. I want to use the primer on the glass to get that OEM black paint look back.
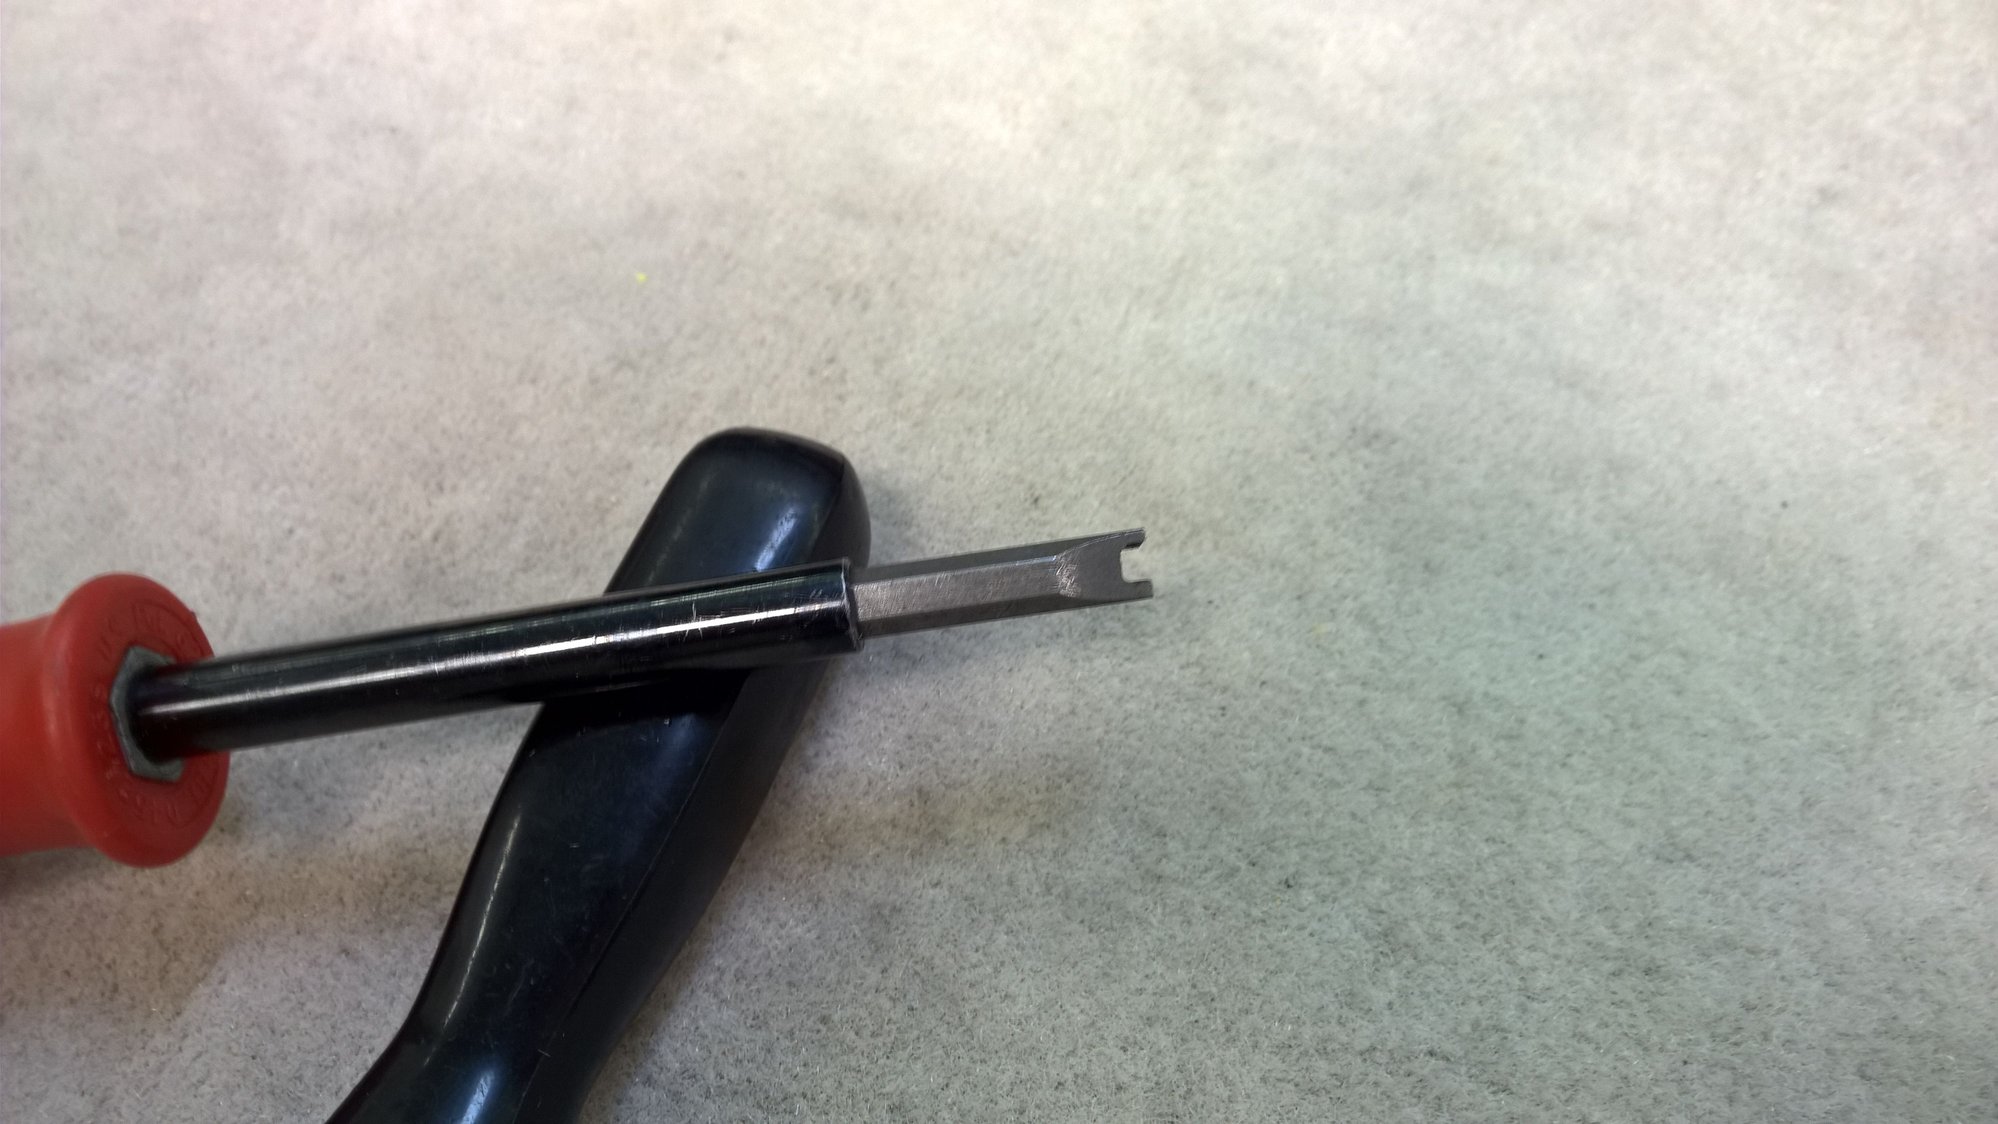
by the way your screw tool is exactly the same I the one I have made - good thinking!!
 09-23-2016, 06:50 PM