When you click on links to various merchants on this site and make a purchase, this can result in this site earning a commission. Affiliate programs and affiliations include, but are not limited to, the eBay Partner Network.
The instructions aren't clear on the installation of the small monitoring wire. Does the end with bare wire get spliced into the existing LIN harness? Cut and solder?
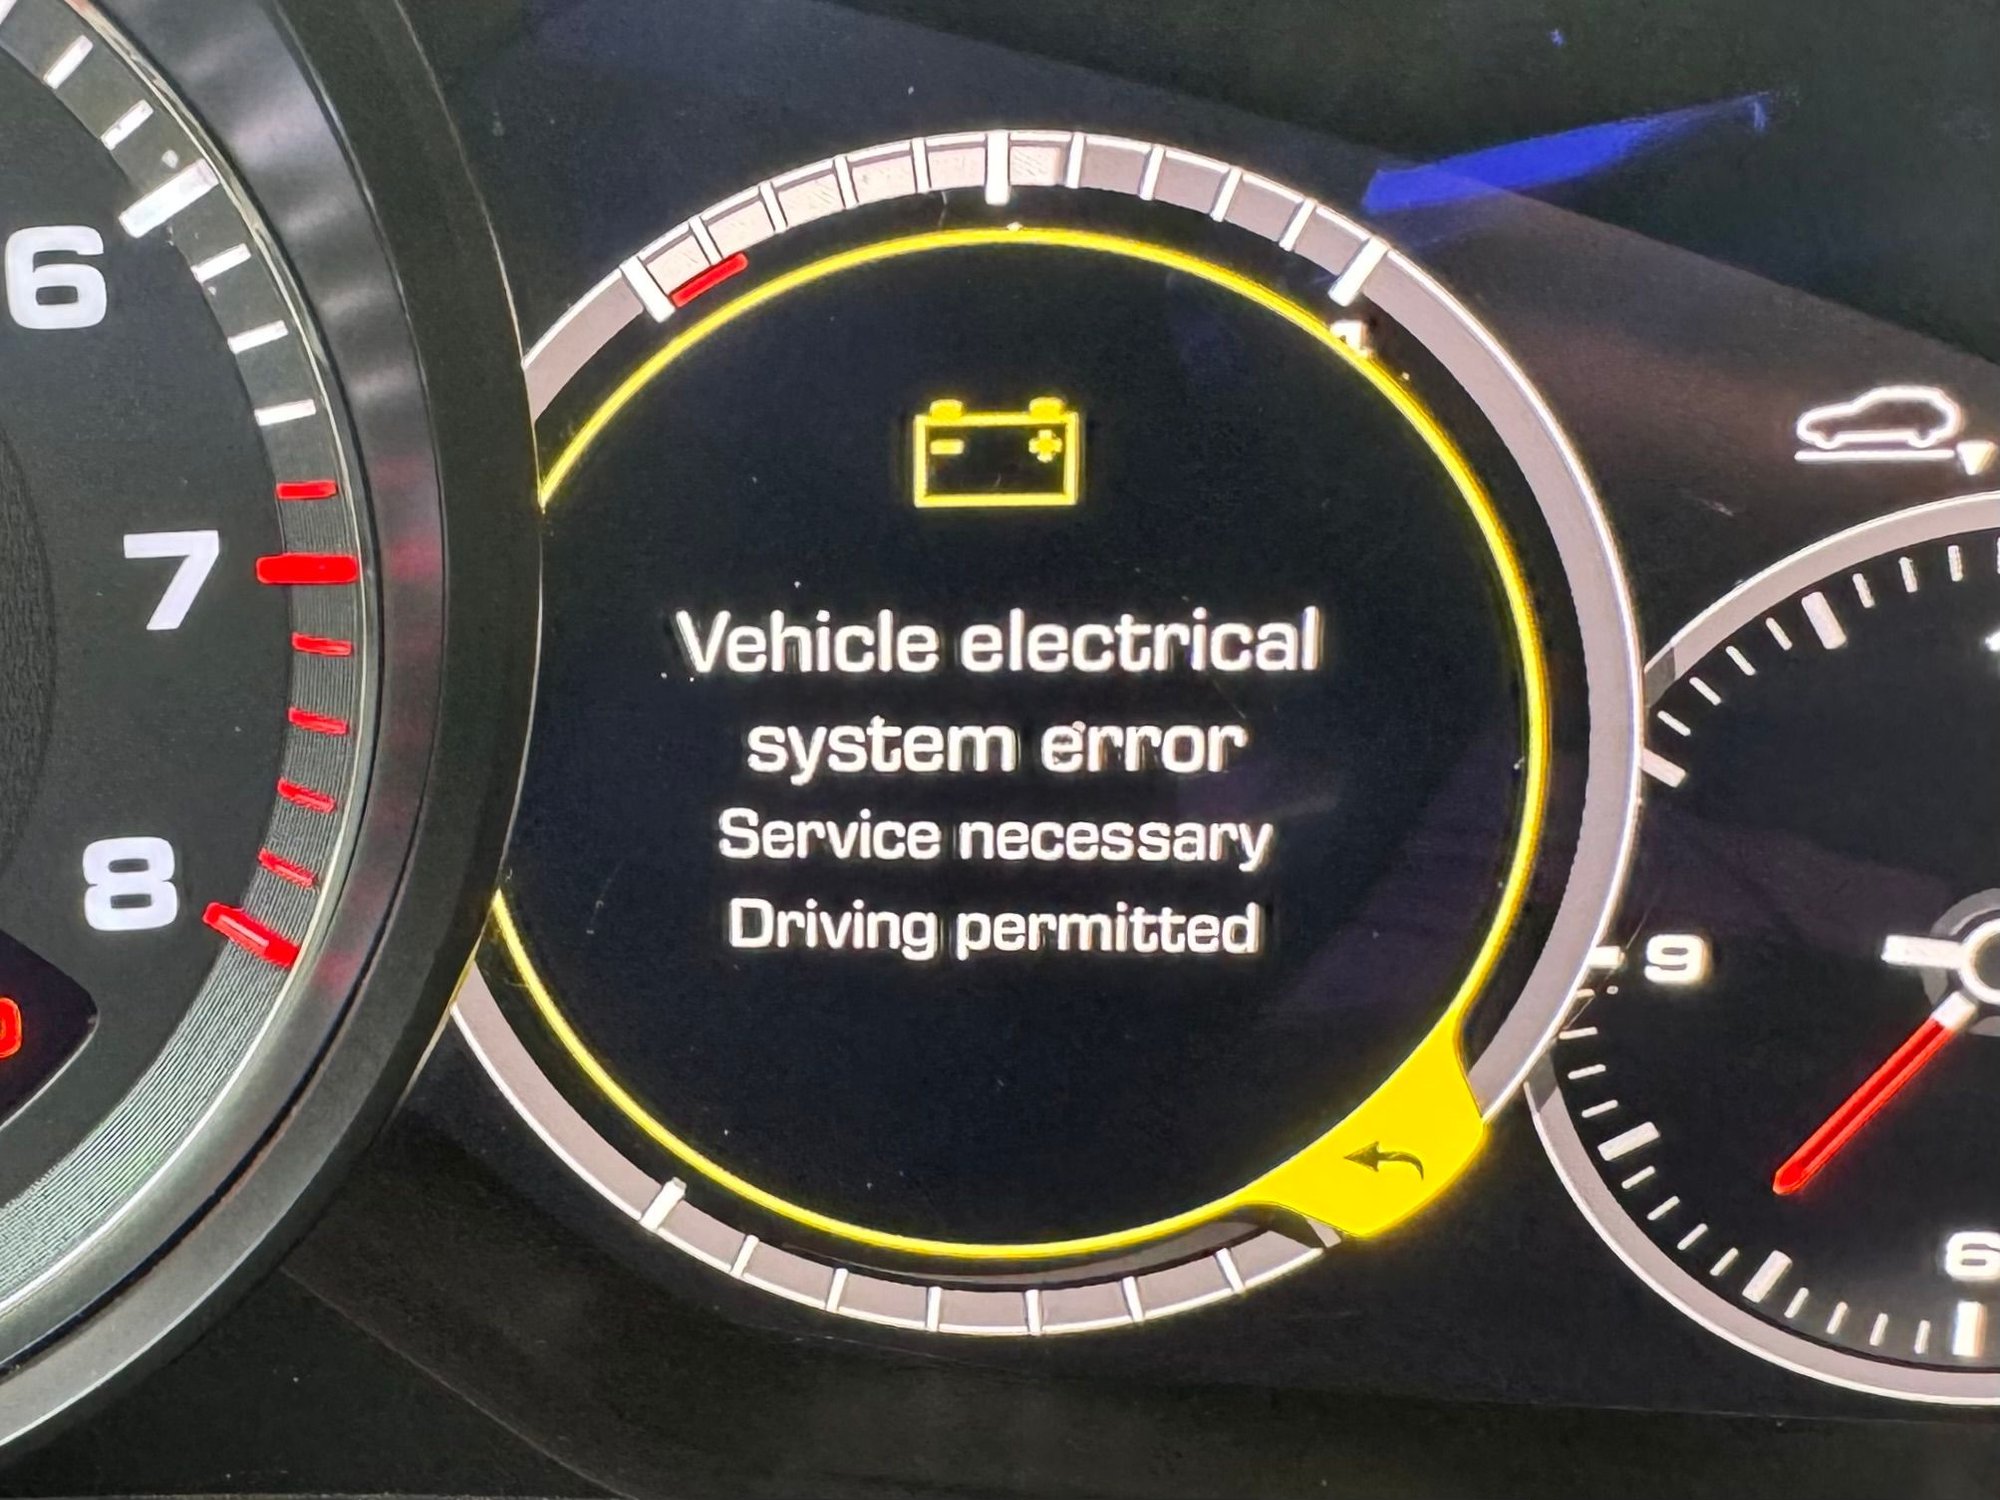
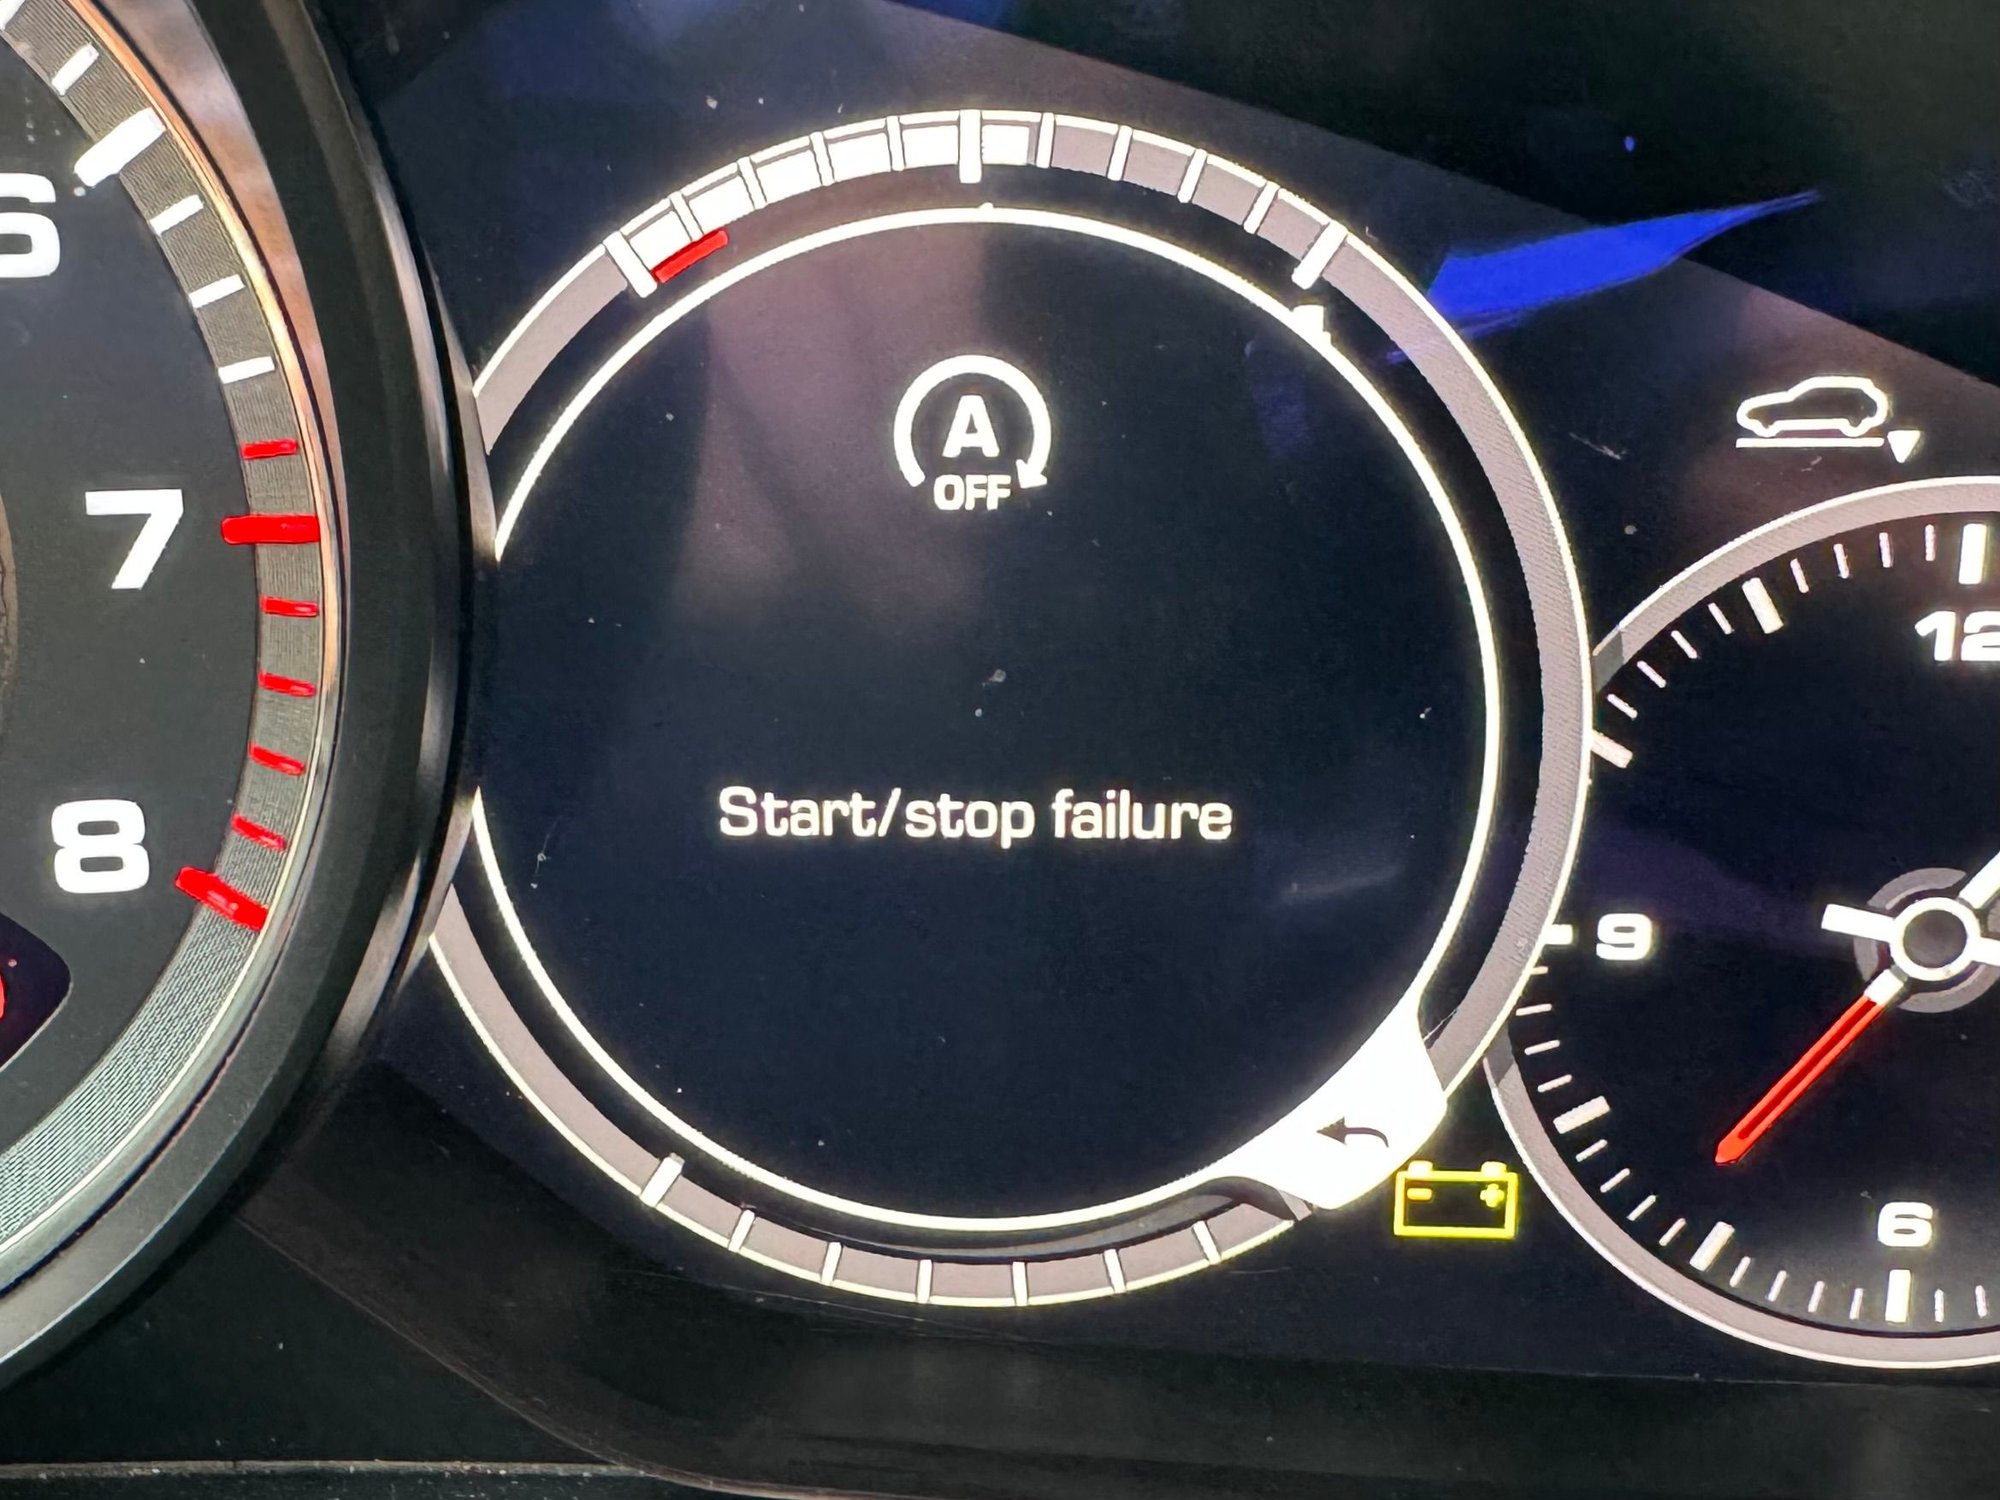
I installed the kit today. @kingstoneThe dongle will not code the AGM battery. Per your instructions, I installed the AGM battery and started the car. I received the electrical system error as expected. I turned off the vehicle, plugged in the dongle to the OBD port and turned key to first detent to power up the center screen as instructed.
Nothing happened. No beep from the dongle after 10 seconds. I waited about a minute with no beep. No apparent reprogramming, as the electrical fault remains. No voltage readout on the instrument panel.
I removed dongle, started car, and repeated the coding procedure three times. No luck.
I did not change the DIP Switches. See photo to confirm if they are correct.
I will troubleshoot tomorrow. I will verify I have a good connection between the battery and the LIN connector.
I have a base 19 Cayenne w 151K miles and started to get all these weird codes mainly with the transmission but also the "SOS". I assume it is the battery which from my understanding is about 3K out the door at the dealership as well as the only place you can get the battery. Seems absolutely crazy. What is the issue with using a non Porsche battery? Somehow I'm under the impression that the battery has to be programmed to the car, Is this correct? I would love another solution since I really don't want to be held hostage to Porsche over a very expensive battery that is less than. I would appreciate your feedback as well as what were the issues you were having prior to the battery replacement. Another fault I get is "reverse may not be available". I've had an issue w reverse about 5X in the course of the past 6K miles which as this problem escalates I'm starting to think it is battery related
I installed the kit today. @kingstoneThe dongle will not code the AGM battery. Per your instructions, I installed the AGM battery and started the car. I received the electrical system error as expected. I turned off the vehicle, plugged in the dongle to the OBD port and turned key to first detent to power up the center screen as instructed.
Nothing happened. No beep from the dongle after 10 seconds. I waited about a minute with no beep. No apparent reprogramming, as the electrical fault remains. No voltage readout on the instrument panel.
I removed dongle, started car, and repeated the coding procedure three times. No luck.
I did not change the DIP Switches. See photo to confirm if they are correct.
I will troubleshoot tomorrow. I will verify I have a good connection between the battery and the LIN connector.
Schnave, any news on the programming dongle not working?
Do you think your year 9Y0 model may be the issue?
I’m not certain I have a good 12V connection between the battery’s positive terminal and the LIN connector. The pin for the LIN connector didn’t fit very well. I ordered a new 2-pin LIN connector that came pre-wired. I’ll splice into the existing LIN wire and 12V wire; then retry the dongle. Stay tuned . . .
I’m not certain I have a good 12V connection between the battery’s positive terminal and the LIN connector. The pin for the LIN connector didn’t fit very well. I ordered a new 2-pin LIN connector that came pre-wired. I’ll splice into the existing LIN wire and 12V wire; then retry the dongle. Stay tuned . . .
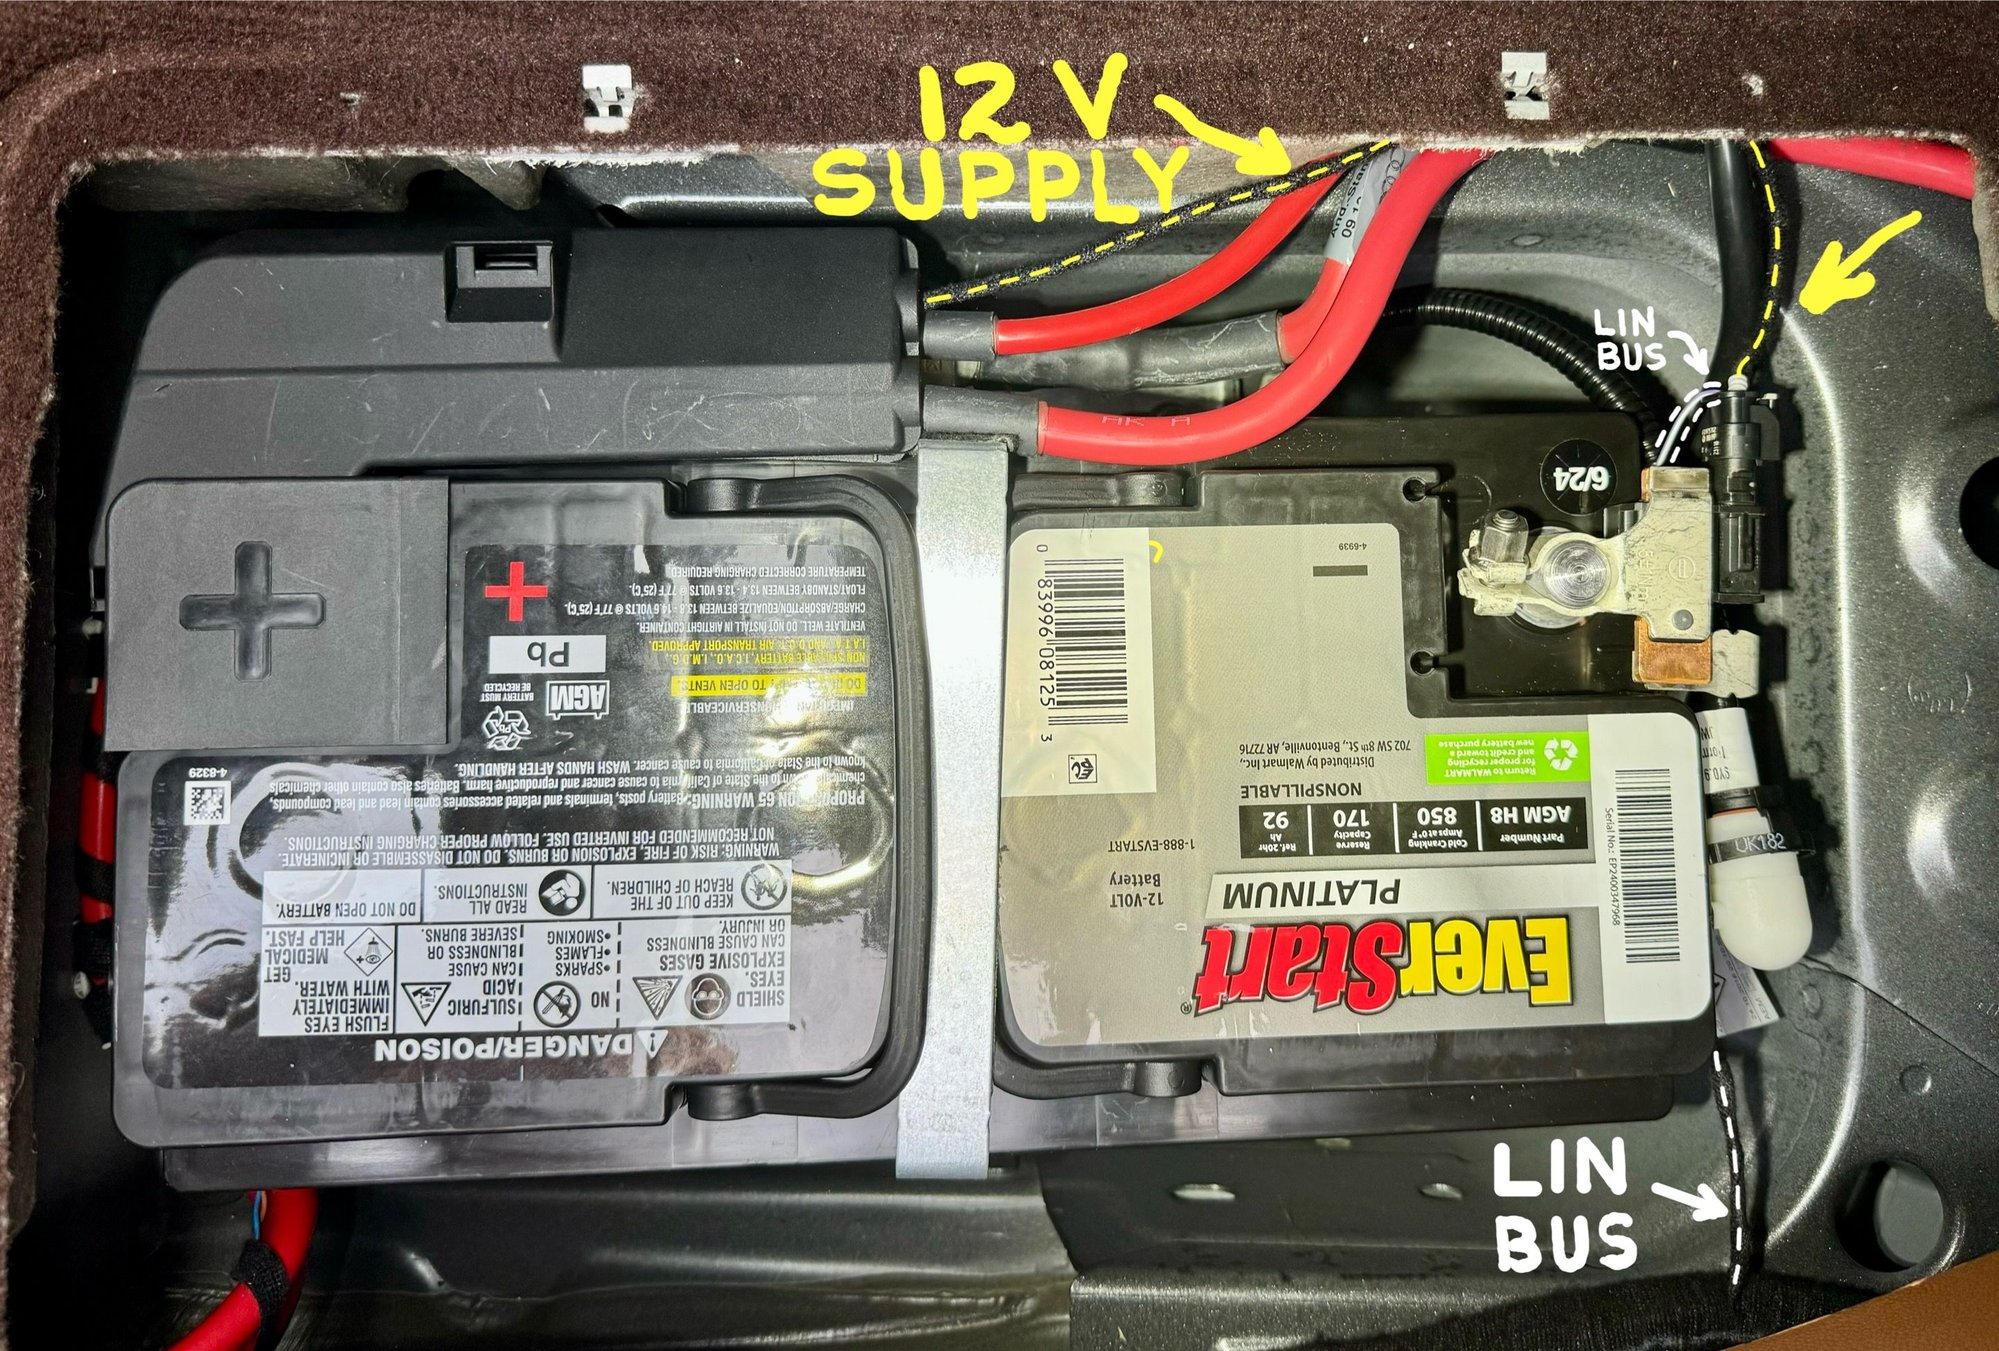
As runbuh explained in a previous post, the LIN is a single wire. The 12V required by the LIN Bus is supplied by an internal connection in the LFP battery. No such connection is available with the AGM battery, so you must run a wire from the positive terminal to the LIN connector.
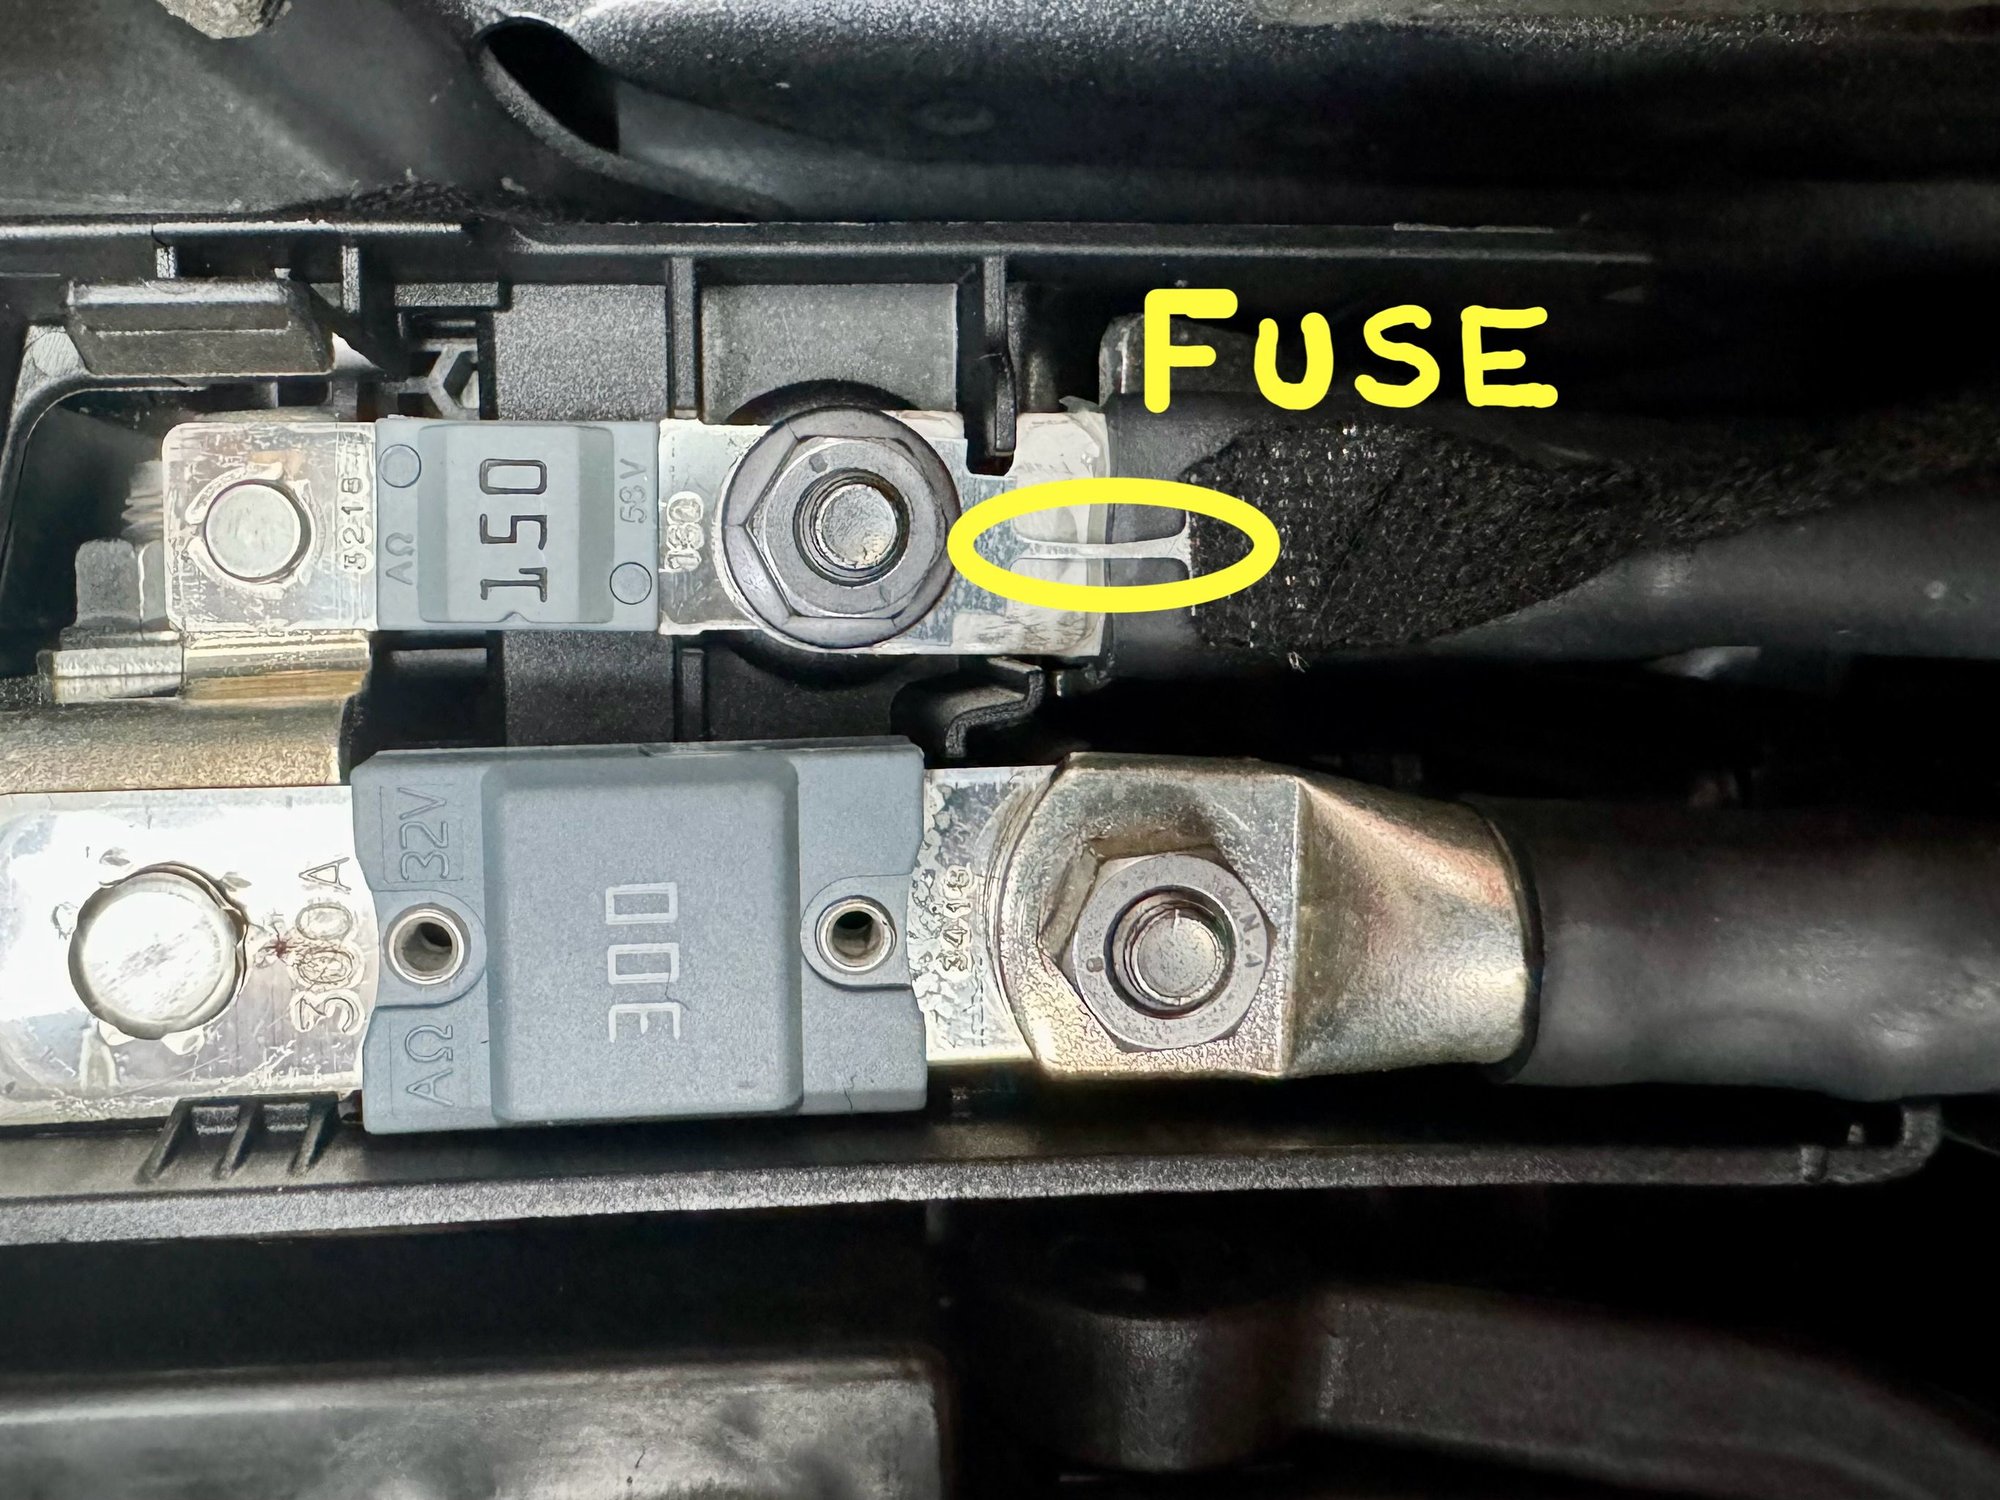
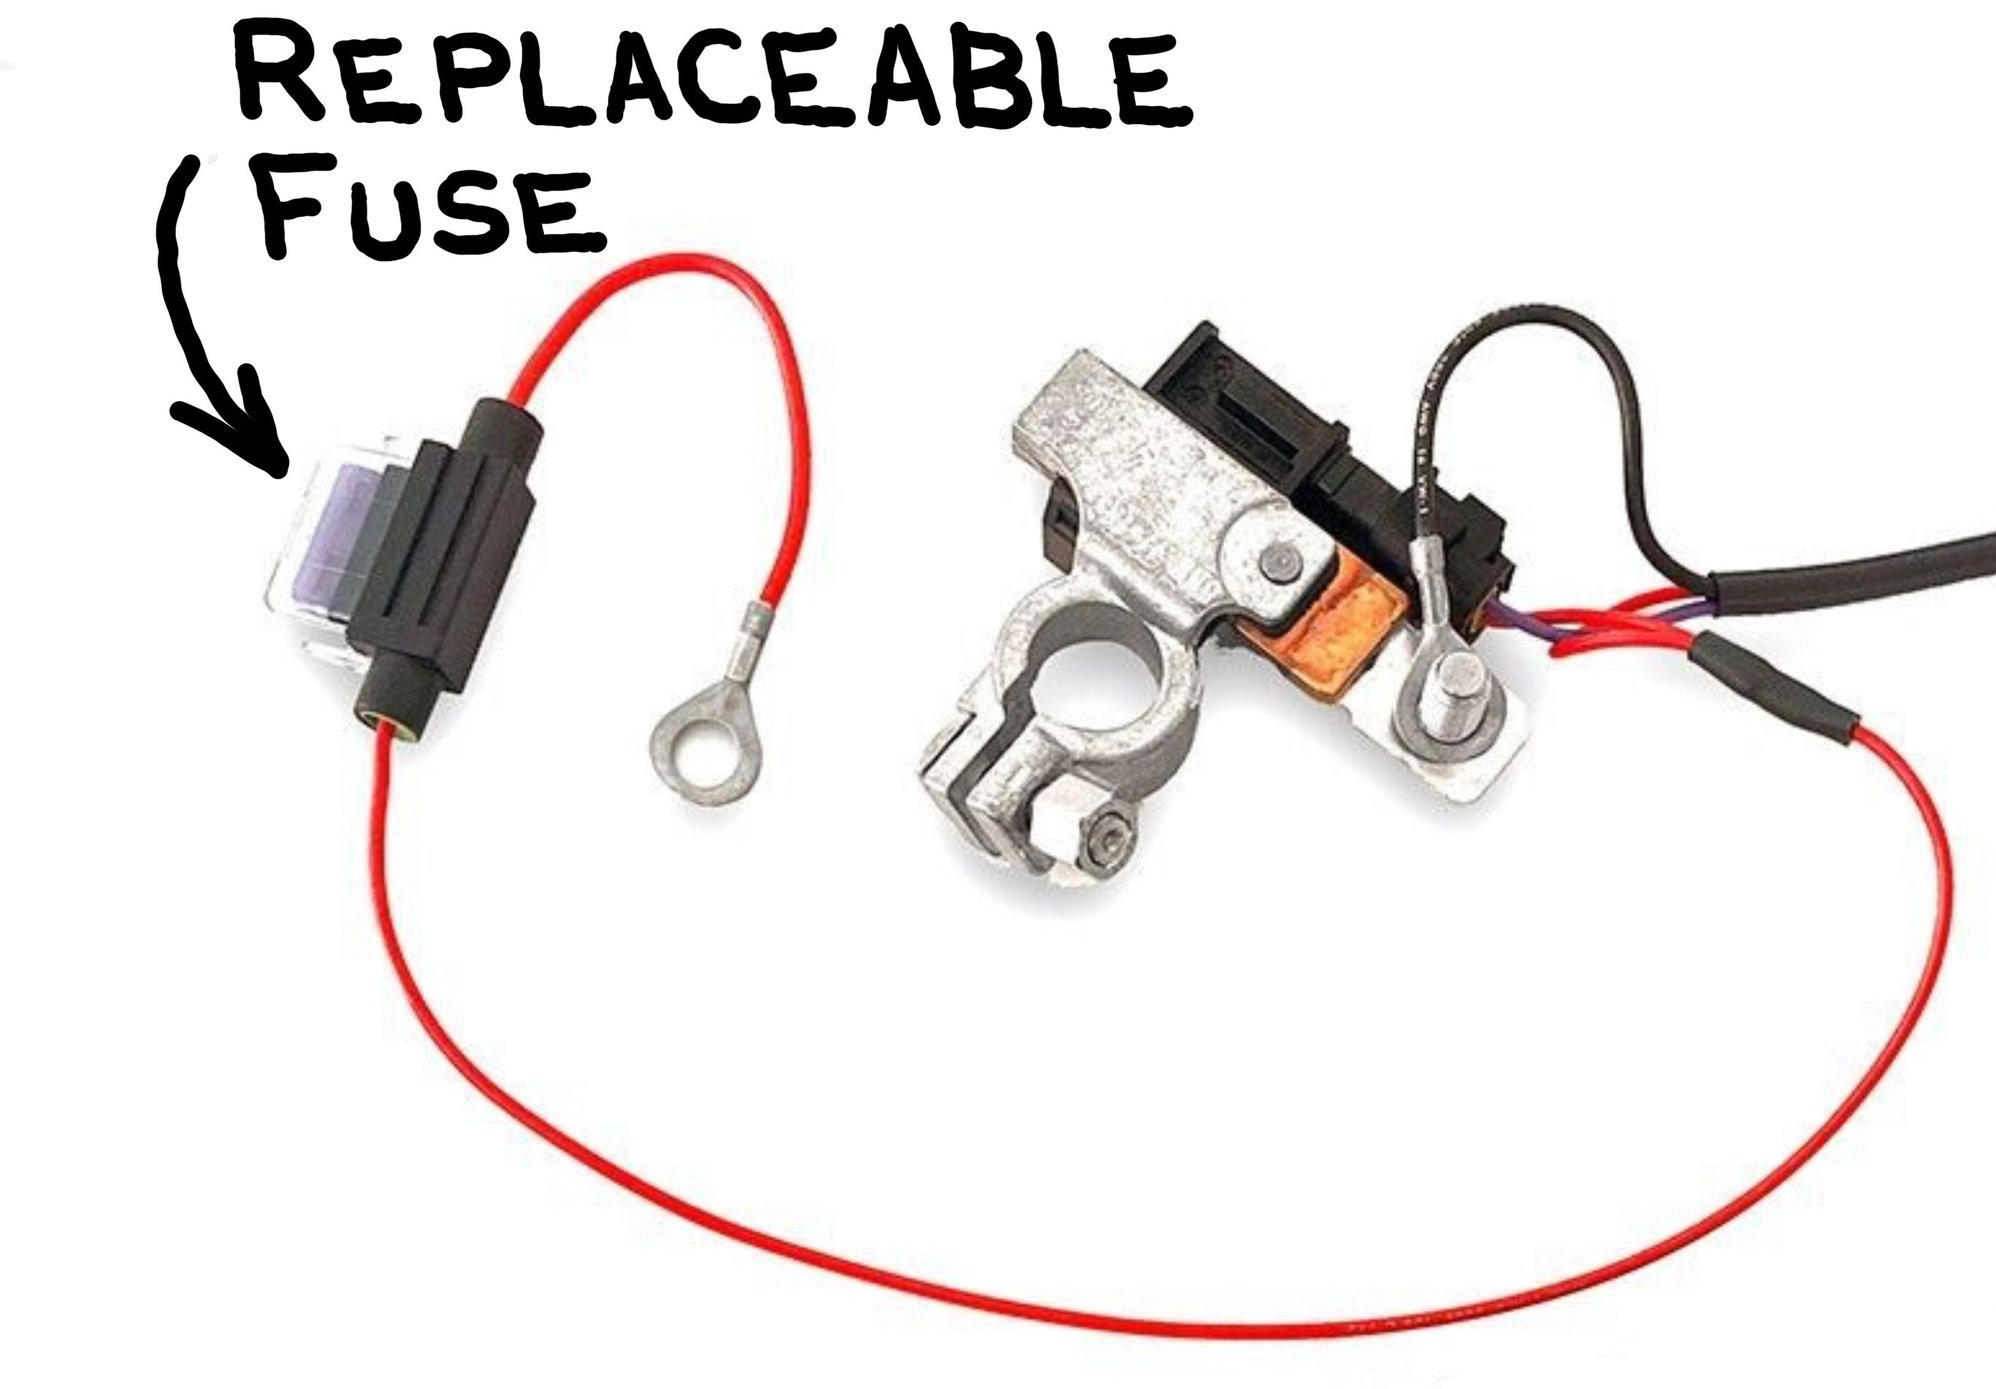
Here is the connection to the positive terminal. Note the integral fuse near the ring connector. Handle with care during installation.
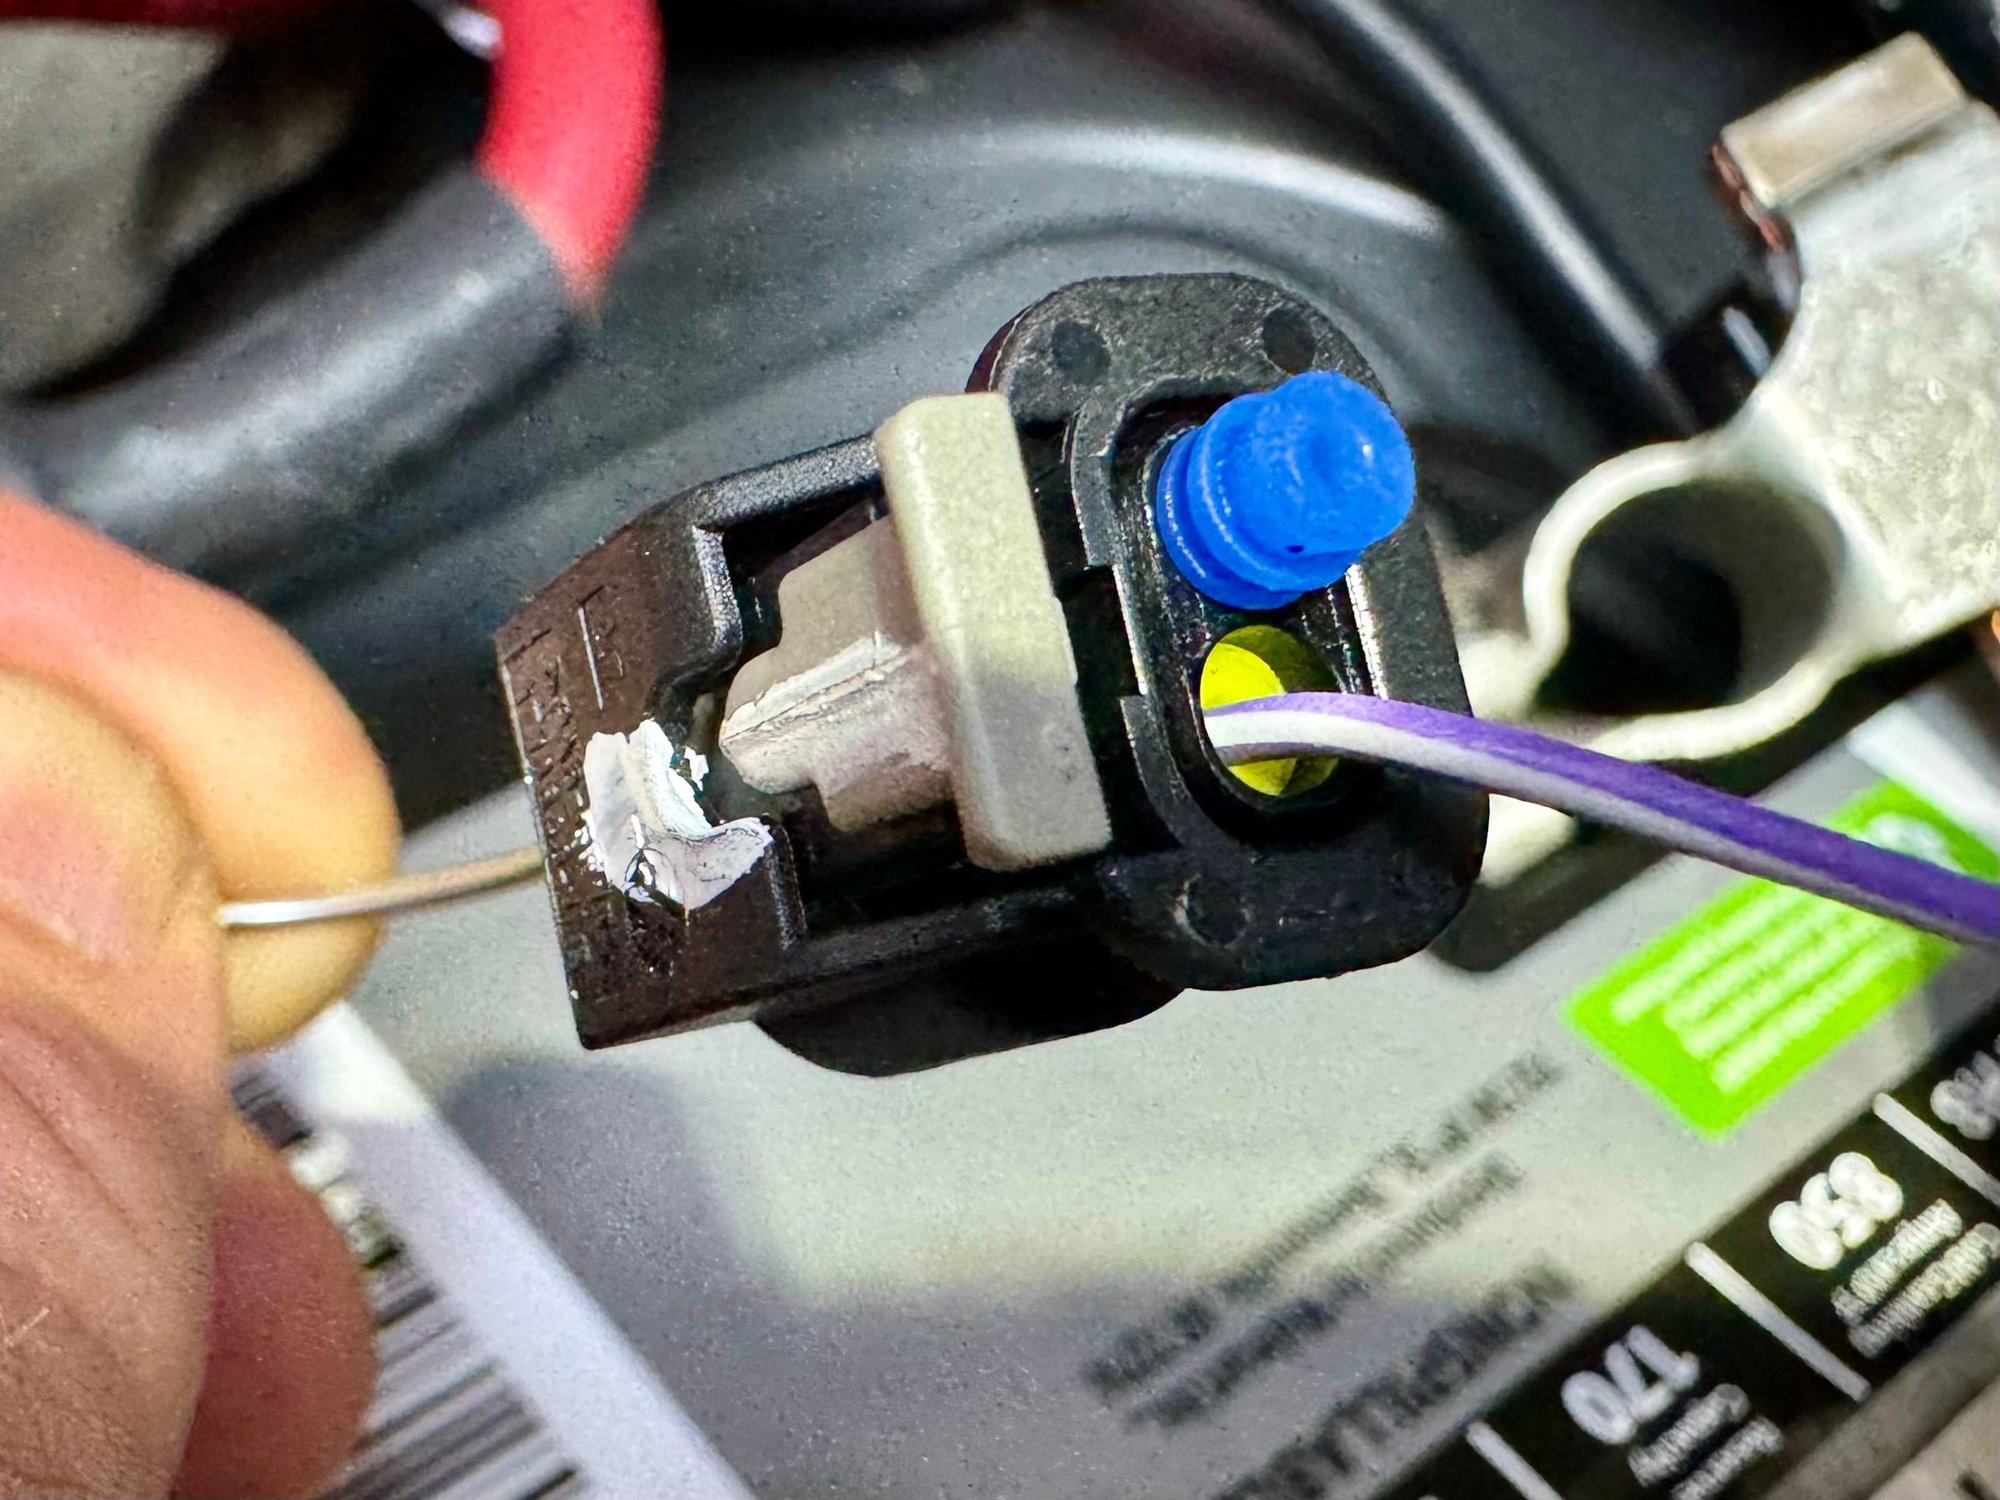
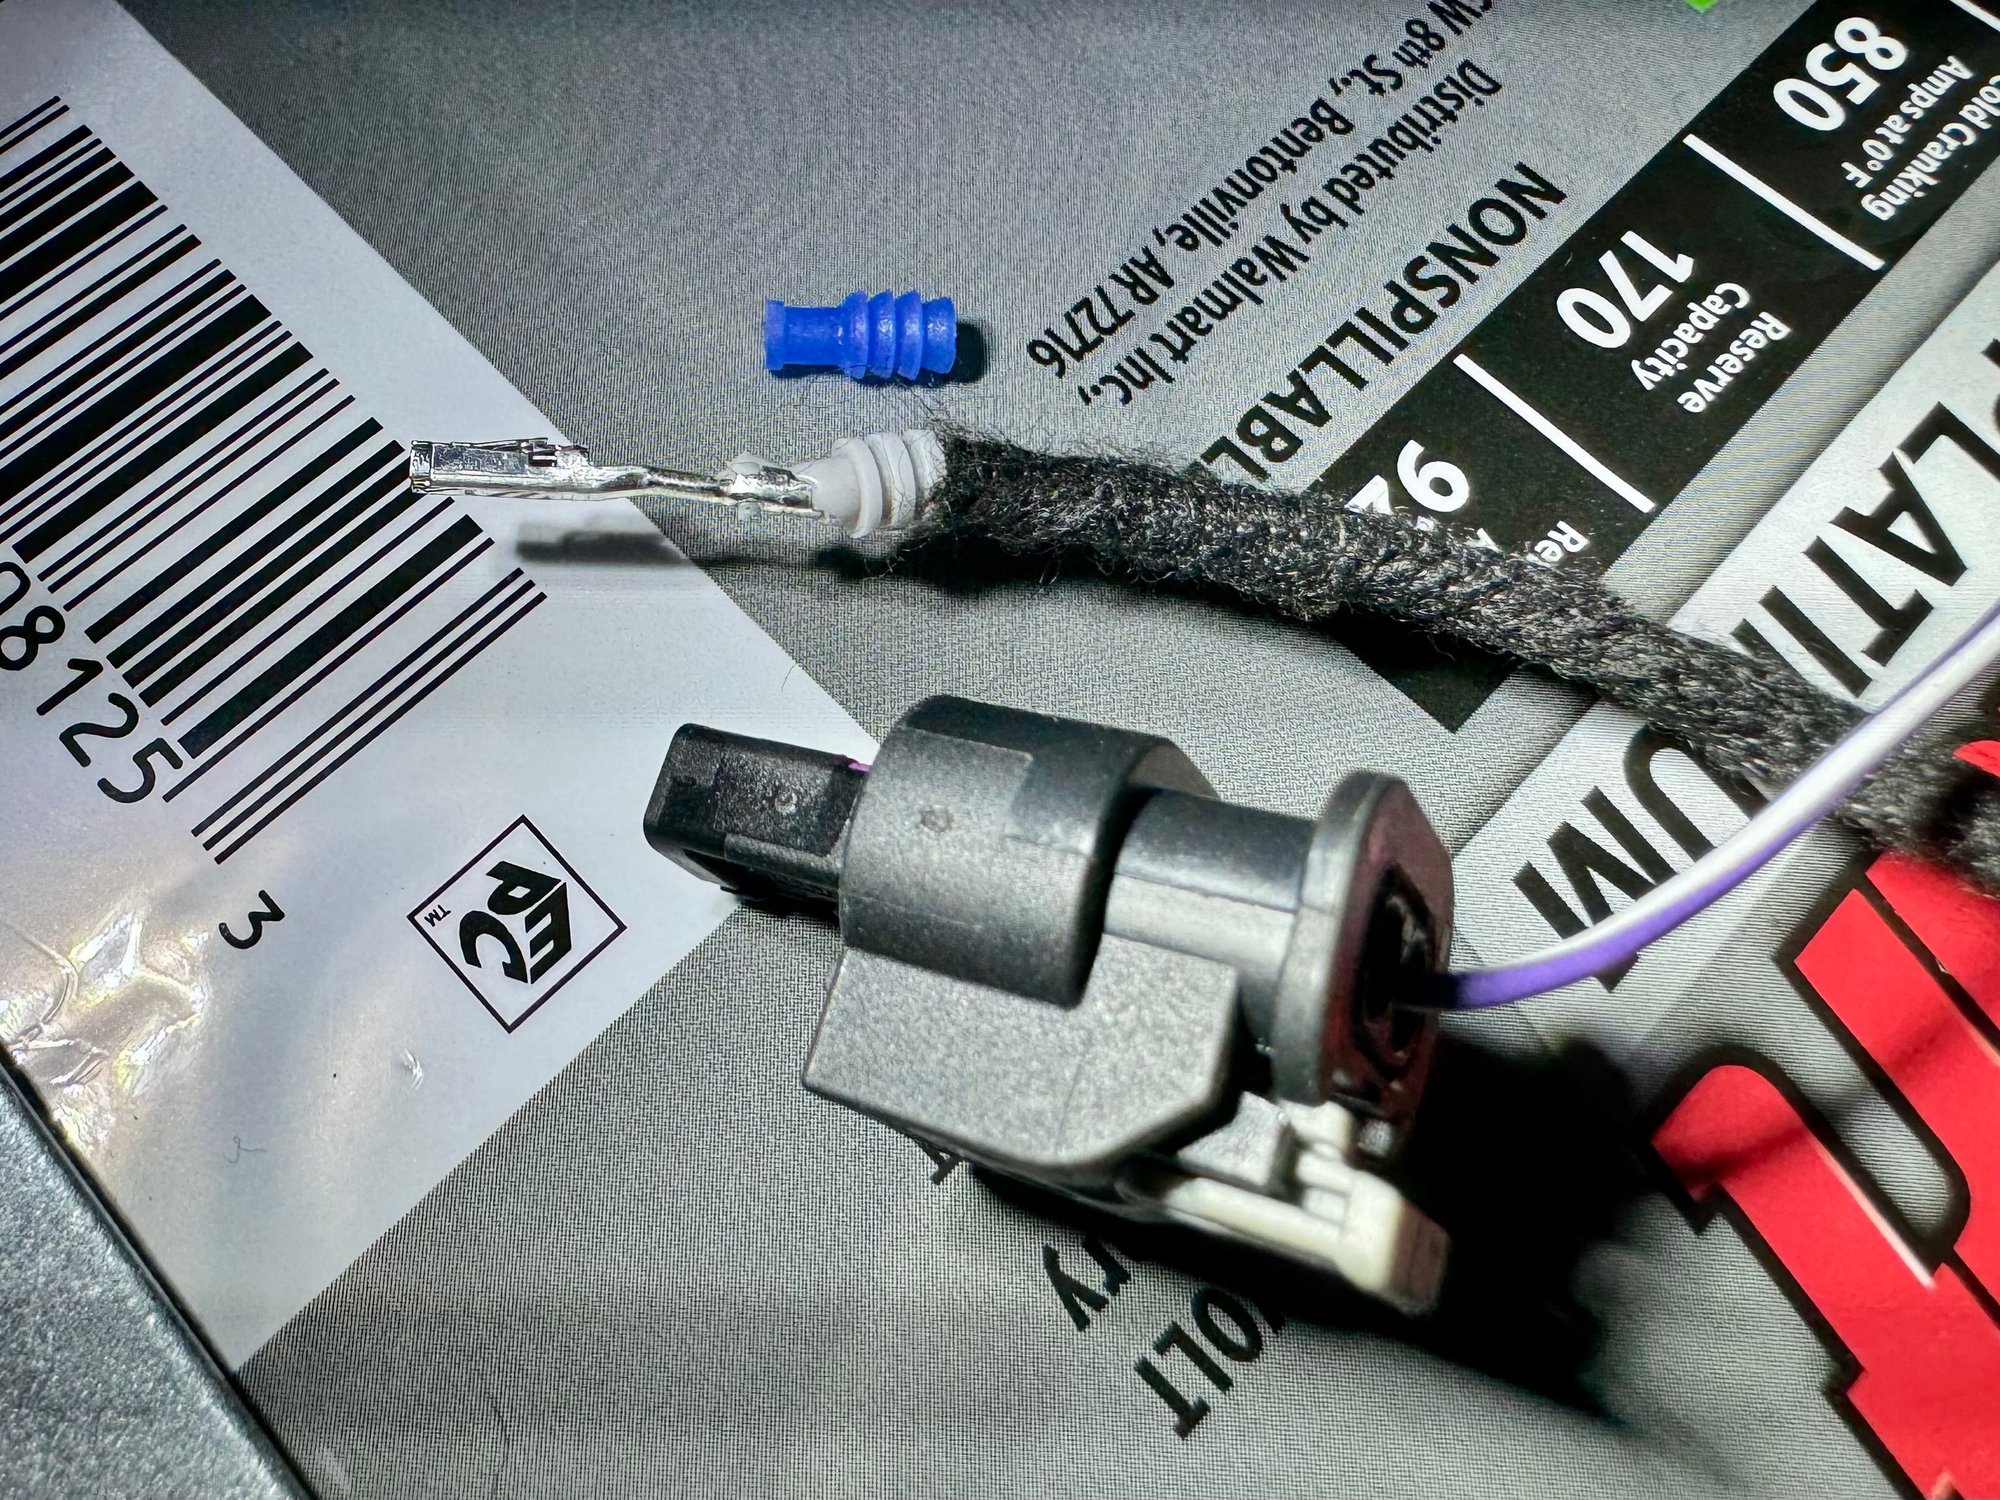
Here’s the 2-pin LIN connector. It comes from the factory with just one purple LIN wire. The second pin has a blue gasket that has to be removed. Push it out as pictured, below. I used a straightened out old key ring that dealers use to attach a tag to your key fob during servicing. The gasket slides out easily.
Here’s the blue gasket after removal pictured next to the other end of the 12V supply wire. The 12V pin (with gray gasket) slides into the 2-pin connector in place of the blue gasket you just removed.
Note: The 12V pin did not fit into the connector very well. I felt as if I forced it into the connector and it may not have inserted completely to make a good connection. The new connector I ordered has the two pins pre-wired with about 8” of wire extending from the connector. I’ll splice these into the LIN and 12V wires and retry the dongle.
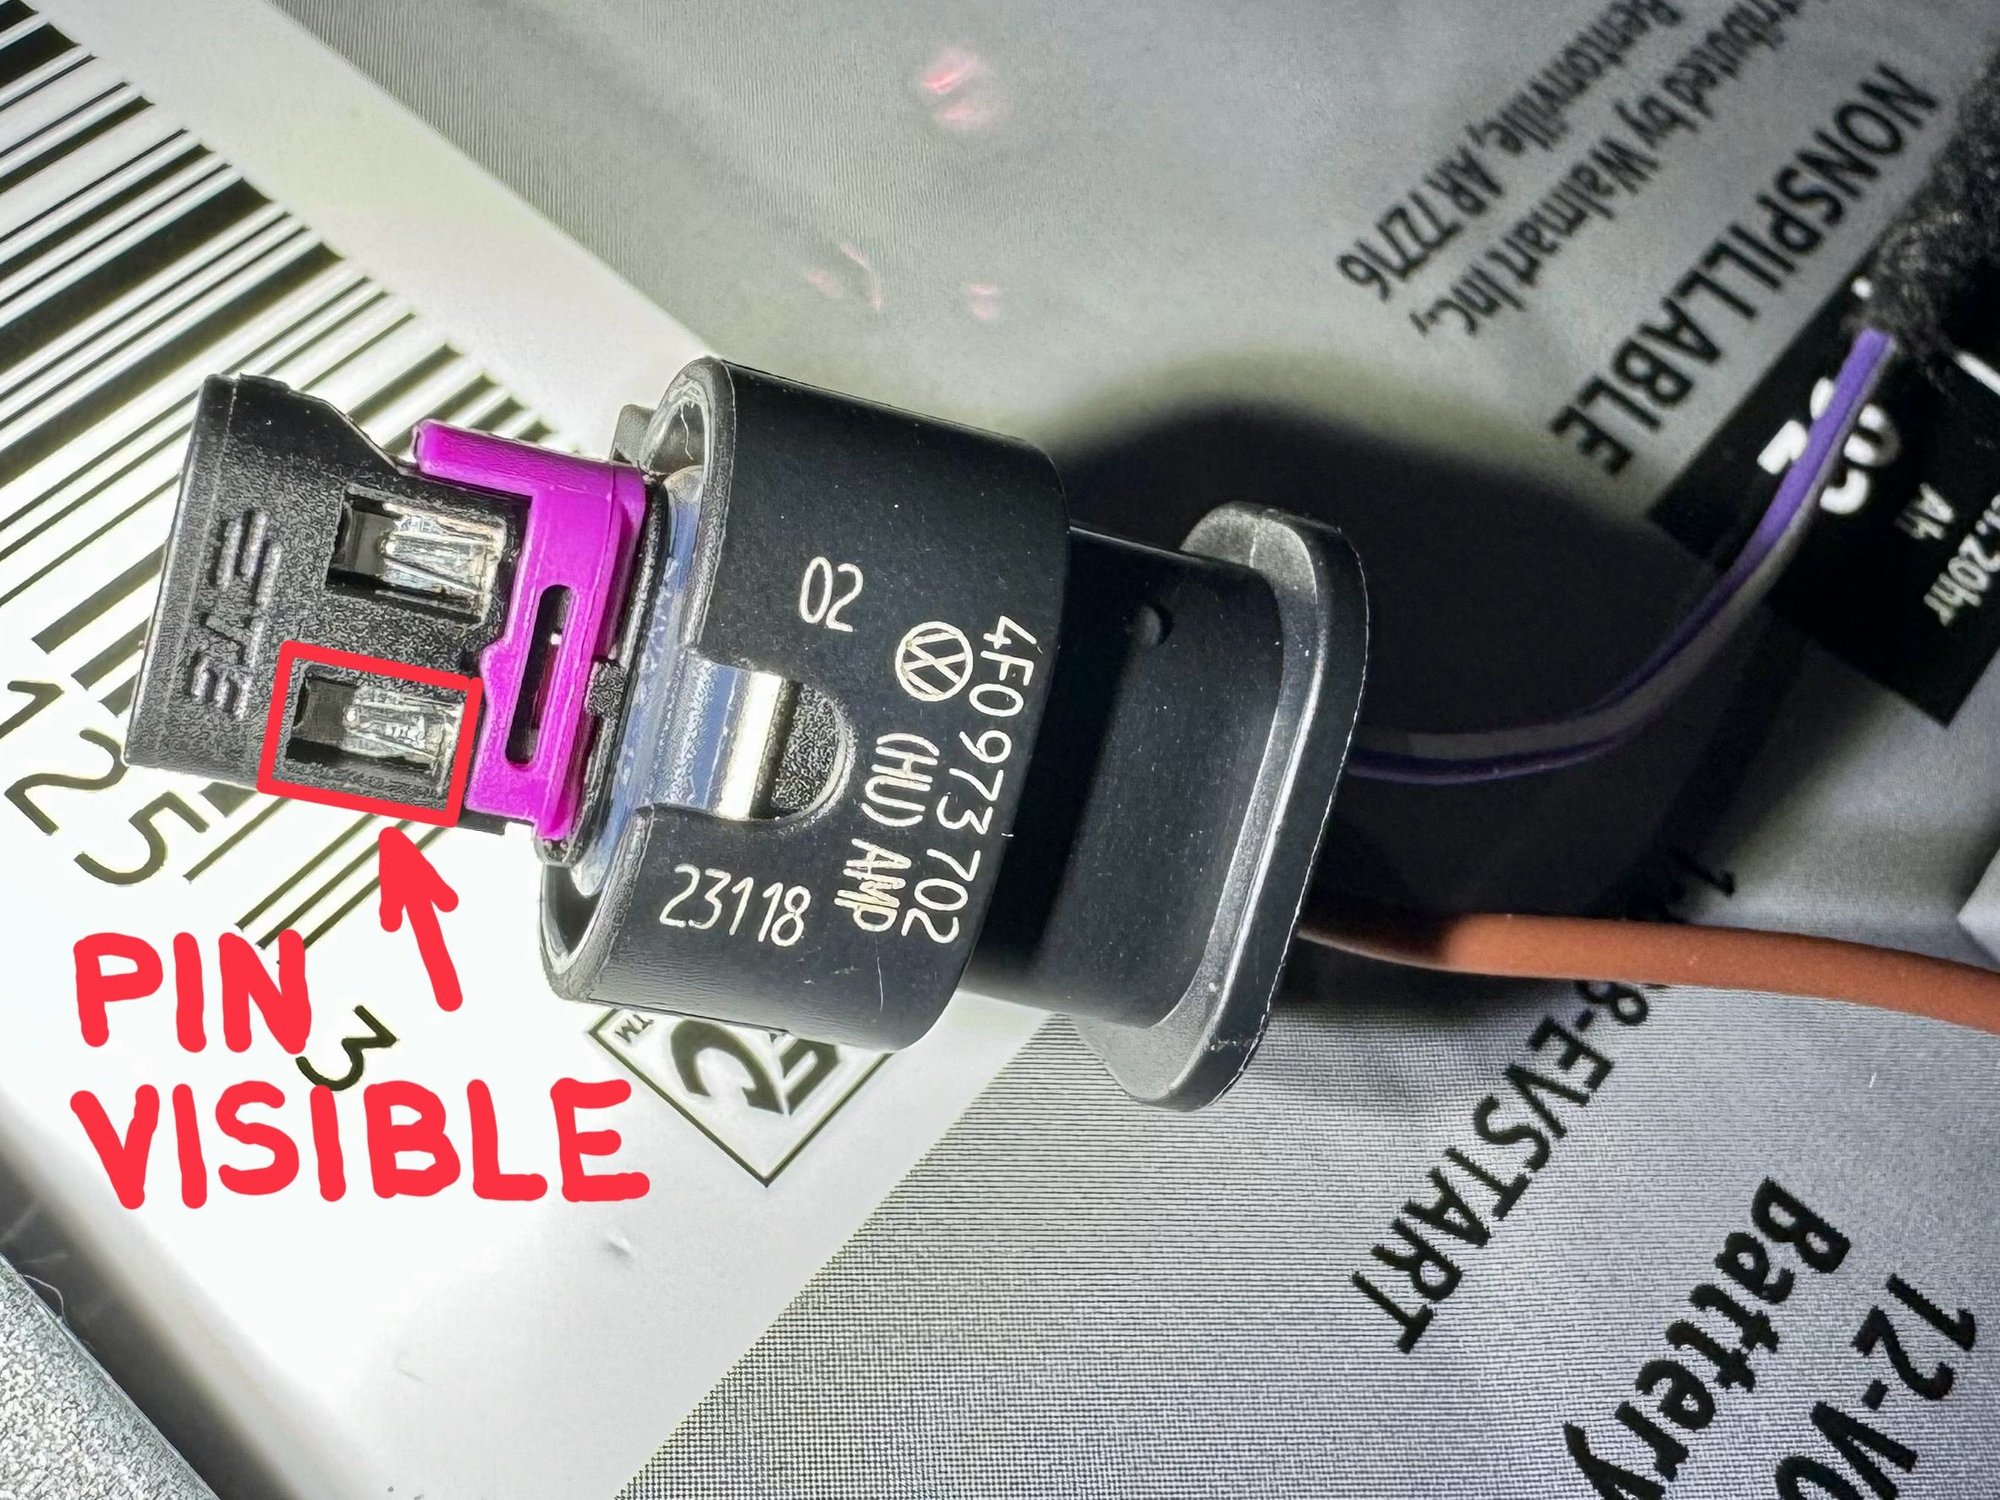
Closeup of the 12V pin supplied with the kit. Note: The factory LIN wire pin uses the hole labeled #1 and you will insert the 12V pin in hole #2. The connector only fits one way so that the proper pins are aligned.
Finished installation. 92 Ah, H-8 AGM battery is manufactured by Johnson Controls, the same folks who manufacture Varta batteries for Porsche. Mine cost $179 at Walmart.
Here�s a better explaination. Full tutorial coming if I can get this working.
As runbuh explained in a previous post, the LIN is a single wire. The 12V required by the LIN Bus is supplied by an internal connection in the LFP battery. No such connection is available with the AGM battery, so you must run a wire from the positive terminal to the LIN connector.
Here is the connection to the positive terminal. Note the integral fuse near the ring connector. Handle with care during installation.
Here�s the 2-pin LIN connector. It comes from the factory with just one purple LIN wire. The second pin has a blue gasket that has to be removed. Push it out as pictured, below. I used a straightened out old key ring that dealers use to attach a tag to your key fob during servicing. The gasket slides out easily.
Here�s the blue gasket after removal pictured next to the other end of the 12V supply wire. The 12V pin (with gray gasket) slides into the 2-pin connector in place of the blue gasket you just removed.
Note: The 12V pin did not fit into the connector very well. I felt as if I forced it into the connector and it may not have inserted completely to make a good connection. The new connector I ordered has the two pins pre-wired with about 8� of wire extending from the connector. I�ll splice these into the LIN and 12V wires and retry the dongle.
Closeup of the 12V pin supplied with the kit. Note: The factory LIN wire pin uses the hole labeled #1 and you will insert the 12V pin in hole #2. The connector only fits one way so that the proper pins are aligned.
Finished installation. 92 Ah, H-8 AGM battery is manufactured by Johnson Controls, the same folks who manufacture Varta batteries for Porsche. Mine cost $179 at Walmart.
Hi Schnave,
Thanks for the feedback!
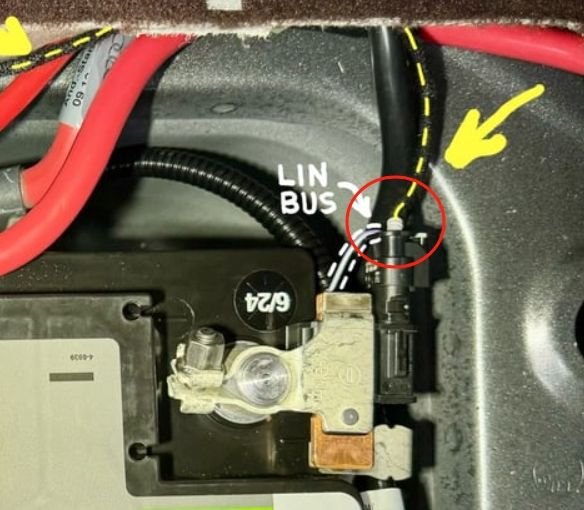
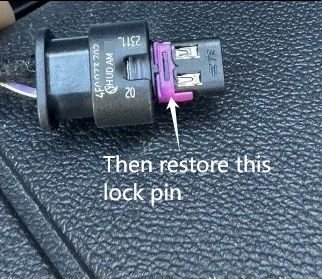
Based on the pictures you provided, I found that you did not fully insert the other end of the 12V SUPPLY (marked by the yellow dotted line) (see the red circle in the picture). The gray plastic part should be fully inserted. The cause of this problem is the "purple lock pin" part in the manual. You need to completely remove the purple pin to fully insert the 12V SUPPLY. Please make sure to restore the purple lock pin after fully inserting it (be gentle, this lock pin is a bit fragile). Make sure the gray plastic part is fully inserted
Based on the pictures you provided, I found that you did not fully insert the other end of the 12V SUPPLY (marked by the yellow dotted line) (see the red circle in the picture). The gray plastic part should be fully inserted. The cause of this problem is the "purple lock pin" part in the manual. You need to completely remove the purple pin to fully insert the 12V SUPPLY. Please make sure to restore the purple lock pin after fully inserting it (be gentle, this lock pin is a bit fragile). Make sure the gray plastic part is fully inserted
Below is the detail of the purple locking pin section.
Gently remove the purple locking pin Remove and fully insert the 12V SUPPLY Return the purple locking pin to its original position
I will update this section to the manual.
Below is the detail of the purple locking pin section.
Gently remove the purple locking pin Remove and fully insert the 12V SUPPLY Return the purple locking pin to its original position
I will update this section to the manual.
Very helpful! I will reinsert the 12V pin after unlocking the purple lock pin. I�ll then retry the coding dongle. Thanks for the clarification!
Very helpful! I will reinsert the 12V pin after unlocking the purple lock pin. I�ll then retry the coding dongle. Thanks for the clarification!
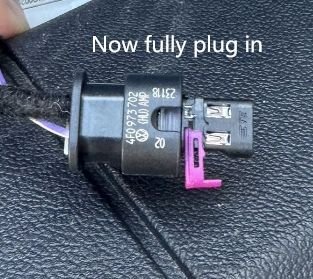
You are welcome! And please make sure that the vehicle is powered on when you insert the programmer (don't start the engine, just the dashboard display). Regarding the DIP part of the programmer, please make sure that all the switches are on the digital side as shown in the picture. I will also complete this part in the manual.
It works! 😎 Thanks @kingstone With the locking bracket removed, I reinserted the 12V pin. Unfortunately, it was pretty bent up from my previous attempts to force it and it wouldn’t fit. No worries — I removed another pin from a LIN connector I ordered and inserted it into the connector. I spliced your 12V wire to the new pin and everything worked.
I had a valid voltage reading on my instrument panel. I inserted the dongle into the OBD port with the key turned to accessory mode; after about ten seconds the dongle beeped 5 or 6 times. I removed the dongle, checked my notifications and all were extinguished.
A test drive indicated a charging voltage appropriate for an AGM battery (14.4 V). Auto start stop worked perfectly fine.
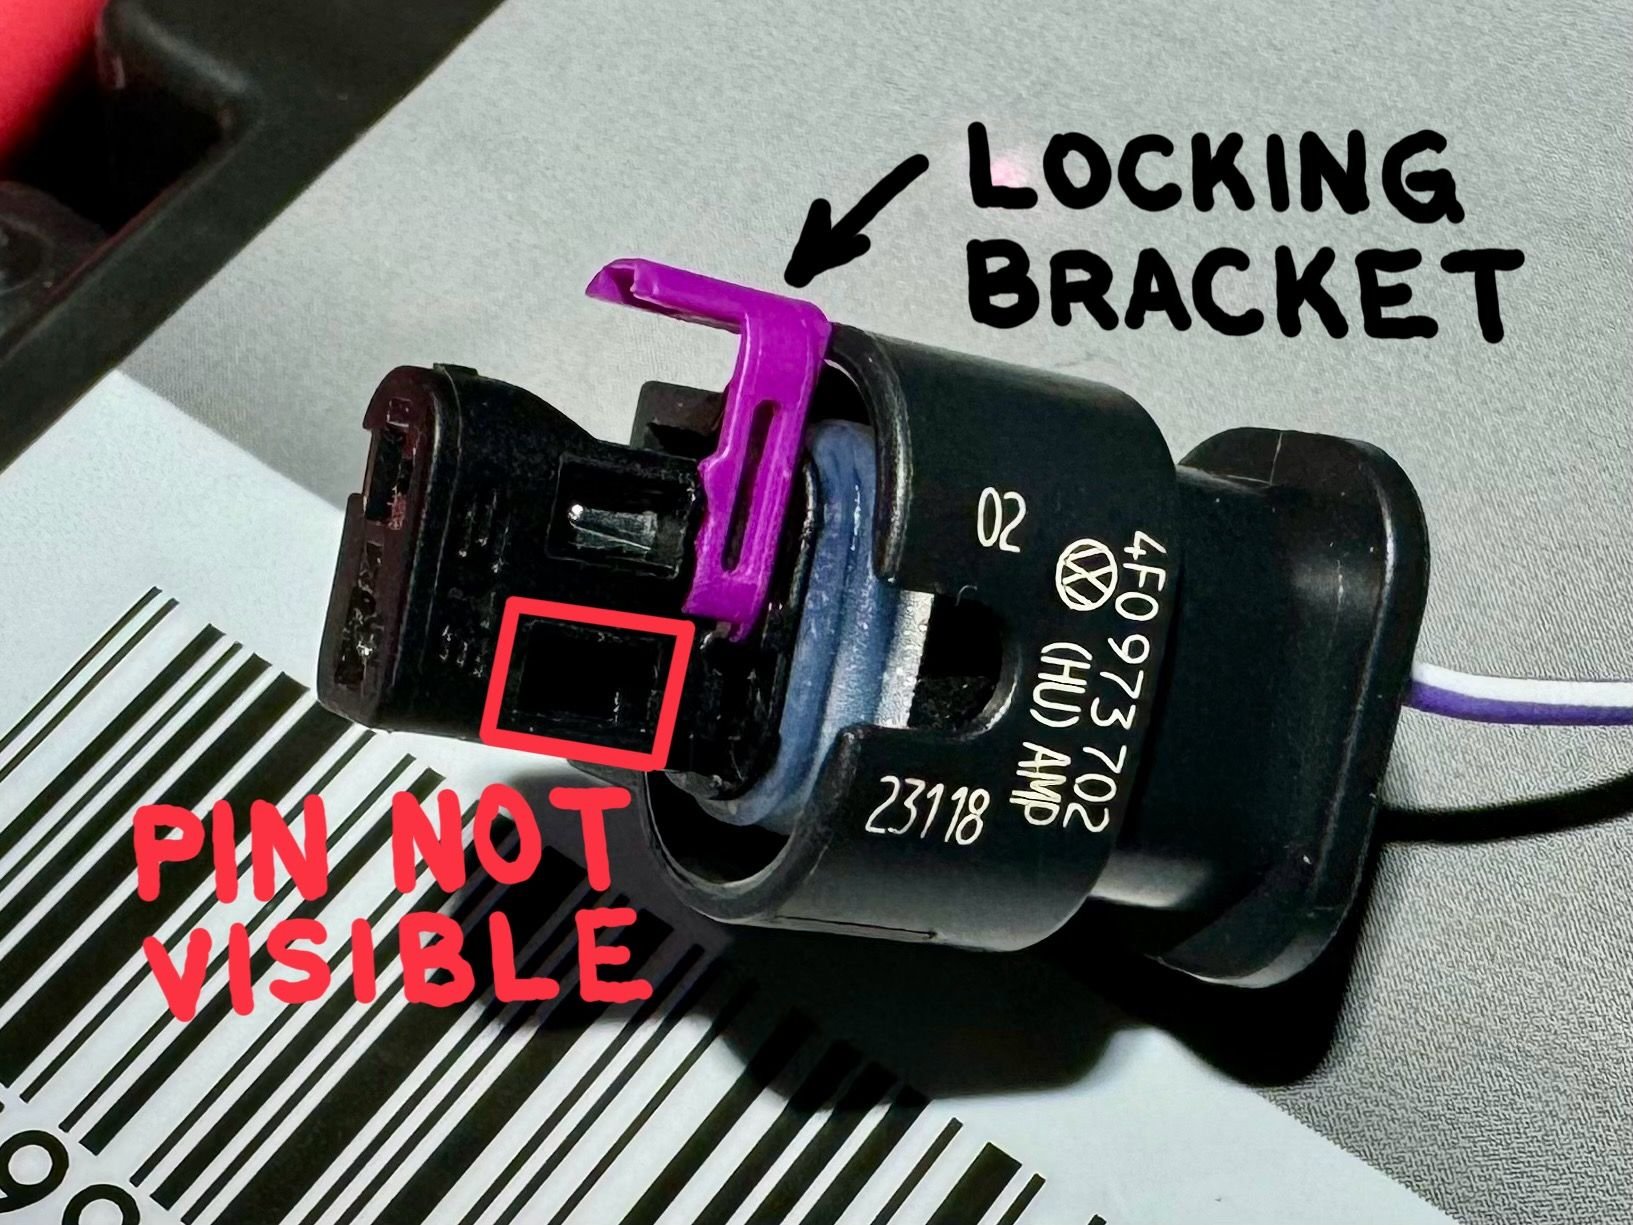
Here’s some pictures of the LIN connector. This shows the purple locking bracket partially removed. I removed it completely to install the 12V pin. Note the window where the pin will install. You must push the pin completely in so that the window is fully filled with the pin.
New 12V pin installed correctly and fully seated in the window. Purple locking bracket reinstalled.
I am very satisfied with the kit. Two things:
1. The installation instructions could be better — especially the 12V wiring instructions. Also, removal of the factory installed negative cable would be much easier with some helpful hints. I’ll fix that with a full tutorial to be published on this forum in the next day or two.
2. The 12V wire supplied with the kit could be better. It has a fusable link near the ring connector that seems very delicate. If it ever burns out you will need to contact the manufacturer for a new wire. A better solution would be a wire with a replaceable fuse as shown in the picture below. I may order a fused wire like depicted in the picture.
Question for @kingstone. What amperage is the fusable link on the 12V wire?
It works! 😎 Thanks @kingstone With the locking bracket removed, I reinserted the 12V pin. Unfortunately, it was pretty bent up from my previous attempts to force it and it wouldn�t fit. No worries � I removed another pin from a LIN connector I ordered and inserted it into the connector. I spliced your 12V wire to the new pin and everything worked.
I had a valid voltage reading on my instrument panel. I inserted the dongle into the OBD port with the key turned to accessory mode; after about ten seconds the dongle beeped 5 or 6 times. I removed the dongle, checked my notifications and all were extinguished.
A test drive indicated a charging voltage appropriate for an AGM battery (14.4 V). Auto start stop worked perfectly fine.
Here�s some pictures of the LIN connector. This shows the purple locking bracket partially removed. I removed it completely to install the 12V pin. Note the window where the pin will install. You must push the pin completely in so that the window is fully filled with the pin.
New 12V pin installed correctly and fully seated in the window. Purple locking bracket reinstalled.
I am very satisfied with the kit. Two things:
1. The installation instructions could be better � especially the 12V wiring instructions. Also, removal of the factory installed negative cable would be much easier with some helpful hints. I�ll fix that with a full tutorial to be published on this forum in the next day or two.
2. The 12V wire supplied with the kit could be better. It has a fusable link near the ring connector that seems very delicate. If it ever burns out you will need to contact the manufacturer for a new wire. A better solution would be a wire with a replaceable fuse as shown in the picture below. I may order a fused wire like depicted in the picture.
Question for @kingstone. What amperage is the fusable link on the 12V wire?
Schnave, thanks for using your Porsche�s knowledge and experience to verify this Lithium to AGM conversion kit..
I just ordered mine a minute ago after your success in your installation and your comments..
@Schnave , thanks for the detailed testing and troubleshooting.
Please get the Mods to sticky your tutorial when you complete it - it will be the definitive guide to avoiding an extremely expensive battery replacement! My OE lithium is more than three years old and I'll likely buy the conversion kit to use in the future.
The instructions aren't clear on the installation of the small monitoring wire. Does the end with bare wire get spliced into the existing LIN harness? Cut and solder?
Yes I will update the whole manual soon and keep it updated once we received any useful feedback

 05-30-2024, 10:38 PM