When you click on links to various merchants on this site and make a purchase, this can result in this site earning a commission. Affiliate programs and affiliations include, but are not limited to, the eBay Partner Network.
The OEM one is plastic. Mine had some cracking on the back where it mounts on the water pump flange, so to be safe, I replaced it with a URO aluminum one. Pelican has them for $50 or so, but Rockauto has the same one for about $25.
I can't wait till summer to get in my CS and look it over inside out too. Just not a fan of attacking in the cold.
Thanks for posting this AMCPILOT. I'm right in the middle of addressing the potential coolant leaks job and noticed that I have some seepage at the vent lines where they enter the heads. But thanks to you I am prepared for it. My ends aren't broken and could probably get away with new seals but I bought the whole hose.
Thanks AMCPILOT and twodollardoug, For some reason I thought there is another plastic tube (duh!).
I already got the part, the last one available in northern Illinois as of today!
OP - Will that thermostat housing with the bolted down pipes work for my 2008 Cayenne Turbo? On FCP Euro, it's saying it doesn't fit but looks exactly a like to my thermostat housing. My thermostat pipe housing are starting to leak and I rather start replacing these parts sooner with the better/best revisions.
OP - Will that thermostat housing with the bolted down pipes work for my 2008 Cayenne Turbo? On FCP Euro, it's saying it doesn't fit but looks exactly a like to my thermostat housing. My thermostat pipe housing are starting to leak and I rather start replacing these parts sooner with the better/best revisions.
It sounds like you're looking for 94810606005 which is the thermostat housing for 2008-10 Cayenne S, GTS, Turbo, and Turbo S models.
I had the same EXACT problem as the OP. Fortunately, when I got in there, I saw that the Thermostat Housing is the new one, so I don't have to worry about that - just have to swap the vent tube.
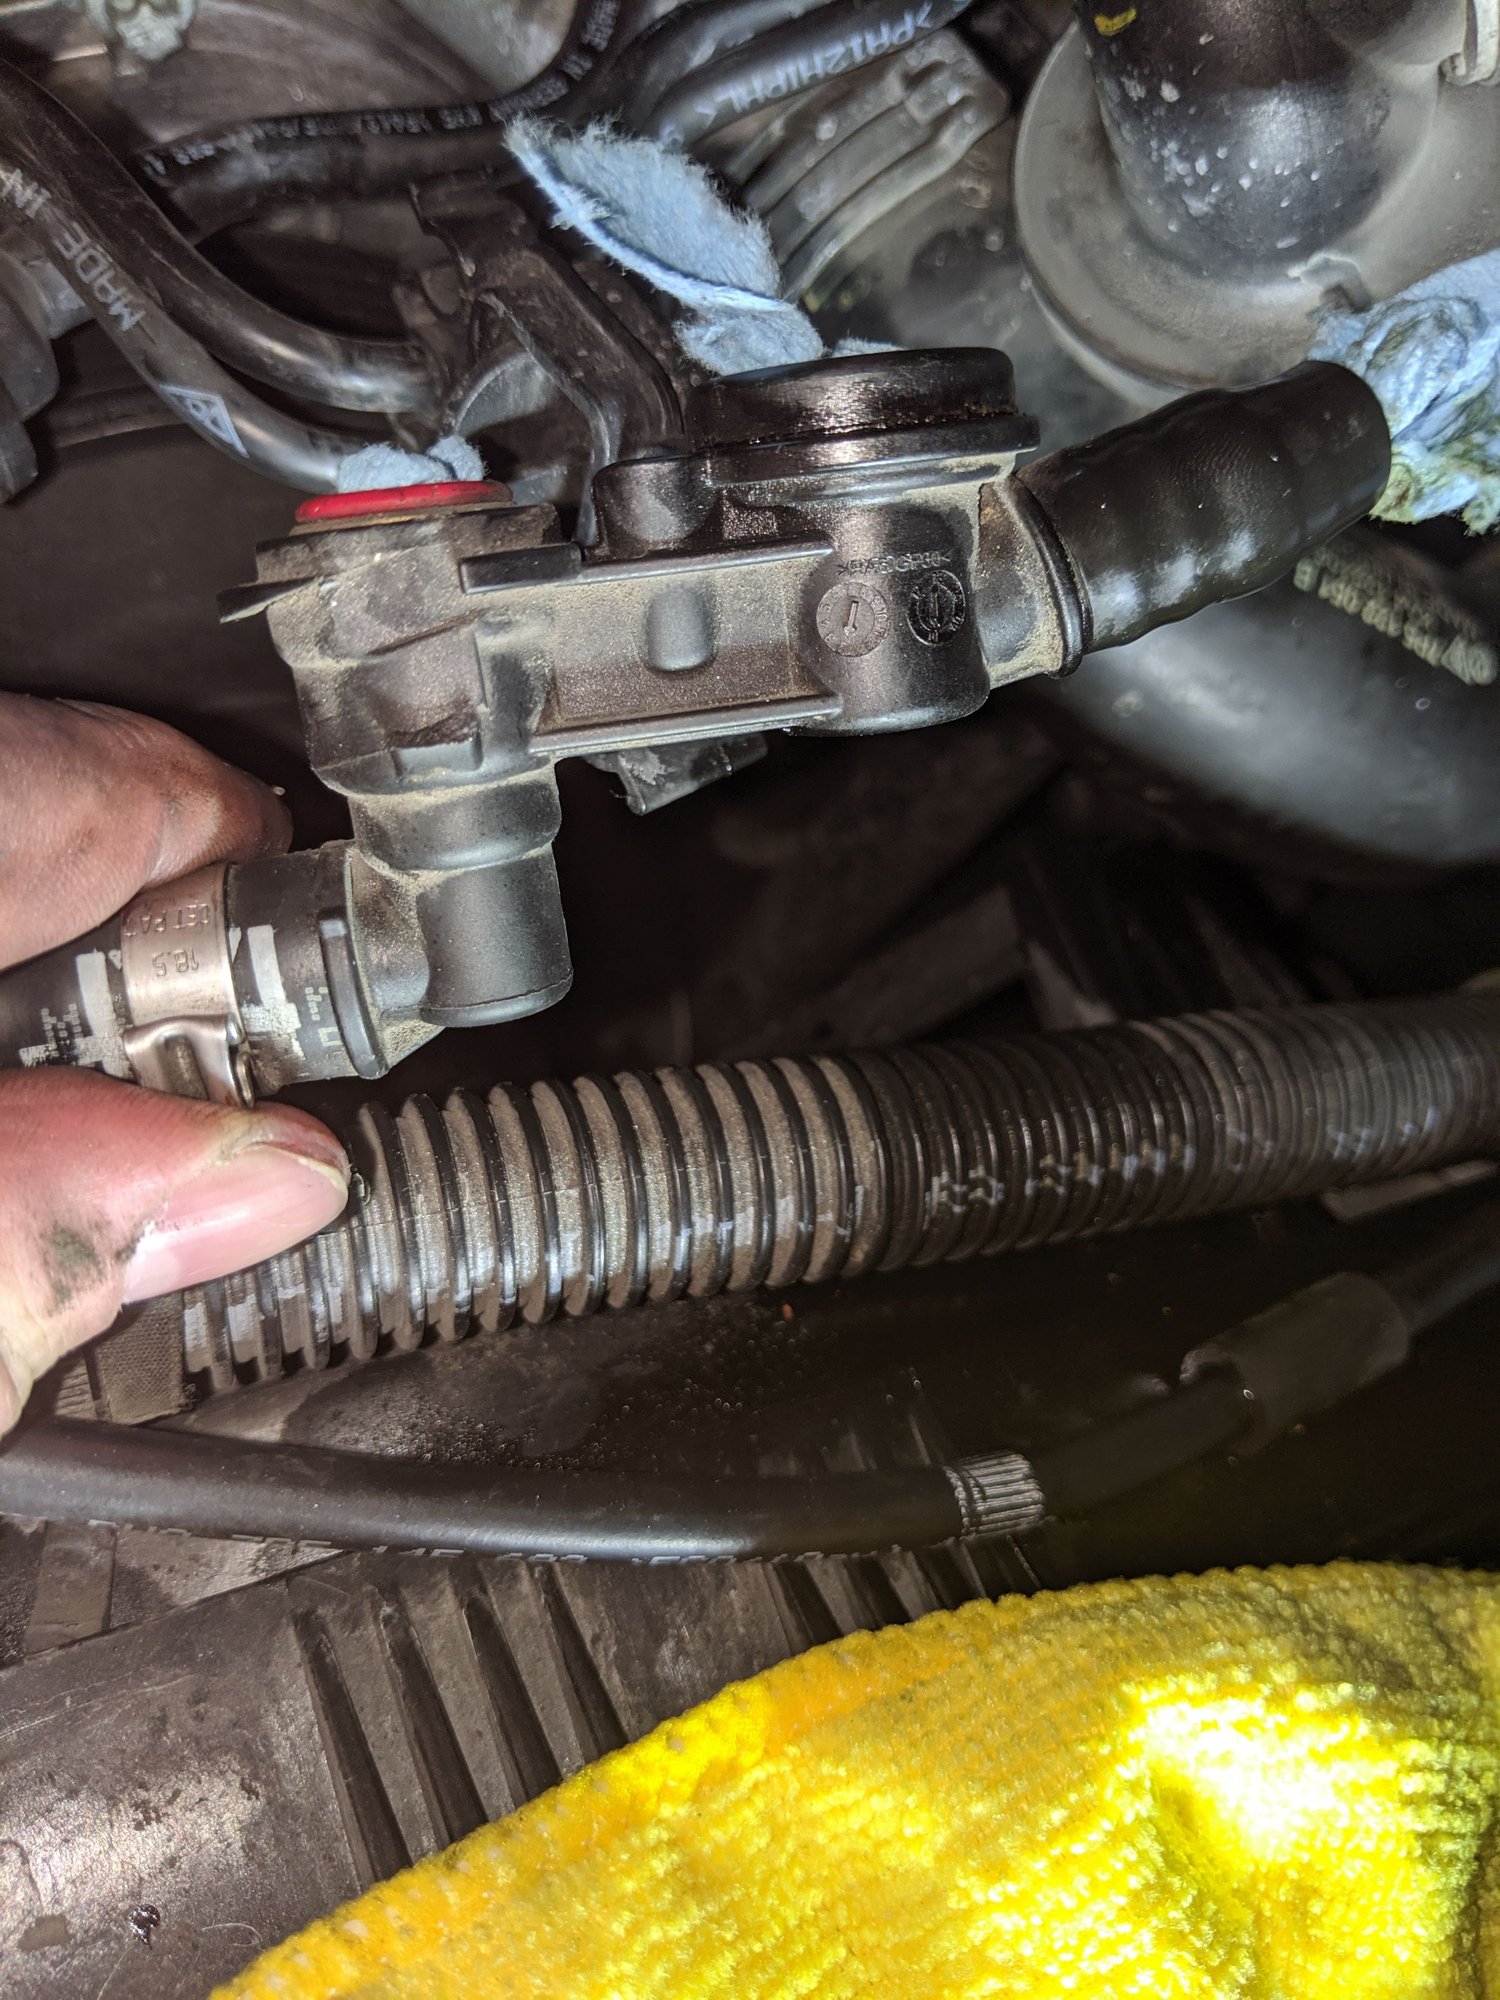
Unfortunately, I cracked a plastic hose on as I was removing the air-intake from the throttle body - then broke the clips on the part that it was connected to (that connects the mystery part to the intake distributor). Does anyone happen to know the part number for the oil-line feed that sprays into the air system? It clips on to the bottom of the intake distributor. I've been scouring the parts diagrams and have no clue what it might be called. The part number is also, unfortunately, over-stamped.
Any help would be much appreciated!
ETA: I found it - 958-110-265-50 . "Vent" . It's a $130 part, which is more than the vent tube.... GRRR!
-SC
Part I'm trying to identify, and the cracked plastic hose coming off the right hand side of it.
I'm going to dig into my 958 TT next week. It's likely the same problem. The symptoms are exactly the same. I'm at 115,000 miles and live in an extremely hot desert. Originally, the coolant level never dropped, but I always smelt coolant vapor in the garage, once parked, after driving. It didn't leak; not a single drip for 1.5 years of this phenomenon. Then, it started leaking a 12 inch round puddle every time parked, but still the coolant level not dropping much, not even enough for cooling concerns. Thanks for your wonderful write up! I have done every repair and service myself for the past 1.5 years on mine and your documentation has proven completely helpful.
Last edited by nakism; 01-09-2020 at 03:04 AM.
Reason: too much info
This part just started leaking on my 958 TT too (2011 Cayenne Turbo with 115,000 miles on it). Thanks for the part number! I've been looking for 2 hours online and couldn't find it in the parts catalog!
Did you ever smell this coolant smell when you used your defroster or was it only on the outside of your car in your garage.
I used my defroster this morning and thought I smelled a burning smell. The cayenne doesn’t use any type of electrical heating element in addition to the hot coolant for defrost does it?
Did you ever smell this coolant smell when you used your defroster or was it only on the outside of your car in your garage.
I used my defroster this morning and thought I smelled a burning smell. The cayenne doesn�t use any type of electrical heating element in addition to the hot coolant for defrost does it?
Update: No initially, I did not smell it in the car, but once that sucker started leaking... it was dripping on a hot catalytic converter and steaming up... while parked the smell did come into the car. For me the leak ended up being behind the engine on the passenger side. A scew that holds a water pipe in had vibrated loose and fallen out. The water pipe that was loose, directly connected to the water manifold (water distributor) behind the engine. I ordered the screw and took the passenger side wheel off and bent the firewall out of my way to gain access and insert the screw to secure the pipe. This was a FAIL. I screwed in the screw nice and tight, but the leak persisted. The O-ring had gotten pinched. The O-Ring had been pushed out of place from the pressure on the loose water pipe. So, I knew the catalytic converter, part of the exhaust, and likely the air intake manifold would have to come off (again) to complete the job. So I threw in the towel and let the indie shop do it. ~$600 labor, some coolant, and an $11 O-Ring later it was fixed. The shop bled the coolant system 3x with vacuum and still failed to get air bubbles out of the heater core. So, the car blew cold air out of the heater while idling and would run hot if idling for extended periods of time. I did my best to continue bleeding the system of air bubbles by heat cycling, driving, using the bleeder valve, and keeping coolant levels appropriate. There is an actual technique to do the coolant bleeding properly. I will post it here. It will work if you can remove the automatic transmission fuse... you don't want to damage the transmission during the process. I was unable to find/remove the fuse, thus unable to use this bleeding technique. Any how, I did get enough air out of the system after about 3 days of driving and letting air out of the bleeder valve. Every thing works perfectly now... heating and idling and no leaks. It also took about a week for most of the coolant vapor to go away even though I did an engine detail with Simple Green Extreme Aircraft and Precision Cleaner (Aluminum Block Safe).
Here are steps given in the service manual for bleeding the air from the coolant system:
1. Consider covering the trunk with plastic in case of a coolant overflow. 2. Remove the radiator cap, (SKIP) oil filler cap, and dipstick. 3. Pop the cover trim plate off the filler access area. This reveals the bleeder valve. If you remove the little screw above the trim plate to do this, be extremely careful to not drop the screw into any of the filler necks. 4. Flip the bleeder valve locking clip up to release it. 5. If you have an automatic transmission, remove fuse B1 (the ATF cooler valve). 6. Fill with coolant up to the bottom edge of the filler neck. 7. With the engine idling, occasionally revving the engine, fill up with coolant until there's no more room when the engine is revved. (Revving may raise the level a bit.) 8. Replace radiator cap. 9. Warm up engine until you are sure the thermostat is open. 10 minutes at 2500 RPM should do it, and you should hear the radiator fans come on. 10. Run 5 more minutes at 2500 RPM, revving to 5000 RPM every 30 seconds. 11. Carefully open the radiator cap, and top up the coolant. 12. Replace the radiator cap. 13. Run 5 more minutes at 2500 RPM, revving to 5000 RPM every 30 seconds. 14. Idle until the radiator fans cycle on and off once. 15. Carefully open the radiator cap, and top up the coolant. 16. Put everything back the way it was


 02-05-2019, 12:35 AM