
Replacing Rear Hatch Shocks
 04-10-2012, 02:38 PM
#46
Advanced

Join Date: Oct 2010
Posts: 51
Likes: 0
Received 0 Likes
on
0 Posts
Got the parts yesterday morning and installed them yesterday afternoon. Got the GF to help { small hands } . It wasn't too bad thanks to these instructions { Thanks Michael } I can't believe how well the hatch stays up, after dealing with the old weak ones for so long . For me the hardest part was removing and installing the trim , I was worried about breaking something. I hope they last a while . Here are the part #'s and cost from Suncoast { I could have reused the deformable elements but they were inexpensive enough so I ordered them. }
955-512-528-00 Damper { window shock } $17.20 each
955-512-550-06 Gas-Pressure { hatch strut } $65.58 each
955-512-583-00 trim piece { deformable element with sealant } $8.58
955-512-584-00 trim piece { deformable element with sealant } $8.58
The shipping was $15.25 for a total of $197.97
Hey I saved about $300.00 in labor thanks to this forum
 05-28-2012, 04:31 PM
#48

Great write-up. I just replaced the two hatch struts on my 03 Cayenne S - my local Porsche dealers prices on the parts are high $110 each. The project took me 3 hours with a short lunch break before reassembly.
The hardest part for me was removing the struts but I finely figured out that with a small screwdriver I could pop the retaining clip free and the strut would fall off. The new struts snap in very easily.
Overall a reasonablly straight forward project that most people should be able to complete - just take it slow and don't force anything.
Thanks again for the instructions and encouragement to give it a try. My indy wanted $550 to replace them. So I saved ~$300 but more importantly I feel like I accomplished something.
The following users liked this post:
Gonzalo Zamarro (03-30-2022)
07-15-2012, 04:13 PM
#49

Thanks for the write-up. I did this today by myself and it was straight forward with no issues. I also opted to leave the C-pilars installed. The hardest part for me was removing the clips from the overhead as they separated from the panels when removed. Wife won't have her head assaulted this winter! Thanks again.
08-05-2012, 08:07 PM
#50
Rennlist Member
I need to get this done - dealer just quoted me $892 and I declined.....
I still have CPO on the truck but they claimed it wasn't covered......can anyone confirm or deny?
I still have CPO on the truck but they claimed it wasn't covered......can anyone confirm or deny?
 08-06-2012, 04:22 PM
#53
Race Director
Depends on what version of CPO you are under. When I tried to get mine done just before CPO expired they said mine didn't cover them but the new CPO version does. I know before winter I will need to do this.
08-06-2012, 05:39 PM
#54
Rennlist Member
 10-17-2012, 04:46 PM
#57
Former Vendor

That's a great DIY, we actually offer a kit that includes everything you need to replace the necessary parts for an easy installation. The kit includes: Two new hatch struts, Two new rear glass struts (replace them at the same time so that you only have to do the job once), and New foam baffles for the left and right sides.
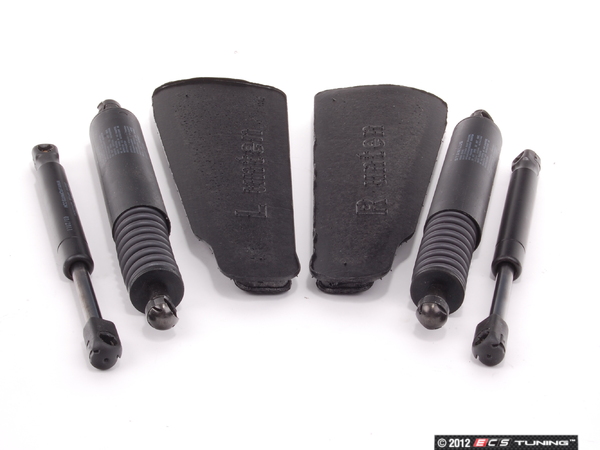
For more information on the Rear Hatch Strut Click Here
For more information on the Trim Tool Kit to make for easy removal Click Here
For more information on the Rear Hatch Strut Click Here
For more information on the Trim Tool Kit to make for easy removal Click Here
Last edited by ECS Tuning; 11-15-2012 at 01:26 PM. Reason: Added Picture
10-17-2012, 05:04 PM
#58
That's a great DIY, we actually offer a kit that includes everything you need to replace the necessary parts for an easy installation. The kit includes: Two new hatch struts, Two new rear glass struts (replace them at the same time so that you only have to do the job once), and New foam baffles for the left and right sides.
For more information on the Rear Hatch Strut Click Here
For more information on the Trim Tool Kit to make for easy removal Click Here
For more information on the Rear Hatch Strut Click Here
For more information on the Trim Tool Kit to make for easy removal Click Here
I know I ordered it from your company

Dang didn't get the trim kit though.
10-18-2012, 03:31 PM
#59
Former Vendor
We thought it might help a bit with the process while cutting down on time and would recommend getting one if you don't have one already. Let us know how you like the kit.
09-01-2014, 04:42 PM
#60
Instructor

Bump
Thanks for all the info and to ECS for the kit. Replaced all four and foam seals in 90 minutes. I spent the first 45 going slow so as to not damage the headliner and clips. Also had to build up a learning curve on how to do this without a helper to hold up the hatch once you take out one shock. LOL
After the first side and taking 2 minutes to cut a 1x2 to hold up the hatch, I was able to knock out the driver side in about 15 minutes. Well worth the time, new shocks will lift the hatch right away from release.