
Serious Top Issue.
 01-12-2008, 01:19 PM
#1
Intermediate
Thread Starter

Join Date: Oct 2005
Location: Farmington
Posts: 48
Likes: 0
Received 0 Likes
on
0 Posts
It was nice last week in the St. Louis area, so I thought I would drop the top. I have a 98. The back cover lifted, but the top didn't move at all. When the cover went back down, it started popping like something was jammed possibly.
Now the cover does not move at all and when I press the button I get a loud popping noise every second. I haven't had a chance to find out where the popping is coming from I think behind the driver side.
Does anyone have any suggestions on where to begin or what the problem could be.
Thank you,
blilley
 01-13-2008, 01:06 AM
#2
Intermediate

Join Date: Aug 2007
Location: Freeport, New York
Posts: 28
Likes: 0
Received 0 Likes
on
0 Posts
Billey:
The loud popping noise you hear every second when the button is pressed is the sound of the half-moon gear that is inside the convertible top transmission (one on left side, one on right side), as it has gone past its "maximum" rotation. What happens is the gear goes past by one tooth, and then gets pulled back by the pulling force of the hydraulic pushrods that connect the (rear of) the V-lever (one on each side) to the clamshell, and then repeats again and again.
The fact that the top did not move (assuming that the back cover lifted equally and evenly on both the left and right side) means that the white plastic cups (red plastic if they are original and haven't been replaced) either popped off their steel ***** at the base of the B-pillar, or that they have broken apart.
If the clamshell no longer goes up, and your top is now stuck in the up position, you are going to have to manually disconnect the black hydraulic pushrods to be able to operate the top manually so that you can properly diagnose and replace the broken parts.
If you are up to doing that, let me know and I will look for a write-up that I recently did on how to manually open a top that is stuck in the "up" (closed) position.
Regards, 1schoir (Maurice).
Last edited by 1schoir; 01-13-2008 at 01:08 AM. Reason: left out part of explanation
01-13-2008, 09:49 PM
#4
Intermediate
Join Date: Aug 2007
Location: Freeport, New York
Posts: 28
Likes: 0
Received 0 Likes
on
0 Posts
Billey:
I had a "heck" of a time uploading the photo and diagram. I reduced the sizes and hope they come out okay. If you can't see the photo, send me a PM and I'll e-mail them to you.
Here it is:
To get the top to open manually, you must disconnect the white (or red if yours are original and have never been replaced) plastic cups at the base of the B-Pillar and the black hydraulic pushrods where they connect to the V-levers.
Disconnecting the white plastic cups will allow you to operate the convertible top manually.
Disconnecting the black hydraulic pushrods will allow you to operated the clamshell manually.
Below is a diagram of the mechanism, which should help you orient yourself as to what you are looking for.
The V-lever is part #6, the black hydraulic pushrod is part #12, and the white (or red) plastic cup is located on the forward end of part #3. Part #14 is the clamshell, and Part #1 is the canvas top.
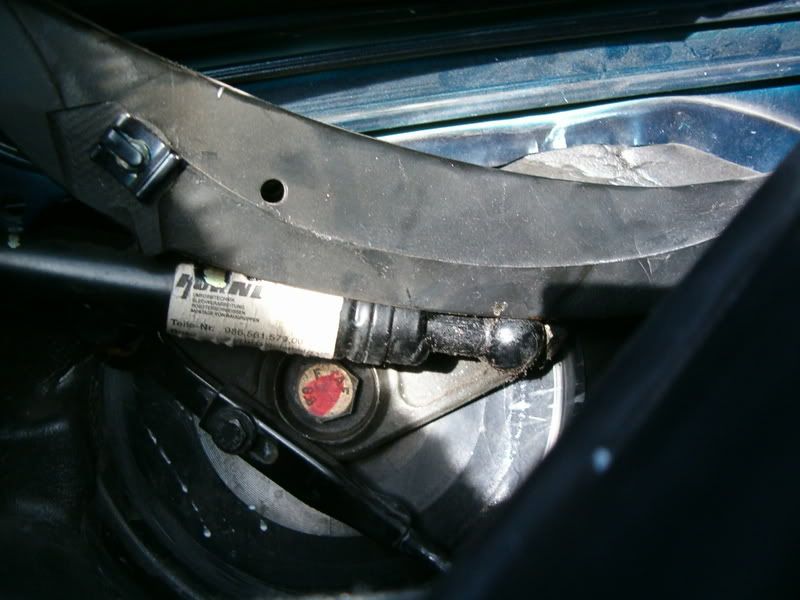
To have a better chance to see the parts that must be disconnected, you will have to pull aside the (vinyl) rain curtain. That curtain is loosely held in place by yet another cable that is located just outside the rearmost corners of the (foam liner covered) engine compartment lid (on the car body, not on the lid). That cable is held on to a small metal ball and you must pry it apart from that metal ball.
Below (on the left) is a photo of the flexible cable that leads to the metal ball (hidden under the metal cup at the bottom of the cable) at the side of the curtain:
That particular connection is easy to separate, unlike the black hydraulic pushrod.
Once you have the curtain's cable separated, you may also have to remove the black plastic cosmetic covers (if they are still on your car) that are simply clipped onto the arm that supports the clamshell.
To access the white plastic cups, sit sideways in the driver's seat with the door open and your feet on the ground. Look down from above the side of the car (just behind where the rear quarter panel meets the rear of the door if the door were closed) and you should be able to see the white (or red) plastic cup. Pry that cup off by levering it outboard. You will nee a fat screwdriver or pry bar.
Then you will have to reach between the roll bar hoops, or possibly reach through them, to get at the connection of the hydraulic push rod to the V-lever. That connection is a real bear, so you will have to apply a great deal of pressure to separate it. Be careful not to hurt yourself there, but you just have to get the connection apart, again with a fat screwdriver or, preferably an angled screwdriver. I have also had success using a non-automotive tool called a cat's claw, which is usually used to pull nails.
Once you have the various parts disconnected, DO NOT press the dashboard switch without CAREFULLY marking (and photographing) the position of the V-levers relative to the sides of the body that they are mounted on. Otherwise, it will be much more difficult to re-sychronize the V-levers.
Regards, Maurice.
I had a "heck" of a time uploading the photo and diagram. I reduced the sizes and hope they come out okay. If you can't see the photo, send me a PM and I'll e-mail them to you.
Here it is:
To get the top to open manually, you must disconnect the white (or red if yours are original and have never been replaced) plastic cups at the base of the B-Pillar and the black hydraulic pushrods where they connect to the V-levers.
Disconnecting the white plastic cups will allow you to operate the convertible top manually.
Disconnecting the black hydraulic pushrods will allow you to operated the clamshell manually.
Below is a diagram of the mechanism, which should help you orient yourself as to what you are looking for.
The V-lever is part #6, the black hydraulic pushrod is part #12, and the white (or red) plastic cup is located on the forward end of part #3. Part #14 is the clamshell, and Part #1 is the canvas top.
To have a better chance to see the parts that must be disconnected, you will have to pull aside the (vinyl) rain curtain. That curtain is loosely held in place by yet another cable that is located just outside the rearmost corners of the (foam liner covered) engine compartment lid (on the car body, not on the lid). That cable is held on to a small metal ball and you must pry it apart from that metal ball.
Below (on the left) is a photo of the flexible cable that leads to the metal ball (hidden under the metal cup at the bottom of the cable) at the side of the curtain:
That particular connection is easy to separate, unlike the black hydraulic pushrod.
Once you have the curtain's cable separated, you may also have to remove the black plastic cosmetic covers (if they are still on your car) that are simply clipped onto the arm that supports the clamshell.
To access the white plastic cups, sit sideways in the driver's seat with the door open and your feet on the ground. Look down from above the side of the car (just behind where the rear quarter panel meets the rear of the door if the door were closed) and you should be able to see the white (or red) plastic cup. Pry that cup off by levering it outboard. You will nee a fat screwdriver or pry bar.
Then you will have to reach between the roll bar hoops, or possibly reach through them, to get at the connection of the hydraulic push rod to the V-lever. That connection is a real bear, so you will have to apply a great deal of pressure to separate it. Be careful not to hurt yourself there, but you just have to get the connection apart, again with a fat screwdriver or, preferably an angled screwdriver. I have also had success using a non-automotive tool called a cat's claw, which is usually used to pull nails.
Once you have the various parts disconnected, DO NOT press the dashboard switch without CAREFULLY marking (and photographing) the position of the V-levers relative to the sides of the body that they are mounted on. Otherwise, it will be much more difficult to re-sychronize the V-levers.
Regards, Maurice.
Last edited by 1schoir; 01-27-2008 at 09:25 PM. Reason: spelling
01-14-2008, 09:15 AM
#5

if the sockets did pop off payattention to the water trays, the arms will normally jam thereselves forward through the water tray, and unless you want to also replace the alarm control moduale and related components make sure its sealed.
Mark
Mark
01-14-2008, 11:17 AM
#6
Intermediate
Thread Starter
Join Date: Oct 2005
Location: Farmington
Posts: 48
Likes: 0
Received 0 Likes
on
0 Posts
Maurice,
Great information, I do appreciate it. The pics will work just fine. If I am in need of parts do you guys have any recommended suppliers?
blilley
Great information, I do appreciate it. The pics will work just fine. If I am in need of parts do you guys have any recommended suppliers?
blilley
01-15-2008, 03:05 AM
#7
Intermediate
Join Date: Aug 2007
Location: Freeport, New York
Posts: 28
Likes: 0
Received 0 Likes
on
0 Posts
Sorry I've been mispelling your name all this time.
Sunset Imports has very good prices compared to most dealers, as does Suncoast and AutohausAZ. You can find Sunset at www.sunsetimports.com or call them at (800) 346-0182, ask for "Jeff" in parts, he's always been very helpful to me.
Did you find that your white (or red) plastic cups broke apart? If so, Porsche only sells the complete pushrod that the plastic cup is mounted on, for about $52.00 when I last checked with Sunset.
I found a guy in Belgium who has produced exact replicas of the plastic cups (in black). If you're not in a hurry, you can get them from him in about 5 days, assuming you have a paypal account. If you want to go that route, send me a PM and I will send you his info.
Regards, Maurice.
Trending Topics
01-15-2008, 10:12 AM
#8
Intermediate
Thread Starter
Join Date: Oct 2005
Location: Farmington
Posts: 48
Likes: 0
Received 0 Likes
on
0 Posts
Blilley:
Sorry I've been mispelling your name all this time.
Sunset Imports has very good prices compared to most dealers, as does Suncoast and AutohausAZ. You can find Sunset at www.sunsetimports.com or call them at (800) 346-0182, ask for "Jeff" in parts, he's always been very helpful to me.
Did you find that your white (or red) plastic cups broke apart? If so, Porsche only sells the complete pushrod that the plastic cup is mounted on, for about $52.00 when I last checked with Sunset.
I found a guy in Belgium who has produced exact replicas of the plastic cups (in black). If you're not in a hurry, you can get them from him in about 5 days, assuming you have a paypal account. If you want to go that route, send me a PM and I will send you his info.
Regards, Maurice.
I haven't had time too look, my daughter has gymastics, ballet, and I have hockey throughout the week. I will probably have to wait until this weeked to see what's up with it.
I'm not in a hurry, it's now going to be in the 30's and 20's for a while here so top will be up. I'll send you a PM if I decide to go that way. Thanks again for the great info.
blilely
01-27-2008, 09:43 PM
#10
Intermediate
Join Date: Aug 2007
Location: Freeport, New York
Posts: 28
Likes: 0
Received 0 Likes
on
0 Posts
I haven't had time too look, my daughter has gymastics, ballet, and I have hockey throughout the week. I will probably have to wait until this weeked to see what's up with it.
I'm not in a hurry, it's now going to be in the 30's and 20's for a while here so top will be up. I'll send you a PM if I decide to go that way. Thanks again for the great info.
blilely
I'm not in a hurry, it's now going to be in the 30's and 20's for a while here so top will be up. I'll send you a PM if I decide to go that way. Thanks again for the great info.
blilely
I read on the other thread where you may be having difficulty separating the black hydraulic pushrod from the V-lever. There are two other methods for accomplishing the same end. It's hard to reach in there but it can be done.
1. You can slip in a thin (14mm?) open end wrench between the ball cup of the black hydraulic pushrod and the arm of the V-lever and gradually "unbolt" the steel ball from where it is threaded onto the V-lever arm. The steel ball's shank, before it is threaded onto the V-lever, has a six-sided (hex head) flattened surface that will allow you to slowly unbolt it.
2. If you look at the diagram, you can also push off a spring clip that holds the other end of the hydraulic push rod onto the clamshell arm at position #11.
You can push off that clip, and then pull that end of the push rod inboard to disengage it from the clamshell arm. On that end, the push rod has a small, metal tubular perpendicular projection that is held in place by a spring clip. You cannot see the spring clip in the diagram, but it is on the other side of where that end of the hydraulic push rod fits through the clamshell arm.
Remember that in both of these procedures (as well as the normal prying apart of the steel ball from the ball cup on the end of the push rod) the hydraulic pushrod is exerting pressure on the connections, so it will be difficult to pull them apart.
Also, because they are under pressure be very careful when they finally snap off so that you don't injure yourself. The pressure is a result of the V-levers pulling down on the clamshell to hold it tight against the body so that it doesn't rattle.
Remember the earlier cautions against operating the switch with the V-levers disconnected.
Regards, Maurice.
Last edited by 1schoir; 01-27-2008 at 09:45 PM. Reason: left out a small step
01-27-2008, 10:32 PM
#11
Easy way to do what was just described is open the top to service position, remove both spring clips where they attach to the clamshell, then get somone to help you. One person on each side work the pins out of the clamshell and twist the clamshell up ward, it will stand up on its own and you can then inspect the arms (ball sockets)
Mark
Mark
01-27-2008, 11:48 PM
#12
Intermediate
Join Date: Aug 2007
Location: Freeport, New York
Posts: 28
Likes: 0
Received 0 Likes
on
0 Posts
Easy way to do what was just described is open the top to service position, remove both spring clips where they attach to the clamshell, then get somone to help you. One person on each side work the pins out of the clamshell and twist the clamshell up ward, it will stand up on its own and you can then inspect the arms (ball sockets)
Mark
Mark
The problem in this case is that Blilley cannot operate his top and the clamshell is shut down tight and won't move.
As he stated at the beginning of this thread ..."[W]hen the cover went back down, it started popping like something was jammed possibly..."
Regards, Maurice.
01-28-2008, 10:07 AM
#13
Intermediate
Thread Starter
Join Date: Oct 2005
Location: Farmington
Posts: 48
Likes: 0
Received 0 Likes
on
0 Posts
Mark:
The problem in this case is that Blilley cannot operate his top and the clamshell is shut down tight and won't move.
As he stated at the beginning of this thread ..."[W]hen the cover went back down, it started popping like something was jammed possibly..."
Regards, Maurice.
The problem in this case is that Blilley cannot operate his top and the clamshell is shut down tight and won't move.
As he stated at the beginning of this thread ..."[W]hen the cover went back down, it started popping like something was jammed possibly..."
Regards, Maurice.
Great info Maurice thank you. I didn't have time to continue to work on the top. I am off this weekend and will try again. While in there, I did find that the white cup has in fact broken on the driver side, which you said was the cause for the top not moving.
While I was in there and could look at all the parts in motion I pressed the button to see where the pop was coming exactly. I noticed that the pushrod would take some pressure, bow a little and pop. In an earlier post you mention the gear in the transmission in this case the driver side. Can I fix that gear myself, or will I just need to order a new transmission on that side?
Thank you
blilley
01-28-2008, 08:40 PM
#14
Intermediate
Join Date: Aug 2007
Location: Freeport, New York
Posts: 28
Likes: 0
Received 0 Likes
on
0 Posts
Great info Maurice thank you. I didn't have time to continue to work on the top. I am off this weekend and will try again. While in there, I did find that the white cup has in fact broken on the driver side, which you said was the cause for the top not moving.
While I was in there and could look at all the parts in motion I pressed the button to see where the pop was coming exactly. I noticed that the pushrod would take some pressure, bow a little and pop. In an earlier post you mention the gear in the transmission in this case the driver side. Can I fix that gear myself, or will I just need to order a new transmission on that side?
Thank you
blilley
You should not have to replace the gear or the transmission, as the teeth on the half moon gear rarely break. More commonly, the last of the (50) teeth goes past the worm gear, then gets pulled back by the force of the black hydraulic pushrod and then "skips" again, causing the loud popping noise that you hear. New transmissions list for about $600, and I believe you can only buy the new style (B-version) transmissions now (unless you find them used). You can, however, use a new style transmission on one side and the old style (A-version) transmission on the other side without any modifications. The new ones are a more trouble-free design.
If you want to lubricate everything while you are in there, you can remove the transmissions (three 13mm nuts) with the drive cables still attached and then unscrew the phillips screws holding the black plastic cover onto the underside of the transmission. Make sure to also snug down the 4 phillips screws that hold the (other) small black plastic cover over the worm gear (at the end of where the cable goes into the transmission) as that sometimes causes the gear to skip because the worm gear can shift its position slightly if the cover is not snug.
I am attaching a photo which shows the transmission half moon gear out of position and past where it should be engaged to the worm gear. You can also see the 4 phillips screws on the small black plastic cover to be tightened. Take a look at the three large holes on the perimieter of the housing of the transmission, as that will indicate the location of the three 13mm nuts that must be removed to get the transmissions unbolted from the body.
If only one of your transmissions was "popping", then in all likelihood the other transmission's half-moon gear is in the correct position and you can use that one as a reference to get the faulty one into position before re-assembly.
Again, remember to take notes or photographs to show the exact position of the V-levers before removing the 19mm which holds the center of the V-lever onto the transmissions.
There is a protrusion on the back of each V-lever that insures that the V-levers can only be re-installed in one of two positions: correct position or 180 degrees off. Also make sure that the V-levers have not bent from the force of whatever the malfunction was. They are pretty thick, but can definitely end up bent.
BTW, since you found one of the plastic cups broken on your MY98 and it was white, it has already been replaced at least once. The original ones where red (and more brittle). You will have to at least replace that one white plastic cup to get your top operational again, along with possibly adjusting or replacing some other parts (such as the drive cable/cables).
If you are careful when you get everything back together, you can determine what else, if anything must be done to have a working top again. It's not difficult, it just takes a little patience and whatever you come up with, we can figure it out.
Regards, Maurice.
Last edited by 1schoir; 01-28-2008 at 08:43 PM. Reason: corrected part of a sentence
01-29-2008, 11:10 AM
#15
Intermediate
Thread Starter
Join Date: Oct 2005
Location: Farmington
Posts: 48
Likes: 0
Received 0 Likes
on
0 Posts
Maurice,
You are a wealth of knowledge, thank you. Here is a pic of the current V position. I was looking in the Bentley book and it didn't look as if this was a normal position in either opened or closed. Since the cups have been replaced could this have been why? Or is this a normal position?
You are a wealth of knowledge, thank you. Here is a pic of the current V position. I was looking in the Bentley book and it didn't look as if this was a normal position in either opened or closed. Since the cups have been replaced could this have been why? Or is this a normal position?