When you click on links to various merchants on this site and make a purchase, this can result in this site earning a commission. Affiliate programs and affiliations include, but are not limited to, the eBay Partner Network.
As you can see my baby has no feet right now. The passenger side CV axle flange bolts that holds the axle to the transmission essentially. Were loose! 😱. And because of this all the grease proceeded to eject out. My inner CV now has a dreaded thump when driving at lower speeds. The boots are all intact and excellent looking.
Is is it possible to open the boot and refill it? Or has the damage been done and it�s gotta be replaced? (Video attached below)
You'll need to buy new boot kits, which include CV grease. It's a messy job, but do-able. I did both of mine, figure a couple of hours, a bunch of brakleen, and a couple of rolls of paper towels.
When you repack the joints, evaluate whether they still clunk. Alternatively, much easier and less dealing with bunches of messy grease, is to buy rebuilt axles.
Flange bolts need to be put in with blue loctite, btw.
@Brian in Tucson How is the axle being transferred the power? I haven�t removed mine yet but I was looking at images and there�s no inner spindle? How does the inner side get the power from the engine?
@Brian in Tucson How is the axle being transferred the power? I haven�t removed mine yet but I was looking at images and there�s no inner spindle? How does the inner side get the power from the engine?
No inner spindle, the diff output terminates with a flange, the inner part of the CV is flanged, too. The two bolt together with 6 8mm bolts. On the outer end, the axle has a spindle which goes thru the hub is secured with a big nut.
Following the instructions in '101 Projects', I did the inner CV boots on mine without entirely dropping the axle. It was a little messy, but not too bad. I was replacing torn boots, not thunking bearings. However, I did clean and check the bearings before regreasing and reinstalling.
And, yeah, blue Locktite on those bolts. And I think the recommendations is to retorque them after 500 miles.
@Brian in Tucson @Shawn Stanford
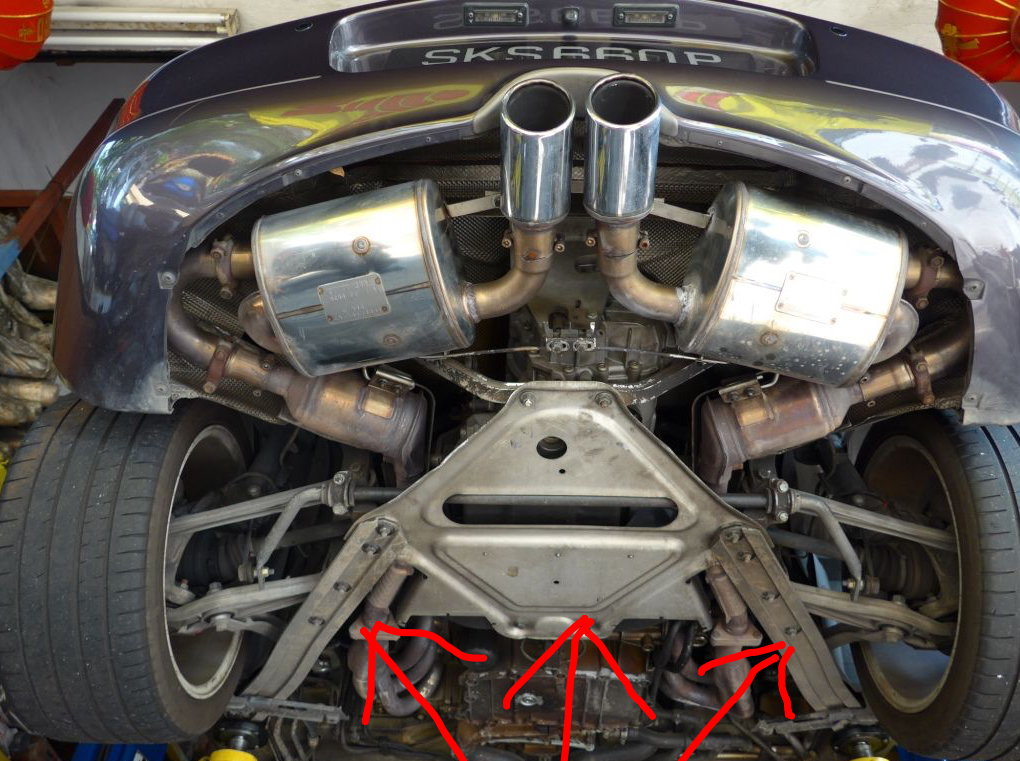
whats the the name of the metal plate and the 2 overlapping/connecting beams that sit below and cover the exhaust/inner CV boot. And is it true that the car will need to be aligned after it�s removal?
whats the the name of the metal plate and the 2 overlapping/connecting beams that sit below and cover the exhaust/inner CV boot. And is it true that the car will need to be aligned after it’s removal?
I'm not sure which metal plate you mean, can you give me a number from the diagram?
I call the two beams the lower control arm (#9) and the positioning arm (#8), although those might not be the correct names. In order to free the drive shaft, you're going to need to give the wheel room to move. I don't remember exactly what I removed. I'd do a YouTube video search, and definitely spend the money on the "101 Projects" book. You can also get a 'thumbnail' version of a lot of those projects over at Pelican forums (https://www.pelicanparts.com/techart...nt_-_Boots.htm).
However, having to try to guess/remember, I think I'd do the following:
Remove and hang the brake caliper (2 bolts).
Remove nut #11 and bolt #10 and push arm #8 out of the way.
Remove nut #21 and nut #15, pop those ball joints apart and push arms #9 and #17 out of the way,
Remove the bolt that holds the carrier (#1) to the strut.
That should allow the entire carrier to be moved outward so you can drop the drive shaft end down and deal with the boot. That sounds like a lot, but it will only take 10 or 15 minutes, depending on how easily your bolts come loose. Suspension bolts can sometimes be ornery; I've had to do the heat/WD40 trick in the past.
Be careful removing the hex bolts holding the drive shaft to the transaxle. The metal isn't particularly hard, and you can strip them pretty easily (ask me how I know). Get a set of long hex keys, scrub the nuts with a wire brush or blast some air in there, and make sure the hex key is well seated before you try to turn it.
The car won't need to be aligned unless you turn the bolts that change the alignment, which you shouldn't have to do. Those are bolts #18 and #12 on the inside (chassis side) of arms #9 and #17. As long as you don't touch those, you'll be fine.
I'm not going to say that you're over-thinking this, but it's easier than you think. This was one of the first repairs I did on my Boxster, and it was the first time I'd done a CV boot. The hardest part was getting enough clearance to drop the shaft away from the transaxle.
@Shawn Stanford I appreciate all the help. The part I�m curious about isn�t in that photo. I�m going to find a generic photo off google to show you what I mean.
Attached shows the plate and 2 beams that attach to it. As well the link I�m providing here shows what I�m talking about. Fast forward to 9 minutes exact and it�s right there. THANK YOU IN ADVANCE, I really can�t figure out the name of it.
Oh, I see what you mean. Burner's videos are good, I use them all the time. Those hold that plate in place and kind of tie everything together. I honestly don't remember what all that is called, but he's going in a lot deeper than you are. You don't need to take those down to do the CV boots.
When I did mine engine, I had those braces completely out. And as the engine and trans were both out, I removed the old perished boots, wiped as much grease out, and cleaned the whole mess in a parts washer w/ safety kleen solvent. Then removed any residue with a couple of kans of Brakekleen. The kits I got were from Rock Auto, pretty inexpensive, and had big packets of grease and proper bands to hold the boot to the CV. Shawn is correct, he usually is.
Mine ended up like new, factory paint is still shiny. And tight. I built a dedicate 1/4" drive socket with an allen wrench glued in. A little breaker bar with a cheater pipe is enough to start, mostly. But it may require using a vice grip to break them loose.
After I got it all back together, I didn't have the rear end aligned. If you don't lower it down on the floor with it all loosy goosey, it might be okay. Never hurts to have a car alignment checked and adjusted, tho.
Burner's vids are very good! So is 101 projects--and it's really bargain price! Don't quite understand how they can produce such a high quality book, charge so little, and still make any money.
I built a dedicate 1/4" drive socket with an allen wrench glued in. A little breaker bar with a cheater pipe is enough to start, mostly. But it may require using a vice grip to break them loose.
Clever. I took the easy route and bought the set of 3/8" long-shaft Allen sockets from HF.
Originally Posted by Brian in Tucson
Don't quite understand how they can produce such a high quality book, charge so little, and still make any money.
Publishing a book in the digital age is very different than it was only 20 years ago. Based on what I know from my own experience, they're probably doubling their money on every copy, and pretty much every Boxster owner has a copy!
@Shawn Stanford@Brian in Tucson @HenryPcar
As mentioned before the bolts on the CV were loose and that caused grease to leak out, I pulled out the bolts and cleaned off the globs of grease using wd40 and used qtips too clean the grease out of the hole that the bolts go into. Then blue loctite and put bolts back in. (CV remained in car)
Then used an injection needle fitting on my grease gun to inject grease into the Boot and where the bearings are at. Then high temp RTV over the needle hole.
Ive driven it XXX amount of miles with the extra grease injected but still leaking due to loose bolts, however the clunking hadn�t returned.
And then today was the first time I drove it with the cleaned bolts back in with loctite after letting sit for 24+hours.
As of right now it doesn�t appear to be leaking any grease, I drove it 3 seperate times today so far for roughly 50+ Miles.
Sounds like a win! Just retorque the bolts in a couple weeks.
You shouldn't need all that much grease in there. As I recall, the boot kit I bought had a packet of grease about the size of a packet of salad dressing. I think I used about half of it.
A few years ago, my brother and I rebuilt the drive shaft on my Cayenne, and he loaded that sumbitch with grease. It spewed grease for weeks and it always made a rumble. At some point I went in to my mechanic for something unrelated and he says, "Your drive shaft is all messed up. It's not flexing properly." Turns out that too much grease is a Bad Thing. Whoda thunk it?

 09-08-2019, 12:56 PM