
Removing bumperettes fill in gap?
 07-26-2016, 12:03 AM
#1
Drifting
Thread Starter
Excluding the purchase of a Euro bumper(I'm not looking to spend 3k+ just to get rid of the bumperettes), has anyone made an alternative of covering the hole cut outs for the bumperettes ? I.e. a cover plate for that area ? Would like to know before i hit Solid works and 3D printing. Would save me loads of time. TIA
 07-26-2016, 12:10 AM
#2
Go euro, did on my previous GT3 and enjoyed the expenditure after the fact. I am sure not everyone cares for it, but seemed to fit nicely with the rear end of the car in terms of aesthetics.
 07-26-2016, 12:20 AM
#3
Drifting
Thread Starter
 07-26-2016, 01:58 AM
#4
GT3 player par excellence
Lifetime Rennlist
Member
Lifetime Rennlist
Member
just LEAVE IT ALONE.
when you think of modding again enrique, must save up and get RS ;-)
when you think of modding again enrique, must save up and get RS ;-)
07-26-2016, 03:00 PM
#5
Rennlist Member
Here's what I did. Fiberglass plate from McMaster-Carr, made a cardboard template, cut with jigsaw, sanded to fit, then paint. It is bolted to the bumper, so it moves with it.
The rivets for the USA bumper extensions had to be drilled out to remove these parts. They sit just under the bumperettes.
I think it looks dramatically better, and cost roughly $25 and about 4 hours of my time. Also, everything is reversable, and the holes I put in the bumper will sit uner the bumperettes if I ever need to put them back on.
07-26-2016, 03:16 PM
#7
Burning Brakes

Trending Topics
07-26-2016, 03:16 PM
#8
Drifting
Thread Starter
Here's what I did. Fiberglass plate from McMaster-Carr, made a cardboard template, cut with jigsaw, sanded to fit, then paint. It is bolted to the bumper, so it moves with it.
The rivets for the USA bumper extensions had to be drilled out to remove these parts. They sit just under the bumperettes.
I think it looks dramatically better, and cost roughly $25 and about 4 hours of my time. Also, everything is reversable, and the holes I put in the bumper will sit uner the bumperettes if I ever need to put them back on.
The rivets for the USA bumper extensions had to be drilled out to remove these parts. They sit just under the bumperettes.
I think it looks dramatically better, and cost roughly $25 and about 4 hours of my time. Also, everything is reversable, and the holes I put in the bumper will sit uner the bumperettes if I ever need to put them back on.
All designed up to print out and mock up. I have a feeling i need to redo the lower edges however another 1 hour on cad and we're good to go for printing.
07-26-2016, 03:19 PM
#9
Drifting
Thread Starter

RS is out of the question now with new little one. Unless i get a raise ....
07-26-2016, 04:14 PM
#10
Rennlist Member
Can you please attach your file to this thread once completed?
07-26-2016, 05:17 PM
#11
Rennlist Member
Another thing to consider is that the bumper has stiffening ribs molded into it under the license plate holder, so the design that you have shown won't sit flat against the bumper. you will need to provide some cutouts. You'll see once you get everything apart.
Post your results when you're done!
07-26-2016, 08:02 PM
#12
Drifting
Thread Starter
I'll post results when done.
Yup. For best fit i will need w/ 3D scanning which i'm thinking of going that route. Since the bumper does have curvature i can do a 3d print with curvature or.....
Will definitely post results.
That's awesome. I play with SW all day long, but without a CMM to asist I felt that the good old fashioned template method suited this the best too. My car is never near my plotter, so it would have been way more iterative.
Another thing to consider is that the bumper has stiffening ribs molded into it under the license plate holder, so the design that you have shown won't sit flat against the bumper. you will need to provide some cutouts. You'll see once you get everything apart.
Post your results when you're done!
Another thing to consider is that the bumper has stiffening ribs molded into it under the license plate holder, so the design that you have shown won't sit flat against the bumper. you will need to provide some cutouts. You'll see once you get everything apart.
Post your results when you're done!
Will definitely post results.
07-26-2016, 11:20 PM
#13
Drifting
Thread Starter
Update:
The weight of the beam with bumperettes: 5,660 grams
The weight of the beam without bumperettes: 4,650 grams
Pair of bumperettes: 1,010 grams.
Removing the bumperettes is a 15-25 minute job. Just drill the head of the old rivets, and off they come. If ever need to be reinstalled- just rivet back on.
07-27-2016, 03:34 AM
#14
Rennlist Member
More fun facts, the US rear bumper weighs 14 lbs while the Euro rear bumper weighs 11 lbs.
Here is a comparison of the US aluminum brace to the Euro version. Notice how the Euro version has cut outs on the back side.
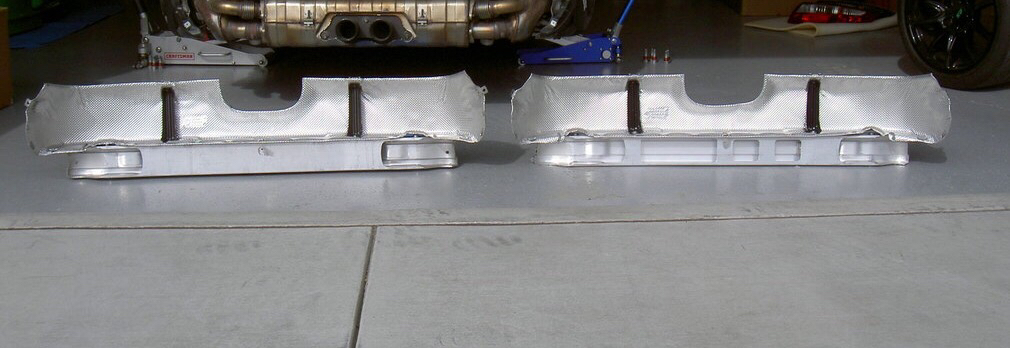
The US aluminum brace weighed 16 lbs and the Euro version weighed 8 lbs.
I prefer no bumperettes as well
Here is a comparison of the US aluminum brace to the Euro version. Notice how the Euro version has cut outs on the back side.
The US aluminum brace weighed 16 lbs and the Euro version weighed 8 lbs.
I prefer no bumperettes as well
07-27-2016, 08:08 PM
#15
Drifting
Thread Starter
bmwtye,
Are those Mikymu's numbers ? I had my rear bar proceed through ncp, i was going to get it type 3 anodize however i decided against it to keep it oem look.
Their was a lot of gunk. final weight came at 4227 grams, which equates to 9.3 lbs for my rear bumper bar. I believe the 16lbs is on the high side regardless. I' have all the stuff needed for 3d scanning on the lift come Friday.
Looking into material that will best fit oem finish and already told local painter to expect my job soon. He is awesome. I believe he is also mooty approved.