

Explosive free with OMP quick release steering wheel
 09-22-2010, 05:50 AM
#1
Addict
Rennlist Member
Rennlist Member
Thread Starter
There is one thing that bother me about tracking my RS is all the explosives in the cabin. These nicely packaged TNT originally design for crash safety with love from Stuttgart serve no purpose when I am 6 points strapped in with HANS device. They have become potential finger and wrist breaker in a case of off on the track and has no more entertainment value then popping birthday party balloons. I decided to remove them all and replace factory steering wheel with OMP quick release for easy of getting in and out of the car with factory roll cage. Here is a detail DIY on installing OMP steering wheel and airbags removal for those of you deranged enough to carry out this mod 
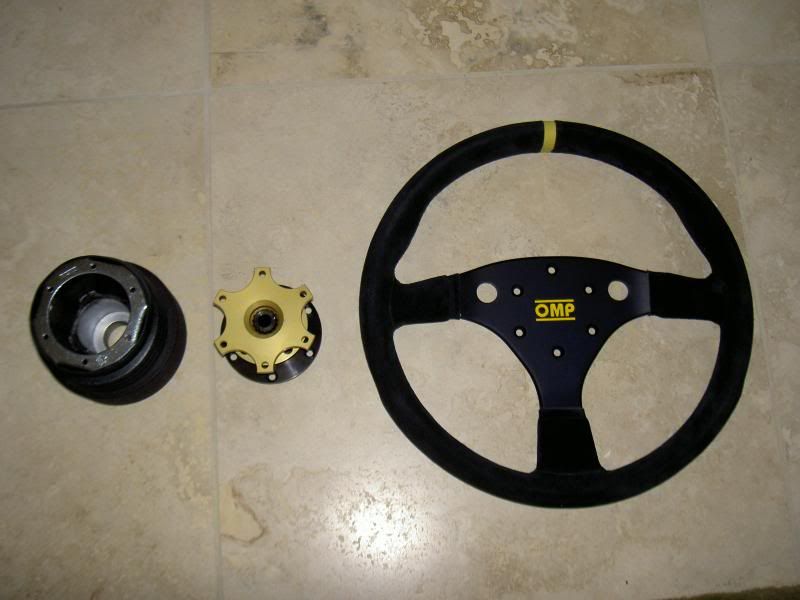
There are many options as far as hub, quick release and after market steering wheel goes. You will need to chose the type of setup depends on if you want to retain horn function, size of steering wheel, distance to driver etc. I decided to use the MOMO hub with lifeline quick release and OMP superturismo steering wheel which is the one used in 997 Cup car. The lifeline quick release is suppose to last longer than ball bearing type of quick release with less play. It comes in yellow (FIA approved) or black. Here are the sites I bought my parts from for price reference:
MOMO hub: $72 http://www.paragon-products.com/MOMO...hubadapter.htm
lifeline quick release: $249 http://splparts.com/store/product-info.php?pid99.html
OMP superturismo steering wheel: $289 http://www.vividracing.com/catalog/s...l-p-64625.html
Here is a picture of what the individual parts look like
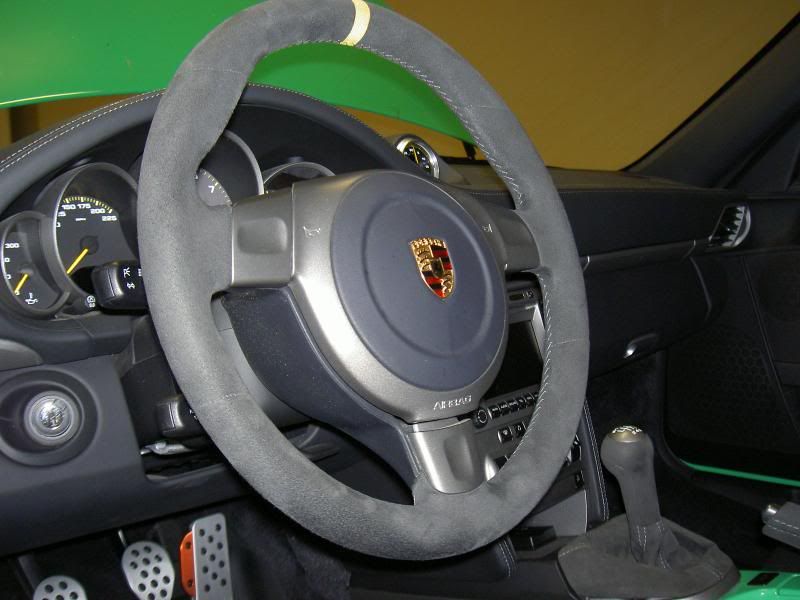
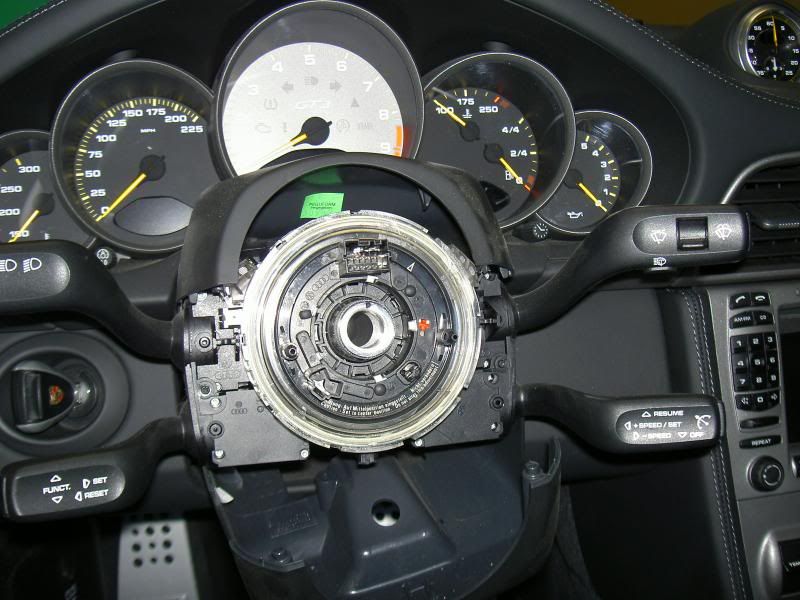
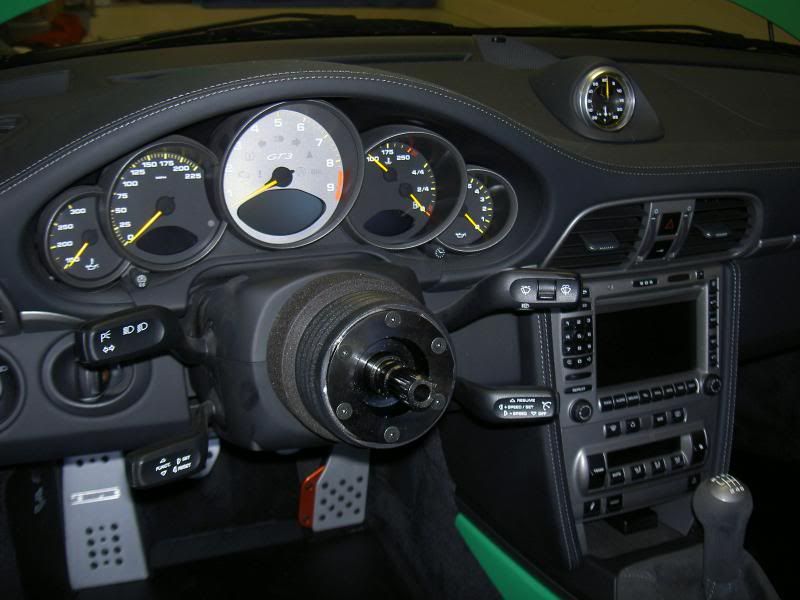
OK, let's get started and remove the factory steering wheel. First disconnect the battery for at least 20-30 minutes to make sure your airbags don't discharge by accident. Take a good look at your steering wheel and say good by to the explosive that's aiming at your sternum
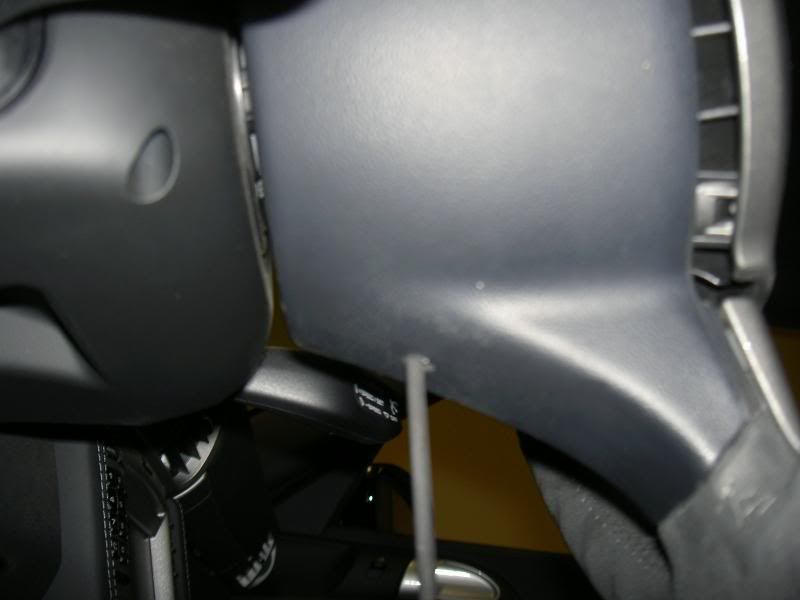
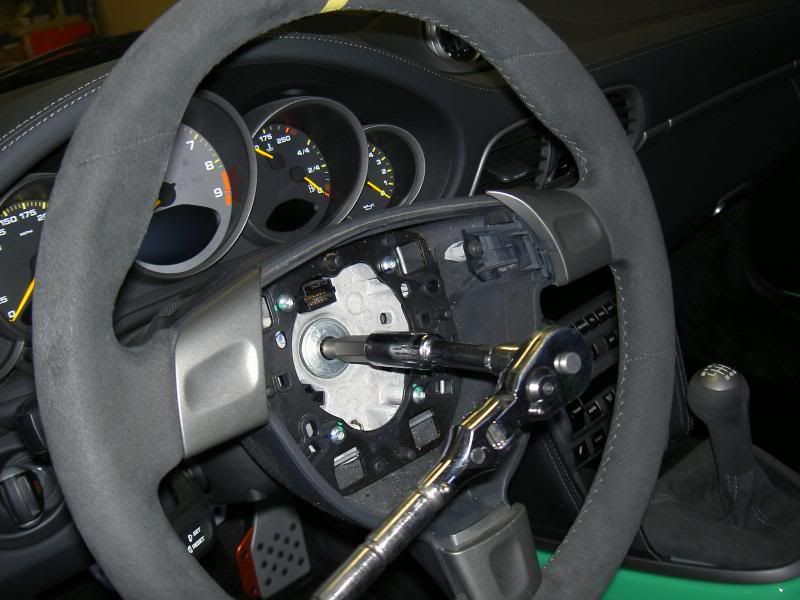
Pop the steering wheel airbag unit out by inserting a long thin Allen wrench at the lower opening behind the steering wheel and carefully push hard upward. This will release the springs that hold the airbag unit.
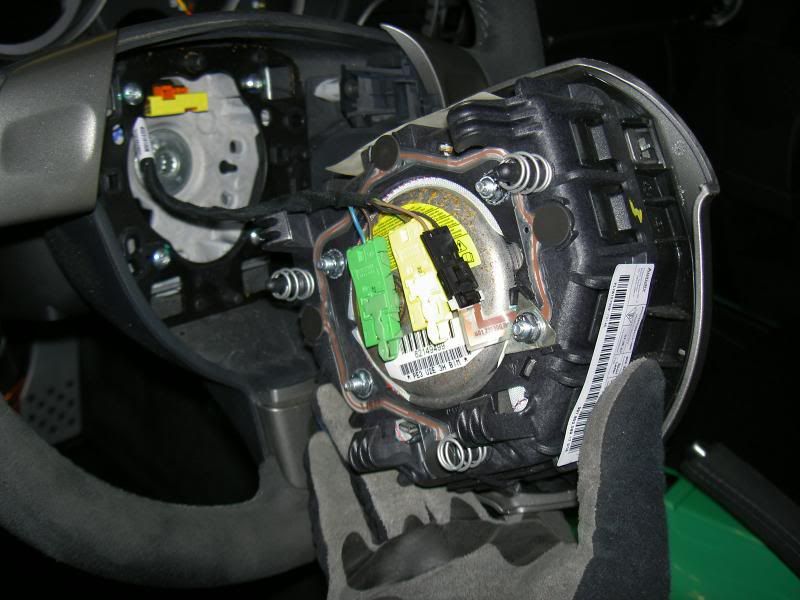
Pull on the top of the airbag unit toward you then gently pop the whole thing out. Disconnect the airbag yellow connector at the steering wheel side and remove the airbag unit
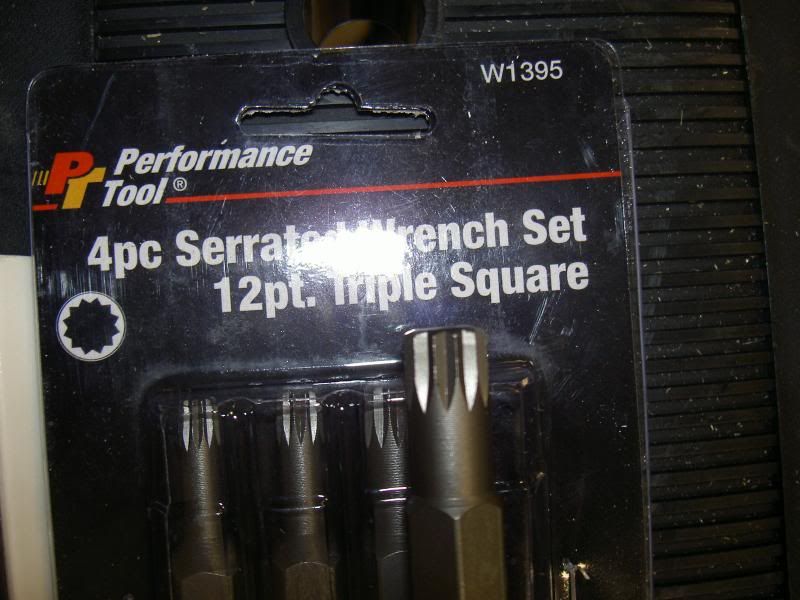
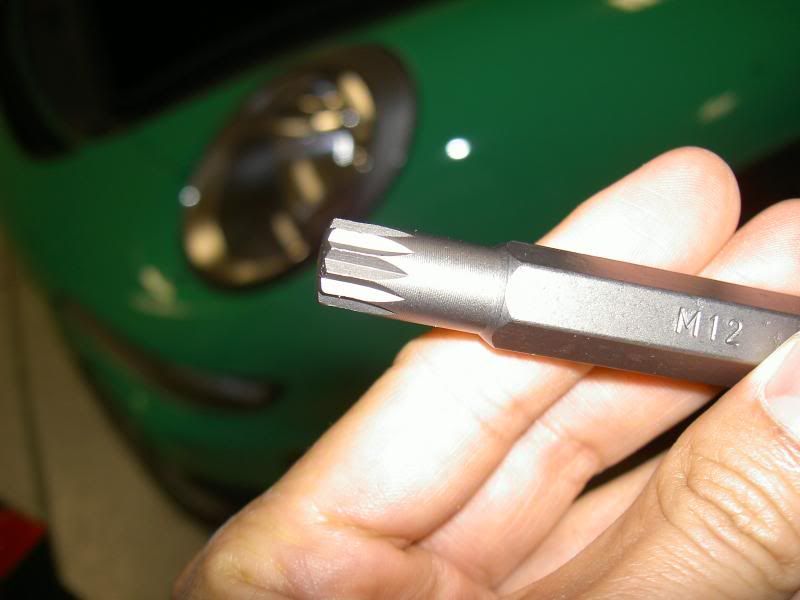
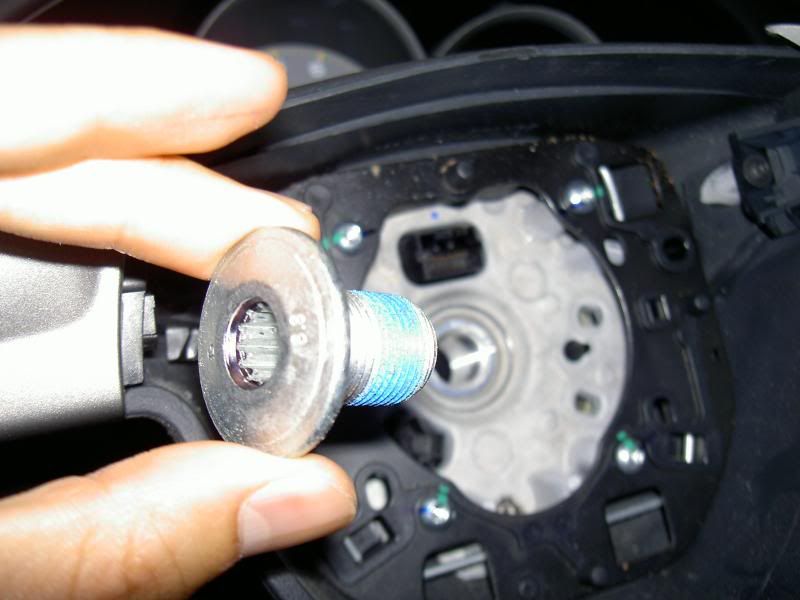
Now you will find a 12 points M12 bolt securing the steering wheel. You will wonder why on earth did Porsche use a M12, 12 point bolts!? I had to buy the special wrench from Napa auto store
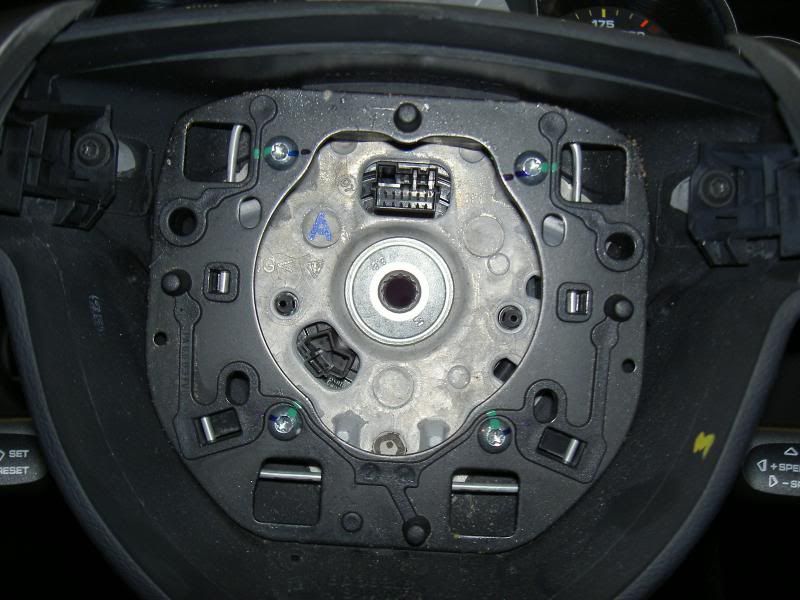
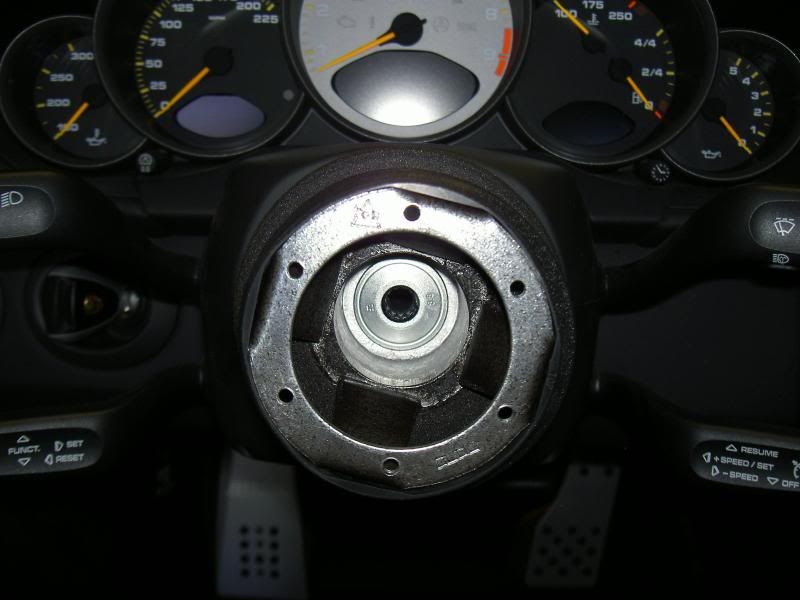
Remove the M12, 12 points bolt and out comes the steering wheel.
It's a good idea to mark the steering wheel and column just in case you need to put the factory steering wheel back
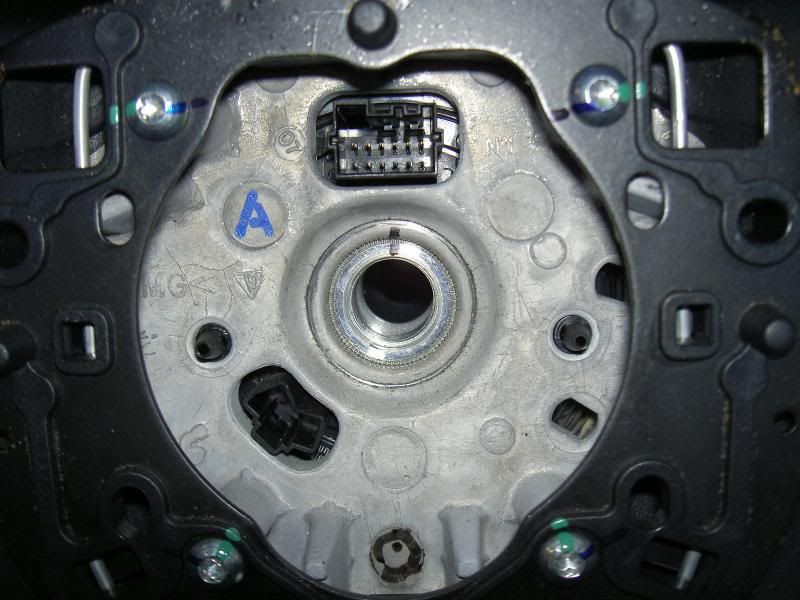
Now you will see the electrical connector unit which rotate with steering wheel and act as part of the traction control sensor. You need to remove this unit for some trimming to fit the MOMO hub. This may not be necessary if you use other hub
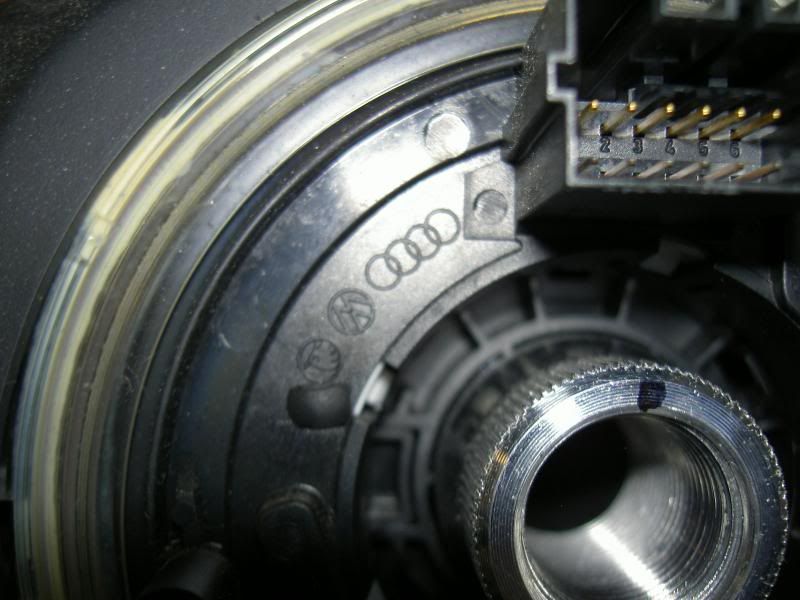
Audi parts ... hummm
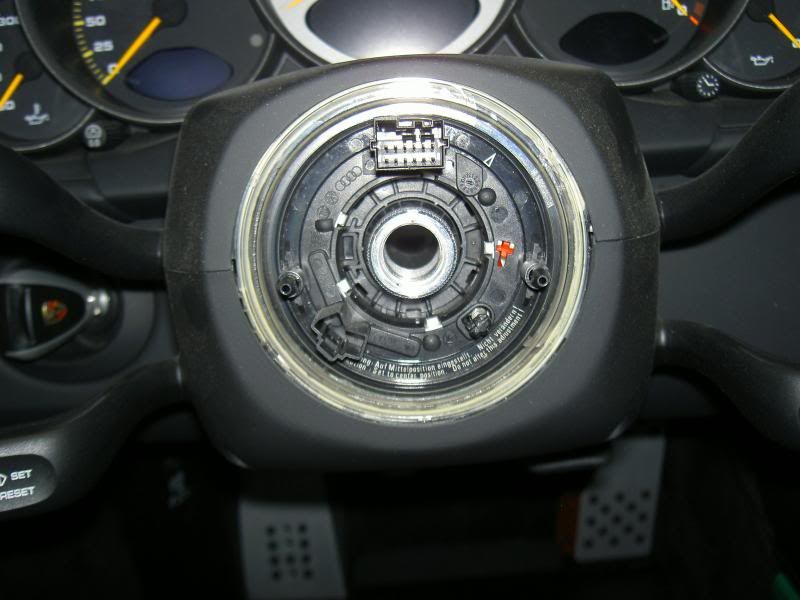
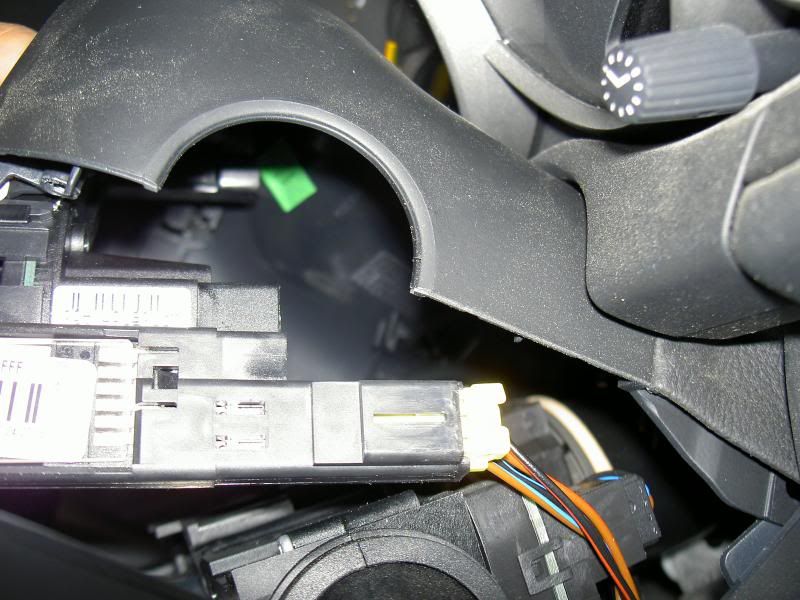
Remove the steering wheel column cover by removing the two T10 securing screws

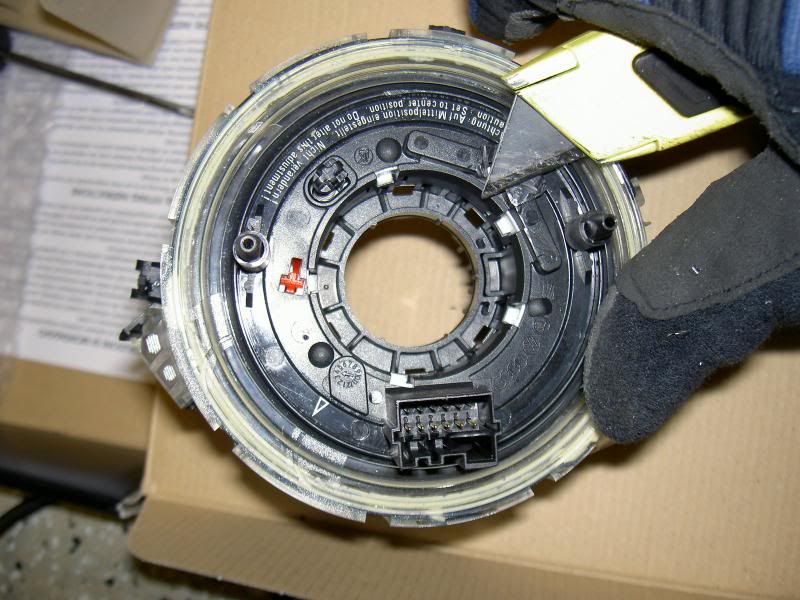
Unclip the legs that secure the electrical sensor unit and unclip the wire plug on the right hand side
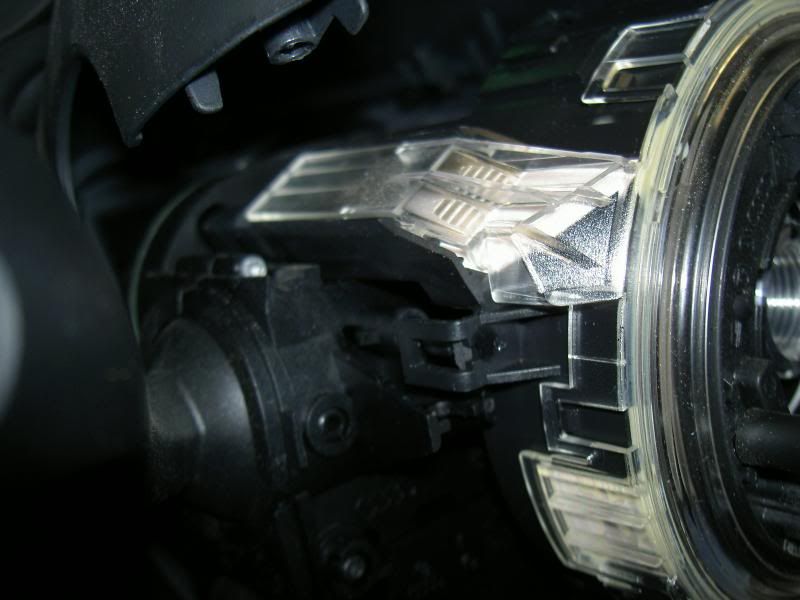
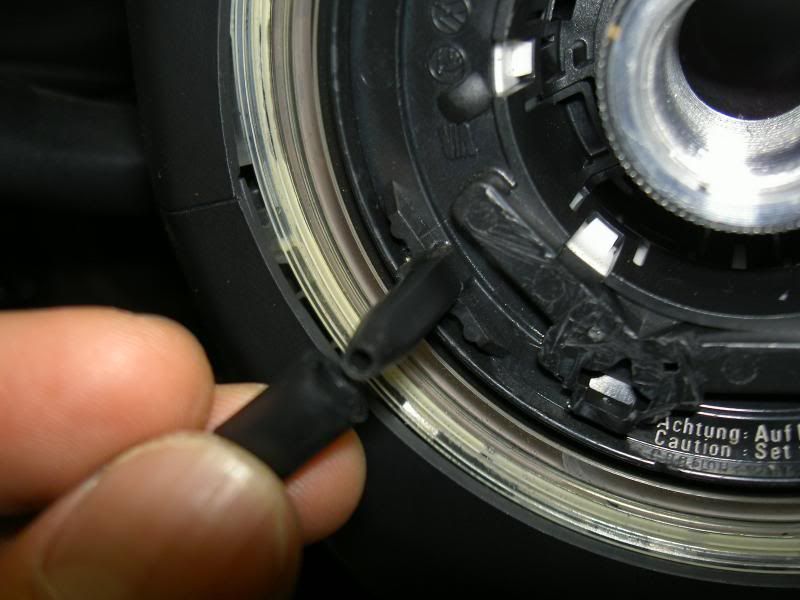
The electoral sensor unit has a dummy plastic plug receiver at 7 O;clock which blocks the MOMO hub.
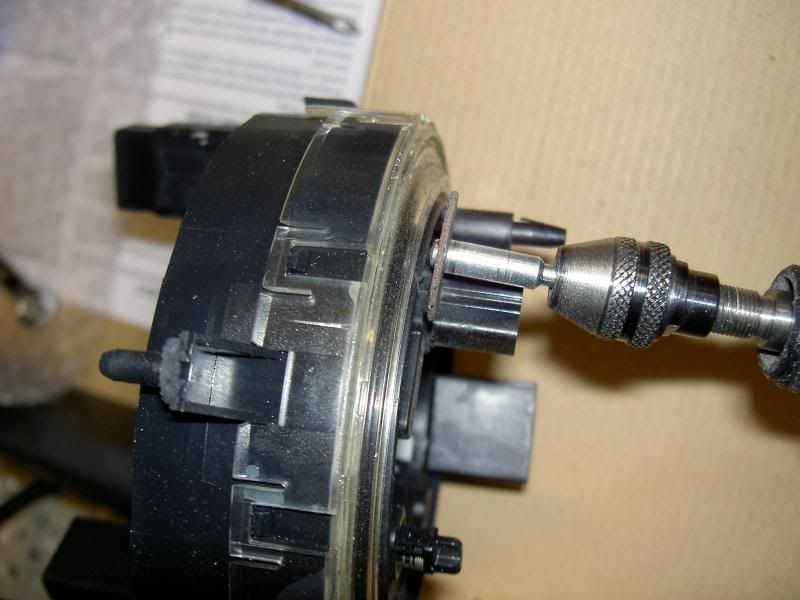
Carefully dremel off the dummy plug receiver and trim off any excess plastic that may get in the way. Take great care not to damage the sensor unit
Now it's ready to mate with the MOMO hub
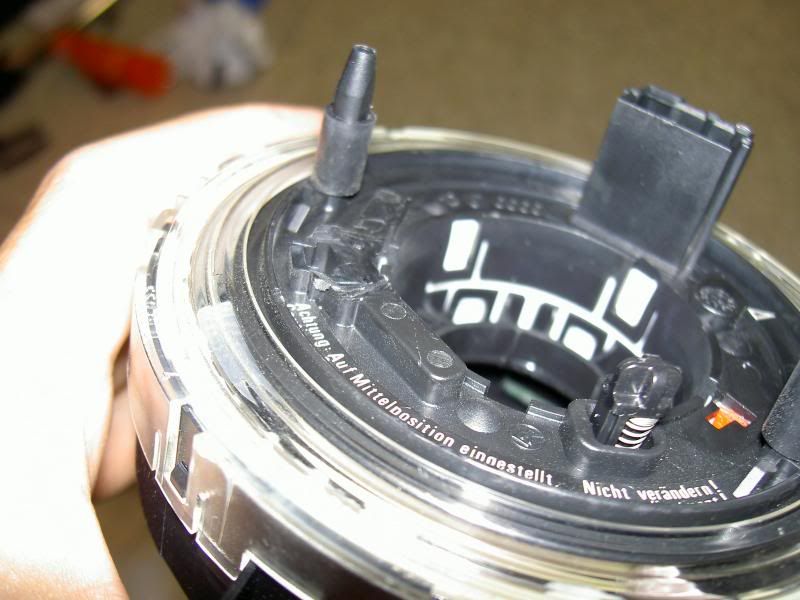
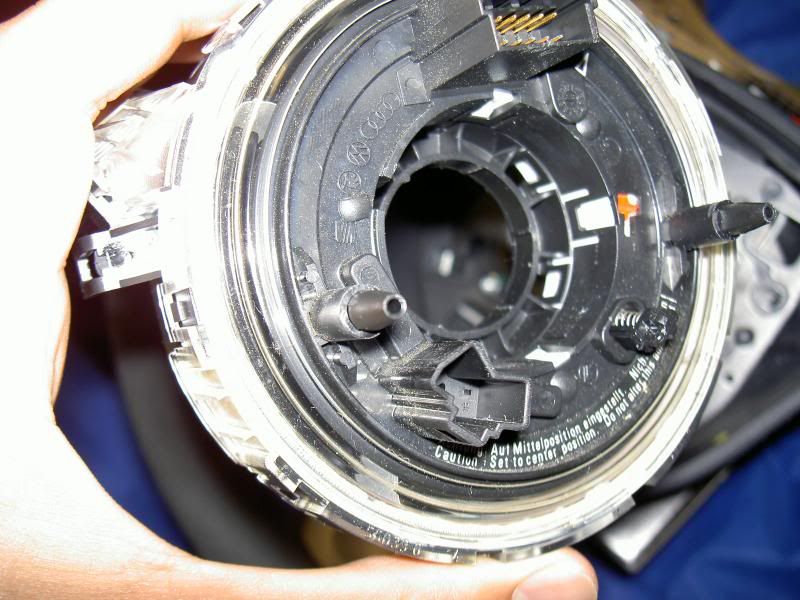
You need to remove the soft plastic cover on the two plastic taps on each end of the electrical sensor to fit inside of the MOMO hub.
It will sit flat on the MOMO hub
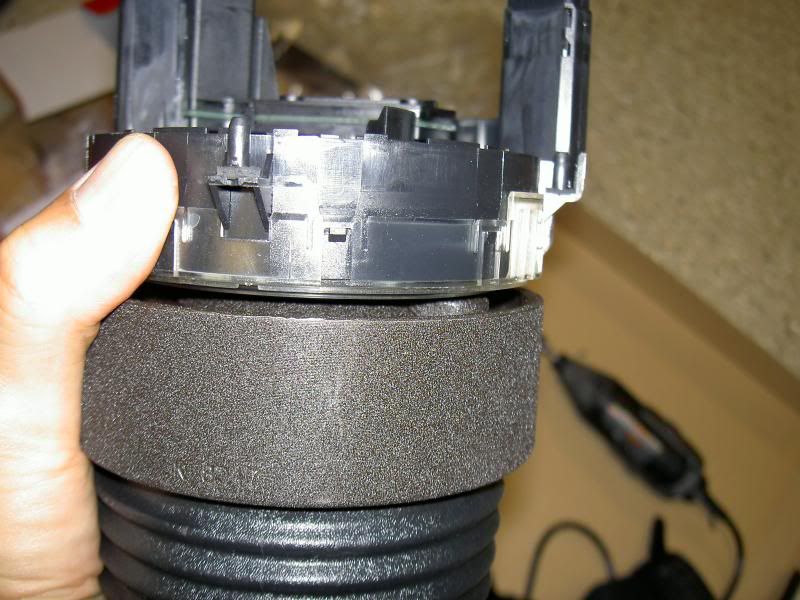
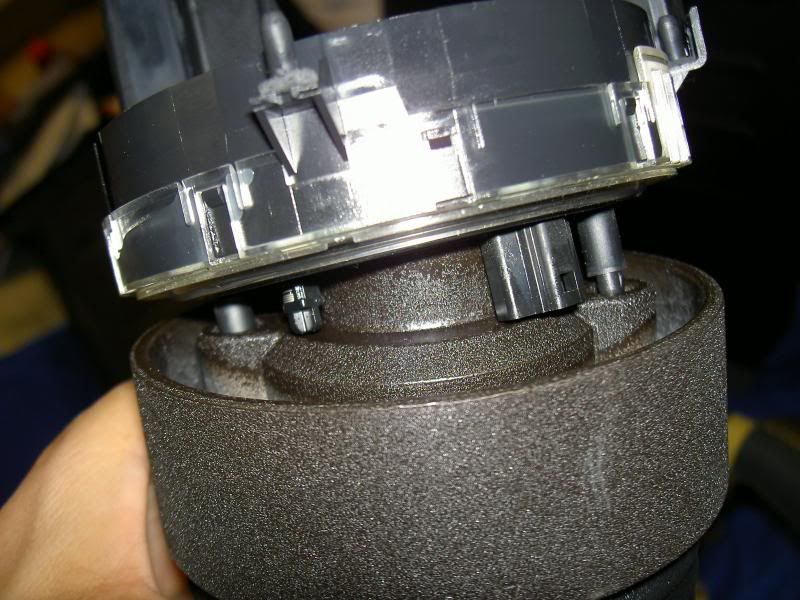
Put the electrical sensor back and this is what the MOMO hub look like from the side installed
Install the M12, 12 point bolt. Porsche calls for replacement of the bolt with each use and torque the bolt to 50 Nm or 37 ftlb. Before tightening the bolt, it's a good idea to test install everything to make sure the yellow strip is centered.
Align and install the base of the lifeline quick release on MOMO hub
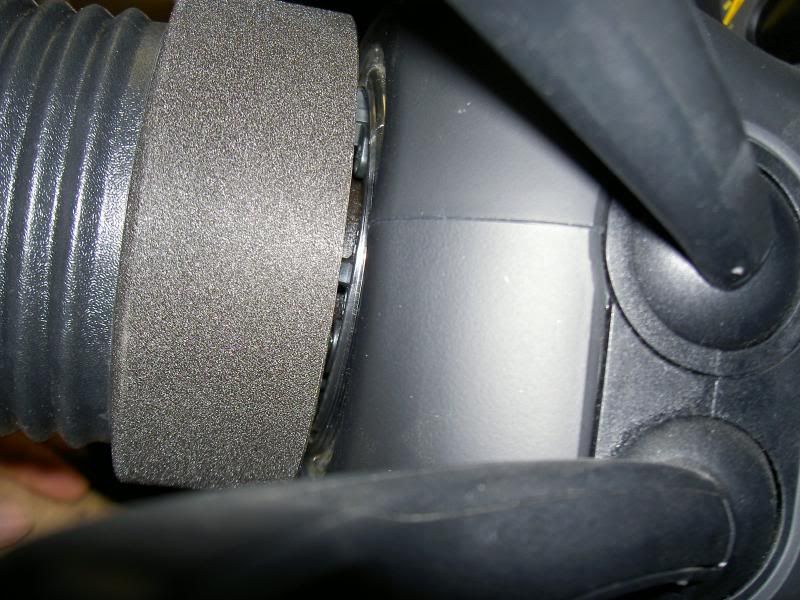
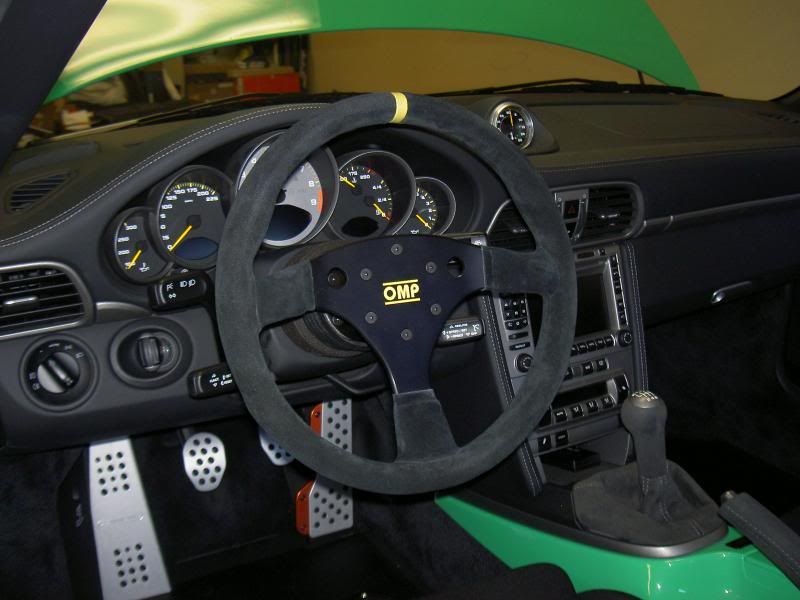
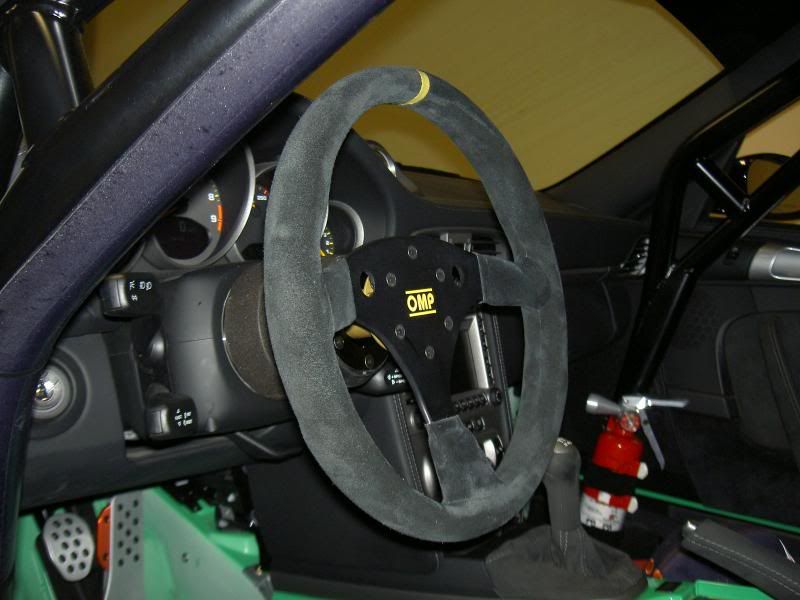
Initial view of the whole setup ... SWEET!
There are many options as far as hub, quick release and after market steering wheel goes. You will need to chose the type of setup depends on if you want to retain horn function, size of steering wheel, distance to driver etc. I decided to use the MOMO hub with lifeline quick release and OMP superturismo steering wheel which is the one used in 997 Cup car. The lifeline quick release is suppose to last longer than ball bearing type of quick release with less play. It comes in yellow (FIA approved) or black. Here are the sites I bought my parts from for price reference:
MOMO hub: $72 http://www.paragon-products.com/MOMO...hubadapter.htm
lifeline quick release: $249 http://splparts.com/store/product-info.php?pid99.html
OMP superturismo steering wheel: $289 http://www.vividracing.com/catalog/s...l-p-64625.html
Here is a picture of what the individual parts look like
OK, let's get started and remove the factory steering wheel. First disconnect the battery for at least 20-30 minutes to make sure your airbags don't discharge by accident. Take a good look at your steering wheel and say good by to the explosive that's aiming at your sternum
Pop the steering wheel airbag unit out by inserting a long thin Allen wrench at the lower opening behind the steering wheel and carefully push hard upward. This will release the springs that hold the airbag unit.
Pull on the top of the airbag unit toward you then gently pop the whole thing out. Disconnect the airbag yellow connector at the steering wheel side and remove the airbag unit
Now you will find a 12 points M12 bolt securing the steering wheel. You will wonder why on earth did Porsche use a M12, 12 point bolts!? I had to buy the special wrench from Napa auto store
Remove the M12, 12 points bolt and out comes the steering wheel.
It's a good idea to mark the steering wheel and column just in case you need to put the factory steering wheel back
Now you will see the electrical connector unit which rotate with steering wheel and act as part of the traction control sensor. You need to remove this unit for some trimming to fit the MOMO hub. This may not be necessary if you use other hub
Audi parts ... hummm
Remove the steering wheel column cover by removing the two T10 securing screws
Unclip the legs that secure the electrical sensor unit and unclip the wire plug on the right hand side
The electoral sensor unit has a dummy plastic plug receiver at 7 O;clock which blocks the MOMO hub.
Carefully dremel off the dummy plug receiver and trim off any excess plastic that may get in the way. Take great care not to damage the sensor unit
Now it's ready to mate with the MOMO hub
You need to remove the soft plastic cover on the two plastic taps on each end of the electrical sensor to fit inside of the MOMO hub.
It will sit flat on the MOMO hub
Put the electrical sensor back and this is what the MOMO hub look like from the side installed
Install the M12, 12 point bolt. Porsche calls for replacement of the bolt with each use and torque the bolt to 50 Nm or 37 ftlb. Before tightening the bolt, it's a good idea to test install everything to make sure the yellow strip is centered.
Align and install the base of the lifeline quick release on MOMO hub
Initial view of the whole setup ... SWEET!
 09-22-2010, 05:51 AM
#2
Addict
Rennlist Member
Rennlist Member
Thread Starter
OK, there are two more air bags to remove. One is the side impact airbag on the side of my GT2 seat. To remove this, all you need to do is remove the back cushion and pull up on the left side cloth to expose the securing bolts

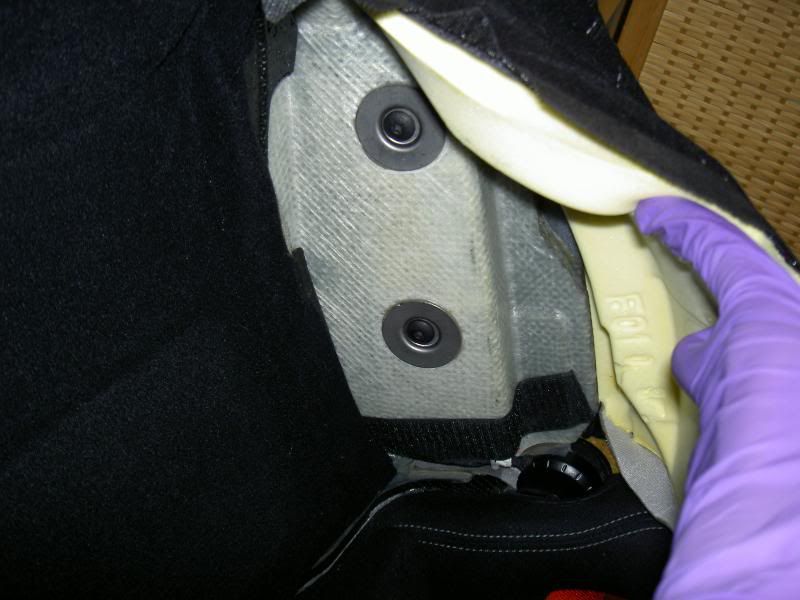
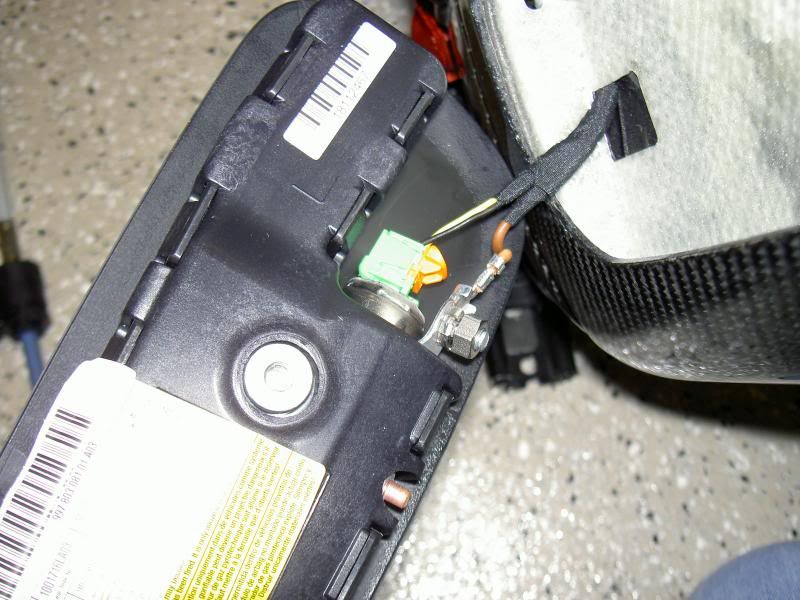
Remove the bolts and gently pull out the side impact airbag and disconnect the electrical plugs
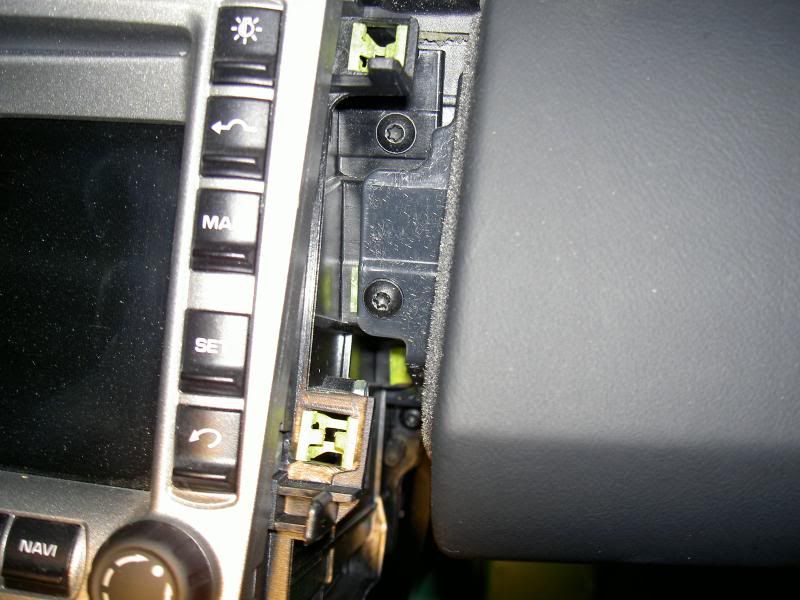
Now the passenger airbag is a bit tricky. You need to remove the whole glove compartment to get access. First, remove radio/Nav side trim and the glove compartment right side trim to expose the glove compartment securing screws
Remove the cup holder by removing the two securing bolts under the assembly
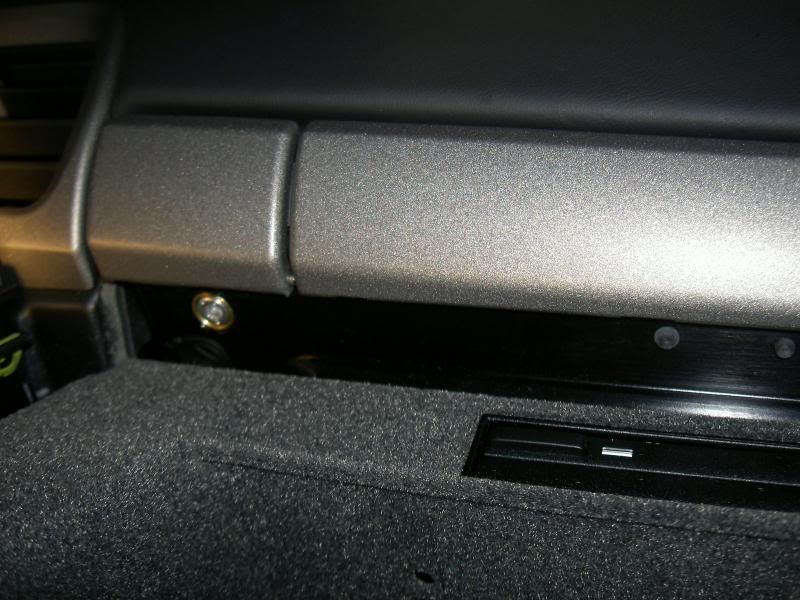
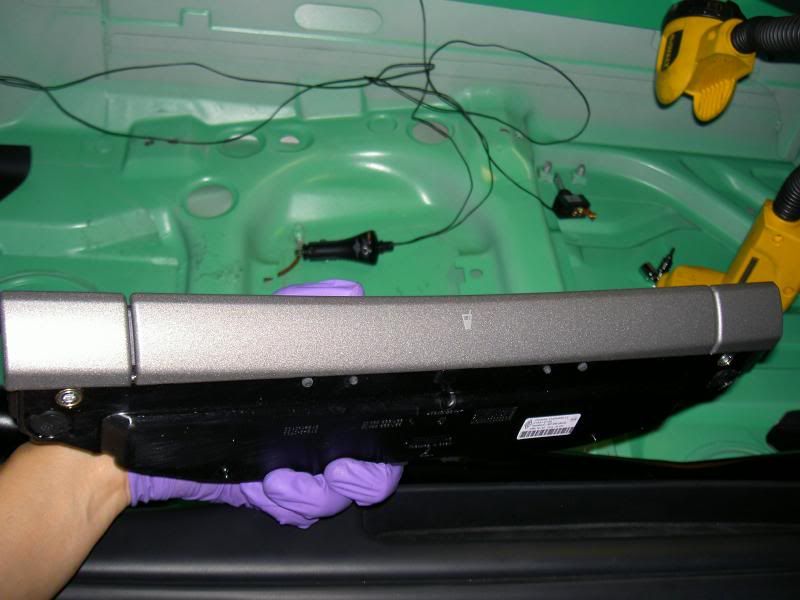
Remove all the screws that secure the glove compartment and gently drop it down and unclip the wire connector on the back
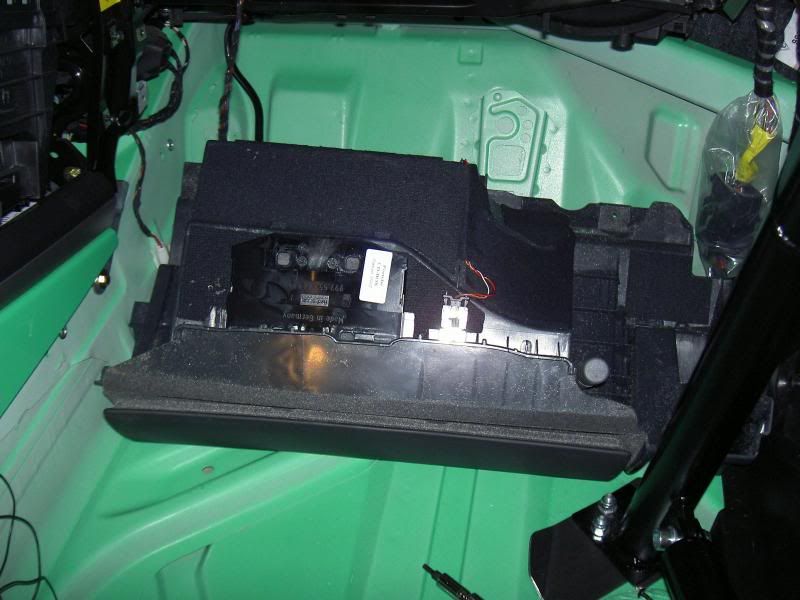
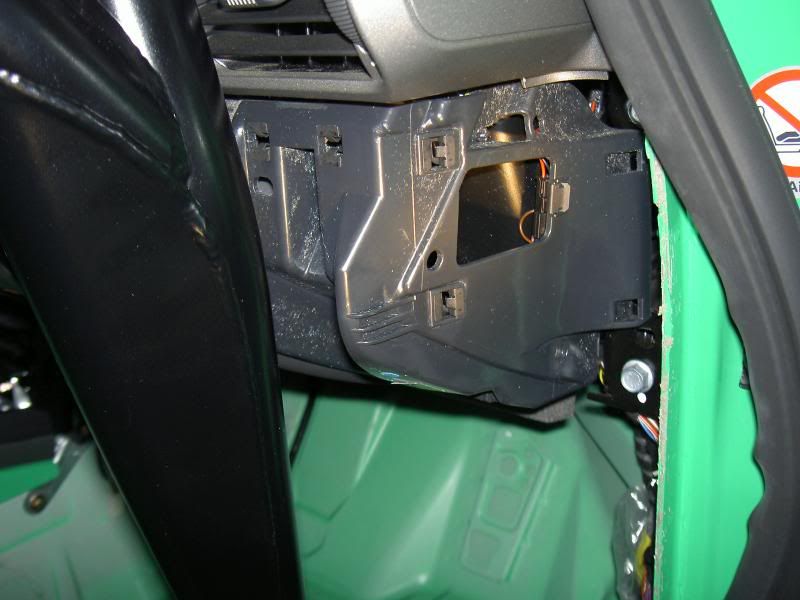
Remove the plastic air duct under the passenger airbag
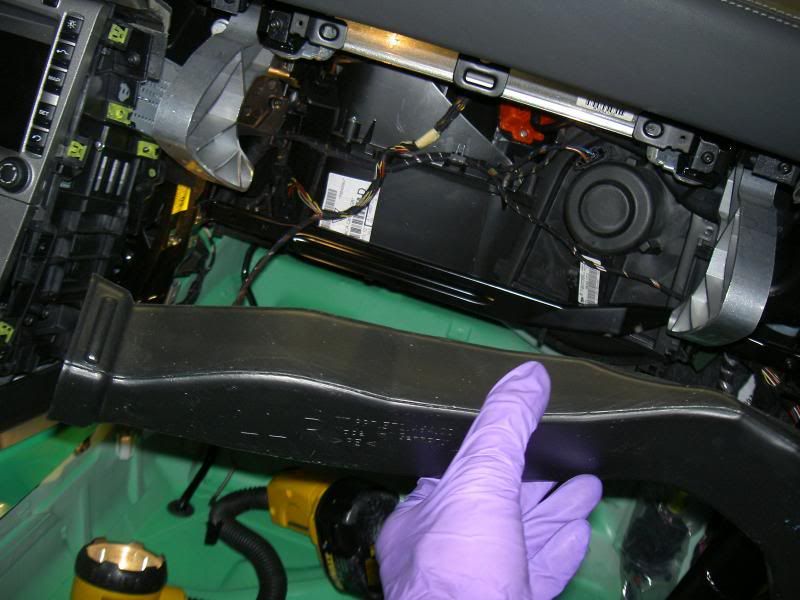
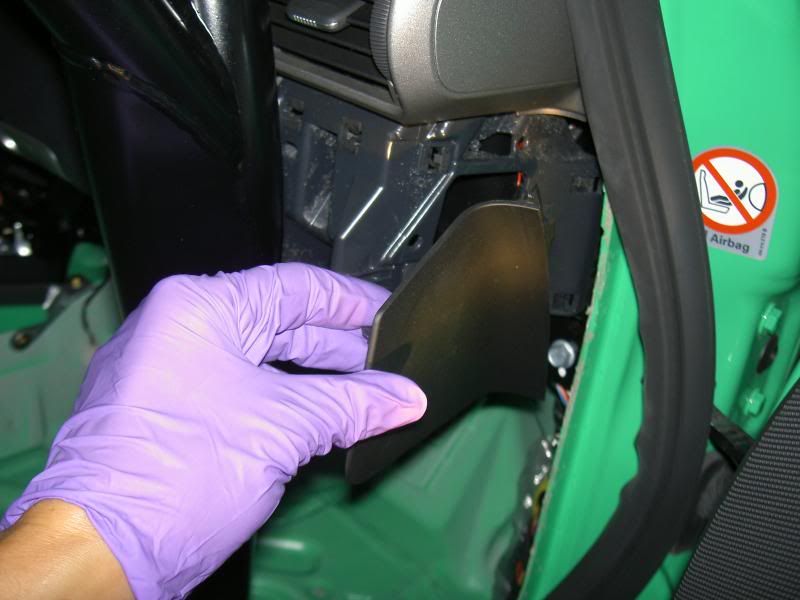
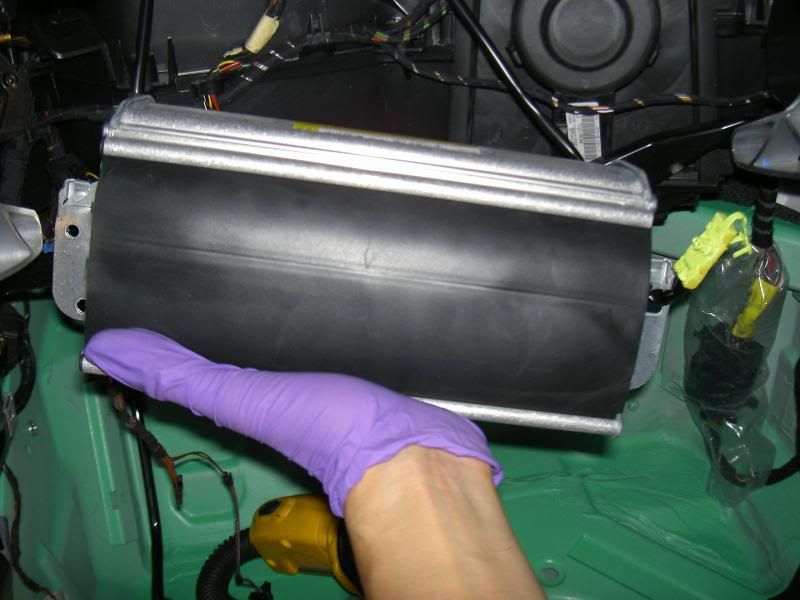
Here is what the passenger airbag look like tug above the glove compartment. Remove the 4 bolts that secure the airbag unit and remove the airbag assembly
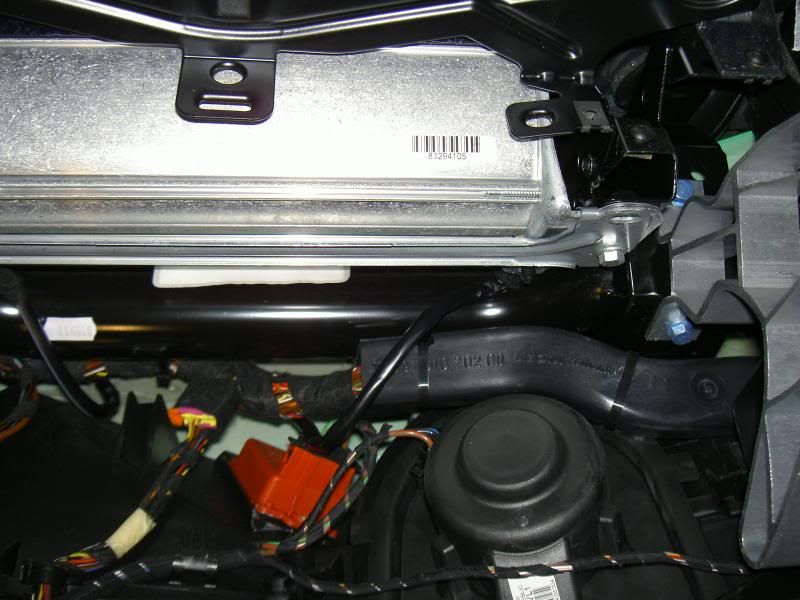
Remove the electrical plugs on the airbag ... this thing is REALLY heavy -7 lbs!
OK, now we are officially explosive free!! ... except for the flat 6 that sits behind and the high octane fuel in the tank
We have shave off total of 16 lbs of explosive weights (3 lbs each for steering wheel and side airbags and 7 lbs for passenger airbag)
Let's take a look at the factory vs OMP/lifeline/MOMO setup and compare weight and physical location on the steering column.
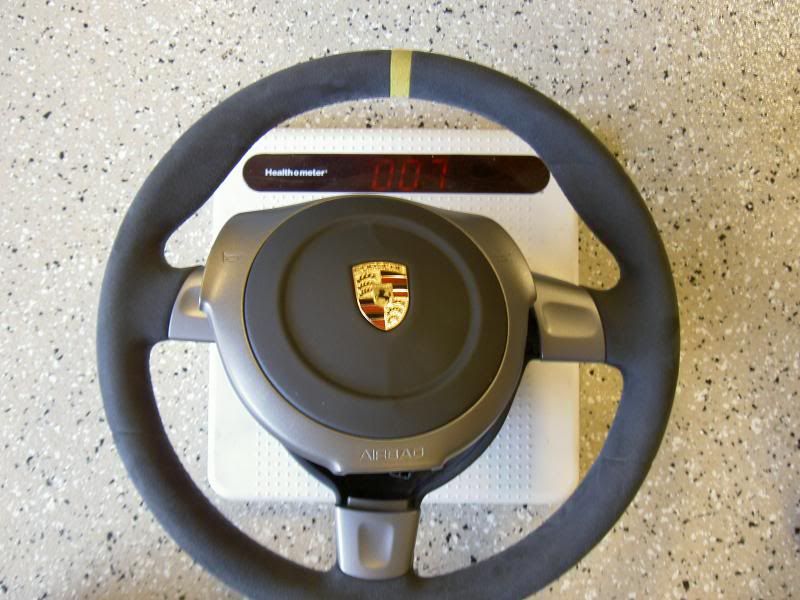
Factory steering wheel setup - 7 lbs
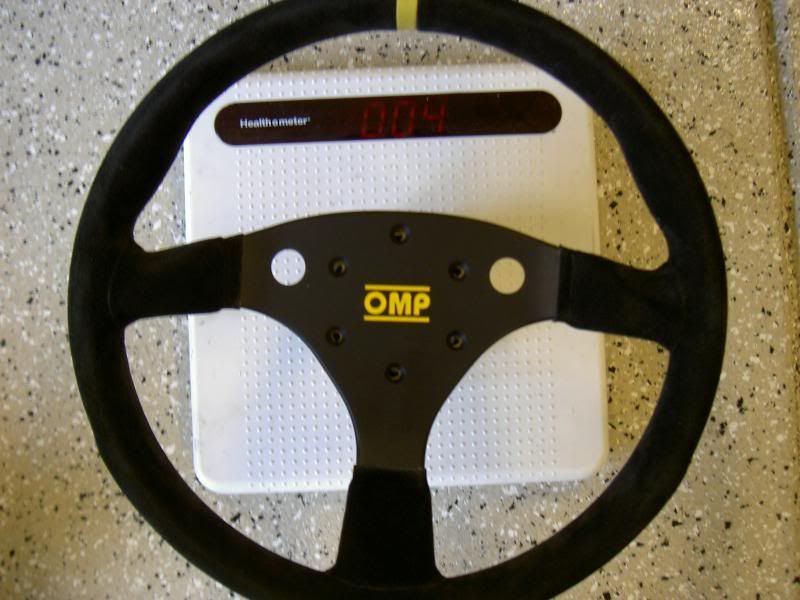
OMP/lifeline/MOMO setup - 4 lbs. 3 lbs of weight saving
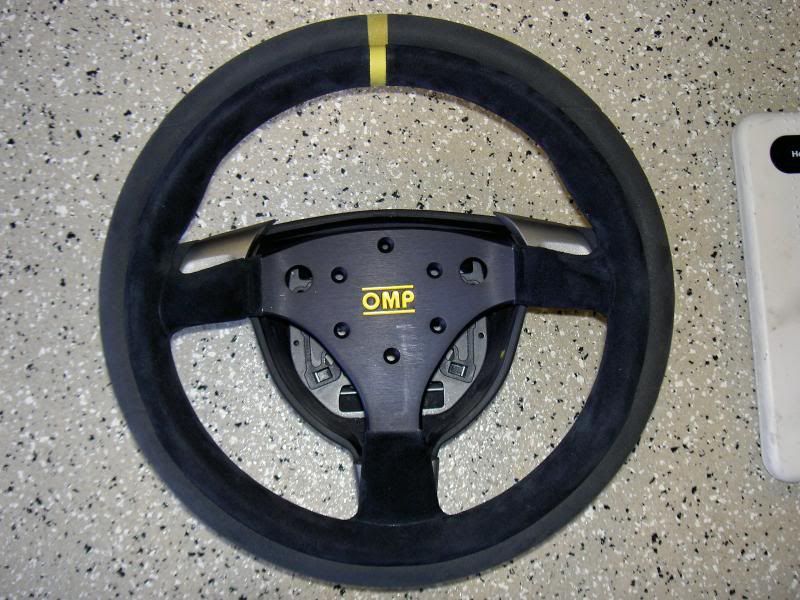
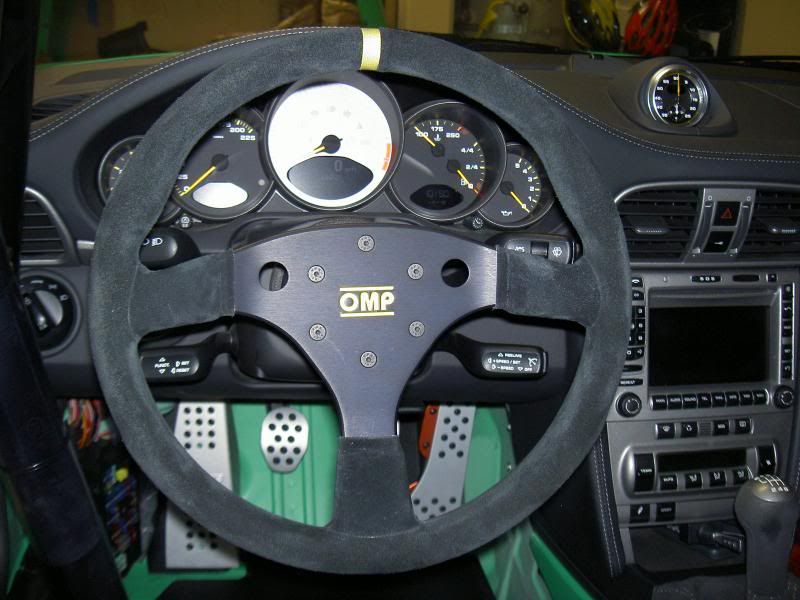
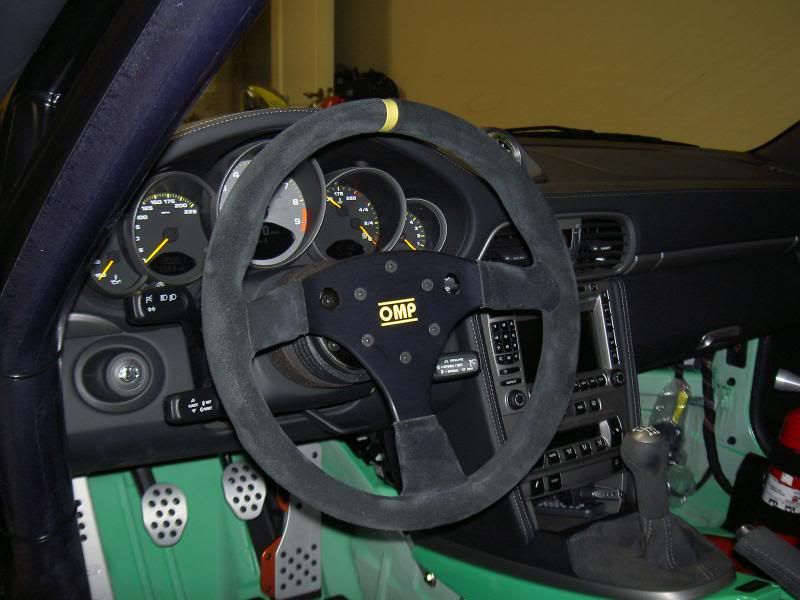
OMP wheel is smaller in diameter - unfortunately the top part of the steering wheel block my view of the RPM gauge. If you don't have a long torso or if your seat sits lower then you will have full view of the RPM gauge

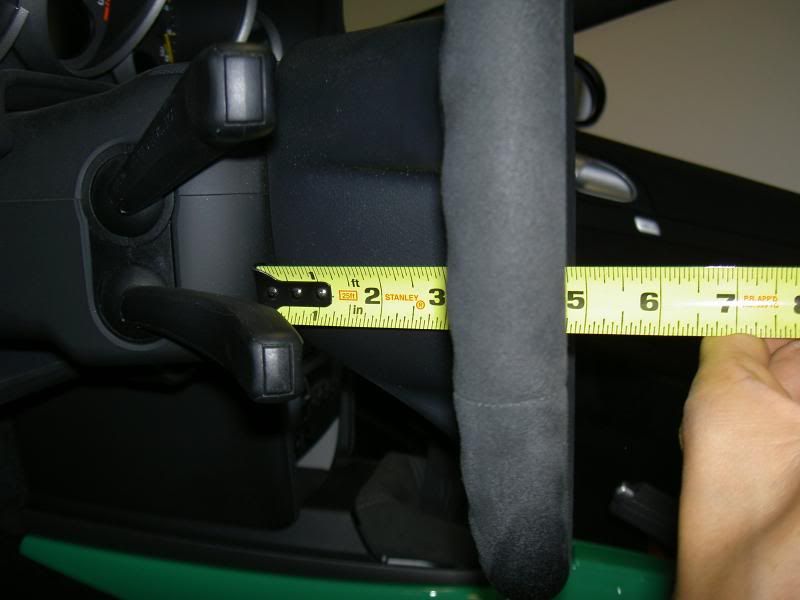
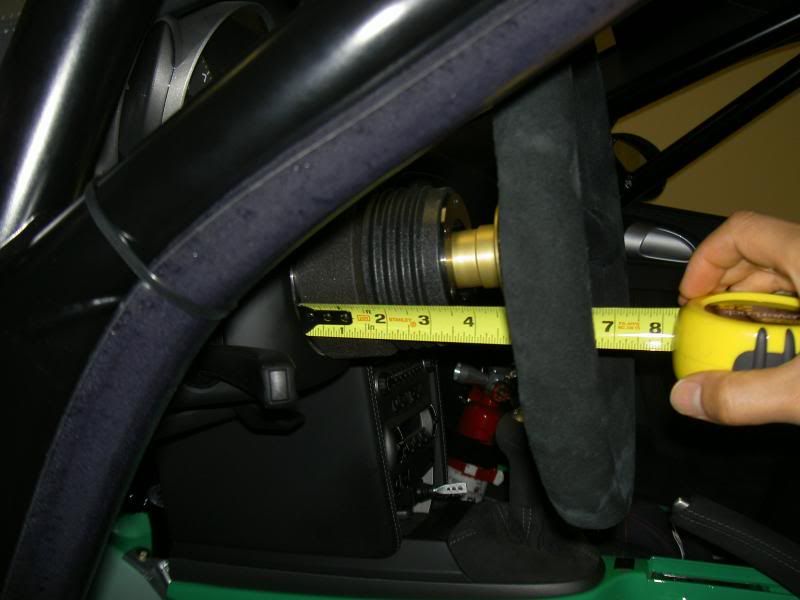
Factory steering wheel setup stick out about 4 3/4 inches compare with OMP/lifeline/MOMO setup which stick out about 6 1/2 inches - 1 3/4 inches longer than factory. I have to push the steering column all the way in and up for a comfortable position and reach further back to use the turn signal etc. 996 GT3 don't have the luxury to adjust their steering column.
Overall, I am very happy with this setup. The only draw back is that the steering wheel partially block the RPM gauge. I remove GT2 seat cushion on the track for lower seating position which help ameliorate this situation. Explosive free, light weight and solid feel of the OMP superturismo alcantara steering provide an all business cabin for track enjoyment
Remove the bolts and gently pull out the side impact airbag and disconnect the electrical plugs
Now the passenger airbag is a bit tricky. You need to remove the whole glove compartment to get access. First, remove radio/Nav side trim and the glove compartment right side trim to expose the glove compartment securing screws
Remove the cup holder by removing the two securing bolts under the assembly
Remove all the screws that secure the glove compartment and gently drop it down and unclip the wire connector on the back
Remove the plastic air duct under the passenger airbag
Here is what the passenger airbag look like tug above the glove compartment. Remove the 4 bolts that secure the airbag unit and remove the airbag assembly
Remove the electrical plugs on the airbag ... this thing is REALLY heavy -7 lbs!
OK, now we are officially explosive free!! ... except for the flat 6 that sits behind and the high octane fuel in the tank
We have shave off total of 16 lbs of explosive weights (3 lbs each for steering wheel and side airbags and 7 lbs for passenger airbag)
Let's take a look at the factory vs OMP/lifeline/MOMO setup and compare weight and physical location on the steering column.
Factory steering wheel setup - 7 lbs
OMP/lifeline/MOMO setup - 4 lbs. 3 lbs of weight saving
OMP wheel is smaller in diameter - unfortunately the top part of the steering wheel block my view of the RPM gauge. If you don't have a long torso or if your seat sits lower then you will have full view of the RPM gauge
Factory steering wheel setup stick out about 4 3/4 inches compare with OMP/lifeline/MOMO setup which stick out about 6 1/2 inches - 1 3/4 inches longer than factory. I have to push the steering column all the way in and up for a comfortable position and reach further back to use the turn signal etc. 996 GT3 don't have the luxury to adjust their steering column.
Overall, I am very happy with this setup. The only draw back is that the steering wheel partially block the RPM gauge. I remove GT2 seat cushion on the track for lower seating position which help ameliorate this situation. Explosive free, light weight and solid feel of the OMP superturismo alcantara steering provide an all business cabin for track enjoyment
09-22-2010, 08:27 AM
#4
Rennlist Member
Join Date: Feb 2006
Location: Wishing I Was At The Track
Posts: 13,668
Received 1,900 Likes
on
978 Posts
Nice!
Assume this means side bars are going on the cage. Are you finding that these clear the stock interior door panels and handles or are mods required?
Re: removing seat airbags, why not track down a set of lightweight sport buckets and save yourself another 20lbs - or better yet OMP/Recaro aftermarket race items? The GT2 seats are valuable resale items.
I see a fuel cell in your future....
Trending Topics
09-22-2010, 12:18 PM
#8
Addict
Rennlist Member
Rennlist Member
Thread Starter
Cool, this will serve as a reference if you ever decide to do it
No fuel cell ... will get a Cup car if I decide to go that far ...
The factory cage with door bar clear all interior panels. Will have that write up done in couple days. All these interior mods really took up alot of time - not as easy as LSD rebuild. I like the GT2 seats. They are very comfortable plus I need passenger seat once in a while when wife track my RS.
Yeah ... forgot to take my lithium
It's there ... along with low tire pressure and traction off warning light on the track. Don't bother me. It actually make me feel better seeing the airbag warning light knowing I am now TNT free
Nice!
Assume this means side bars are going on the cage. Are you finding that these clear the stock interior door panels and handles or are mods required?
Re: removing seat airbags, why not track down a set of lightweight sport buckets and save yourself another 20lbs - or better yet OMP/Recaro aftermarket race items? The GT2 seats are valuable resale items.
I see a fuel cell in your future....
Assume this means side bars are going on the cage. Are you finding that these clear the stock interior door panels and handles or are mods required?
Re: removing seat airbags, why not track down a set of lightweight sport buckets and save yourself another 20lbs - or better yet OMP/Recaro aftermarket race items? The GT2 seats are valuable resale items.
I see a fuel cell in your future....
The factory cage with door bar clear all interior panels. Will have that write up done in couple days. All these interior mods really took up alot of time - not as easy as LSD rebuild. I like the GT2 seats. They are very comfortable plus I need passenger seat once in a while when wife track my RS.
It's there ... along with low tire pressure and traction off warning light on the track. Don't bother me. It actually make me feel better seeing the airbag warning light knowing I am now TNT free
09-22-2010, 12:22 PM
#9
Addict
Rennlist Member
Rennlist Member
Thread Starter
09-22-2010, 12:28 PM
#10
Burning Brakes
Join Date: Oct 2008
Location: Trying to be the driver my car wants me to be
Posts: 1,249
Likes: 0
Received 0 Likes
on
0 Posts
09-22-2010, 12:32 PM
#11
Rennlist Member
Join Date: Feb 2006
Location: Wishing I Was At The Track
Posts: 13,668
Received 1,900 Likes
on
978 Posts
No fuel cell ... will get a Cup car if I decide to go that far ...
The factory cage with door bar clear all interior panels. Will have that write up done in couple days. All these interior mods really took up alot of time - not as easy as LSD rebuild. I like the GT2 seats. They are very comfortable plus I need passenger seat once in a while when wife track my RS.
The factory cage with door bar clear all interior panels. Will have that write up done in couple days. All these interior mods really took up alot of time - not as easy as LSD rebuild. I like the GT2 seats. They are very comfortable plus I need passenger seat once in a while when wife track my RS.
Thanks for the feedback on the door bars. Look forward to the write up.
09-22-2010, 01:14 PM
#13
That's a good improvement and easily reversible. Though you appear set on a course with no turning back. Nice work.
I wish there was a DOT quick release wheel (the airbag is fine by me ... if it deploys and breaks my nose with the helmet chin bar, that can only happen if the HANS has already failed.) Same with the thorax bag -- it's bulky and I'd prefer to just go with a shell seat and halo with HANS, but if that rib bag deploys, then it's probably helping. I can see the design advantage of the bag being in the seat (its position relative to the occupant is a constant) but it seems to me that putting the bag in the door, allows the owner to choose a better seat.
I wish there was a DOT quick release wheel (the airbag is fine by me ... if it deploys and breaks my nose with the helmet chin bar, that can only happen if the HANS has already failed.) Same with the thorax bag -- it's bulky and I'd prefer to just go with a shell seat and halo with HANS, but if that rib bag deploys, then it's probably helping. I can see the design advantage of the bag being in the seat (its position relative to the occupant is a constant) but it seems to me that putting the bag in the door, allows the owner to choose a better seat.
09-22-2010, 01:44 PM
#14
Addict
Rennlist Member
Rennlist Member
Thread Starter
There is no going back to Kanses no matter how hard I click my heels
That's a good improvement and easily reversible. Though you appear set on a course with no turning back. Nice work.
I wish there was a DOT quick release wheel (the airbag is fine by me ... if it deploys and breaks my nose with the helmet chin bar, that can only happen if the HANS has already failed.) Same with the thorax bag -- it's bulky and I'd prefer to just go with a shell seat and halo with HANS, but if that rib bag deploys, then it's probably helping. I can see the design advantage of the bag being in the seat (its position relative to the occupant is a constant) but it seems to me that putting the bag in the door, allows the owner to choose a better seat.
I wish there was a DOT quick release wheel (the airbag is fine by me ... if it deploys and breaks my nose with the helmet chin bar, that can only happen if the HANS has already failed.) Same with the thorax bag -- it's bulky and I'd prefer to just go with a shell seat and halo with HANS, but if that rib bag deploys, then it's probably helping. I can see the design advantage of the bag being in the seat (its position relative to the occupant is a constant) but it seems to me that putting the bag in the door, allows the owner to choose a better seat.
09-22-2010, 03:54 PM
#15
Admin
Lifetime Rennlist
Member
Lifetime Rennlist
Member
Mike tell me again why you have the 1000pounds radio there? 
If you want to kill the airbag lights wire a 2.8 Ohm resistor in each one. The resistor emulates the resistance of the airbags circuit and car thinks it will go boom if needed.
John
If you want to kill the airbag lights wire a 2.8 Ohm resistor in each one. The resistor emulates the resistance of the airbags circuit and car thinks it will go boom if needed.
John