When you click on links to various merchants on this site and make a purchase, this can result in this site earning a commission. Affiliate programs and affiliations include, but are not limited to, the eBay Partner Network.
The RS mounts are from the 964 RS and the 993 RS, it has been a commonly known upgrade to use these on later cars as they are not liquid filled.
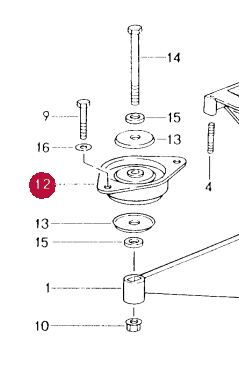
Our RS mount kit includes the new longer bolts needed (not pictured on our our site). To be specific the kit includes the following shown in the diagram below:
2 x #12
2 x #10
2 x #14
4 x #15
4 x #13
4 x #16
4 x #9
Local dealer quoted me 2hrs labor plus $680 for the parts. Plus tax. So close to $1000 all in.
I don't know how that compares to other dealers, but after looking at the online tutorials (Bruce's and Pelican's), this is obviously a job that almost anyone can tackle with basic hand tools and a floor jack.
Knowing that, there's no way I'd pay that much for the job, or the parts.
The RS mounts are from the 964 RS and the 993 RS, it has been a commonly known upgrade to use these on later cars as they are not liquid filled.
Our RS mount kit includes the new longer bolts needed (not pictured on our our site). To be specific the kit includes the following shown in the diagram below:
2 x #12
2 x #10
2 x #14
4 x #15
4 x #13
4 x #16
4 x #9
You may want to fix your listing to address that. I wondered the same thing when I looked at the mounts in your link. Just sayin'.
Agreed. I ordered parts from Renn and I'll let you know how it goes. I really appreciate all the DIY information on here. I'll be replacing my Frunk switch, too, using help from this site.
Originally Posted by mickfluff
whats a dealer install price on these? if you supply the part... labor speaking? Just curious... in spring dealer likely doing alternator line as slow crank (typical issue) so thought while doing that add these...
thanks
Originally Posted by Iceter
I don't know how that compares to other dealers, but after looking at the online tutorials (Bruce's and Pelican's), this is obviously a job that almost anyone can tackle with basic hand tools and a floor jack.
Knowing that, there's no way I'd pay that much for the job, or the parts.
You may want to fix your listing to address that. I wondered the same thing when I looked at the mounts in your link. Just sayin'.
It is a little confusing the way it is now, we will be adding a photo of the kit next week to replace the stock photo
Originally Posted by carmanah1965
Agreed. I ordered parts from Renn and I'll let you know how it goes. I really appreciate all the DIY information on here. I'll be replacing my Frunk switch, too, using help from this site.
Has anyone measured the distance between the top of the exhaust tip and bumper? Mine is 7/8".
These are the factory-recommended offsets for the PSE tips. I imagine the other tips are similar but I don't have that.
21mm, the larger Y value, is a little over 0.82", just a tad under ⅞" but not likely enough to worry about since that hits the +/-1mm tolerance just fine.
With my tips on a C2.2 the tips are adjustable. I could see how the original installer didn't line then up correctly and/or the single bolt holding the tips on allowed for some adjustment over time.
Now, if there is a measurement to actual exhaust pipe, that might be more accurate.
With my tips on a C2.2 the tips are adjustable. I could see how the original installer didn't line then up correctly and/or the single bolt holding the tips on allowed for some adjustment over time.
Now, if there is a measurement to actual exhaust pipe, that might be more accurate.
Agreed there is substantial adjustability and that swiveling is what you are using to make adjustments in the diagram above. However, I think that with the tips sitting fairly straight on the pipe without a lot of swivel you should be in the ballpark of the figures above. If you have to push the tips way up at an angle to get there you likely have sagging mounts, especially if you have to do that more on one side than the other.
But to check it by the pipes alone: Due to the fact that the engine torque twists the engine mostly in one direction I think it is most common for the driver's side mount to sag more first. If you look at the pipes without the tips and see the left pipe is substantially lower, you can pretty much bet your driver's side mount has gotten weak. In my case, without the tips on, no measurement was needed. You could easily see that the left side pipe was hanging down lower. When I had to swivel the tips on that side at a noticeable upward angle to get rid of the excess gap I knew a replacement was needed.
This is an easy DIY... actually easier than a brake job. It is just scary as you are screwing with the engine..... don't be afraid.
Regarding the sagging right side...... I am going to make an assumption (a swag).... if you have 75K or miles on your car, the right is sagging. This does not mean your mounts require replacement.... I am not sure they ever really require replacement unless they are leaking or clunking. But if you are looking for an excuse or something to feed your neurosis, let's say 75K miles will do it. Mounts are a wear item.
Just for amusement, and not to be alarmist, I did remember a long time ago seeing a post from some poor guy whose engine mount failed after having the previously owned car only two weeks!
Here is one photo, he has others including how far the engine drops when this occurs. It isn't quite as catastrophic as I would have imagined, but not terribly pleasant either.


 01-26-2017, 02:47 PM