When you click on links to various merchants on this site and make a purchase, this can result in this site earning a commission. Affiliate programs and affiliations include, but are not limited to, the eBay Partner Network.
This is a short write-up about how to replace front rotors and pads on the Carrera 997.1 S or 4S. There are already a couple of very good videos done by Van on how to replace the pads and rotors on a 996. However, I never found a comprehensive and complete write-up on how to replace the brakes on a 997.1 S.
When the need to change brake pads arise, the owner must decide if it worth changing the rotors or not. Measurements should be done to determine if the rotors need to be replaced or not. In my case, the existence of a little lip all around the rotors justified their replacement.
When it comes to replacing the brake parts, there is a plethora of parts available and it can quickly become overwhelming and confusing. Prices vary considerably from one place to the next. Of course Porsche genuine parts remain by far the most expensive and they have to, if Porsche wants to maintain the significant profit margin it does on each car ($18K in average) and on their spare parts.
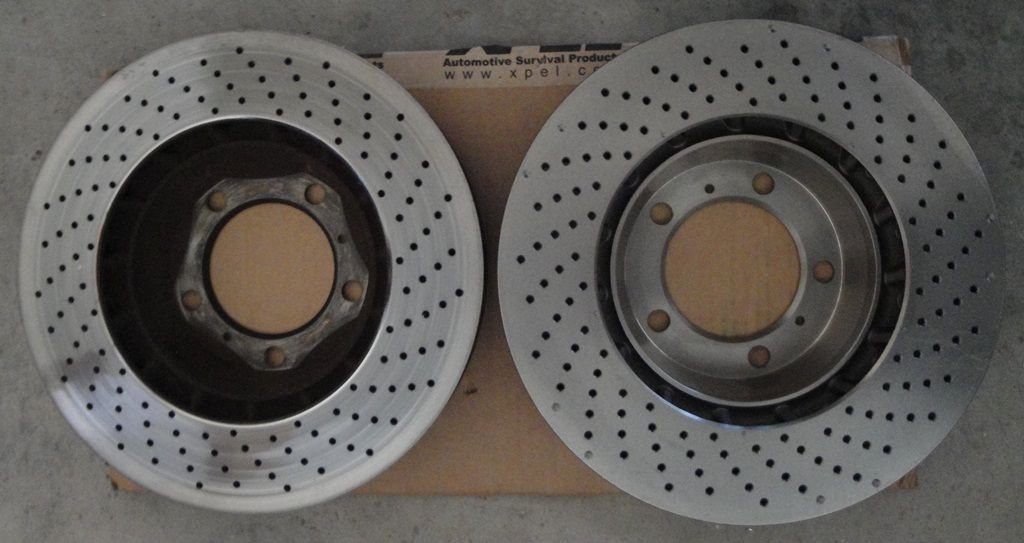
After looking carefully at the brakes, it appears that the brake system is designed and manufactured by Brembo (Italy). Originally, the calipers are by Brembo, the rotor surprisingly are not marked at all (no number, no brand), pads are from Jurid (Spain) and all remaining parts are from Brembo. It seemed logical to me to select Brembo rotors sold by Pelican for $150 piece (a third of the Porsche price). The rotors are extremely well finished, plated on the outside and on the hub to prevent corrosion and very similar to the original Porsche rotors as it can be seen on the following pictures.
I did not weight the two rotors to see if there was any differences. I suspect that both rotor types are very identical, with perhaps a slight advantage to the Brembo rotors which seemed better built.
For the pads, I decided to stick with the Porsche genuine pads for the very good feeling they give you in street and daily driving. I do not race my car and thus did not even look into the vast choice of racing and competition pads. I have used Ceramic pads on all my BMWs and found them sometimes dry to the touch, slow to respond under the rain, sometimes noisy, despite their fantastic advantage of not generating that black and nasty dust like regular pads. I also found that if you do not use them hard on a regular basis, they tend to glaze and loose a lot of their efficiency. With the above in mind, I decided to go with the Porsche genuine pads that can be obtained for $210 from Suncoast Porsche (a really good price - These guys limit their margin and make it up with the large volume of parts sold to enthusiasts all over North America. I also ordered from Suncoast the bolts, springs, clips and got the damping plates from my local dealer. In hindsight, I should have bought all the miscellaneous parts from my local dealer who always give me a very good discount.
There have been discussions about whether or not replace the bolts, springs clips and plates. My car is close to 70K miles, almost ten years old, and I thought it deserved to have a complete and new braking system. In addition the moral comfort to know that all the parts that could be replaced have been replaced, helps a lot when you take some risks. Besides, all miscellaneous parts add about $120 to the overall bill.
Before replacing, you have to take apart. Let's review quickly some of the steps involved in taking apart the front brakes.:
1) After jacking up safely the car and removing the front wheels, you need to start taking apart the old brakes.
2) Using pliers, remove the small clip holding the pin. The clip is placed along the back of the caliper, on the inside.
3) Using an old Torx screwdriver or a long rod, push the pin located above the pads, towards the inside of the car.
4) Remove very carefully the wear sensors on each pad. A small screwdriver is the best tool I have found to dislodge these sensors without damaging them. Both sensors are plunging into a hole located in the pads, so be careful when pulling them out. They have to be extracted perpendicularly to the pads.
5) Once everything is cleared, use an adjustable pliers to squeeze the pads to the side of the caliper. Make sure you place a piece of rags between the outside of the caliper and the teeth of the pliers, so as to not damage the paint. You must squeeze each pad towards the outside as much as possible. You may want to open the brake fluid reservoir and make sure that none of the fluid is spilling while you try to spread away both pads. Once the pads are next to the caliper walls, they will remain there and you can move to the next phase.
6) Using a thin blade (I found a cheese knife to be the perfect tool), insert it between the pad and the damping plate. The damping plate is glued to the pads, but the heat and pressure usually cook the glue, and cutting through that glue is not that difficult. Take your time and make sure that the pads are free from their damping plate from the top all the way to the bottom.
7) At this point, just pick up the pad and pull it out. It should slide out very easily.
8) Using your cheese knife, gently insert it between the damping plate and the caliper and remove the damping plate. The damping plate has two cylinders attached to it (see picture). They are of different sizes. If you have pushed the pad completely against the wall of the caliper, you will have just enough space to remove the damping plate. If the damping plate are not coming out, re-insert the pad, and squeeze with your adjustable pliers (and rag) until the two pistons are completely compressed inside the caliper.
9) Do the same for the other pad and damping plate.
10) Using an hex-pan of 10 mm, insert it into one of the two bolts holding the caliper to the hub. Use a breaking bar if you have access to a 10 mm Hex Pan mounted on a 1/2 socket. I could only find a 10 mm Hex pan mounted on 3/8 socket and noticed that the 10 mm bit was starting to rotate into its socket.....Not good. Instead, I inserted a regular 10 mm Hex wrench (the L shaped stuff, hard and solid) and using a hammer, tapped it a few times to break it. After that, it was easy to remove both bolts.
11) Before taking away completely the second bolt, you will secure the caliper to the suspension spring using some twig, wool or soft material to not damage the paint. The fluid line going to the caliper is solid and gives you just enough play to remove the caliper out of the rotor.
12) Spray a drop of PB Blaster on both Phillips screws holding the rotor, wait a few seconds and remove these two screws. Here, I have read a lot of horror stories, where people had to use impact screwdrivers or even worse, having to drill out the screws. On my car, they came out very easily. I suppose that on cars submitted to extreme thermal cycling (such as racing) or if the previous mechanic did not use anti-seizing agent on these screws, they may be more challenging to remove.
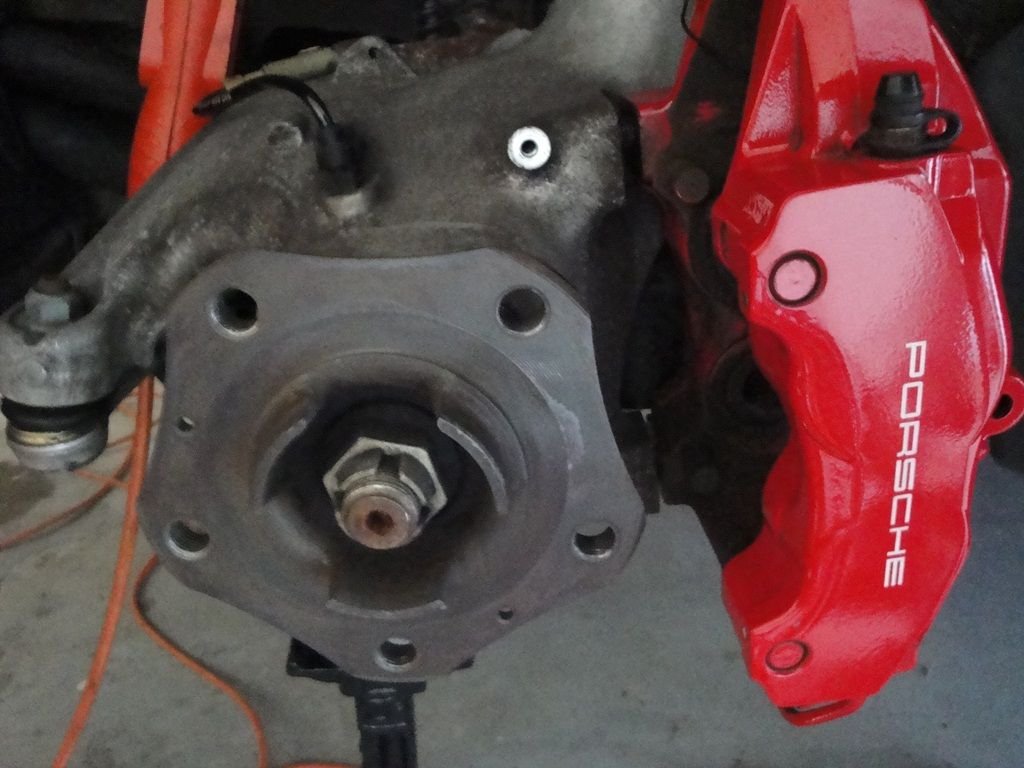
13) Finally, wiggle the rotor and remove it from the hub. Alternatively, you can use a rubber hammer to dislodge it with some friendly taps.
Alright, the hub appears in all its glory and we are ready to start rebuilding.
Wanting to do things as cleanly as possible, I brushed the hub with a metallic brush and removed all traces of corrosion and dust. As customary when replacing the pads, a can of brake cleaner comes handy to give a final blow of cleanliness.
I also, took apart the brake shield plate, sanded it and repainted it with a high temperature spray paint. It may last whatever it will, but it looks much better than the corroded and dusty shield I removed earlier:
When re-attaching the shield, do not forget the anti seize paste on all three bolts.
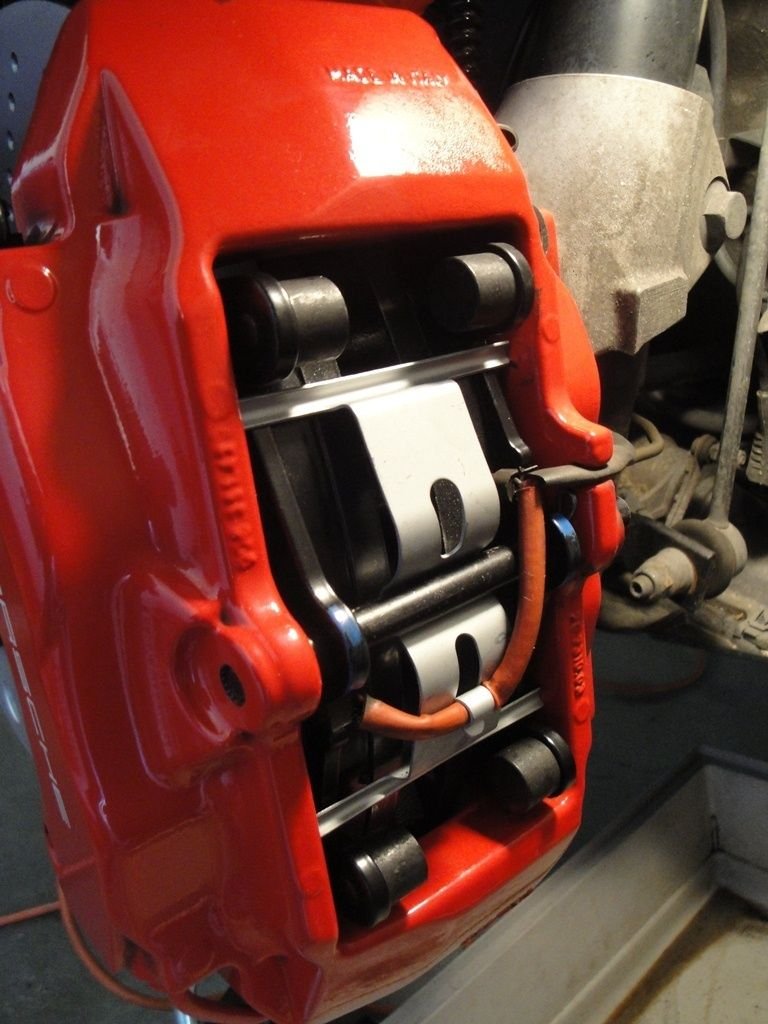
Then comes the philosophical question: Should I clean the caliper (think Concours d'Elegance) or should I leave it the way it is? To clean or not to clean? I will leave that question to each and everyone. What I did was rather simple and would not allow me to score any points at a Concours d'Elegance. I sprayed the caliper with simple green, left it soaking and used a tooth brush to remove most of the grime on the inside and mostly around the pistons. I also verified that each piston could be squeezed and would travel freely within the caliper. The small pistons can be easily verified and actuated, whereas the larger one will require more powerful fingers.
I know, it is not perfect but who has time for perfection anyway? Once happy with the clean (or dirty) appearance of the caliper, the new rotor (or the old one) can be installed. When I ordered the brake parts from Suncoast, I also decided to get a set of 7mm spacers for the front wheels and 15 mm spacers for the rear wheels. These spacers comes as a complete kit with beautiful chrome plated lugs and longer screws for fixing the spacer and the rotor to the hub:
It makes for a very nice assembly. Again, do not forget the Permatex anti-seizing grease on the tip of the two screws holding the spacer and rotor. This is your insurance against future headaches.
We are moving along with the re-assembly with the installation of the caliper on the new rotor.:
1) Take your time and wiggle the caliper until it slide on the rotor without scratching it or damaging it. It is tight but it will pass.
2) Insert the two new black bolts into the caliper and torque them at 63 foot-pounds with your torque wrench.
3) with all pistons squeezed as much as possible, insert one damping plate in the pistons. Push it all the way inside. Damping plates are apparently mounted dry with no type of anti-squealing grease or anything. Peel carefully the sticker to reveal the glue.
4) Insert a new pad all the way in and push it against the damping plate. Adhesion will start but you have plenty of time to move the pad or even remove it and re-insert it.
5) Do the same for the other damping plate and pad.
6) Place the spring on top and insert the pin from the inside of the car out. You may have to tap gently the pin to make it go all the way on the front wall of the caliper.
7) Do not forget to insert the clip in the pin. Verify twice that everything is perfect.
8) Spin the rotor and make sure all is fine. Clean the rotor if some greasy or dirty fingers have contaminated it (use Brake cleaner fluid).
9) Carefully re-insert both wear sensors into the pads. I found it easier to first insert the inside sensor, place the wire under the spring, and finish with the outside sensor.
10) Carefully re-attach the electrical wire of the sensors to the brake line with the two plastic clips. On the C4S, make sure the wire is not located near the universal joint of the front wheel.
11) Now is a good time to flush that specific caliper. I know there are people (and even dealers) who looks at the fluid in the reservoir, finds it clear and beautifully transparent and concludes that it never needs to be changed. The point is: the fluid in the reservoir and the fluid in the calipers are two different animals, separated by meters of brake lines. When you do a job such as this one, do not take a short cut and do not skip the flushing phase. Instead, I run about half a liter of fluid through each caliper and alternate between blue and yellow fluid. Here I was going from Blue back to Yellow, which takes a lot of fluid to get rid of any shades of blue and green. Start flushing the outside caliper/pistons first, and then flush the inside/caliper pistons. Of course, use the one-man pressure system hooked to your brake fluid reservoir.
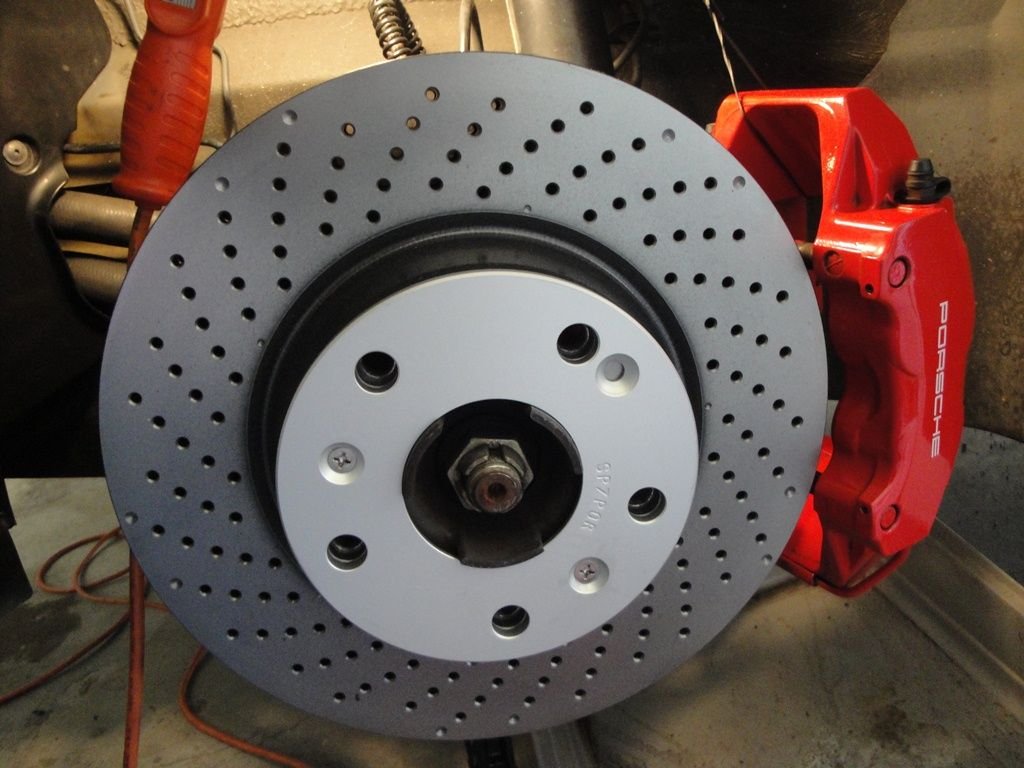
Here is a picture of the finished brake assembly:
As indicated before, I am also installing some 7 mm spacers. The new bolts provided in the kit are quite beautiful and 7 mm longer than the original bolts. I am also getting rid of the anti theft lug which is always a problem, when doing some maintenance.
The spacer kit also comes with a couple of Porsche mounting pins to help you position the wheel and avoid paint damage to your beautiful calipers:
Because of the near absence of shoulders on the 7 mm spacer, the wheel must be installed as carefully as possible and torqued very progressively. I use a soft wrench of 19 mm (Autozone $9.99) which is built with a plastic cover to preserve your rims, a brass insert to not mar your lugs and a 1/2 inch socket to match your torque wrench. A beautiful and very inexpensive tool. I also washed carefully the wheels before re-assembling them. Wheel lugs must be torqued at 96 foot-pound.
The finished result is a lot nicer than it was with the old lugs and will provide me with some good braking capabilities for years to come. Now, it is time to move to the other front wheel......and to play it again.
I hope you enjoyed that write-up and will find it useful when replacing your brakes. I have learnt so much from that 997 community that I really enjoy giving back and contributing when I see certain topics not covered or missing.
This is a short write-up about how to replace front rotors and pads on the Carrera 997.1 S or 4S. There are already a couple of very good videos done by Van on how to replace the pads and rotors on a 996. However, I never found a comprehensive and complete write-up on how to replace the brakes on a 997.1 S.
When the need to change brake pads arise, the owner must decide if it worth changing the rotors or not. Measurements should be done to determine if the rotors need to be replaced or not. In my case, the existence of a little lip all around the rotors justified their replacement.
When it comes to replacing the brake parts, there is a plethora of parts available and it can quickly become overwhelming and confusing. Prices vary considerably from one place to the next. Of course Porsche genuine parts remain by far the most expensive and they have to, if Porsche wants to maintain the significant profit margin it does on each car ($18K in average) and on their spare parts.
After looking carefully at the brakes, it appears that the brake system is designed and manufactured by Brembo (Italy). Originally, the calipers are by Brembo, the rotor surprisingly are not marked at all (no number, no brand), pads are from Jurid (Spain) and all remaining parts are from Brembo. It seemed logical to me to select Brembo rotors sold by Pelican for $150 piece (a third of the Porsche price). The rotors are extremely well finished, plated on the outside and on the hub to prevent corrosion and very similar to the original Porsche rotors as it can be seen on the following pictures.
I did not weight the two rotors to see if there was any differences. I suspect that both rotor types are very identical, with perhaps a slight advantage to the Brembo rotors which seemed better built.
For the pads, I decided to stick with the Porsche genuine pads for the very good feeling they give you in street and daily driving. I do not race my car and thus did not even look into the vast choice of racing and competition pads. I have used Ceramic pads on all my BMWs and found them sometimes dry to the touch, slow to respond under the rain, sometimes noisy, despite their fantastic advantage of not generating that black and nasty dust like regular pads. I also found that if you do not use them hard on a regular basis, they tend to glaze and loose a lot of their efficiency. With the above in mind, I decided to go with the Porsche genuine pads that can be obtained for $210 from Suncoast Porsche (a really good price - These guys limit their margin and make it up with the large volume of parts sold to enthusiasts all over North America. I also ordered from Suncoast the bolts, springs, clips and got the damping plates from my local dealer. In hindsight, I should have bought all the miscellaneous parts from my local dealer who always give me a very good discount.
There have been discussions about whether or not replace the bolts, springs clips and plates. My car is close to 70K miles, almost ten years old, and I thought it deserved to have a complete and new braking system. In addition the moral comfort to know that all the parts that could be replaced have been replaced, helps a lot when you take some risks. Besides, all miscellaneous parts add about $120 to the overall bill.
Before replacing, you have to take apart. Let's review quickly some of the steps involved in taking apart the front brakes.:
1) After jacking up safely the car and removing the front wheels, you need to start taking apart the old brakes.
2) Using pliers, remove the small clip holding the pin. The clip is placed along the back of the caliper, on the inside.
3) Using an old Torx screwdriver or a long rod, push the pin located above the pads, towards the inside of the car.
4) Remove very carefully the wear sensors on each pad. A small screwdriver is the best tool I have found to dislodge these sensors without damaging them. Both sensors are plunging into a hole located in the pads, so be careful when pulling them out. They have to be extracted perpendicularly to the pads.
5) Once everything is cleared, use an adjustable pliers to squeeze the pads to the side of the caliper. Make sure you place a piece of rags between the outside of the caliper and the teeth of the pliers, so as to not damage the paint. You must squeeze each pad towards the outside as much as possible. You may want to open the brake fluid reservoir and make sure that none of the fluid is spilling while you try to spread away both pads. Once the pads are next to the caliper walls, they will remain there and you can move to the next phase.
6) Using a thin blade (I found a cheese knife to be the perfect tool), insert it between the pad and the damping plate. The damping plate is glued to the pads, but the heat and pressure usually cook the glue, and cutting through that glue is not that difficult. Take your time and make sure that the pads are free from their damping plate from the top all the way to the bottom.
7) At this point, just pick up the pad and pull it out. It should slide out very easily.
8) Using your cheese knife, gently insert it between the damping plate and the caliper and remove the damping plate. The damping plate has two cylinders attached to it (see picture). They are of different sizes. If you have pushed the pad completely against the wall of the caliper, you will have just enough space to remove the damping plate. If the damping plate are not coming out, re-insert the pad, and squeeze with your adjustable pliers (and rag) until the two pistons are completely compressed inside the caliper.
9) Do the same for the other pad and damping plate.
10) Using an hex-pan of 10 mm, insert it into one of the two bolts holding the caliper to the hub. Use a breaking bar if you have access to a 10 mm Hex Pan mounted on a 1/2 socket. I could only find a 10 mm Hex pan mounted on 3/8 socket and noticed that the 10 mm bit was starting to rotate into its socket.....Not good. Instead, I inserted a regular 10 mm Hex wrench (the L shaped stuff, hard and solid) and using a hammer, tapped it a few times to break it. After that, it was easy to remove both bolts.
11) Before taking away completely the second bolt, you will secure the caliper to the suspension spring using some twig, wool or soft material to not damage the paint. The fluid line going to the caliper is solid and gives you just enough play to remove the caliper out of the rotor.
12) Spray a drop of PB Blaster on both Phillips screws holding the rotor, wait a few seconds and remove these two screws. Here, I have read a lot of horror stories, where people had to use impact screwdrivers or even worse, having to drill out the screws. On my car, they came out very easily. I suppose that on cars submitted to extreme thermal cycling (such as racing) or if the previous mechanic did not use anti-seizing agent on these screws, they may be more challenging to remove.
13) Finally, wiggle the rotor and remove it from the hub. Alternatively, you can use a rubber hammer to dislodge it with some friendly taps.
Alright, the hub appears in all its glory and we are ready to start rebuilding.
Wanting to do things as cleanly as possible, I brushed the hub with a metallic brush and removed all traces of corrosion and dust. As customary when replacing the pads, a can of brake cleaner comes handy to give a final blow of cleanliness.
I also, took apart the brake shield plate, sanded it and repainted it with a high temperature spray paint. It may last whatever it will, but it looks much better than the corroded and dusty shield I removed earlier:
When re-attaching the shield, do not forget the anti seize paste on all three bolts.
Then comes the philosophical question: Should I clean the caliper (think Concours d'Elegance) or should I leave it the way it is? To clean or not to clean? I will leave that question to each and everyone. What I did was rather simple and would not allow me to score any points at a Concours d'Elegance. I sprayed the caliper with simple green, left it soaking and used a tooth brush to remove most of the grime on the inside and mostly around the pistons. I also verified that each piston could be squeezed and would travel freely within the caliper. The small pistons can be easily verified and actuated, whereas the larger one will require more powerful fingers.
I know, it is not perfect but who has time for perfection anyway? Once happy with the clean (or dirty) appearance of the caliper, the new rotor (or the old one) can be installed. When I ordered the brake parts from Suncoast, I also decided to get a set of 7mm spacers for the front wheels and 15 mm spacers for the rear wheels. These spacers comes as a complete kit with beautiful chrome plated lugs and longer screws for fixing the spacer and the rotor to the hub:
It makes for a very nice assembly. Again, do not forget the Permatex anti-seizing grease on the tip of the two screws holding the spacer and rotor. This is your insurance against future headaches.
We are moving along with the re-assembly with the installation of the caliper on the new rotor.:
1) Take your time and wiggle the caliper until it slide on the rotor without scratching it or damaging it. It is tight but it will pass.
2) Insert the two new black bolts into the caliper and torque them at 63 foot-pounds with your torque wrench.
3) with all pistons squeezed as much as possible, insert one damping plate in the pistons. Push it all the way inside. Damping plates are apparently mounted dry with no type of anti-squealing grease or anything. Peel carefully the sticker to reveal the glue.
4) Insert a new pad all the way in and push it against the damping plate. Adhesion will start but you have plenty of time to move the pad or even remove it and re-insert it.
5) Do the same for the other damping plate and pad.
6) Place the spring on top and insert the pin from the inside of the car out. You may have to tap gently the pin to make it go all the way on the front wall of the caliper.
7) Do not forget to insert the clip in the pin. Verify twice that everything is perfect.
8) Spin the rotor and make sure all is fine. Clean the rotor if some greasy or dirty fingers have contaminated it (use Brake cleaner fluid).
9) Carefully re-insert both wear sensors into the pads. I found it easier to first insert the inside sensor, place the wire under the spring, and finish with the outside sensor.
10) Carefully re-attach the electrical wire of the sensors to the brake line with the two plastic clips. On the C4S, make sure the wire is not located near the universal joint of the front wheel.
11) Now is a good time to flush that specific caliper. I know there are people (and even dealers) who looks at the fluid in the reservoir, finds it clear and beautifully transparent and concludes that it never needs to be changed. The point is: the fluid in the reservoir and the fluid in the calipers are two different animals, separated by meters of brake lines. When you do a job such as this one, do not take a short cut and do not skip the flushing phase. Instead, I run about half a liter of fluid through each caliper and alternate between blue and yellow fluid. Here I was going from Blue back to Yellow, which takes a lot of fluid to get rid of any shades of blue and green. Start flushing the outside caliper/pistons first, and then flush the inside/caliper pistons. Of course, use the one-man pressure system hooked to your brake fluid reservoir.
Here is a picture of the finished brake assembly:
As indicated before, I am also installing some 7 mm spacers. The new bolts provided in the kit are quite beautiful and 7 mm longer than the original bolts. I am also getting rid of the anti theft lug which is always a problem, when doing some maintenance.
The spacer kit also comes with a couple of Porsche mounting pins to help you position the wheel and avoid paint damage to your beautiful calipers:
Because of the near absence of shoulders on the 7 mm spacer, the wheel must be installed as carefully as possible and torqued very progressively. I use a soft wrench of 19 mm (Autozone $9.99) which is built with a plastic cover to preserve your rims, a brass insert to not mar your lugs and a 1/2 inch socket to match your torque wrench. A beautiful and very inexpensive tool. I also washed carefully the wheels before re-assembling them. Wheel lugs must be torqued at 96 foot-pound.
The finished result is a lot nicer than it was with the old lugs and will provide me with some good braking capabilities for years to come. Now, it is time to move to the other front wheel......and to play it again.
I hope you enjoyed that write-up and will find it useful when replacing your brakes. I have learnt so much from that 997 community that I really enjoy giving back and contributing when I see certain topics not covered or missing.
We always appreciate it when someone takes the time to share with us all the issues with a maintenance item. Thanks!
One added question I have for you--mileage on your car when you chose to switch out the rotors and pads?
Thank you Dan. Now for your question, you did not read carefully my prose: It is right below the picture showing all the miscellaneous parts (2006, 69K miles).
Thank you Dan. Now for your question, you did not read carefully my prose: It is right below the picture showing all the miscellaneous parts (2006, 69K miles).
Yves
Sorry!! Too distracted these days. You did fairly well on miles compared to many.
(I'm still on my factory installed pads at 99,244 miles.)
This is a short write-up about how to replace front rotors and pads on the Carrera 997.1 S or 4S. There are already a couple of very good videos done by Van on how to replace the pads and rotors on a 996. However, I never found a comprehensive and complete write-up on how to replace the brakes on a 997.1 S.
When the need to change brake pads arise, the owner must decide if it worth changing the rotors or not. Measurements should be done to determine if the rotors need to be replaced or not. In my case, the existence of a little lip all around the rotors justified their replacement.
When it comes to replacing the brake parts, there is a plethora of parts available and it can quickly become overwhelming and confusing. Prices vary considerably from one place to the next. Of course Porsche genuine parts remain by far the most expensive and they have to, if Porsche wants to maintain the significant profit margin it does on each car ($18K in average) and on their spare parts.
After looking carefully at the brakes, it appears that the brake system is designed and manufactured by Brembo (Italy). Originally, the calipers are by Brembo, the rotor surprisingly are not marked at all (no number, no brand), pads are from Jurid (Spain) and all remaining parts are from Brembo. It seemed logical to me to select Brembo rotors sold by Pelican for $150 piece (a third of the Porsche price). The rotors are extremely well finished, plated on the outside and on the hub to prevent corrosion and very similar to the original Porsche rotors as it can be seen on the following pictures.
I did not weight the two rotors to see if there was any differences. I suspect that both rotor types are very identical, with perhaps a slight advantage to the Brembo rotors which seemed better built.
For the pads, I decided to stick with the Porsche genuine pads for the very good feeling they give you in street and daily driving. I do not race my car and thus did not even look into the vast choice of racing and competition pads. I have used Ceramic pads on all my BMWs and found them sometimes dry to the touch, slow to respond under the rain, sometimes noisy, despite their fantastic advantage of not generating that black and nasty dust like regular pads. I also found that if you do not use them hard on a regular basis, they tend to glaze and loose a lot of their efficiency. With the above in mind, I decided to go with the Porsche genuine pads that can be obtained for $210 from Suncoast Porsche (a really good price - These guys limit their margin and make it up with the large volume of parts sold to enthusiasts all over North America. I also ordered from Suncoast the bolts, springs, clips and got the damping plates from my local dealer. In hindsight, I should have bought all the miscellaneous parts from my local dealer who always give me a very good discount.
There have been discussions about whether or not replace the bolts, springs clips and plates. My car is close to 70K miles, almost ten years old, and I thought it deserved to have a complete and new braking system. In addition the moral comfort to know that all the parts that could be replaced have been replaced, helps a lot when you take some risks. Besides, all miscellaneous parts add about $120 to the overall bill.
Before replacing, you have to take apart. Let's review quickly some of the steps involved in taking apart the front brakes.:
1) After jacking up safely the car and removing the front wheels, you need to start taking apart the old brakes.
2) Using pliers, remove the small clip holding the pin. The clip is placed along the back of the caliper, on the inside.
3) Using an old Torx screwdriver or a long rod, push the pin located above the pads, towards the inside of the car.
4) Remove very carefully the wear sensors on each pad. A small screwdriver is the best tool I have found to dislodge these sensors without damaging them. Both sensors are plunging into a hole located in the pads, so be careful when pulling them out. They have to be extracted perpendicularly to the pads.
5) Once everything is cleared, use an adjustable pliers to squeeze the pads to the side of the caliper. Make sure you place a piece of rags between the outside of the caliper and the teeth of the pliers, so as to not damage the paint. You must squeeze each pad towards the outside as much as possible. You may want to open the brake fluid reservoir and make sure that none of the fluid is spilling while you try to spread away both pads. Once the pads are next to the caliper walls, they will remain there and you can move to the next phase.
6) Using a thin blade (I found a cheese knife to be the perfect tool), insert it between the pad and the damping plate. The damping plate is glued to the pads, but the heat and pressure usually cook the glue, and cutting through that glue is not that difficult. Take your time and make sure that the pads are free from their damping plate from the top all the way to the bottom.
7) At this point, just pick up the pad and pull it out. It should slide out very easily.
8) Using your cheese knife, gently insert it between the damping plate and the caliper and remove the damping plate. The damping plate has two cylinders attached to it (see picture). They are of different sizes. If you have pushed the pad completely against the wall of the caliper, you will have just enough space to remove the damping plate. If the damping plate are not coming out, re-insert the pad, and squeeze with your adjustable pliers (and rag) until the two pistons are completely compressed inside the caliper.
9) Do the same for the other pad and damping plate.
10) Using an hex-pan of 10 mm, insert it into one of the two bolts holding the caliper to the hub. Use a breaking bar if you have access to a 10 mm Hex Pan mounted on a 1/2 socket. I could only find a 10 mm Hex pan mounted on 3/8 socket and noticed that the 10 mm bit was starting to rotate into its socket.....Not good. Instead, I inserted a regular 10 mm Hex wrench (the L shaped stuff, hard and solid) and using a hammer, tapped it a few times to break it. After that, it was easy to remove both bolts.
11) Before taking away completely the second bolt, you will secure the caliper to the suspension spring using some twig, wool or soft material to not damage the paint. The fluid line going to the caliper is solid and gives you just enough play to remove the caliper out of the rotor.
12) Spray a drop of PB Blaster on both Phillips screws holding the rotor, wait a few seconds and remove these two screws. Here, I have read a lot of horror stories, where people had to use impact screwdrivers or even worse, having to drill out the screws. On my car, they came out very easily. I suppose that on cars submitted to extreme thermal cycling (such as racing) or if the previous mechanic did not use anti-seizing agent on these screws, they may be more challenging to remove.
13) Finally, wiggle the rotor and remove it from the hub. Alternatively, you can use a rubber hammer to dislodge it with some friendly taps.
Alright, the hub appears in all its glory and we are ready to start rebuilding.
Wanting to do things as cleanly as possible, I brushed the hub with a metallic brush and removed all traces of corrosion and dust. As customary when replacing the pads, a can of brake cleaner comes handy to give a final blow of cleanliness.
I also, took apart the brake shield plate, sanded it and repainted it with a high temperature spray paint. It may last whatever it will, but it looks much better than the corroded and dusty shield I removed earlier:
When re-attaching the shield, do not forget the anti seize paste on all three bolts.
Then comes the philosophical question: Should I clean the caliper (think Concours d'Elegance) or should I leave it the way it is? To clean or not to clean? I will leave that question to each and everyone. What I did was rather simple and would not allow me to score any points at a Concours d'Elegance. I sprayed the caliper with simple green, left it soaking and used a tooth brush to remove most of the grime on the inside and mostly around the pistons. I also verified that each piston could be squeezed and would travel freely within the caliper. The small pistons can be easily verified and actuated, whereas the larger one will require more powerful fingers.
I know, it is not perfect but who has time for perfection anyway? Once happy with the clean (or dirty) appearance of the caliper, the new rotor (or the old one) can be installed. When I ordered the brake parts from Suncoast, I also decided to get a set of 7mm spacers for the front wheels and 15 mm spacers for the rear wheels. These spacers comes as a complete kit with beautiful chrome plated lugs and longer screws for fixing the spacer and the rotor to the hub:
It makes for a very nice assembly. Again, do not forget the Permatex anti-seizing grease on the tip of the two screws holding the spacer and rotor. This is your insurance against future headaches.
We are moving along with the re-assembly with the installation of the caliper on the new rotor.:
1) Take your time and wiggle the caliper until it slide on the rotor without scratching it or damaging it. It is tight but it will pass.
2) Insert the two new black bolts into the caliper and torque them at 63 foot-pounds with your torque wrench.
3) with all pistons squeezed as much as possible, insert one damping plate in the pistons. Push it all the way inside. Damping plates are apparently mounted dry with no type of anti-squealing grease or anything. Peel carefully the sticker to reveal the glue.
4) Insert a new pad all the way in and push it against the damping plate. Adhesion will start but you have plenty of time to move the pad or even remove it and re-insert it.
5) Do the same for the other damping plate and pad.
6) Place the spring on top and insert the pin from the inside of the car out. You may have to tap gently the pin to make it go all the way on the front wall of the caliper.
7) Do not forget to insert the clip in the pin. Verify twice that everything is perfect.
8) Spin the rotor and make sure all is fine. Clean the rotor if some greasy or dirty fingers have contaminated it (use Brake cleaner fluid).
9) Carefully re-insert both wear sensors into the pads. I found it easier to first insert the inside sensor, place the wire under the spring, and finish with the outside sensor.
10) Carefully re-attach the electrical wire of the sensors to the brake line with the two plastic clips. On the C4S, make sure the wire is not located near the universal joint of the front wheel.
11) Now is a good time to flush that specific caliper. I know there are people (and even dealers) who looks at the fluid in the reservoir, finds it clear and beautifully transparent and concludes that it never needs to be changed. The point is: the fluid in the reservoir and the fluid in the calipers are two different animals, separated by meters of brake lines. When you do a job such as this one, do not take a short cut and do not skip the flushing phase. Instead, I run about half a liter of fluid through each caliper and alternate between blue and yellow fluid. Here I was going from Blue back to Yellow, which takes a lot of fluid to get rid of any shades of blue and green. Start flushing the outside caliper/pistons first, and then flush the inside/caliper pistons. Of course, use the one-man pressure system hooked to your brake fluid reservoir.
Here is a picture of the finished brake assembly:
As indicated before, I am also installing some 7 mm spacers. The new bolts provided in the kit are quite beautiful and 7 mm longer than the original bolts. I am also getting rid of the anti theft lug which is always a problem, when doing some maintenance.
The spacer kit also comes with a couple of Porsche mounting pins to help you position the wheel and avoid paint damage to your beautiful calipers:
Because of the near absence of shoulders on the 7 mm spacer, the wheel must be installed as carefully as possible and torqued very progressively. I use a soft wrench of 19 mm (Autozone $9.99) which is built with a plastic cover to preserve your rims, a brass insert to not mar your lugs and a 1/2 inch socket to match your torque wrench. A beautiful and very inexpensive tool. I also washed carefully the wheels before re-assembling them. Wheel lugs must be torqued at 96 foot-pound.
The finished result is a lot nicer than it was with the old lugs and will provide me with some good braking capabilities for years to come. Now, it is time to move to the other front wheel......and to play it again.
I hope you enjoyed that write-up and will find it useful when replacing your brakes. I have learnt so much from that 997 community that I really enjoy giving back and contributing when I see certain topics not covered or missing.
Yves
Is it bad if I put copper anti-seize on the back of the brake pads, between the brake pad and the dampening pads??
I put copper anti-seize on the rear of my brake pads before putting them into the caliper - the side of the pad that goes against the caliper pistons. Is this ok or should I not use copper anti-seize there? Should I take the caliper off and clean it off?? Will it damage my caliper?
it's fine. The copper anti-seize won't hurt anything. I am assuming you are not using the dampening pads. If you are using the dampening pads then a coating will prevent the dampening pads from properly sticking to the back of the pad so in that case then I would not use it.
X2 on loosing the wheel locks.
The only person they inconvenience is the owner of the car.
If the purp wants the wheels? Where is the wheel key.
Smash the window to look in the glove box, or pry the frunk to look for it in there.
Are take the whole car?
Yves? No clay bar on the Brembo's? We do have a similar affliction. Lots of old toothbrushes in my tool box as well.


 01-31-2016, 11:15 PM