When you click on links to various merchants on this site and make a purchase, this can result in this site earning a commission. Affiliate programs and affiliations include, but are not limited to, the eBay Partner Network.
MantisSport 1.2L Baffled Deep Sump Kit and Oil Change - My Impressions
I found a nice MS deep sump kit offered for sale by forum member "ja78911sc", who goes by "Jim", in the classifieds for a good price. Since I was planning on autocrossing the car this season, I figured a little bit of insurance against oil surge issues was in order, so I picked it up. Jim was a pleasure to deal with and I highly recommend him as a seller.
I followed USMC_DS1's great writeup on the installation of his FVD oil pan in the writeup index sticky.
The stock sump is quite shallow. There isn't much of anything there, outside of the stock plastic baffling.
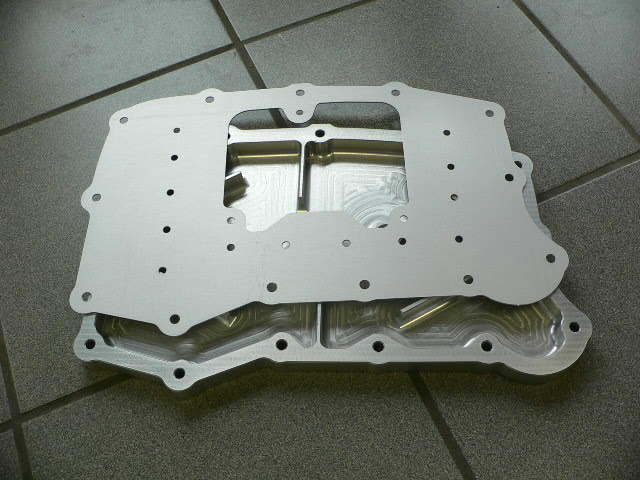
Note the two "walls" in the middle of the pan - the oil pickup would be situated in the middle, meaning the oil underneath the windage tray will have to pass through the pickup tube.
These pictures were not taken by me (who puts an oil sump on the floor?!), but they accurately depict the inside baffling and windage tray that is built-in to the pan. It's an impressive-looking piece. All one-piece billet aluminum. While the outside "MantisSport" logo is a nice touch, I would have preferred "cooling fins", as on the FVD deep sump ... Not that the fins on the FVD pan would make much of a difference (I think they're too shallow), but it at least looks more purposeful.
Mr. Raby and his cadre of skilled M96 technicians had just been in here ten-thousand miles ago, so it was clean as a whistle. No metal shavings anywhere. Minimal deposits on the magnetic drain plug as well. Looking good so far.
Trimming the bottom of the stock baffle per the instructions on the kit.
This is where it can get very tricky. I used a Dremel tool with a worn cutting disc to cut the lip off the baffle. You need a steady arm to trim it accurately. Especially the above pictured part, which has a "base" to it which is a bit harder to cut through accurately than the rest of the baffle.
The first test fit revealed that the cuts I had made were not level. I removed the baffle and ground down some of the high edges with a sanding drum on the Dremel tool until the baffle was able to sit mostly flush on the windage tray.
MAKE SURE TO CLEAN THE STOCK BAFFLE THOROUGHLY BEFORE INSTALLATION!
There were small black "slag" plastic particles from the trimming of the baffle. I made sure to rinse the baffle in degreaser and water, then dried it out with some compressed air. This is open-heart surgery on your vehicle - treat it as such! I actually took some sandpaper to smooth out some of the rough edges the cutting disc and sanding drum left behind to make sure no small pieces would break off, then I cleaned it all off again.
I wasn't particularly impressed with the fasteners MantisSport supplied with the sump kit, but they would do for the oil pump pickup extension. The nylon lock-nuts holding the baffle onto the windage tray also seem a bit cheap. If you're going through all the trouble of CNC'ing a billet for the oil pan, why not machine some threads into the pan, or the windage tray, to hold the stock baffle?
Actually, why use the stock baffle? Why not create a windage tray or sump design that can accommodate an X51 baffle? It seems like overkill, but we are dealing with the lifeblood of an engine, which is notorious for having oil starvation problems. The more countermeasures - the better.
Adding an X51 baffle in the future doesn't seem like it would be difficult (the stock and X51 baffles mount the same way in the stock pan), you would have to whip out a grinder and cutting disc to open up the windage tray a little more to accommodate the larger baffled pick up area that the X51 tray has.
I did a test-fit of the whole assembly before putting a bead of Permatex black RTV silicone around the outside edge of the oil sump flange and windage tray to make the install. I then allowed the silicone to cure overnight to watch the Mayweather/Pacquiao fight (what a disappointment ).
I also did an oil change, as the car was due for it. You'd be doing yourself a favor by doing a sump swap when your car is due for an oil change - it's the perfect time for it. She took 10 quarts of Joe Gibbs DT40 and a K&N Gold Performance Filter per Mr. Raby's orders.
She's got a taste for steak and caviar it seems. Worse than some of my ex-girlfriends.
Started the car up, drove to an autocross event in Schaumburg, then checked for leaks when I got home - everything looks bone-dry! Note the ground clearance on the oil pan/sump, it's sticking out just past the rear subframe, so I may have to fabricate a skidplate in the future.
Oil temp has gone down about 5-7 degrees on the highway, based on an eyeball reading of the oil temp gauge. Bigger heatsink with the extra 1 1/3 quarts of oil, I suppose.
This oil is freaking expensive ($133 shipped for a 12 pack on Amazon ), so I wanted to make sure I didn't waste a drop. I sat ten quarts like this overnight to get as much oil out of the bottles as I could, then consolidated the residual amount into one bottle, and what we end up with was ...
About 4 ounces of oil I would have otherwise thrown away. It just so happened that this was enough to get that last bar full on the oil readout. I have two quarts left for top-up, which is just enough (she likes to eat around 2 quarts per 5,000 miles, it seems).
Can I ask what deep sump kits offer other than slightly reduced oil temp? Does it function more like a "dry dump" for heavy tracking ? I'm just curious. I love my engine but I'm self conscious it is not a fully dry sumped engine.
What the pan offers is no (or VERY little) drop in oil pressure during sustained G turns versus the stock design. No chance of the oil pump sucking air and thus any oil starvation. It works.
Alexandrius, Mantissport developed the deep sump kit for exactly the that reason, its not dry sump. We spend a lot of time developing this sump. The oil dams and windage tray help reducing oil starvation, by directing oil to the oil pick up.
It is a very nice piece. I went with the MS pan because it struck a good balance between oil capacity and ground clearance, with the added benefit of being a one-piece pan.
I have to ask, though, why not have a windage tray that supports the X51 baffle instead of the stock one? Would the X51 baffle be an improvement, or would it not offer much in the way of oil control? I know you guys at MS posted the oil pressure logs on Planet-9, so I know the pan works. Would I be throwing my money away if I wanted to add an X51 baffle in the future?
Yeah, I just realized that the stock pan has a bit of a slope/gradient towards the back, whereas the MS windage tray is flat. I don't think the OE X51 baffle will work, but maybe the FVD one will ...
I think you are right, AWay, I do not think it would justify the added expense. Those baffles are expensive. The oil that is below the windage tray seems to have adequate baffling, where it counts.
I have yet to observe any evidence of lost oil pressure with the Mantis pan on NT01 tires. Until then, all is well in the oiling department in my book. I'll never run Hoosier on this car but even then I would imagine there would be no issue at all.
I have the same MS pan on my car too. Anything that helps to protect the longevity of my RUF supercharged engine is money well spent in my eyes. I have also noticed a reduction in oil temp. When installing mine, I found that an oscillating tool with the large curved face made it very easy to trim the OEM baffle nice and straight.
I spent maybe a half hour trimming, cutting, and sanding the baffle to fit with a Dremel tool. Oh well.
The effect of this and the third radiator is somewhat misunderstood. Both give your engine cooling systems more heatsink area, so both the coolant and oil are more resistant to heatsoak. Once the heatsoak sets in, the car will recover from higher temperatures much faster than with an OE oil pan or twin radiator setup, but the car will still get hot.
It will just take a longer time to get the oil and coolant hot, and once airflow is reestablished, the temperatures will go down considerably faster. A very worthwhile modification.
Next is a GT3 oil cooler, which should both speed up the warm up process in the morning, and add more cooling for the oil. Or maybe not. We will see, this autocross season.

 05-04-2015, 04:06 PM


") ).
).


 ), so I wanted to make sure I didn't waste a drop. I sat ten quarts like this overnight to get as much oil out of the bottles as I could, then consolidated the residual amount into one bottle, and what we end up with was ...
 I have two quarts left for top-up, which is just enough (she likes to eat around 2 quarts per 5,000 miles, it seems).


