When you click on links to various merchants on this site and make a purchase, this can result in this site earning a commission. Affiliate programs and affiliations include, but are not limited to, the eBay Partner Network.
Does anybody have a checklist to determine when it's a cable vs the starter on a MY07 (997.1)?
Suspect are:
Battery
Starter
Neg Cable
Pos Cable
I've tested the battery so eliminating that as the culprit (at least in my situation). This eliminates the alternator as well but...I've read where people put a charge on the battery and its good for a few weeks even though the Battery and Alternator test out OK.
I'd guess a starter could be "weak" so when the engine is a little tighter (hot start) it cranks slow.
Some have been talking recently about it being the negative cable and the bolt (fixed on the 997.2).
Does measuring the voltage at the battery then the starter help in determining if it's a starter vs cable?
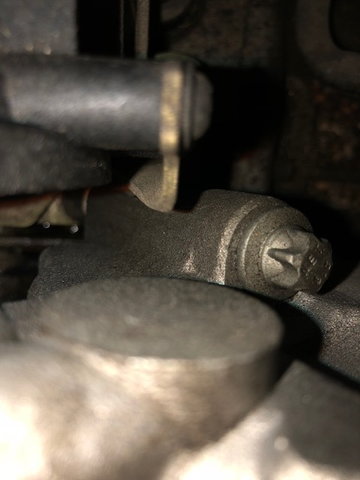
There are two ways to test definitively for the cable. One is to test voltage at the alternator and then again at the battery. If more than a .5 drop its the cable. Another way is to get one of these fiber optic cameras and run it under the throttle body to get a good look at the cable where it attaches to the starter. Many times you can see the rubber boot over the cable has melted because of the resistance. It happened with mine. You could also take the TB and plenum off if you dont have one of those cameras. However testing for the drop between the alt and battery should give you a pretty definitive answer.
Replacing the cable solved my issue 100%. Good luck.
I just completed this cable replacement today and it has solved all the starting issues and low charging voltage at the battery. My local dealer actually diagnosed/confirmed the issue (while getting a new key made for the car no less) but I was not willing to pay the $3k to do the work. The PO replaced the alternator and battery. The Alternator was putting out 13.9V. Voltage at the battery was 12.5V.
I have a 06 C2S Tiptronic. The job took my brother and I approx 10 hrs as the Tiptronic has way less room to work to remove the cable and feed the new one in under the car. Once the cable was exposed at the starter we could see the rubber boot had melted on the starter bolt. The car starts great and I am seeing 13.5V+ at the battery now. No more charging the battery weekly.
If you have a Tiptronic either have a lot of patience to replace this cable or consider a local indy to do the work.
I don't have a lift. Is there a recommendation (jack stands vs ramp)?
Always get the ******* using jack stands in California (smile) but some times ramps don't work well for cars that are low.
JRoach - I used a pair of 16k lb Rhino ramps and had enough room to work under the car. My car is quite low but the ramps worked fine. The other Rhino ramps were to narrow for the rear tires so I went with the 16k lb. In fact it raised the rear end up to a better working height for working in the engine bay.
I started the project today and ran into my first snag on step one. It looks like my rear belly pan is missing. I thought it was strange that I didn't have for T20's to remove and looked for a diagram for the location. It doesn't look like it was torn off as there are no remnants of a belly pan. I plan to order a new one but curious, is this something the dealer likely left off putting it back together or do they sometimes fall off if not torqued properly?
Well thats an odd surprise. If no t20s still in there then somebody forgot it. I think it would be hard for it to pull off itself. Besides the t20s there are two tabs that clip under the forward panel and it clips over bars in the rear as well.
I started the project today and ran into my first snag on step one. It looks like my rear belly pan is missing. I thought it was strange that I didn't have for T20's to remove and looked for a diagram for the location. It doesn't look like it was torn off as there are no remnants of a belly pan. I plan to order a new one but curious, is this something the dealer likely left off putting it back together or do they sometimes fall off if not torqued properly?
Oddly enough mine was missing as well. I just moved on to the next step. As a former 964 owner most 964's had the engine under-panel removed on purpose - Do 997 owners do the same?
Waiting for parts but here is an update on the disassemble:
I would add a slight mod in the tear down to JKW911's great summary.
1a. If using a ramp, I left it on the ramp the entire project. I found it to be a nice heighth for this project and allows you to bounce 'back and forth' as needed.
(Ramps were the ones 911URGE recommended: Rhino 16k...Thanks 911URGE, these worked great!)
5a. Consider ordering a new serpentine belt if: it is due to be replaced or if it shows cracking (bend the belt, ribs showing, look for cracking)
10a. Using my phone I positioned it over the left side (driver side) of the compressor facing in the general area behind the compressor. Position a flashlight (this is where it would be good to have an extra person) between the first and second intake ports on the opposite side of the compressor. I could now see the bolt.
Using a 4� extender plus universal I guided the socket using the view from the camera onto the bolt. (See pic)
(JKW911, I found the rear bolt to be the same as the front two)
FYI, my boot around the cable at the starter had completely melted off. Seems like this could be a safety issue down the road as these cars get older for those that don't replace the cable.
Last edited by JRoach; 08-16-2018 at 12:22 PM.
Reason: spelling/grammar
Doug or JKW911, Any help/thoughts from you guys (or anybody that has done this) would be appreciated..
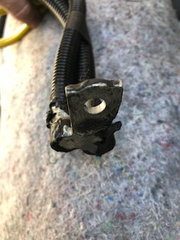
Cable arrived today so I finished snaking out the old one. Observations about my cable:
- As mentioned in the thread above, my boot had melted off.
- No corrosion on the cable but the plastic cable protector (spiral looking stuff that goes around the cable) had melted to the connector/cable.
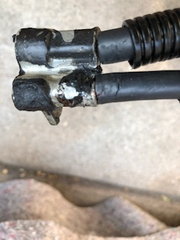
- cutting back the plastic the actual rubber around the cable had cracked
All the pics of bad cables I have seen had corrosion. Is it because I'm in a dry climate or do I have something else going on? I have about 50k miles on the car.
Illustrates how the plastic fused to the connector
Removing some of the plastic you can see how the rubber sheathing is cracked.
Doug or JKW911, Any help/thoughts from you guys (or anybody that has done this) would be appreciated..
Cable arrived today so I finished snaking out the old one. Observations about my cable:
- As mentioned in the thread above, my boot had melted off.
- No corrosion on the cable but the plastic cable protector (spiral looking stuff that goes around the cable) had melted to the connector/cable.
- cutting back the plastic the actual rubber around the cable had cracked
All the pics of bad cables I have seen had corrosion. Is it because I'm in a dry climate or do I have something else going on? I have about 50k miles on the car.
Illustrates how the plastic fused to the connector
Removing some of the plastic you can see how the rubber sheathing is cracked.
My cable was exactly like yours. Melted and looking terrible. This is not due to your climate but a design flaw in the original Alt+Starter+Battery cable with poor crimping where the two cables join. Over time the resistance builds up and causes heat and melting of the rubber boot. This resistance increases with heat and causes the warm/hot start issue. In more significant cases it leads to poor battery charge.


 06-01-2018, 03:07 PM