


997.2 Spark Plug DIY
RL Community Team
Rennlist Member
Rennlist Member

Joined: Dec 2012
Posts: 7,555
Likes: 2,532
From: Atlanta
Thank you very much. I just did mine today using your instructions...fantastic! .... some finer points from a rookie perspective:
1) Ignition packs screws - to keep them from dropping between the heat shield and engine, I jammed a shop towel in there first.... worked perfectly.
2) I used a few extenders for my ratchet wrenches and a swivel joint for a screw or two
3) That top nut on the exhaust/cat joint.... sheeeeesh!!! I almost gave up trying to get it off. They were the only nuts that were rusted up. Make sure you soak them with a penetrating oil for at least a few hours. I purchased some simple S wrenches from Harbor Freight and the teeth in the wrench socket are rounded... the wrench immediately rounded the nut. I then used a socket set I had from ACE that allows a bolt to pass through the head and had a full hex socket, and accessed the nut by putting the entire wrench above the pipes. I could only move the wrench 1 or 2 clicks of the ratchet.... just horrible... I think I spent about 1/2 hour on one nut.
4) I didn't need to remove the exhaust tips (2009 C2S). I took the strap bolts off of one and had trouble getting the tip off so I went ahead and just tried to pull the muffler out.... no problem at all.
5) You have to remove the wheel to get the muffler out and for easy access to the plugs. I had a grease pit and figured I could do it all from below, but you can't... although access from below makes taking out muffler bolts very easy.
Thanx again! Great job.
Bruce in Philly
Last edited by Bruce In Philly; Aug 8, 2013 at 01:45 AM.
Racer
Joined: Sep 2013
Posts: 264
Likes: 7
From: Stuttgart, Germany
I am about to embark on this DYI and prepared the corresponding nuts with penetrating oil.
The top nut on the cat/exhaust joint does have me worried some! I dont see how I can get any leverage up in there to get that first crucial turn. Any ideas?
Thanks.
Regards,
CF
The top nut on the cat/exhaust joint does have me worried some! I dont see how I can get any leverage up in there to get that first crucial turn. Any ideas?
Thanks.
Regards,
CF
Thread Starter
Instructor

Joined: Nov 2010
Posts: 211
Likes: 3
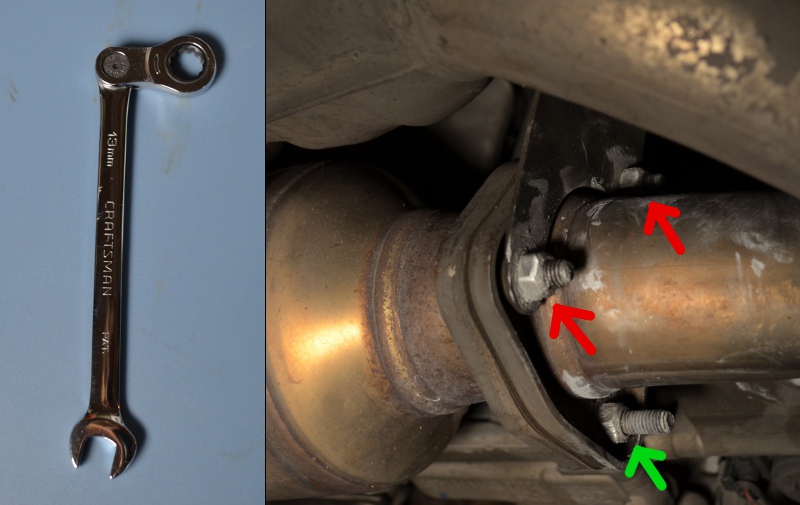
For me this was the most frustrating part of the entire job . . . that is why I ended up buying a set of Craftsman elbow ratcheting wrenches from the local True Value hardware store. It was easy with this wrench. Thus some of the money I saved by doing this DIY was thus spent on a few new tools.
7wrenchandcatrennlist_zps586bb01c.jpg
7wrenchandcatrennlist_zps586bb01c.jpg
Last edited by DGrayling; Sep 21, 2013 at 10:39 PM.
Racer
Joined: Sep 2013
Posts: 264
Likes: 7
From: Stuttgart, Germany
Thanks for your quick reply.
Looking at the explosion drawing in the electronic parts catalog I am now considering removing the 2 long vertical bolts that hold the brackets to the muffler. That way I would be able to avoid the 3 bolts at the cat alltogether.
What is your take on that approach?
Looking at the explosion drawing in the electronic parts catalog I am now considering removing the 2 long vertical bolts that hold the brackets to the muffler. That way I would be able to avoid the 3 bolts at the cat alltogether.
What is your take on that approach?
Racer
Joined: Sep 2013
Posts: 264
Likes: 7
From: Stuttgart, Germany
Okay, I am progressing: got the top nut off with a half moon wrench. Slowly but surely.
Loosened the exhaust tips bolt all the way (e12) but for some unknown reason can't manage to pull tips off. It swivels around freely but wont come off. Is there a trick to this? The easiest of all steps and I am actually stuck. Arghhh!!!! It's the Carrera base model tip with single oval shape.
Thanks guys.
Regards,
CF
Rennlist Stories
The Best Porsche Posts for Porsche Enthusiasts

Porsche Reveals Coupe Variant of the Electric Cayenne With a Fresh Look
Verdad Gallardo
10 Porsche Colors That Have More Personality Than Most People
Verdad Gallardo
Guntherwerks' Final Speedster Creation Is the Ultimate Porsche Restomod
Verdad Gallardo
10 Reasons I Hate Going to the Porsche Dealership (& the 1 Reason I Stay)
Joe Kucinski
Porsche Shakes Up The N�rburgring Lap Record Table Once Again
Verdad Gallardo
6 Ways the Porsche 911 GT3 S/C Redefines Performance
Joe Kucinski
10 Wildest Homologation Specials Porsche Ever Sold
Verdad Gallardo
Super Rare RUF BTR III Comes Out of Hibernation, Looking For a New Home
Verdad Gallardo
10 Porsche Opinions That Can Start a Fight
Joe KucinskiRacer
Joined: Sep 2013
Posts: 264
Likes: 7
From: Stuttgart, Germany
The top nut on the other side (passenger) is not coming off. It doesnt look rounded off but it seems smaller. Wrench is not getting any grip....neither is a socket.

I was really hoping to get the two top nuts done before I go to sleep but no such luck.
RL Community Team
Rennlist Member
Rennlist Member
Joined: Dec 2012
Posts: 7,555
Likes: 2,532
From: Atlanta
You don't need to take the muffler tips off. I could not get them off, so I stopped trying. The muffler comes nicely out of the wheel well.
If the nut you are talking about is that evil nut (the triad), I had to put a socket set above the pipes and manipulate it with my finger tips. The socket I used was a full hex and not a toothed job. The toothed S wrench I put on it only made things worse by rounding the nut.
Peace
Bruce in Philly
If the nut you are talking about is that evil nut (the triad), I had to put a socket set above the pipes and manipulate it with my finger tips. The socket I used was a full hex and not a toothed job. The toothed S wrench I put on it only made things worse by rounding the nut.
Peace
Bruce in Philly
Racer
Joined: Sep 2013
Posts: 264
Likes: 7
From: Stuttgart, Germany
Thanks Bruce.
I will leave muffler tips as they are for now.
The evil nut will have to go. I will get a wrench with a head that can be rotated so that I can use a full hex socket as you advised.
I will leave muffler tips as they are for now.
The evil nut will have to go. I will get a wrench with a head that can be rotated so that I can use a full hex socket as you advised.
Racer
Joined: Sep 2013
Posts: 264
Likes: 7
From: Stuttgart, Germany
As always in life having the right tools and a little perseverance goes a long way.  That ratchet is quite a gem and cost a mere 26 Euros.
I soaked that nut maybe 5 times in the last 2 weeks as well.
So now I am ready to finally proceed...
Regards,
CF
That ratchet is quite a gem and cost a mere 26 Euros.I soaked that nut maybe 5 times in the last 2 weeks as well.
So now I am ready to finally proceed...
Regards,
CF

