When you click on links to various merchants on this site and make a purchase, this can result in this site earning a commission. Affiliate programs and affiliations include, but are not limited to, the eBay Partner Network.
Will Instrument cluster from 997.2 work in 997.1. I have problem s with oil presure and oil tempreture. After replacing no indication other function like display and speed is working well.
Will Instrument cluster from 997.2 work in 997.1. I have problem s with oil presure and oil tempreture. After replacing no indication other function like display and speed is working well.
I have a spare black faced 997.1 instrument cluster I bought that I was going to have RUF do a gauge conversion on for my R-Kompressor, but have decided not too. If you're interested I can figure out a price.
DIY - PORSCHE 997 - Central Display Istrument cluster Replacement
After an exhaustingsearch in the second hand market of Porsche 911/997, I finally found the car that best matched my wishes, so without delay I bought a beautiful 10-year-old 911/997 Carrera S with about 41K Km, in perfect conditions of use and with all the foreseen maintenance operations carried out by the same Porsche dealer who had put it up for sale again, after having collected it from a customer who had moved on to purchase a new 991.
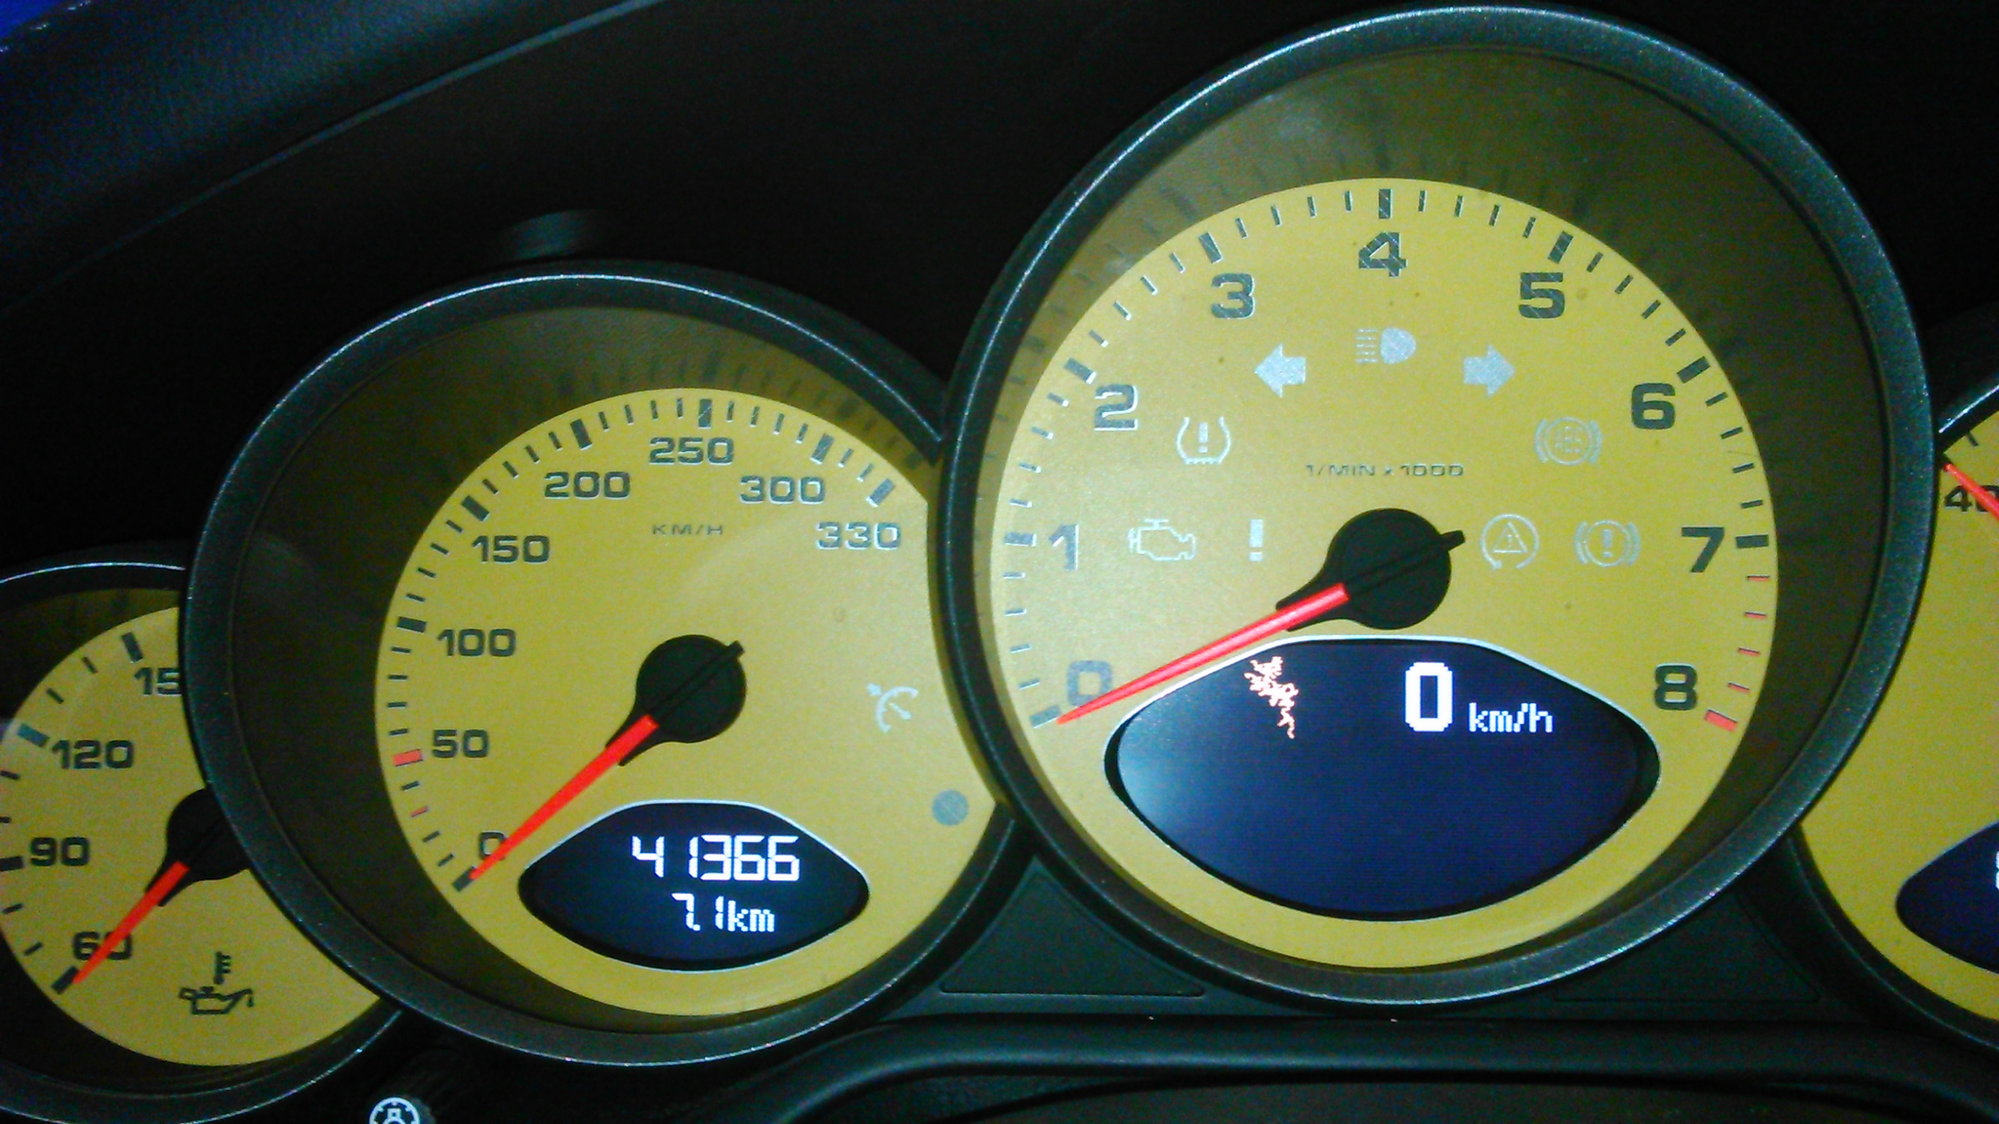
But sometimes it happens not everything goes for the best, and you can discover some unpleasant surprise. So in my case the beautiful Carrera S featured a distorted areas on the upper left side of the central display of the instrument cluster (see Photo). From research and insights through the Rennlist forums it would seem the inconvenience caused when the car is exposed to very cold weather.
Although the car had been purchased together with the Porsche Approved warranty, the dealer was not authorized by the mother company to carry out the replacement of the instrument cluster under warranty (the only type of repairing envisaged by the workshop manual in this case by PORSCHE). The reason for this is that the type of fault cannot be included among the covers provided by the Approved warranty, as it does not affect the car's driving safety. The dealer alone did not intend to take charge of the repair, whose only list price of the instrument panel is about 3500 Euro, to which is added the cost of the workshop labor for disassembly, replacement of the new and reprogramming the car with the PIWIS tester.
Rejecting the idea of taking other actions against the dealer, assuming the low probability of success, I set about looking for Laboratories/Workshops offering this type of service, but difficulties arose immediately. The laboratories in Italy don�t have the spare part (display) in stock, so someone proposes the replacement of the entire instrument cluster with another one dismantled from demolition cars. Other foreign laboratories contacted offer the repair of the display (replacement?), but to do this it is necessary to proceed with the dismantling the cluster in my care and send it abroad, with all the possible surprises I could have encountered.
So for months I started looking in the vast variegated "internet" world for the spare display, but without any success; some suppliers had had it available in the past but at the time it was no longer on offer.
Time passes when I finally come across an Italian company that has the aftermarket spare part in its catalog. I get in touch with the company and in a few days I received the brand new display at home.
At this point, two options were presented to me: take the car to the workshop and supply the display to the repairer, or disassemble the instrument panel myself and send it to the laboratory in Italy together with the new display.
After a few days of meditation and after several consultations of articles, videos, etc. available in that information�s mine that is the internet world I took a courageous decision: I do everything by myself! At the end, considering that I�m very satisfied with the result, I decided to make my experience available to some other unfortunate owner of 997, illustrating the various steps to be able to carry out the repair of the defective display in complete tranquility.
It necessary to premise that this is quite a long and demanding operation but it does not present particular difficulties except that you may incur in breaking of some plastic clips of the many present. The clips fix the different parts to each other that make up the instrument cluster. For the rest a fair familiarity is required in the use of tools such as flat-blade screwdrivers with torx inserts.
The steps described below can of course also be extended in the eventuality of having to replace the two smaller side displays, or if the mounted gauge faceplate is to be replaced with other one of different color: yellow, silver, red, etc.
Moreover I would say that the illustrated method can also be extended to the boxter and cayman models which, although equipped with clusters with three quadrants instead of five as on the 911, have similar characteristics. Required tools
Normal and long handle magnetic screwdriver with T-10 and T-20 Torx inserts for removing the screws that fix the instrument cluster to the dashboard and the different pieces of the cluster itself.
"Y" shaped plastic tool remover with a curve at the end to "detach" the instrument needles and the various clips
Wedge-shaped plastic tool to help remove parts
Flat-blade screwdriver
Step 1 - Instrument cluster removing from the car dashboard
Contrary to what is described in the Porsche manual, in order to be able to remove the instrument cluster from the dashboard of the car it is not strictly necessary to remove the upper and lower panels of the steering column. To gain enough space to get the unit out, simply unlock the steering wheel lock lever under the steering column and pull the steering wheel completely towards you, simultaneously, moving the steering wheel all the way down. Then lock the steering wheel in this position with the locking lever.
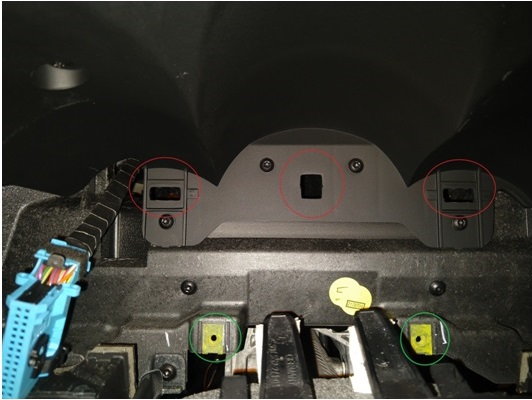
At this point, to access the two T-20 screws Torx that fix the instrument cluster to the dashboard, first must free the plastic former with the leather dust cover them, right under the cluster. To do this simply grasp the piece in the center with your fingers and pull it towards you. The lining is secured by two clips on the back, which requires some strength to release it. The covering element is not completely removed from the dashboard, but it is sufficient slide it backwards far enough to gain access to the Torx fixing screws. Once the coating is free from the shims, proceed with the removal of the cluster fixing devices.
I will not dwell further on the description of the operations to be made since the whole procedure is described in details by Carrera Mike https://rennlist.com/forums/997-curr...rument-cluster .html # post5806269, which I recommend to read before begin to take apart the cluster .
With the instrument cluster free, release the swinging arm (black color) of the electrical harness by pushing it downwards and unplug it. Once the connector has been disconnected the instrument cluster can be safely removed.
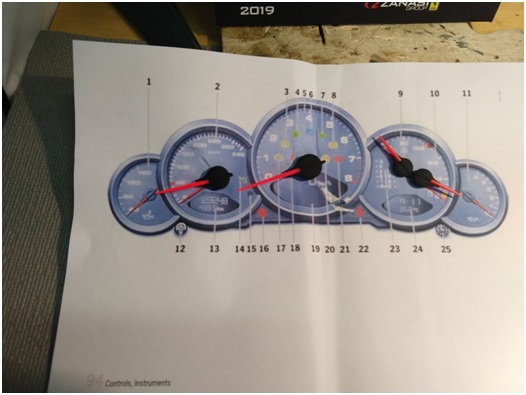
In the Photo below I highlighted in red the slots on the dashboard compartment where the two side and central clips of the instrument panel are inserted, while in green I highlighted the holes where the two T-20 Torx screws fixing the panel to the dashboard are screwed
Warning ! With the instrument panel removed, do not turn on the ignition or attempt to start the car since an error code will probably be present once the instrument panel has been reinstalled.
Step 2 - Cluster instrument disassemble
Before proceeding with this phase, I suggest reading the K-MAN S article https://www.planet-9.com/reviews/cay...faceplate.html to become familiar with, even if the article refers to the Porsche Cayman whose cluster is three gauges and not five as on 997.
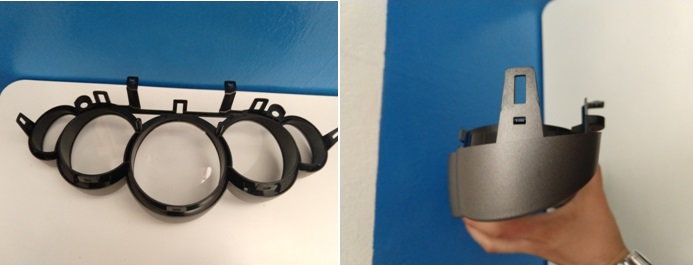
It is a good idea to carry out operations on a surface of soft material so as not to slip the different parts, avoiding to damage or scratch the instrument panel.
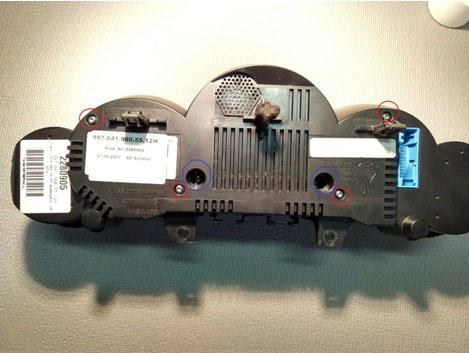
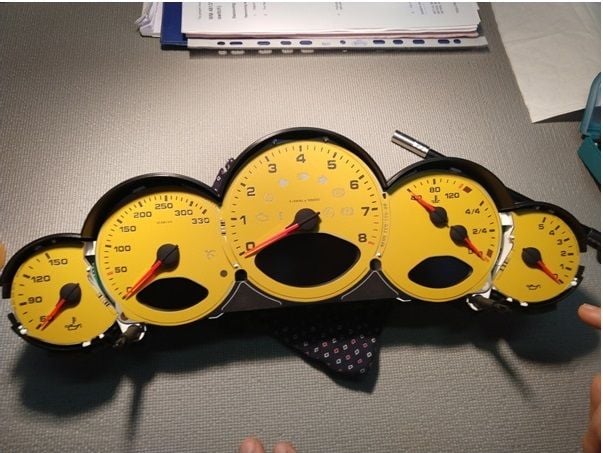
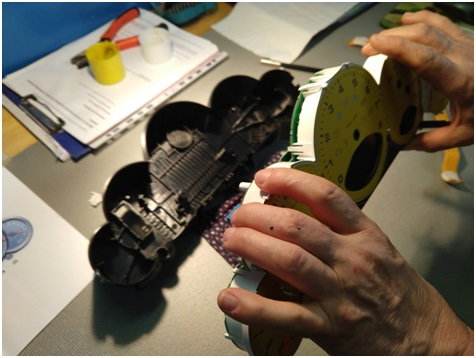
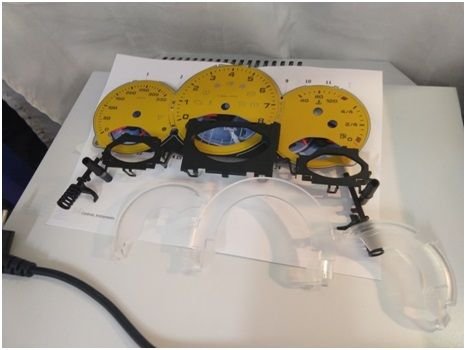
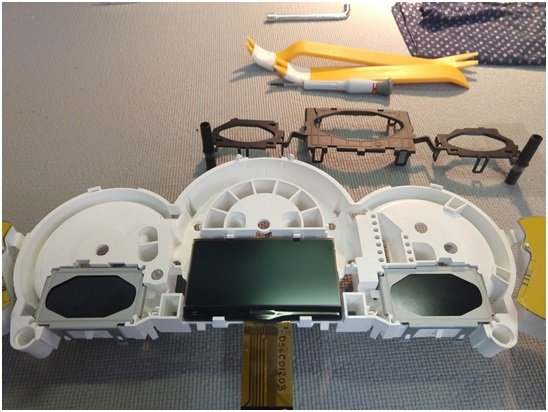
The cluster (Photo above) is held together by 6 T-10 Torx screws, plus some plastic clips at the top, bottom and side. The four Torx screws (red) hold the black case together in the white internal support element, while the two screws in blue encased keep the case fixed to the anthracite outer covering that presents the windows with the five instruments. Before removing the covering pull the two ***** of the time setting and partial Km reset.
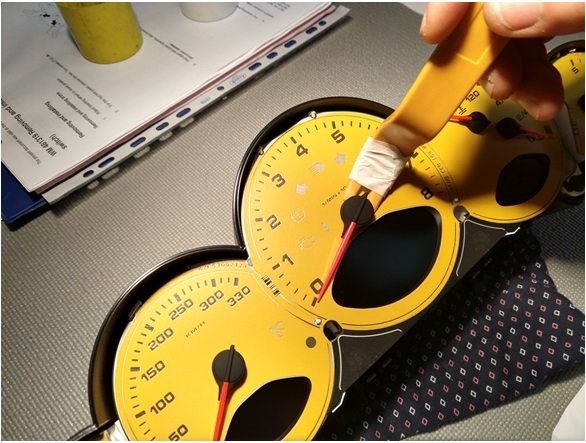
Helping with the plastic remover tool (Photo above) lift the needles out of the housing one at a time, taking care not to scratch the faceplate. For the purpose covering the fork tool with spongy material. Do not need to remove the needles of the pressure gauge and oil temperature to replace the displays only.
To do a ordered job, print the instrument panel image on paper in order to position the needles of the instruments on it, as they were removed from the panel, together with the black hard plastic ring inserted in the respective housing fixing the faceplate to the white bottom support. This for future reference later in the assembly process.
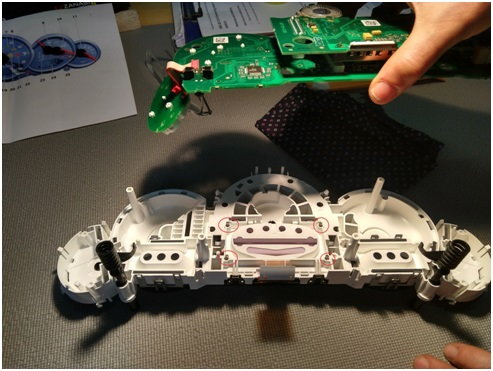
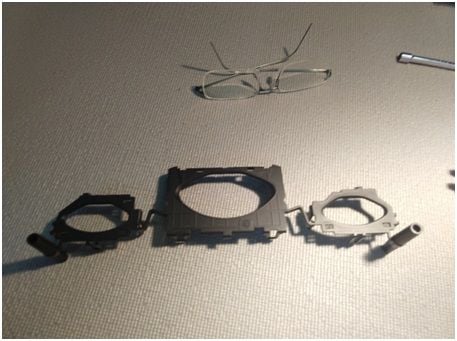
Once the four needles have been removed, in order to disconnect the dial from the white support it is necessary to remove the black case and then remove the "green" electronic circuit board from the white support, disconnecting all the clips that hold it. Be careful because some of the clips are metallic and therefore very robust. Then remove the display flat from its housing on the electronic board, lowering the latches until it is free, then separate the two elements paying close attention to the containers of the instrument needle mechanisms.
Observe (red circles) the position of the four small springs that hold the electronic board in suspension on the white support at the central display.
Now you can start to remove the four black plastic rings from the inside of the white support, pushing them outwards and thus freeing the central quadrant screen from the white support itself.
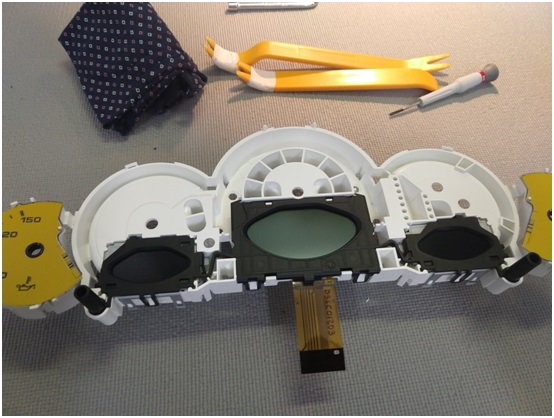
Step 3- Display Replacement
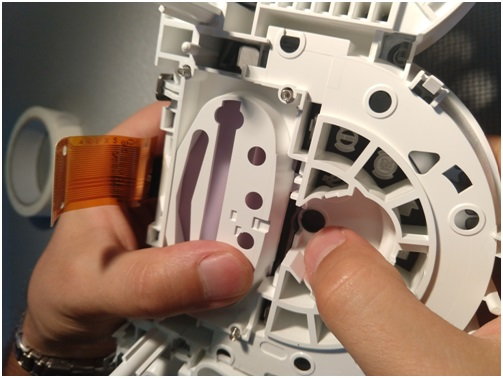
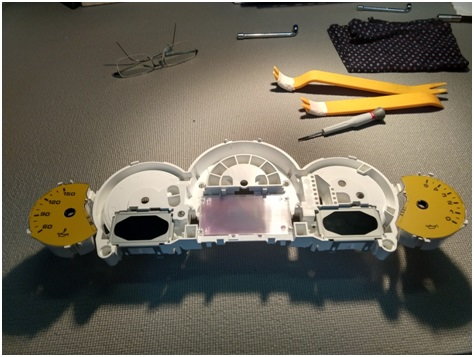
Once the gauge faceplate has been raised, you can see the three display locked in place by the black plate, which in turn is held above by the transparent screen to diffuse the illumination over all the instrument cluster. Both the black and the transparent plates are in one piece only which makes the operation of detaching the retaining clips quite delicate action, with the possibility of breakage.
Work with extreme delicacy by disconnecting all the clips that hold the two elements together and with the lower white support. After removing both plates the display is finally released and you can then proceed with the replacement
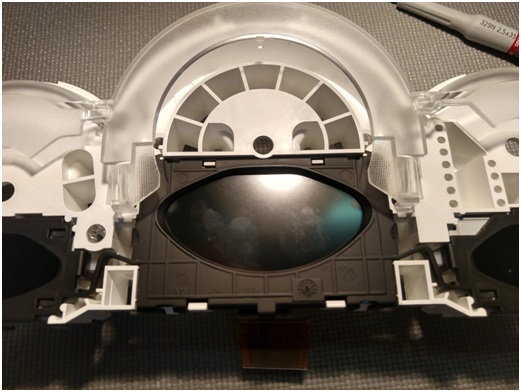
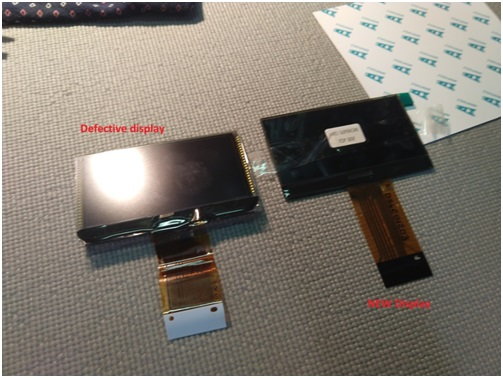
In the Photo below the two displays: the defective e the new are compared and, as can be seen, are perfectly compatible in all respects
Then place the new display in it seat, after which fix over the black plate and the transparent plate so to maintain the display locked to the central white support element
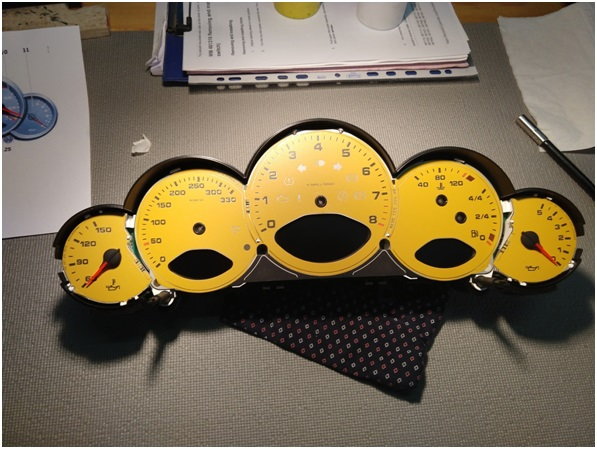
Step 4- Reassemble the instrument cluster
For reassembling the instrument panel proceed in reverse order with respect to the disassembly operations and more specifically:
� Position the faceplate above the display, sliding it under retain clips and locking it on the white central support
� Insert the black plastic rings in the needle holes to fix the faceplate with the white support
� Apply the green electronic board on the back side of the white support, being careful to lock all the clips
� Insert the display flat into the appropriate female terminal on the electronic board
� Insert the block so composed in the black containment case
� Reinstall the needles pressing them down by fingers and take care to align with the zero reference mark
� Regroup with the anthracite gray outer covering
� Screw in all 6 torx screws
� Insert the two ***** into the time set and partial Km sets
Step 5 � Cluster instrument Reinstallation on the dashboard
Proceed in the reverse order to the operations performed for extraction of cluster from dashboard:
� spread the two large clips of the cluster with Vaseline to favor the insertion
� electrically connect the instrument cluster, plugging in the blue connector and rotate the black oscillating arm 180 degrees until it is completely locked
� Insert the key and check the correct positioning of the needles into the instrument cluster, if necessary disassemble again and correct the position
� If the electrical test has been successful, insert the instrument cluster in its seat pushing it down until you hear the click of the fastening clips to the dashboard
� Tighten the two T-20 torx screws at the bottom
� Reinsert the plastic cover with the leather attached
Thank you very much Pinkkot - absolutely invaluable walk-through.
I switched my dial faces with one of Lockwood's replacement faces over the Easter weekend, and wouldn't have known where to start without this forum.
However, I managed to knacker the Oil Pressure (far-left) gauge mechanism and it's now not working. I wasn't aware of having snapped or stripped the gears when disassembling the gauge, but when I fixed the needle back on, there wasn't any resistance in the mechanism compared to the other gauges, and sure enough, it's now not working.
Does anyone happen to know a part number or somewhere that might be able to supply a replacement stepper motor for the oil pressure gauge?
Thank you
Hello Willga
I'm sorry for the inconvenience that happened to you.
I can't give specific indications where to buy a spare stepper motor for the oil pressure gauge.
I can suggest you trying with the display supplier I turned to.
Thank you very much Pinkkot - absolutely invaluable walk-through.
I switched my dial faces with one of Lockwood's replacement faces over the Easter weekend, and wouldn't have known where to start without this forum.
However, I managed to knacker the Oil Pressure (far-left) gauge mechanism and it's now not working. I wasn't aware of having snapped or stripped the gears when disassembling the gauge, but when I fixed the needle back on, there wasn't any resistance in the mechanism compared to the other gauges, and sure enough, it's now not working.
Does anyone happen to know a part number or somewhere that might be able to supply a replacement stepper motor for the oil pressure gauge?
Thank you
The alternative is that you send your gauge to Palo Alto Speedometer and have them fix it for you (they are open for business during COVID-19, but only accept mail in packages)
Thank you very much Pinkkot - absolutely invaluable walk-through.
I switched my dial faces with one of Lockwood's replacement faces over the Easter weekend, and wouldn't have known where to start without this forum.
However, I managed to knacker the Oil Pressure (far-left) gauge mechanism and it's now not working. I wasn't aware of having snapped or stripped the gears when disassembling the gauge, but when I fixed the needle back on, there wasn't any resistance in the mechanism compared to the other gauges, and sure enough, it's now not working.
Does anyone happen to know a part number or somewhere that might be able to supply a replacement stepper motor for the oil pressure gauge?
Thank you
REsuming an old thread but good new info here.....
STEPPER MOTORS! Make sure you get the direction correct.


 03-04-2017 | 10:35 AM