When you click on links to various merchants on this site and make a purchase, this can result in this site earning a commission. Affiliate programs and affiliations include, but are not limited to, the eBay Partner Network.
Will try and add more details to this thread over time, but hope this can help in the interim. Happy to answer questions.
Note that per Bruce's post below and alternative to removing the thermostat housing is to create extra space by loosening the engine mounts also which allows for the engine carrier to be moved further away.
Preliminary work (recommended)
Remove rear bumper cover & heat shields
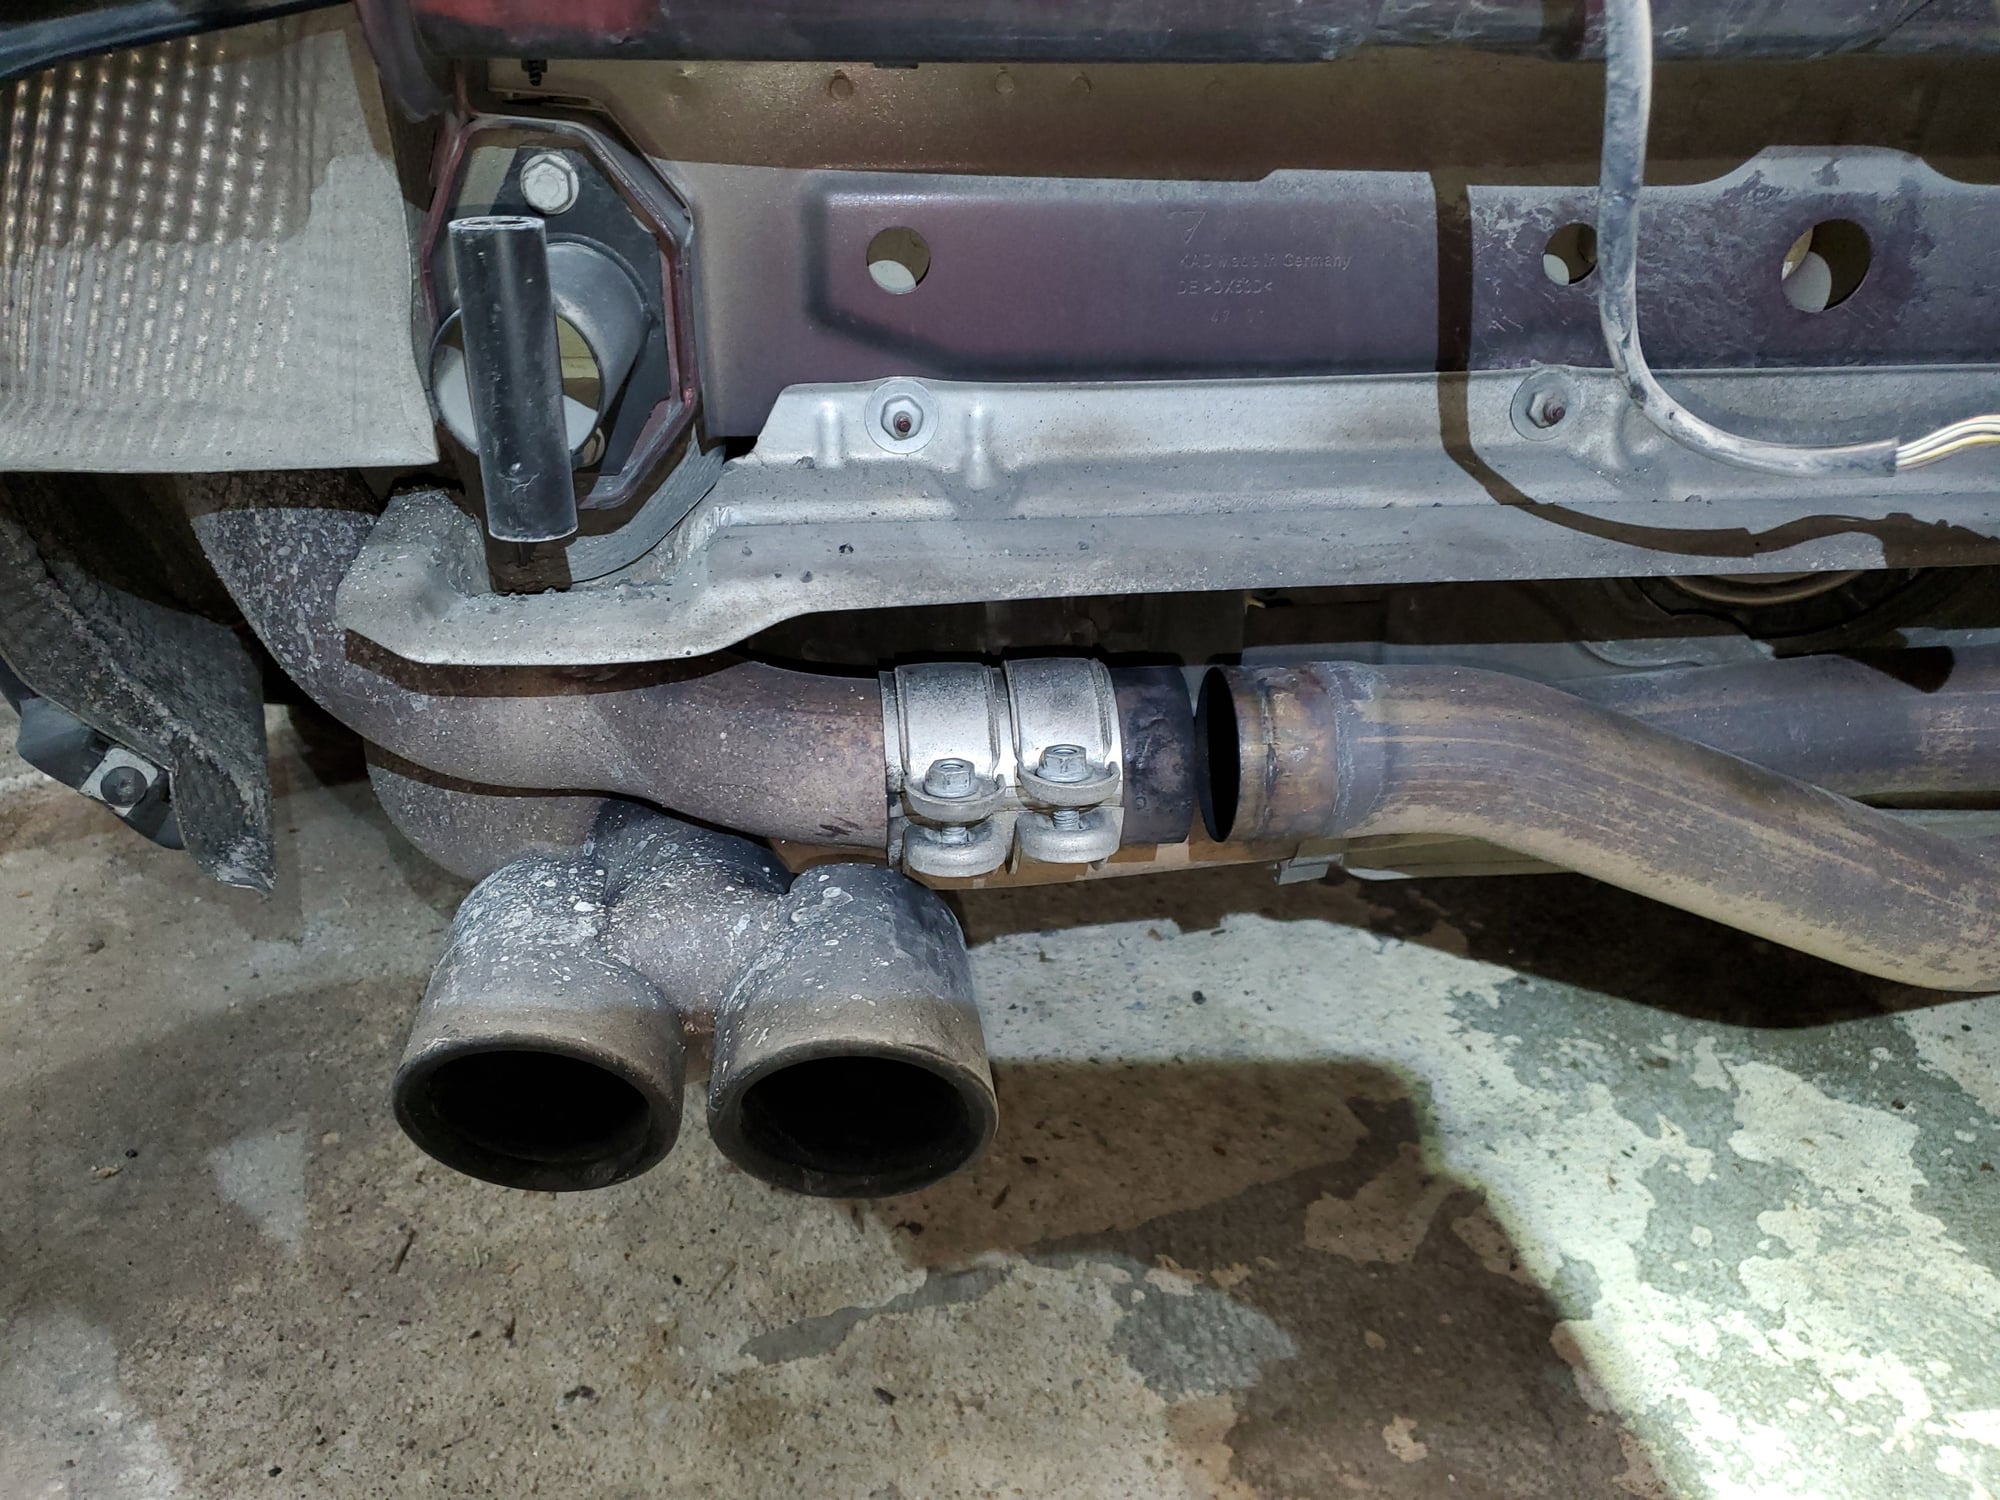
Remove rear center muffler or exhaust (note I have an FVD Sport Exhaust which eliminates the side mufflers giving more room to work with.
Steps
Remove or loosen serpentine belt
Support engine using same method as when replacing engine mounts / floor jack with large wooden plank under oil sump to distribute weight (several DIY’s available on RL)
Loosen engine rear carrier points (3 nuts & 1 bolt with spacer) just by a few mm. to create additional clearance for water pump.
If replacing serpentine belt then fully remove the bolt with spacer. (7 & 8 below). Note when replacing this bolt be extremely careful to ensure the carrier is correctly aligned so as to not misalign and cross thread the bolt when reinserting.
85 Nm (63 ft. mounting Torx T55) torque lb.)
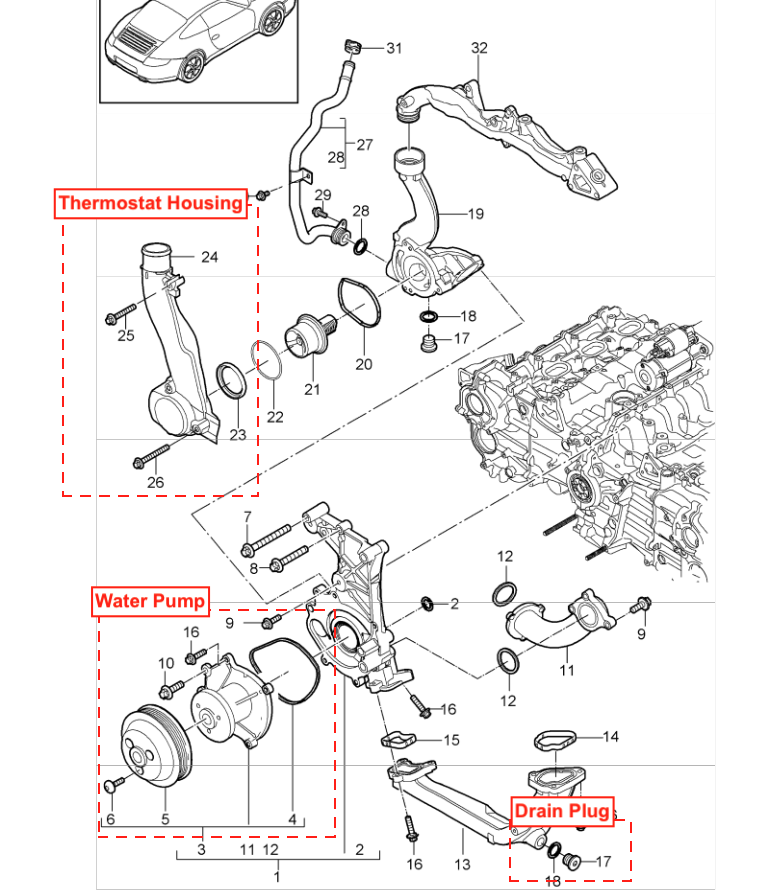
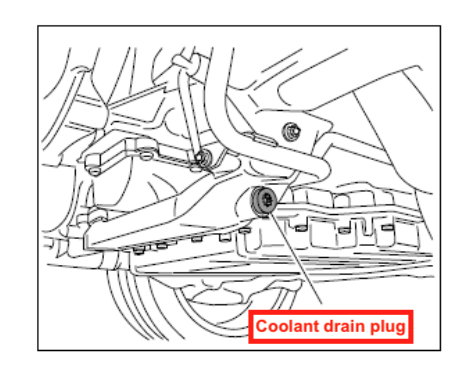
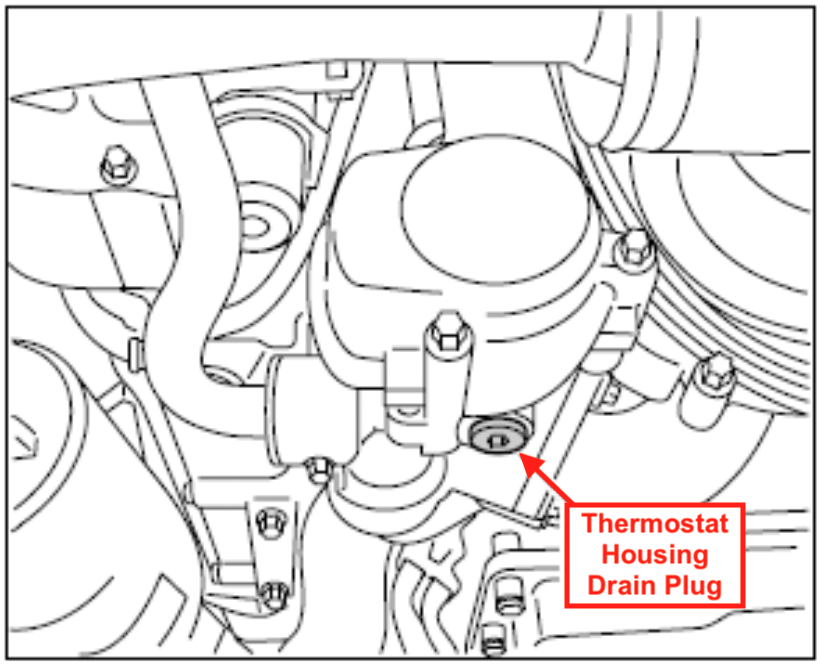
Drain coolant (Drain Plug 30 Nm (22 ft.lb.))
Note there are 2 drain plugs. If not removing the thermostat housing and you are doing a coolant flush as part of this job, then you should drain from both plugs. As I was removing the thermostat housing anyway the remaining coolant could be drained as soon as the bolts are loosened.
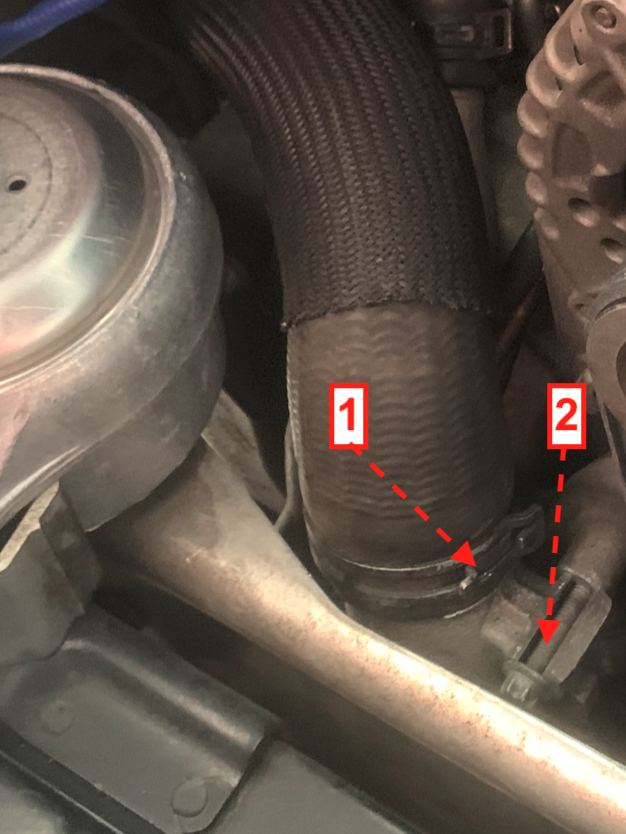
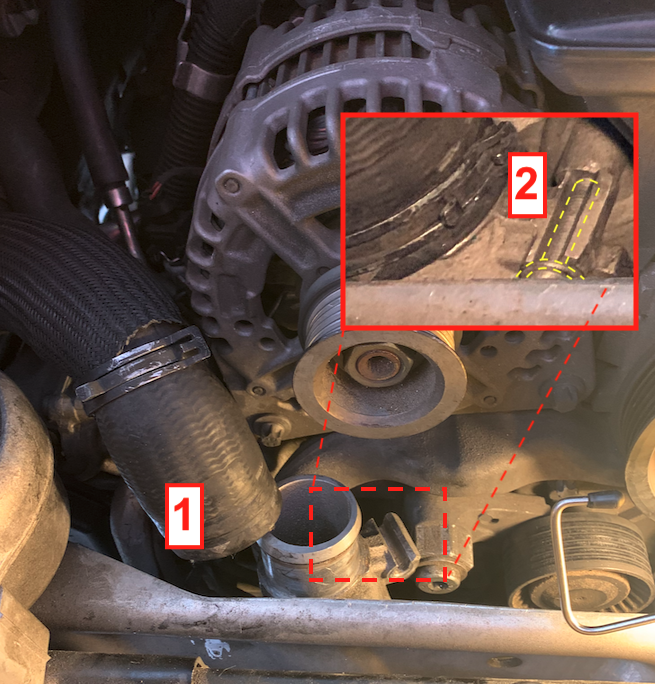
Disconnect top hose [1] from thermostat housing
Loosen top bracket screw [2] for thermostat housing
Remove 3 thermostat housing bolts
Torx screws, M6 x 50 (Tightening torque when replacing: 13 Nm (9.5 ft. lb.))
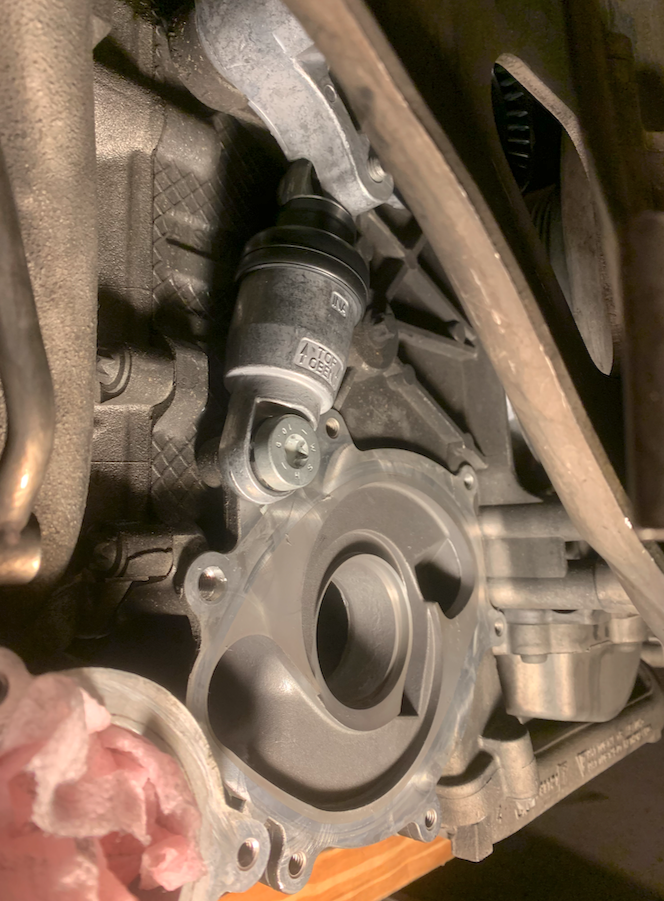
Pull thermostat housing towards the rear of the car by about an inch [1] (remaining coolant will drain from housing)
Rotate thermostat housing clockwise (when looking up into the engine bay from below) by 30 degrees [2]
This should allow enough space for you to lower and then remove the thermostat housing [3]
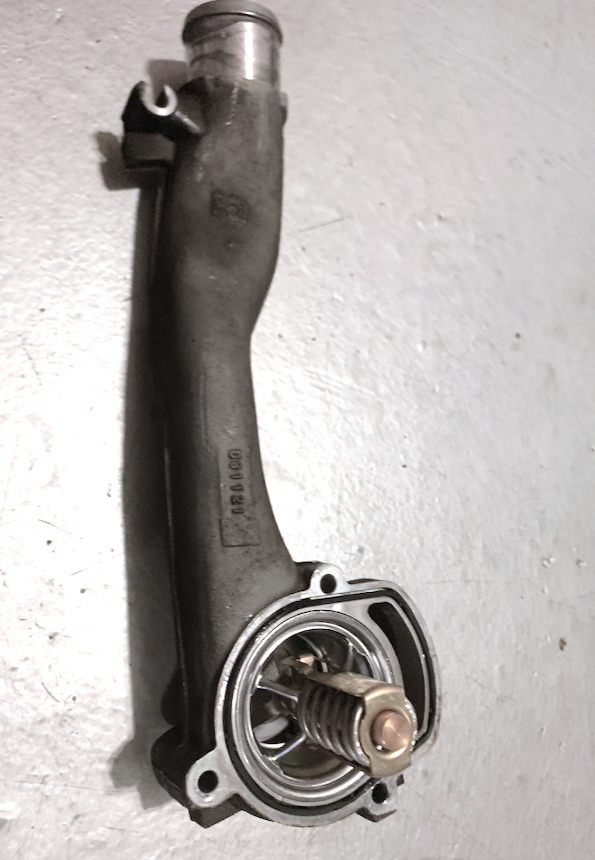
This is a very good time to replace the thermostat, but be prepared for a challenging job. Will post separate DIY.
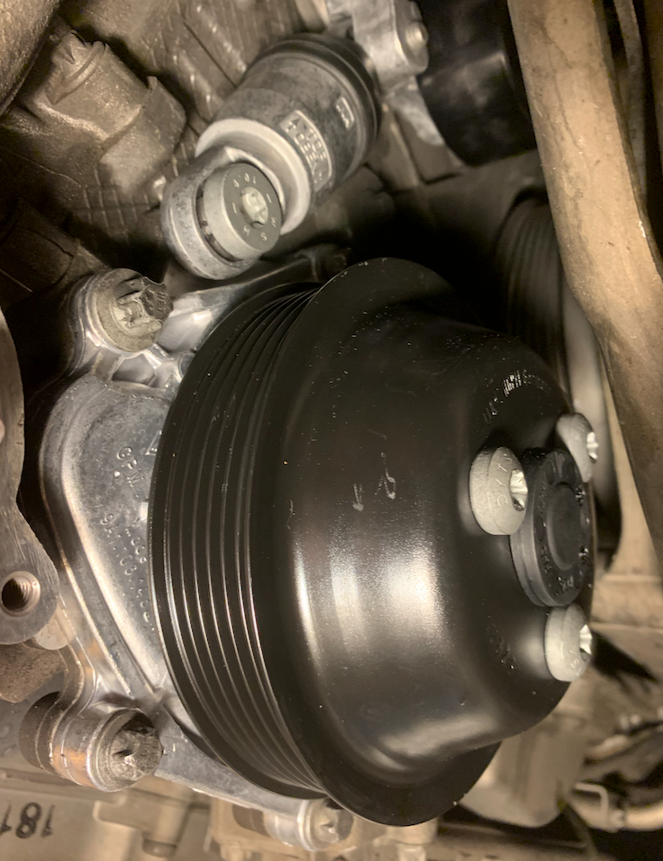
Remove water pump and replace
5 x external Torx screw (E10), M6 x 20) 13 Nm (9.5 ft.lb.)
1 x external Torx screw (E12, M8 x 25) 23 Nm (17 ft.lb.)
The top RHS bolt can be accessed with a compact socket wrench by reaching over the pulley
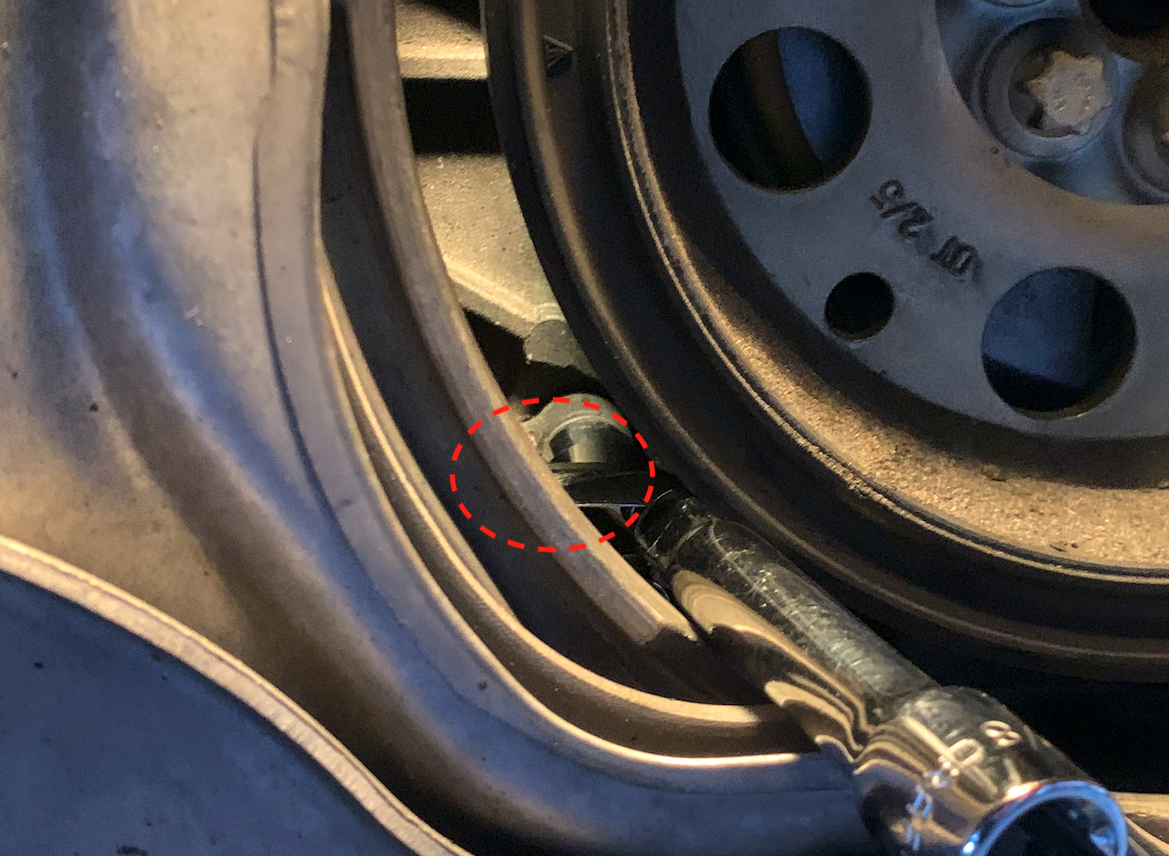
The middle RHS bolt can be accessed through the rear panel as shown below with an elbow connector:
For me this was purely preventative as I was hearing some additional noise coming from the pump verified with a stethoscope and you can hear the side by side comparison here:
Wow, great! Questions for when I do mine (pump arrives this Tuesday):
1 - How did you know how much jacking to do on the engine? Jack up the engine to apply pressure, remove the mounts, then lower just a bit?
2 - Engine mounts: Looks like I need to fully remove the mounts eh? Or which bolts to loosen or remove? Main ones from underneath that hangs the engine #5? The bolts that hold the mounts to the bracket #3? Remove both to remove the mounts and then free the engine?
3 - What about the brackets the engine mounts bolt into?
4 - Doesn't look like you can get a torque wrench in there.... just tight enough?
5 - Looks like you used a Porsche-labeled pump... did you consider a Gebe OEM? Rational?
The only thing that worries me is the engine carrier so any more information would be appreciated. I will be replacing the serp belt so I will be removing that center spacer thing.bolt #8.
Peace
Bruce in Philly
Last edited by Bruce In Philly; 02-12-2021 at 11:16 PM.
Was the R&R of the thermostat housing done to facilitate the water pump R&R or was it independent of it, "while I am in there ..."?
Thanks @CAVU
I wanted to do the thermostat preventatively while in there, and having the housing out the way makes access to the pump much easier.
You ask a good question, and it may be possible to remove the pump with the T-Stat housing in place but I cannot confirm. I'll dig through my notes further and provide an update.
Originally Posted by Bruce In Philly
2009 C2S 169K miles
Wow, great! Questions for when I do mine (pump arrives this Tuesday):
1 - How did you know how much jacking to do on the engine? Jack up the engine to apply pressure, remove the mounts, then lower just a bit?
2 - Engine mounts: Looks like I need to fully remove the mounts eh? Or which bolts to loosen or remove? Main ones from underneath that hangs the engine #5? The bolts that hold the mounts to the bracket #3? Remove both to remove the mounts and then free the engine?
3 - What about the brackets the engine mounts bolt into?
4 - Doesn't look like you can get a torque wrench in there.... just tight enough?
5 - Looks like you used a Porsche-labeled pump... did you consider a Gebe OEM? Rational?
The only thing that worries me is the engine carrier so any more information would be appreciated. I will be replacing the serp belt so I will be removing that center spacer thing.bolt #8.
Peace
Bruce in Philly
@Bruce In Philly
Answer to your question 1,2&3 - Unless you what to create a lot of room, there is no need to loosen or remove the mounts. The carrier will flex forward because of the flex in the hanging engine mount bolts. I also updated the initial post to add some more detail.
Answer to question 4 - If I recall correctly I was able to get the torque wrench into all points on the water pump and thermostat housing. You made me 2nd guess the one WP bolt where you have to access through the engine carrier opening, but I'm press sure I did it with the elbow connector.(I also aded all torque values to the initial post)
Answer to question 5 - yes I did use the OEM Porsche pump. Price difference wasn't too great and I simply didn't want to take any chances. The OEM pump on my one Cayennes lasted more than 160k miles and I changed it preventatively with OEM also.
hope this helps
Regarding not doing the thermostat.... honestly, I don't find removing the bumper et al all that big of a deal. I have done it so many times now, that should the thermostat go, I think it is not big deal. I will deal with it when and if it happens.
Peace
Bruce in Philly
Last edited by Bruce In Philly; 02-13-2021 at 11:17 AM.
Gary/EMC2 did such a good job... I will just add my own additions to help out. Thanx Gary, you instructions were fabulous.
Symptoms:
- Getting a chirp on cold startup...
- Got a rattle on cold startup that would start about 30 seconds in.. rattle for about 30 seconds and stop. I thought it was a tensioner/chain and it was freaking me out.. this rattle only happened twice as I stopped driving the car and replaced the pump.
- Started smelling burning rubber.
- I thought it may be the tensioner pully so I ordered an OEM tensioner pully... only $20.... put it in and the old one I had about 30K miles on it... was fine. But I noticed the serpentine belt was worn on the edge to the cord !!! So I figured it was the water pump. (Update: all new belts show the same cords so maybe I didn't need a new belt)
- Now I am getting a higher-pitched squeal. comes and goes.
- I put my stethoscope on it and I can hear it turn ... sounds like a metal-on-metal wheel ... no grinding or rattling
My impression of this pump is that is built like a tank.. I got 169 K miles on the original pump and I still was not sure it had failed... no leaks and when I removed the old, it did make a slight noise hand spinning it (see Gary's / EMC2 video above) and it had some play in it. But it never leaked and it never really worried me..... I just jumped on it when I heard the chirping.
Add on Work:
- New gaskets (s) and stainless bolts (6) for the cat-to-Sharkwerks cross pipe connection
- Painted the vacuum pump cap... hit it with a wire brush.. very little rust came off... then Rustoleum rust remover... very little rust came off... then one thick coating of Rustoleum flat black paint. Honestly, I don't think you need to do this but the cap was fully staring at me begging for it. And you just can't turn down a begging job.
Quick Comments:
- Pump: Porsche-labeled from Suncoast for $335.55.... I also threw on a Porsche-labeled belt for $68.... Way overpriced belt, I should have ordered a non-Porsche belt elsewhere.. darn!! I wasn't thinking.. it has Porsche & Optibelt painted on it, get a OEM Optibelt for a heck less money. Research showed the pump is made by Gebe and could be had for less money but I could not find "Gebe" stamped anywhere on the old pump, only "WPC". The Gebe pump is noted to have a metal impeller on the supplier sites but the Porsche-labeled pump uses a "composite" impeller... it looks and feels like an odd, hard plastic. For fun, I took apart the old pump to check it out and ended up breaking apart the impeller.. it broke like metal and does not bend so it really is some sort of "composite" material. I think I did the right thing buy buying a Porsche-labeled unit as it really is different that what I found on supplier sites.
- You do NOT have to remove the thermostat. The pump and bolts are straight-line accessible.
- You must remove the rear bumper, side panels, tail lights, the crash member, and both side and center mufflers. (After I thought this through, maybe I did not have to remove that crash member.. hmmm just two bolts.. I was on auto-pilot!). I did NOT jack up the car nor remove the rear wheels.. no issue with access. Interesting, I wonder if I could do my spark plugs this way.... hmmmm...... To get at that way inner nut to remove the side panels, I used two ratchet extenders and this made it real easy.
- One of the toughest jobs was removal of the center muffler. ALL the bolts at the cats broke so have 6-stainless bolts and nuts ready. I also ordered two new gaskets from a discount Porsche dealer (cheap!). The studs just punched out with a punch and hard whack. I contacted Sharkwerks and asked them for the proper size.... Dan Kennedy responded and noted they use M8X25 mm... got a set of 10 flanged from Amazon. Amazon description: "20 Sets M8-1.25X35mm Flanged Hex Head Bolts Hexagon Screws, Serrated Flange Hex Lock Nut, Fully Threaded, Stainless Steel A2, DIN 6921" for about $10. Are these the best? I dunno, they worked fine. The other problem was loosening the muffler straps as the nuts were frozen.. I soaked them overnight with PB Blaster but it did not work. If you turn too hard, the strap will break... I took a BIC lighter and heated them until they smoked.. and they came loose! .... at this point, I thought to myself "I ROCK!". Yea, I felt good about that one.
- Gary did not lower his engine but I wanted more space between the carrier and the pump so I went ahead and lowered my engine a bit... a few inches. I wanted to fully remove the carrier and make life easy but there was an issue. My service manual noted to lower the engine to get the clearance needed to pull out a bolt that removes the engine carrier... don't do this all the way!! You can only lower the engine a few inches without removing some hoses in the engine bay. My manual did not have all the information needed... the coolant line from the tank will snap or crack the tank.. you could remove it as you drained the fluid but... and there is some plastic oil line that will not clear the drop... I saw both of these happening as I was lowering the engine and stopped... I was not sure what else I may damage so I did not remove the carrier. Gary is correct, you can access the pump by pulling on the carrier. But I wanted the extra space so I went ahead and removed the "special" nuts under the engine mounts (the engine hangs from them) to free the carrier and that gave me plenty of space. Use a a T-55 torx bit to remove the special nut from the bottom of the engine mount. So... I lowered the engine as far I could go and not snap the hose and plastic, corrugated oil line and stopped there. This exposed that top bolt fine and allowed me to pull the carrier out further to make access of the pump bolts easier.
- To lower the engine, remove the air box, release the belt, and I put a jack directly behind the car, and two melamine shelves I had laying around and used them to support the oil pan. Be careful they fit under there as the headers hang low along with a cross member at the front of the engine. Now how high to jack the engine to take the weight off of the nuts under the engine mounts? I dunno... I started jacking and the car starts to rise on the springs... then I felt the pressure on the jack got much more so I thought I was now jacking the entire car so I stopped... then I started to loosen one of the mount nuts and it came loose without the chassis dropping so I was fine. Then with both engine mount nuts off, I SLOWLY started lowering the engine while looking into the engine bay... you will see the coolant line and that corrugated line heading for disaster... stop. You will now see the top bolt to the carrier is fully exposed ... but still not removable. Now remove the the two carrier nuts, the long bolt with spacer, and loosen till free that captive bolt (4 items)... Now jiggle and pull hard on the bottom of the carrier plates... they will come way out.
- Drain the coolant by removing only one drain plug, the one under the thermostat... when I removed the pump, very little coolant fell out.. very little so don't worry about trying to capture it.. just put some towels under there.
- When I removed the pump... there was hard crud in the seal on the lower-right mating surfaces.... odd as I saw no evidence of leaks... Scotch Bright took all residue off and I make the entire mating surface shiny and clean.
- The pump bolts: I did have to go out and buy a set of stubby ratchets from Harbor Freight along with some short E-Torx sockets. The E-Torx socket set I have are longies and would not fit in there. These are needed to get that top right pump bolt. Also, make sure you have a nice collection of ratchet extensions and swivel joints.. I had to be creative with them. Removal and replacing the pump was the simplest of these jobs despite the fiddlyness of going behind the hanging carrier.
- Remove and replace your new belt with the carrier off... way easy this way.
- I used a Scotch Brite pad on the cats and the cross pipe fittings... they were all crudded up and wanted a good seal with the new gaskets.
- Reinstalling the center cross pipe was difficult as the holes on the cats don't match up so it was really tough but you just have to muscle it... first, hang the muffler pipe on the hangar but leave the straps way loose (I used some anti-sieze on them). Then thread and bolt one side but leave the bolts way loose.. pull the pipe away from the cat... this give a bunch of play.... oh, I put a little anti-sieze on them too. Then muscle the other side. I first inserted a very thin sacrificial Philips screwdriver into the two misaligned holes and then wedged them into line.. inserted one of the bolts (put the gasket through one and maybe the side muffler mount if you insert that bolt)... then tightened it down a bit to pull the system into alignment... then I could flip the gasket around and then insert the last two bolts. Tighten all six down together going back and forth.
- I used an Airlift vacuum to re-fill the coolant. I had some extra on hand from my last flush but I didn't need it. The airlift sucked in all the fluid but the tank now looked overfilled... no worries, there must have been a tiny bubble in the engine someplace... so when I took the car out for a test drive... get the car up to operating temp and then get the RPMS up to 6K a few times and hold it there... when I looked at the tank the next day, the rest of the fluid was sucked in at the line was at MIN which is normal on my cold car.... perfect.
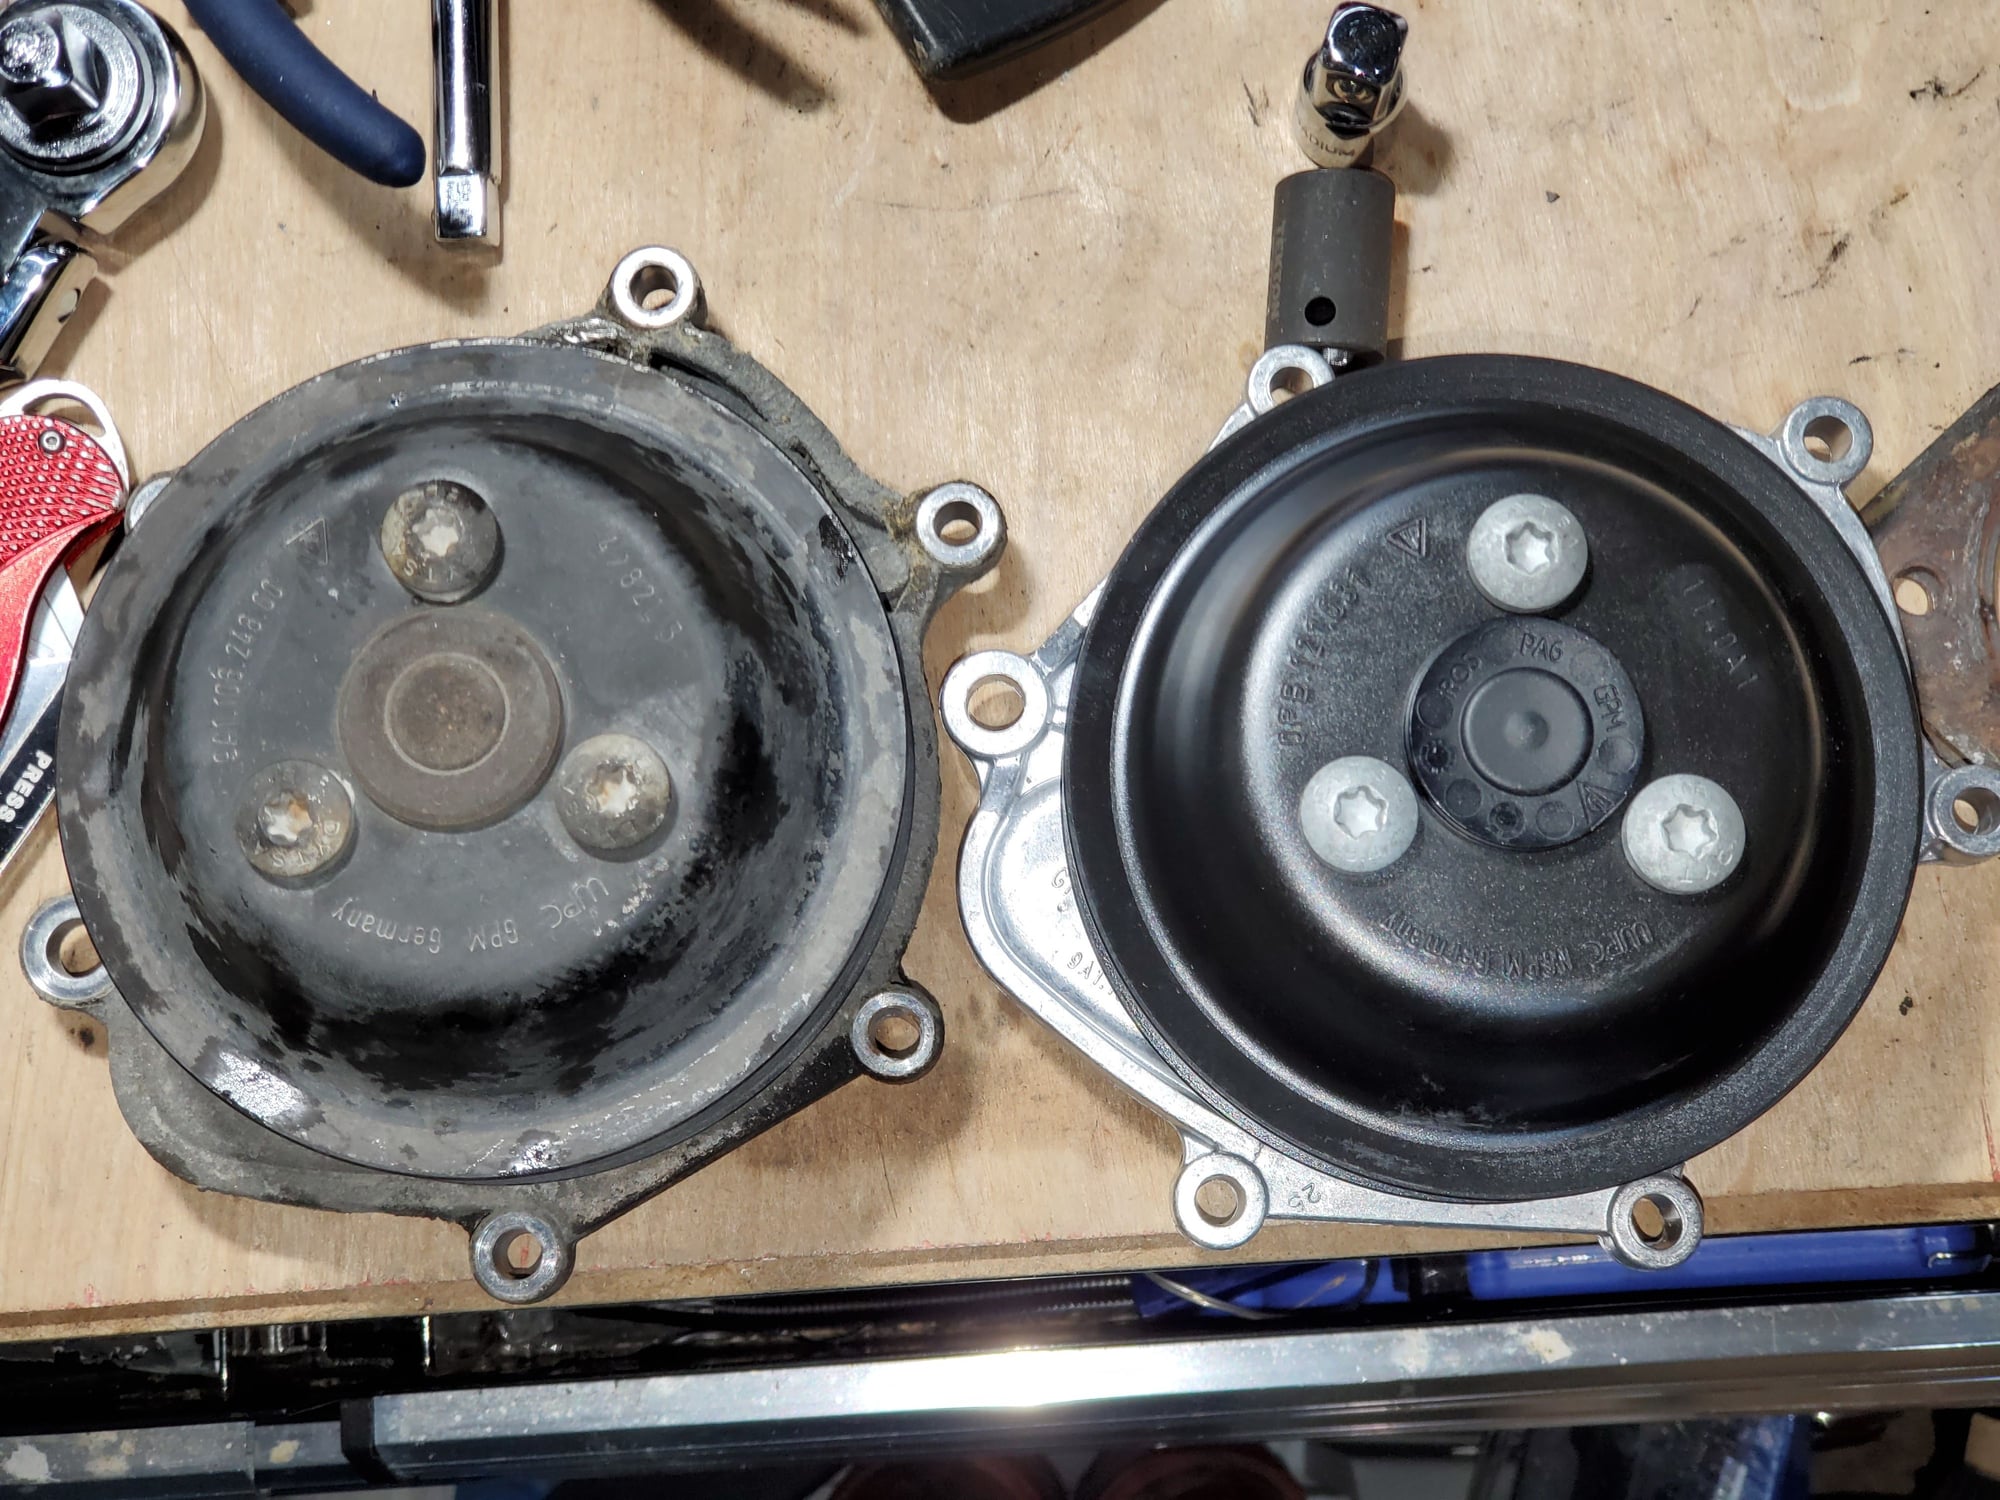
- Oh, the Porsche-sourced pump was exactly like the one I took out... black anodized pulley and "composite" plastic impeller. Both the new and old had had "WPC" on the pulley... not sure if this is a maker or not.
- Total time for this work: 3 days. I go slow... take my time... study crap... go eat something... make some calls.... I think if I worked quickly and had some help (I did this with NO help) I could do it in ... oh... 8 hours.
- I used a torque wrench on all bolts and nuts
- I did not bleed or make a mess of fluids all over the place... I must be getting better at this wrenching thing.... oddly, very few cuss words too. This was not a difficult job. ... there was a lot of fiddly work but not anxiety inducing... it did take a ton of time. Having the tools was key... an assortment extensions and swivels for ratcheting was crucial. Also having an assortment of box wrenches and sockets long and shorties were also helpful. Shortie E-Torx sockets were critical. Porsche uses all sizes.
Peace
Bruce in Philly
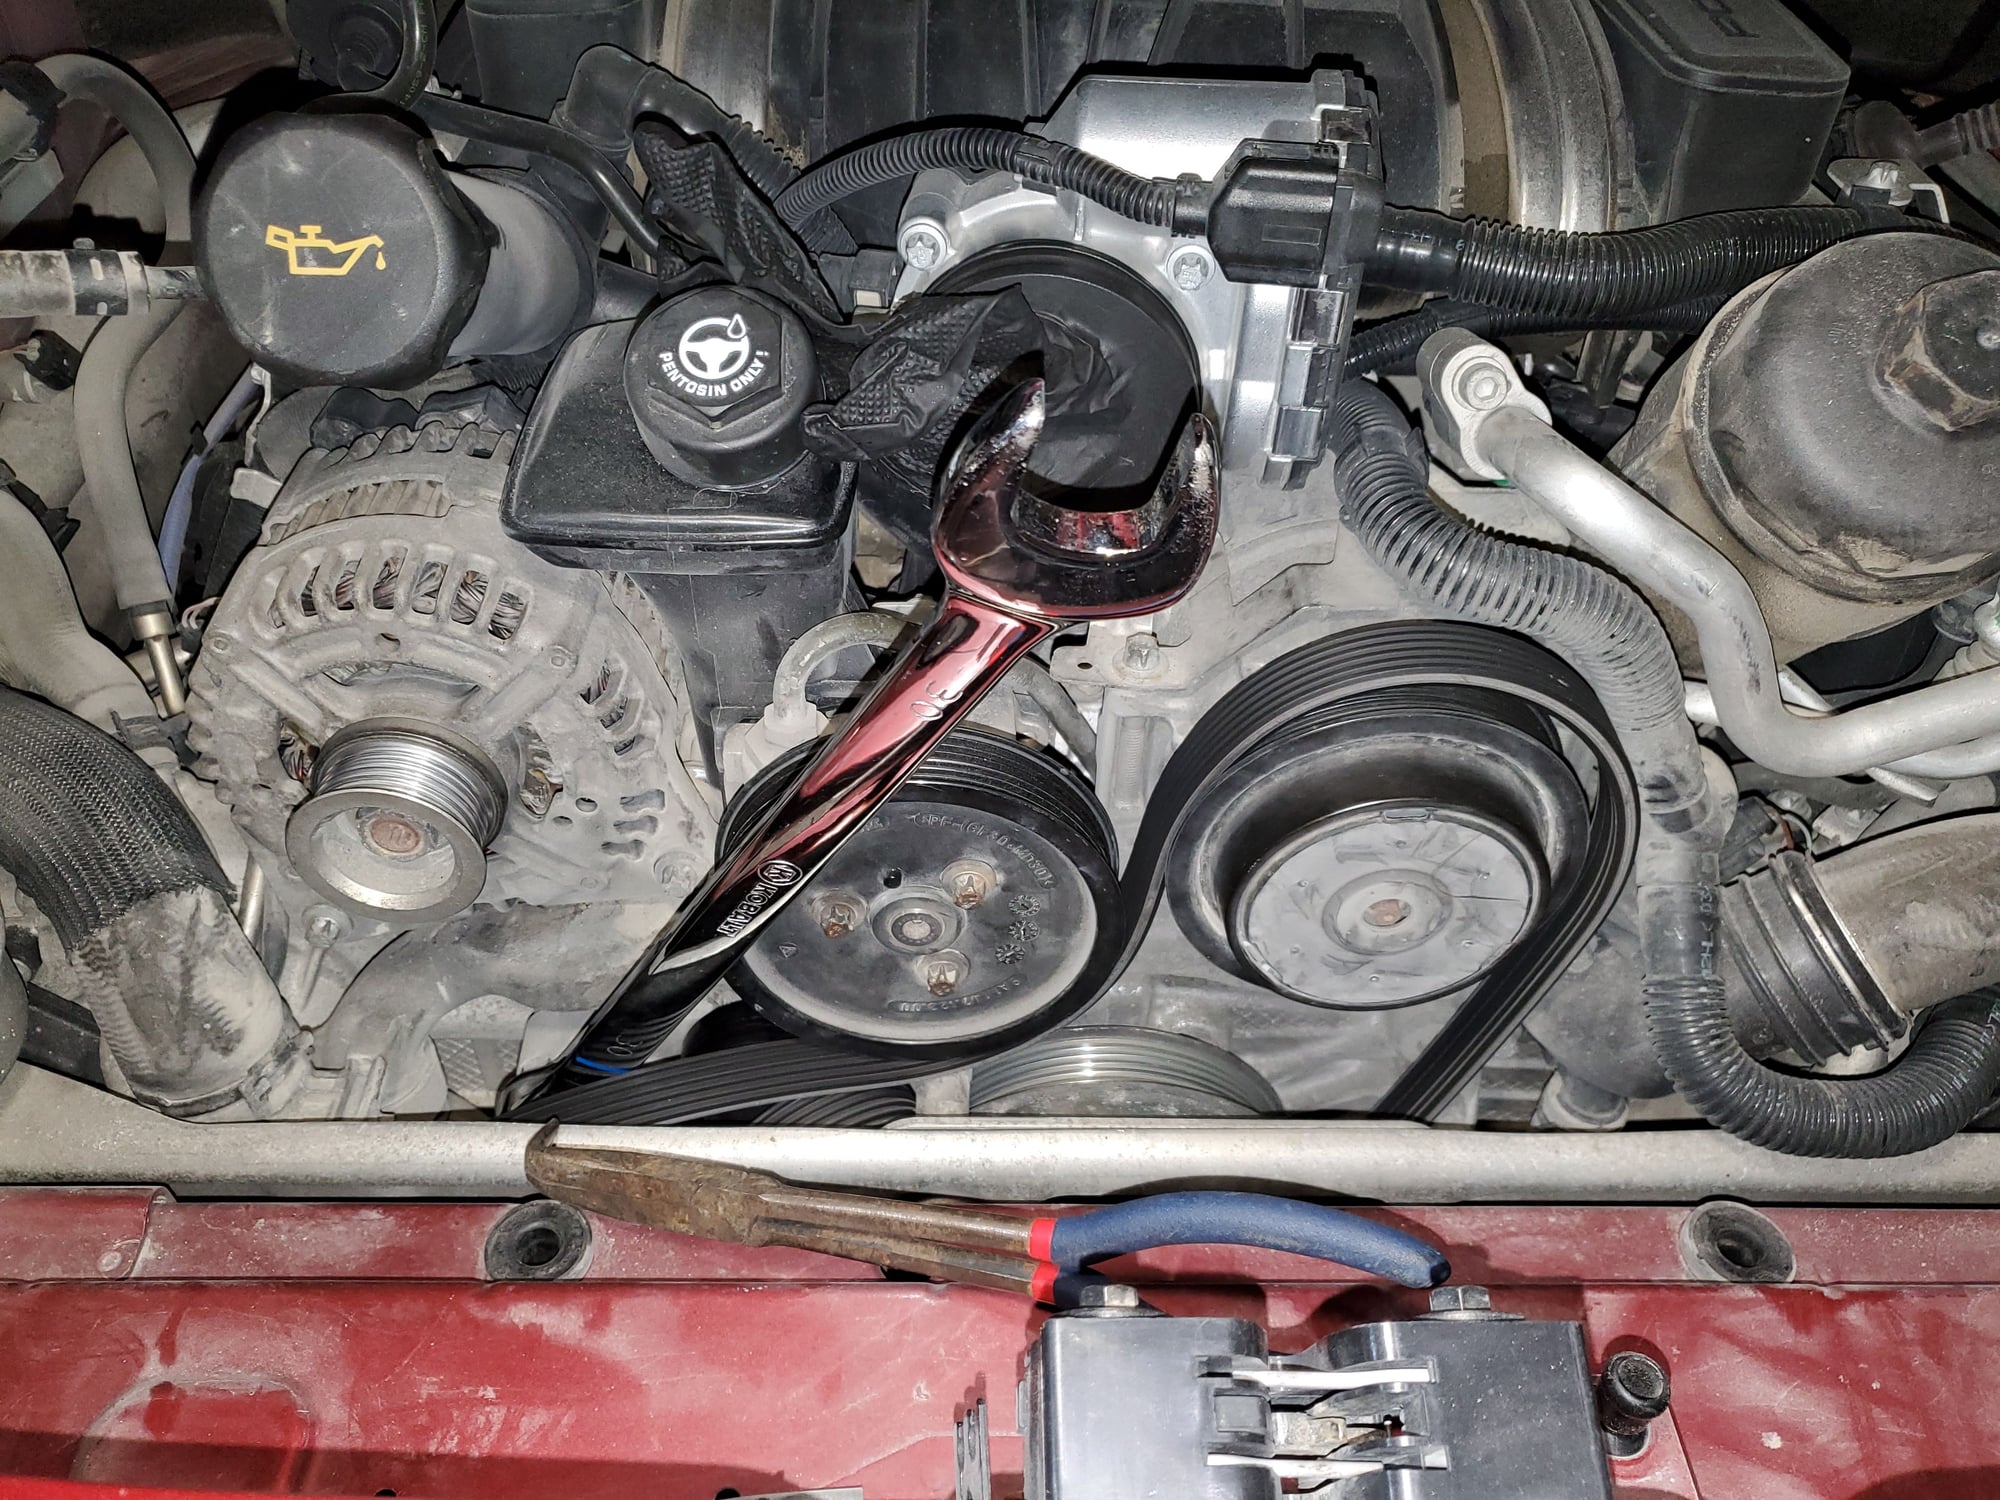
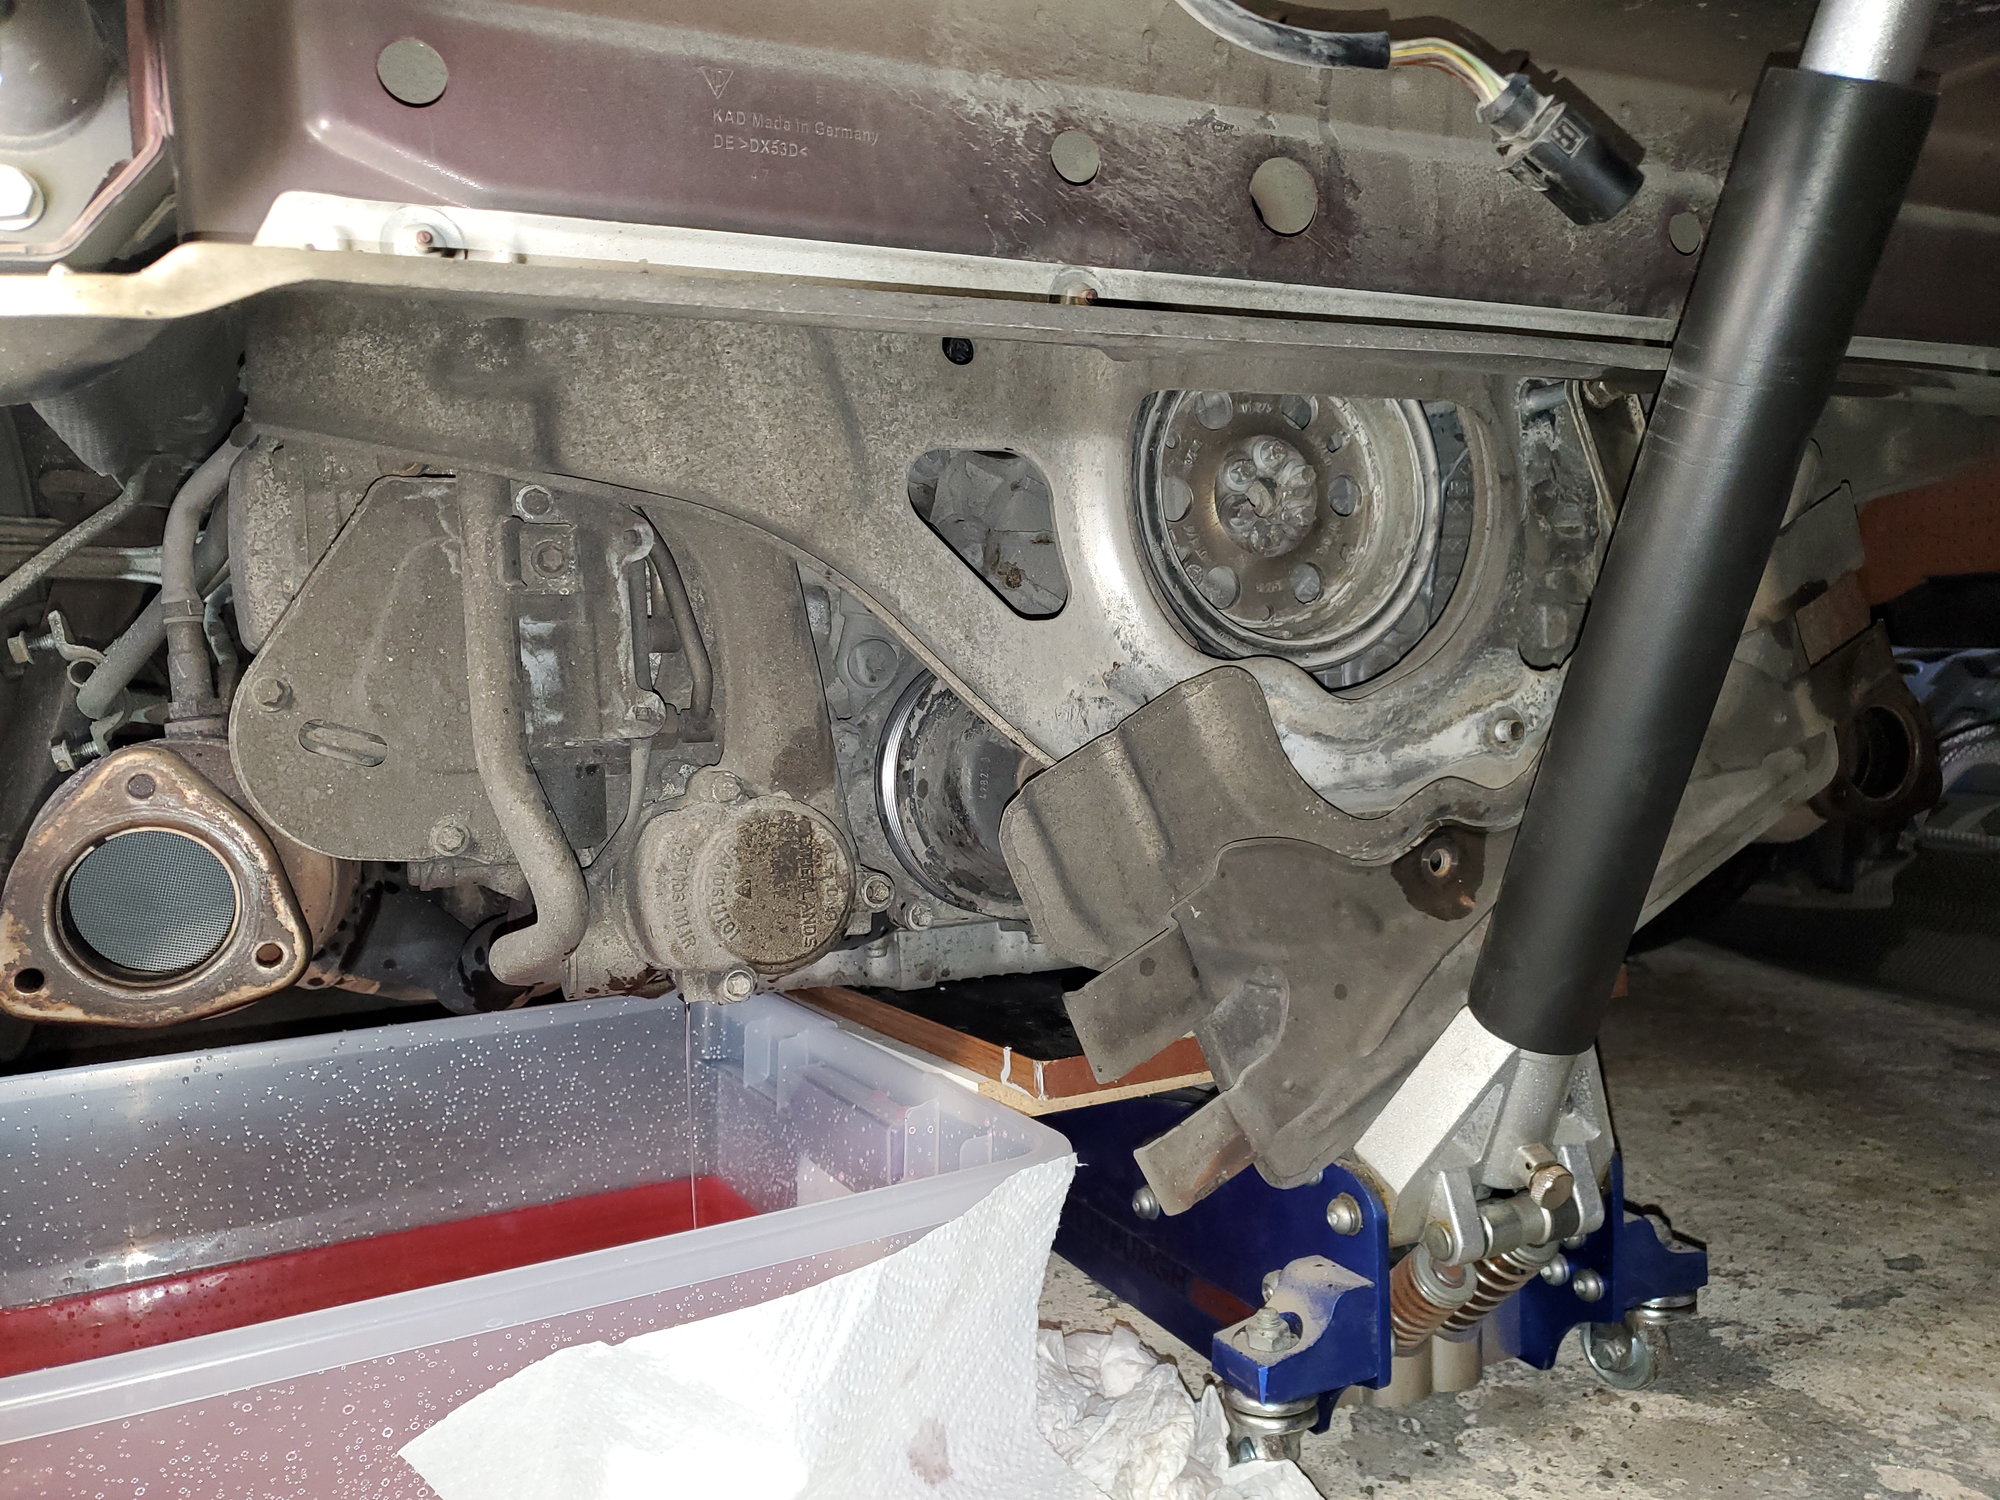
30mm wrench to loosen the serp belt... note I put a black rubber glove over the throttle body to keep out dust. You can see the two hoses that will not allow the engine to be lowered further.... the corrugated black hose right of the AC compressor, and a thinner hose far left of the alternator. You will see these clearly be stressed as you lower the engine. I could have disconnected the hose on the left and maneuvered the corrugated line... I think... but I was worried about doing other damage I could not see. Since my manual did not note anything about the coolant line, I was not sure there was something else I needed to worry about that the manual left out... so I stopped lowering there.
Loosen the muffler-to-muffler collar to then remove the side mufflers. The side mufflers are held onto the car via four nuts ... at two locations... no need to remove or loosen the exhaust tips.These nuts came off easy as I had used anti-seize on them from doing my spark plugs. Note I removed the crash bar... not sure you need to do this.
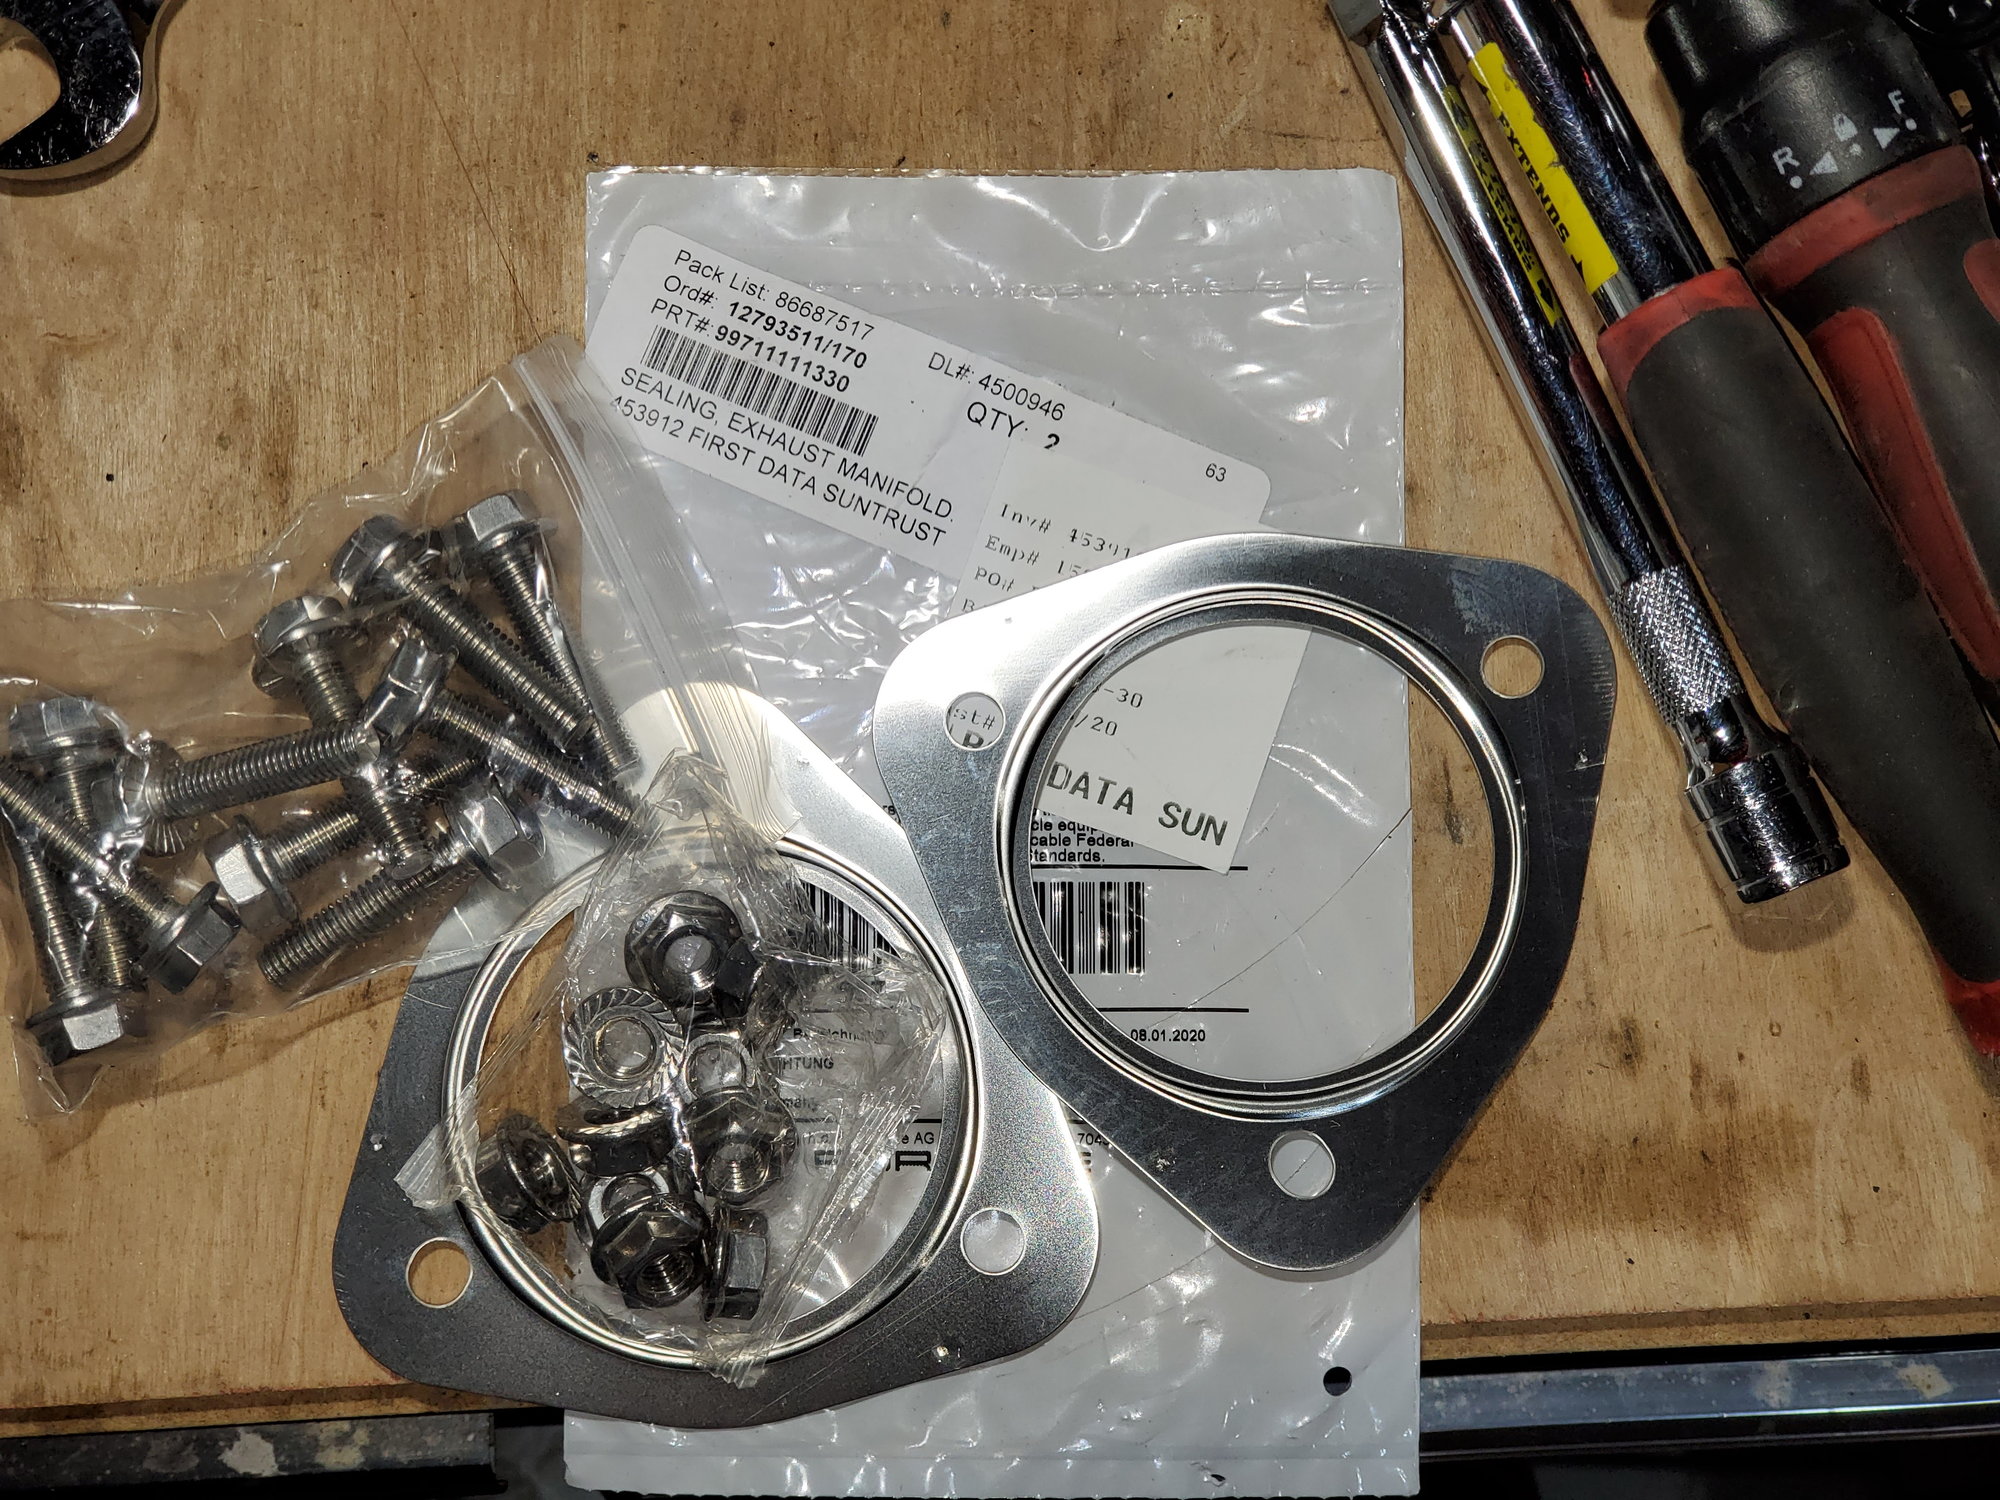
The new exhaust gaskets and stainless bolts... get the flanged ones.
Note the jack, the wooden shelves holding the engine. Also note the carrier is pulled back. In the upper right, you can see the captive bolt... it needs just a bit more lowering and that would allow the bolt to come out and the entire carrier removed but you just can't do it because of the hoses in the engine bay. But it is worth lowering the engine just a few inches that will then allow the carrier to pull out further from the engine giving a bit more space to access the pump. This allows for the use of a shortie torx socket, a swivel joint, an extender and ratchet wrench. I noted in the description I purchased a stubbie ratchet to get on of the bolts... but I am not sure that was needed as having the carrier out so far from lowering the engine allowed almost straight-in access (with a swivel joint). Just buy a stubbie wrench just in case... they are stupid cheap at Harbor Freight and you will find use for them some day.
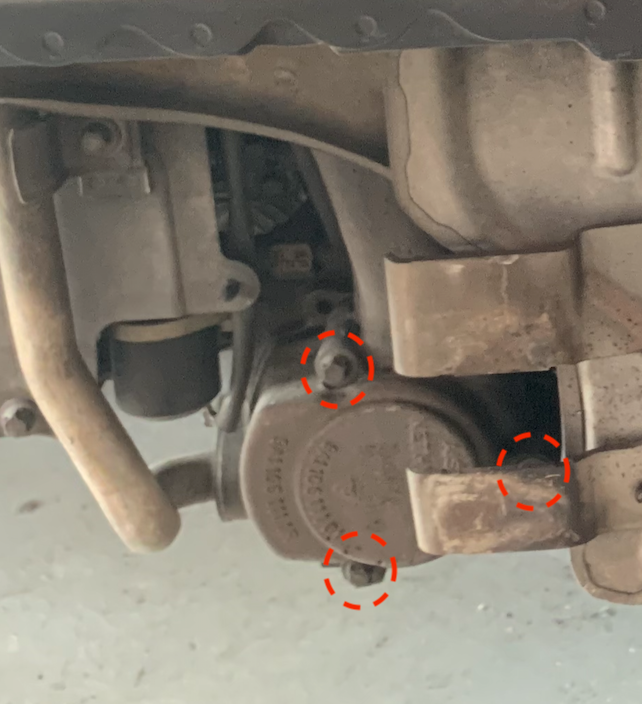
Clean the engine surface with a Scotch Brite pad... the surface on mine had some crud.. no idea how it was contaminated but clean it until shiny. I also sprayed some Simple Green on a paper towel and wiped it all down. You can a ton of gunked up crud around the pump... that is from years and years of a super slow leak from the power steering pump above it. Simple Green will not dissolve this easily... I had to scrape it off in clumps with a screwdriver. If it were summer time and I was outside my garage, I would have given this whole area a good cleaning.
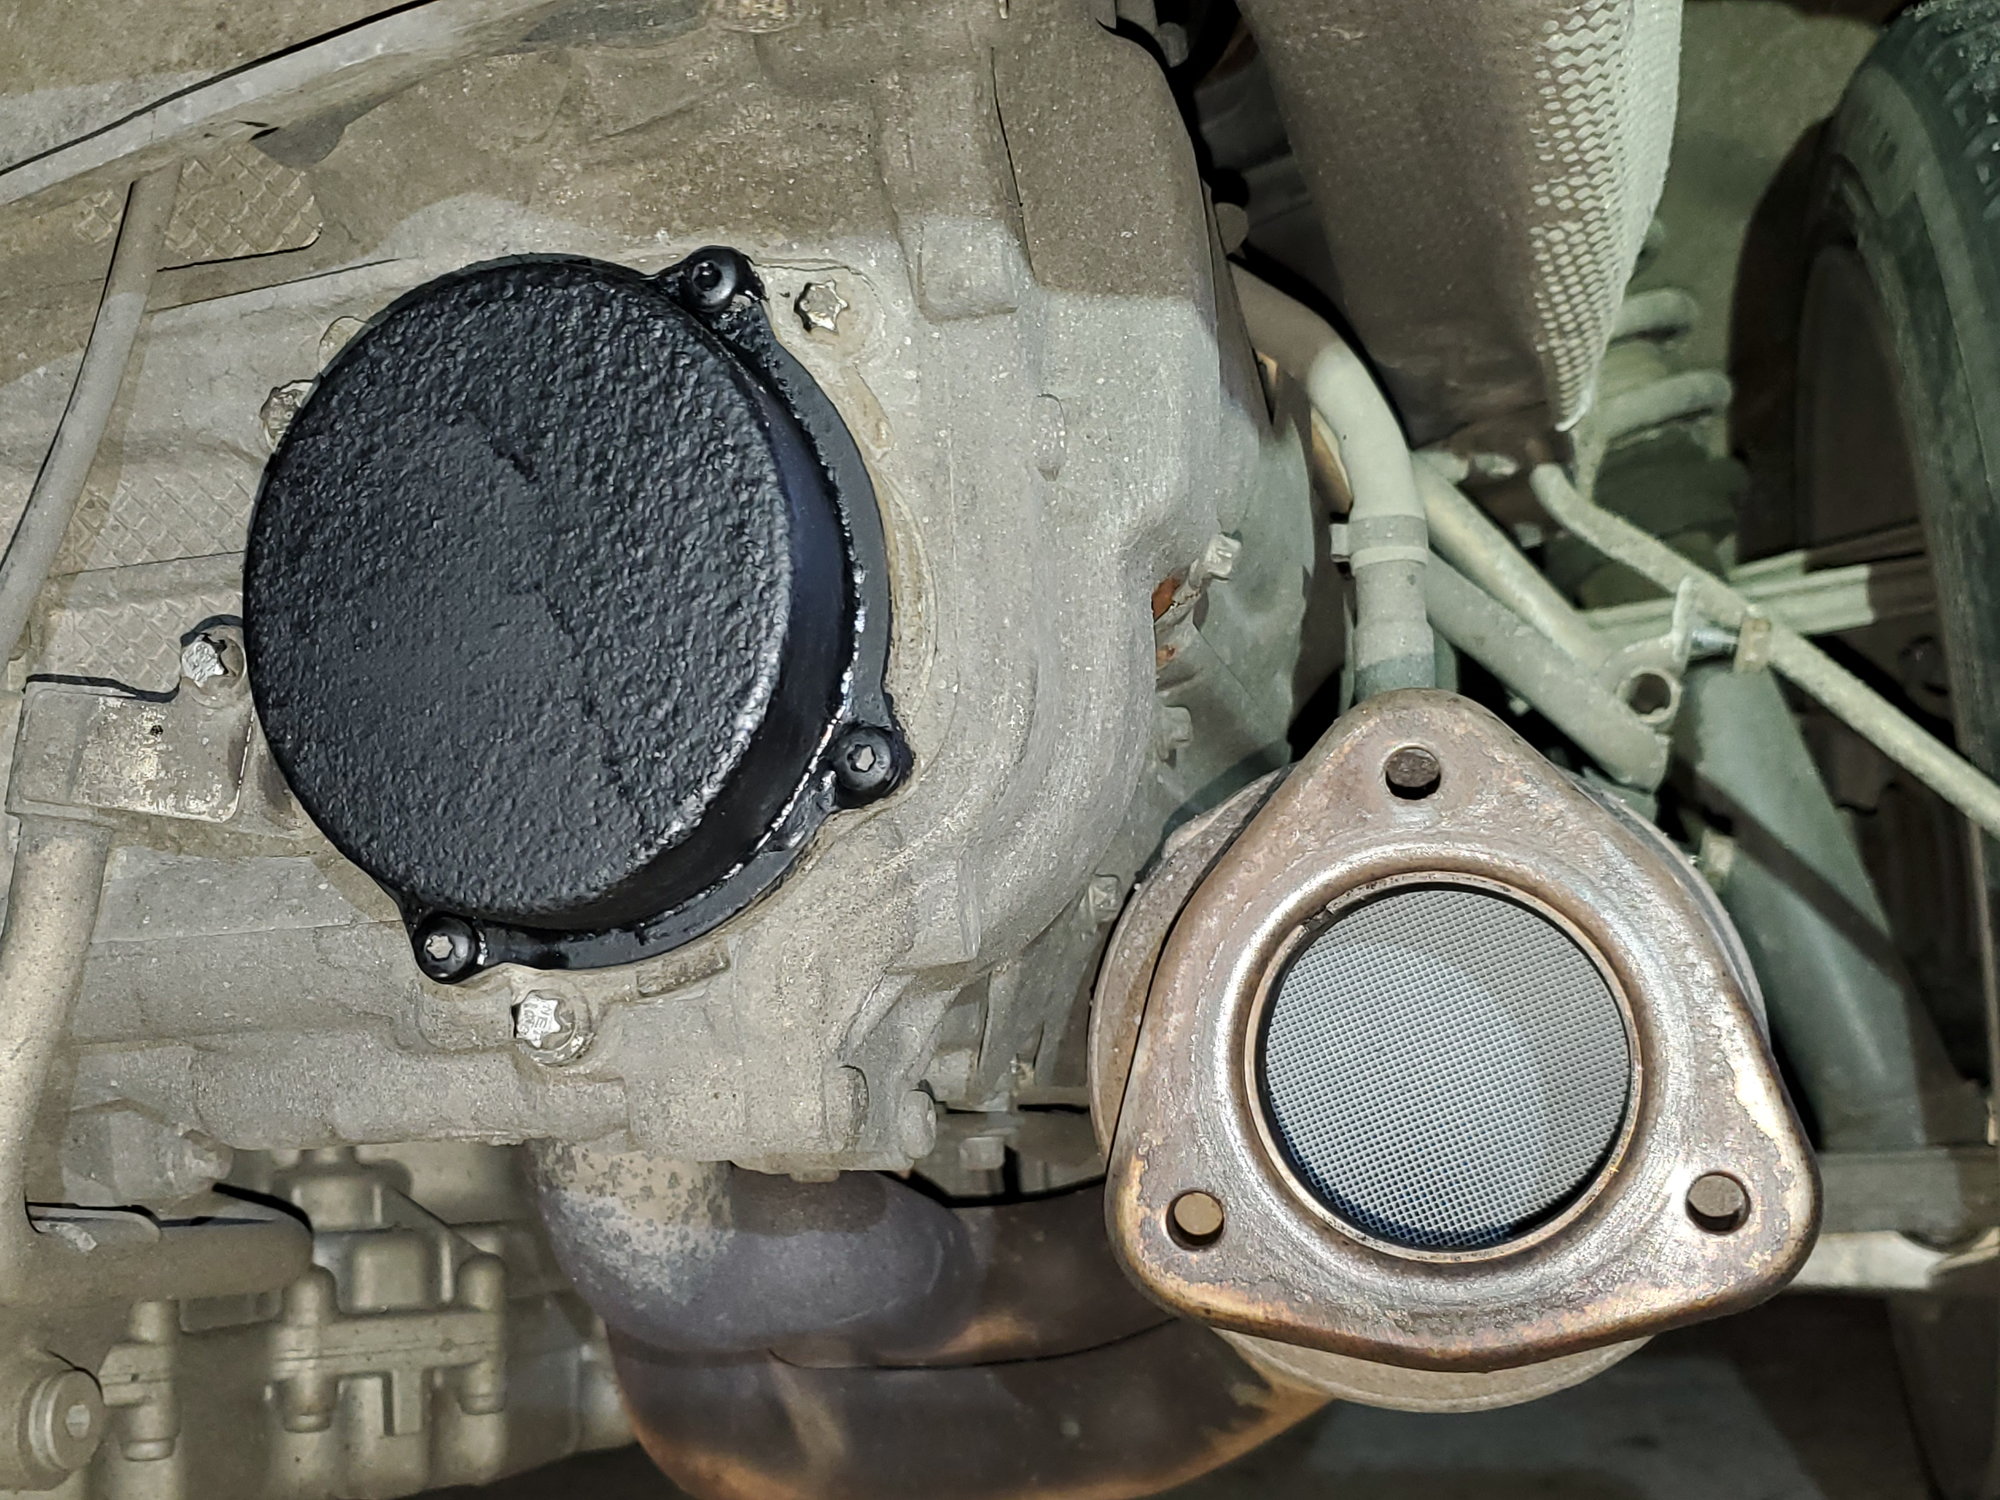
Clean the surface of the catalytic converter with a Scotch Brite pad until smooth... wipe down with Simple Green on a paper towel. Do the same on the center muffler (or cross pipe) mating surface. This will ensure a tight connection with the gasket. I also cleaned off the loose rust on the vacuum pump cap and painted it... very little rust came off despite how ugly it looked. I don't think you really need to do this.
Last edited by Bruce In Philly; 02-19-2021 at 11:21 AM.
Nice write-up Bruce - Just a few questions for clarification -
It looks like the package Qty is 2 on the exhaust gaskets - so to make sure - order qty is 1 and both gaskets come in one package - correct?
Did the water pump come with a gasket?
"Dan Kennedy responded and noted they use M8X25 mm... got a set of 10 flanged from Amazon. Amazon description: "20 Sets M8-1.25X35mm Flanged" From Dan's response and your transcription it is hard to tell if the bolts should be 25 or 35 mm - You used 35 mm length bolts were they the correct length or were they a little long?
Food for thought - as an extra safety guard, I've read on another forum some guys don't take the engine mount bolts off completely so if the jack leaks a little the bolts might save the engine from completely falling.
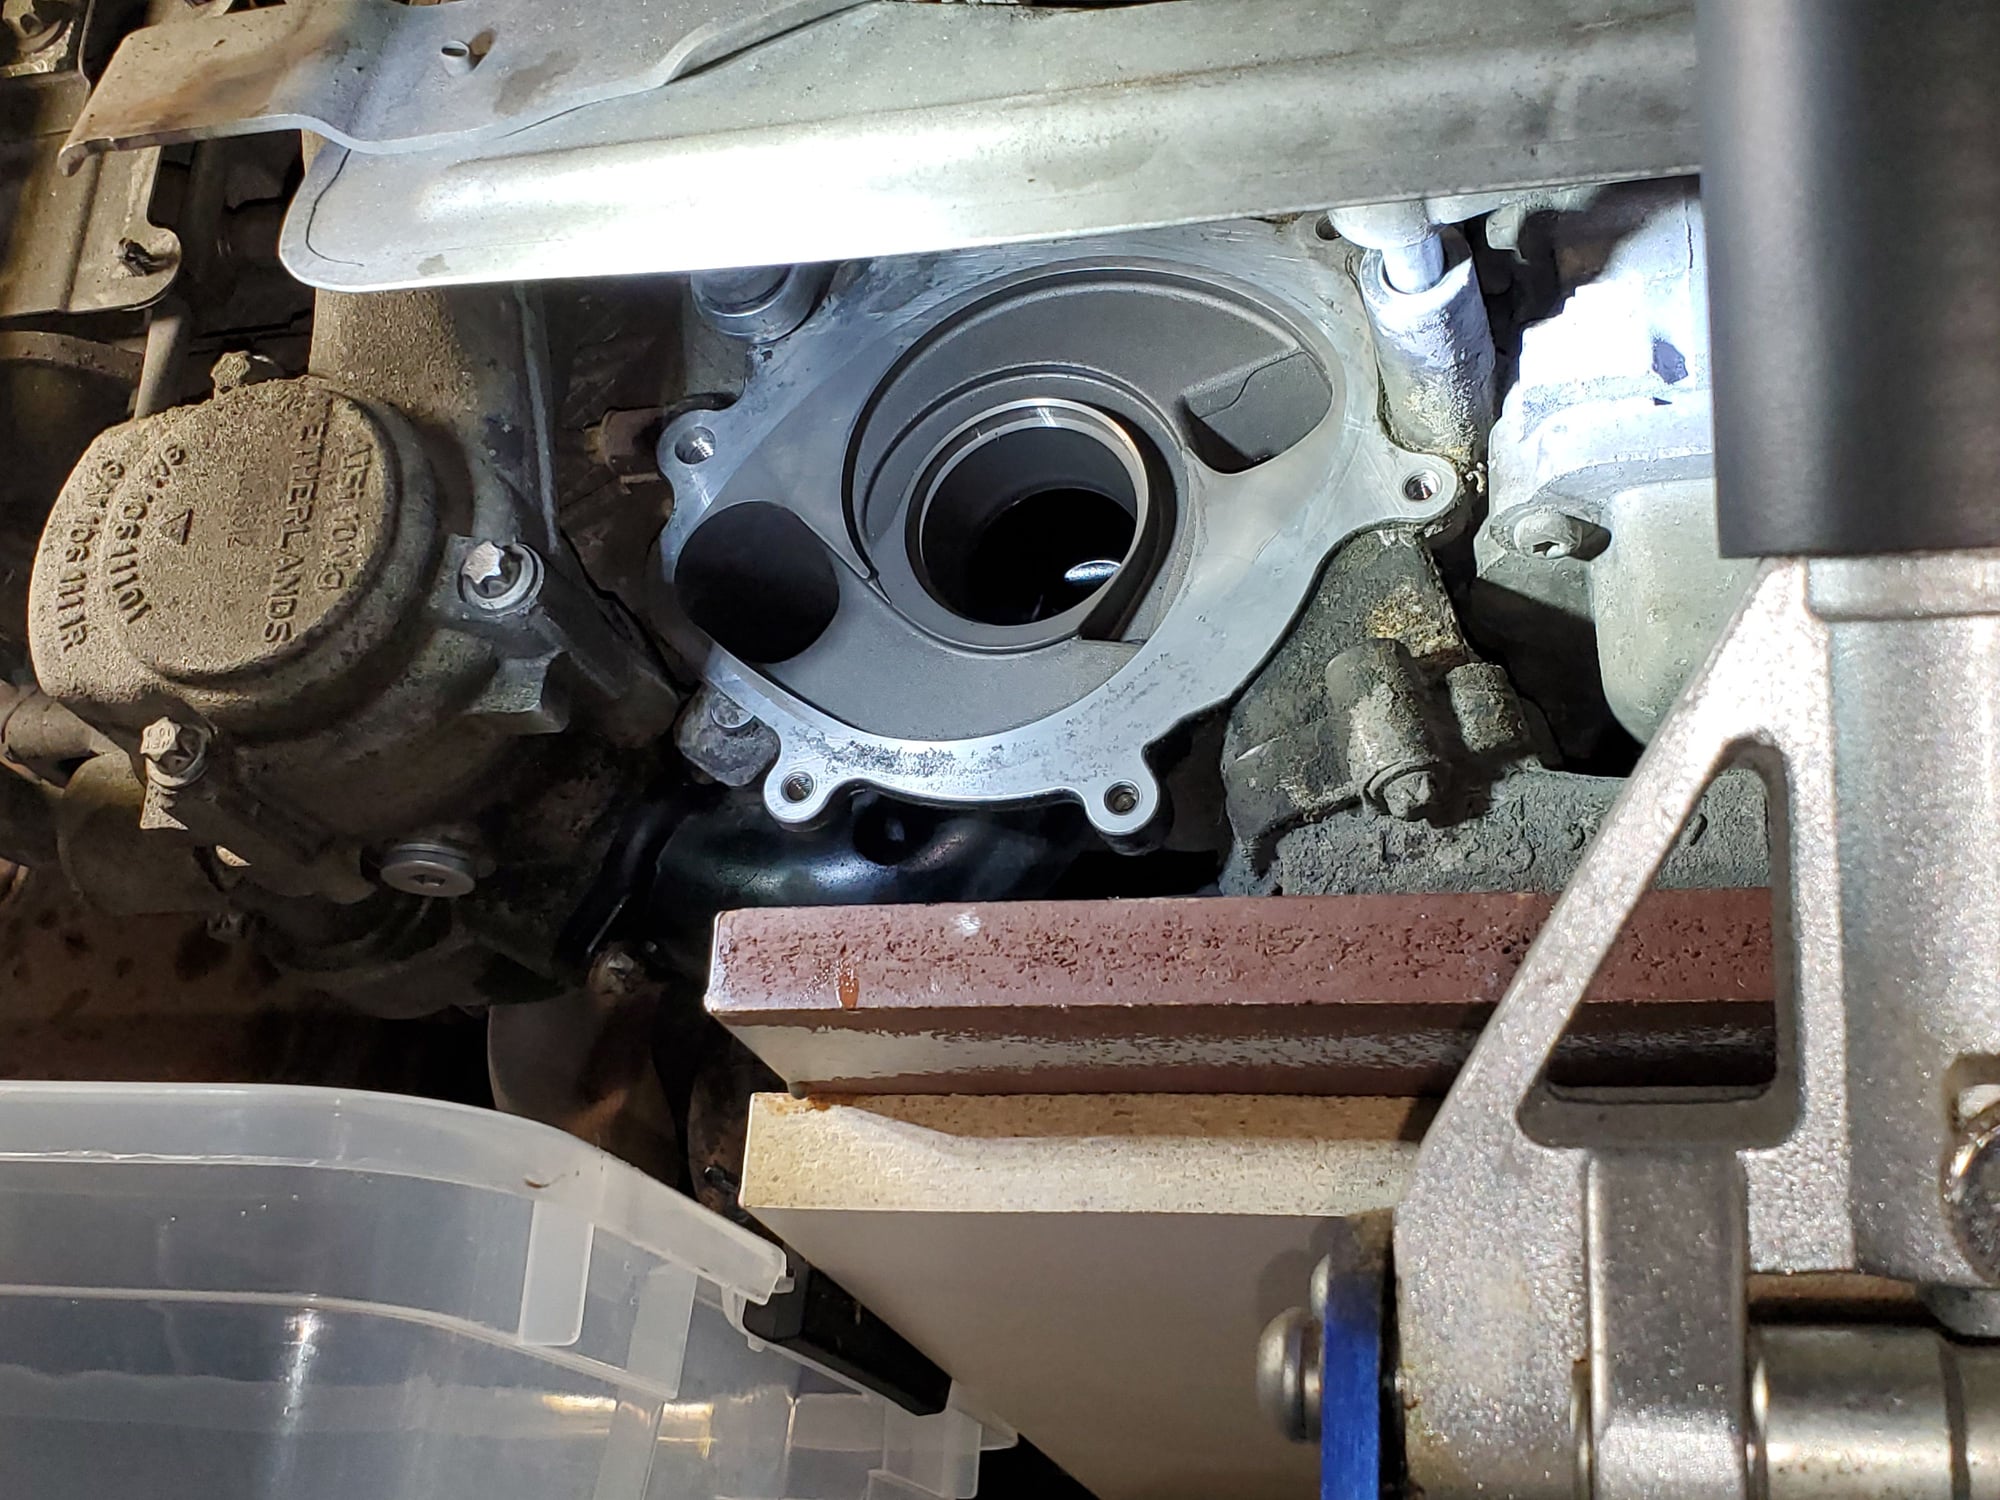
In your picture where the water pump mounts - could you tell what that line/casting/crack looking thing is?
Thanks again for the write-up
Last edited by Phrog Phlyer; 02-19-2021 at 12:01 PM.
Nice write-up Bruce - Just a few questions for clarification -
It looks like the package Qty is 2 on the exhaust gaskets - so to make sure - order qty is 1 and both gaskets come in one package - correct?
Did the water pump come with a gasket?
"Dan Kennedy responded and noted they use M8X25 mm... got a set of 10 flanged from Amazon. Amazon description: "20 Sets M8-1.25X35mm Flanged" From Dan's response and your transcription it is hard to tell if the bolts should be 25 or 35 mm - You used 35 mm length bolts were they the correct length or were they a little long?
Food for thought - as an extra safety guard, I've read on another forum some guys don't take the engine mount bolts off completely so if the jack leaks a little the bolts might save the engine from completely falling.
In your picture where the water pump mounts - could you tell what that line/casting/crack looking thing is?
Thanks again for the write-up
Hi Phil, good questions
- The exhaust gaskets are sold one each... had to order 2 at $13.41 each (Suncoast) - QTY 2 you see is the packing list number.. two packs of them.
- The exhaust bolts were perfect... yes a little long, but no issues at all. The length required is variable as two of the bolts have the side exhaust bracket and one does not... so I have read in places that different sizes are needed.. but six of the same size works fine. That is why I contacted Sharkwerks before I ordered them. The flanges fit in there perfectly.
- The water pump comes with a gasket, and the gasket is glued(?) into a groove on the pump. It just worked out of the bag. At least this is the way the Porsche-labeled pump comes from the dealer.
- Regarding a drift of the jack... yes, that may be an issue but that is related to your jack. I am aware of this issue as my other Craftsman jack drifts. My cheapo Harbor Freight speed jack does not drift. I made sure of this by re-checking that captive bolt. It provides a perfect measure of any change. As Gary noted, he did not loosen or remove those mount nuts... but I wanted to lower the engine which gave for more space between the pump and the carrier. Gary did the work without this... but having changed my engine mounts before, I knew this is a really easy and fast procedure so I did it to give me a bit more access space.
- Regarding that curved line inside the hole... I have no idea what that is. I saw it when I did my work but didn't give it much thought. It didn't look like a crack.. cracks have a hard, perfect edges where it mates.. this does not... but now you have me worried. Cripes man did you have to do this to me? Anywho, I have no leaks inside to the oil or outside and there was no crack on the mating surface. I have watched the coolant level very closely as I flushed my system and am very interested in any change... the coolant level has been rock steady cold. I am fairly certain there is no crack on the mating surface as I ran my fingers on that and inspected it quite closely given I was using a Scotch Brite pad to remove the gunk.... but then why was there gunk there? The gunk was only on the outside of the seal/gasket line. BTW, it was not really gunk.. I tried Simple Green on it and that did nothing.. so maybe it was just corrosion or maybe it was the power steering fluid from the leak above, seeped in. I took this pic after I started the polishing with the Scotch Brite but was not done yet so I had about half of the black stuff removed at this point... it did not come off easily that is for sure. It is hard to be precise when you are my age laying on your side for hours. Oh boy....
Peace
Bruce in Philly
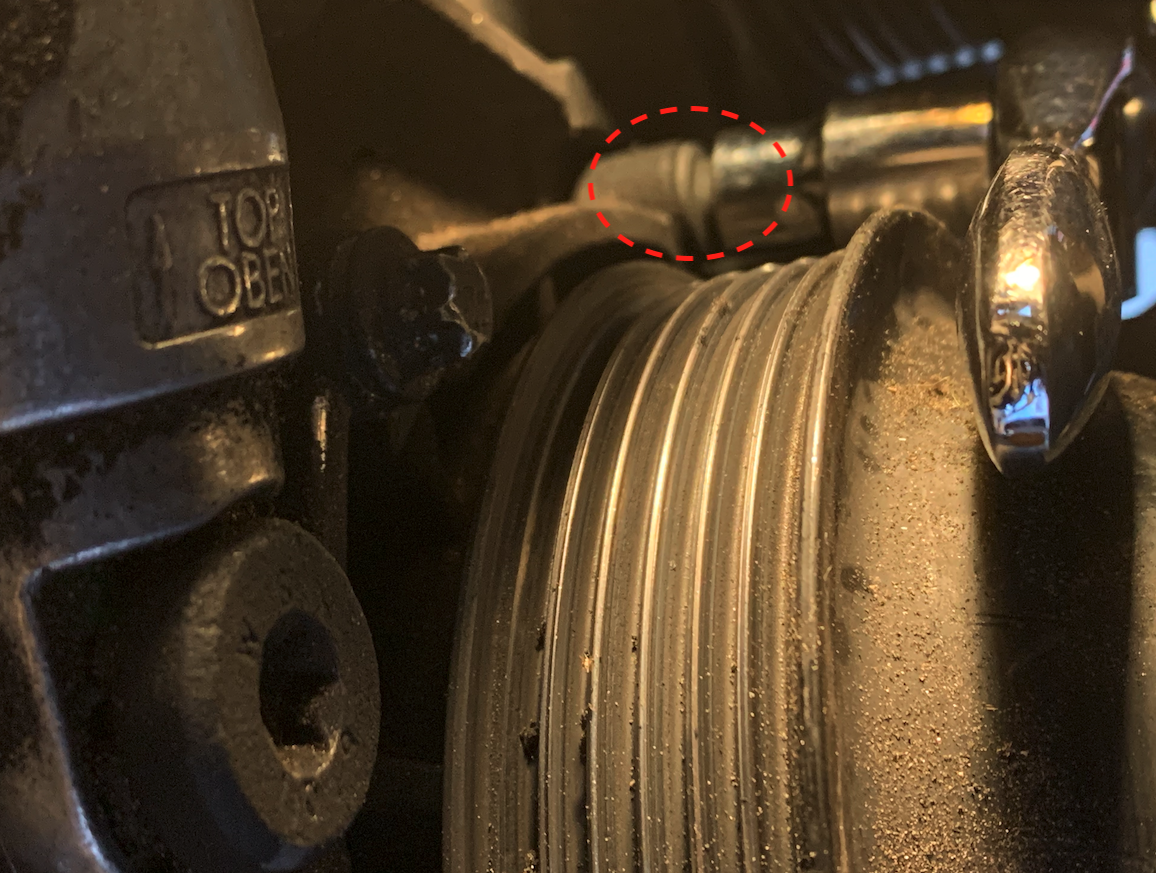
Here is another picture, closer-up of that casting. It does not look like a crack but a mated surface. I am thinking about how this structure was made... modern casting and machining is a marvel but I suspect that is a housing mated to the block. Notice the "line" exists on the outside of the lowest holes... this looks like an assembly mated to the block and then further anchored with the screws. The wetness you see is from either/both the drain of residue coolant or the Simple Green I slopped on with a towel. Before I mounted the pump, I vacuumed out any bits just to be sure of a clean system. Seriously give me some support here or I won't be able to sleep.
Last edited by Bruce In Philly; 02-19-2021 at 02:23 PM.
To above (#14) concern. The line mentioned in the pump mounting surface is the joint formed by two of the sand cores making up the block. It is part of the casting process. Gotta be there. No harm, no foul, play ball.

 02-12-2021, 09:12 PM