When you click on links to various merchants on this site and make a purchase, this can result in this site earning a commission. Affiliate programs and affiliations include, but are not limited to, the eBay Partner Network.
This write-up covers 997.2 3.6 and 3.8 models including Carrera Base, Carrera S, and Carrera GTS models, but not Turbo or GT2/GT3.
The 997.2 is well-known for reliability among 911 models, but one part that appears prone to failure based on the number of people reporting having to have theirs replaced one or multiple times with varying mileage (some as low as 12,000 miles) is the high pressure fuel pump. The 997.2 has a direct-injected motor which means the fuel injectors inject the fuel directly into the combustion chamber as opposed to somewhere upstream of the intake valve (generally in the cylinder head intake port on modern engines). This requires the injectors to run at high pressure, and the pump generates ~1700 psi. The 997.2 has two fuel pumps, an electric pump in the tank that sends fuel back to the high pressure pump (and is capable of generating traditional port fuel injection pressures which is around 30psi), and then the high pressure fuel pump which is a mechanical pump bolted to the back of the left cylinder head. This mechanical pump is driven off one of the camshafts in the cylinder head, and the pump itself looks a bit like a distributor, with the "rotor" fitting into a slot in the camshaft which is how the cam drives it. The pump has two ports: low pressure in, and high pressure out. These connections are made via threaded flare compression fittings similar to an AN-style fitting or a brake-line fitting, and the lines coming off of them are solid stainless steel tubing, not hose. The fittings themselves are stainless steel as well.
As of the time of this writing, I do not have an answer as to why these pumps appear to fail so often (though I plan to take my old pump apart and post what I find here later). Myself and others are on their third pump with under 50k on the car. Water and contaminants in the fuel are said to be the most common causes of HPFP failure. On the 997.2, there is no user-replaceable fuel filter - the fuel filter is integral to the in-tank low-pressure electric fuel pump.
When the pump fails, or begins to fail, a number of symptoms are commonly present. The pump can fail immediately, or over a period of time, with symptoms coming on differently. Here are the complete list of symptoms, in no particular order:
Long cranking period before starting
Severe jerking hesitation under acceleration
A brown fluid leaking from the pump (not sure what the fluid is yet but it doesn't smell like gas, and it appears too thin to be oil - it looks like rusty water and seems to leak from the diaphragm on the pump that has a hole in the end)
Message in instrument cluster stating, "Reduced Engine Power"
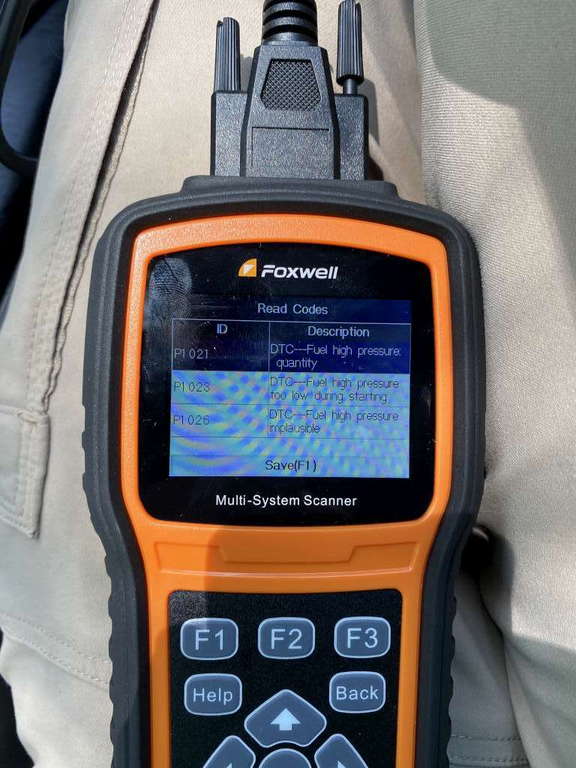
The following error codes when scanning the ECU:
P1021 - DTC - Fuel high pressure: quantity
P1023 - DTC - Fuel high pressure too low during starting
P1026 - DTC - Fuel high pressure implausible
Once some or all of these codes are detected by the ECU, the ECU throws the car into limp mode, generally allowing you to drive but at extremely reduced power. It accomplishes this by running the car off the electronic in-tank fuel pump and increasing injector time to deliver enough fuel to make enough power to drive slowly. I was able to drive 65mph on the freeway to get home, but there was some jerking and it was difficult to make it up hills.
I was quoted $1800 parts and labor from the dealership and a local Porsche indy to replace the pump. The book-rate for the job is 4 hours of labor. List price for the part itself (just the fuel pump) from Porsche is around $1200 at the time of this writing though you can find it for around $900 from the discount online Porsche parts dealers. FCPEuro offers a lifetime warranty on all parts so that is another option to consider, based on the fact that these pumps seem prone to failure. I would only advise buying a new OEM pump. There are two types: remanufactured (9A1-110-315-FX) or brand new (9A1-110-315-06). The prices are basically the same so I went with brand new, hoping that it was "new and improved". The pump comes with the rubber o-ring it uses as its only gasket.
Replacing the pump is not extremely difficult, but it's not like changing the oil or an air filter. If you have ever changed a water pump on any car before, and replaced brake lines before, then this job may be within your skill-set. The factory service manual does not direct you to remove the bumper, exhaust heat shields, or exhaust, but I was unable to complete the job without removing those items and I believe part of the reason for this is that my car has an FVD center muffler delete. Part of this job requires removing the thermostat housing but my FVD exhaust prevented me from completing this step so I had to remove the exhaust. Your mileage may vary. Removing the bumper, side heat shields, center section, and side mufflers is pretty easy and takes only 30 minutes or so. There are other write-ups for these procedures so I will leave them out for now.
Tool list:
1/4" drive deep E10 Torx socket (3/8" drive is too big for some areas)
1/4" drive extensions, short, medium, and long
1/4" drive 10mm socket
1/4" drive ratchet
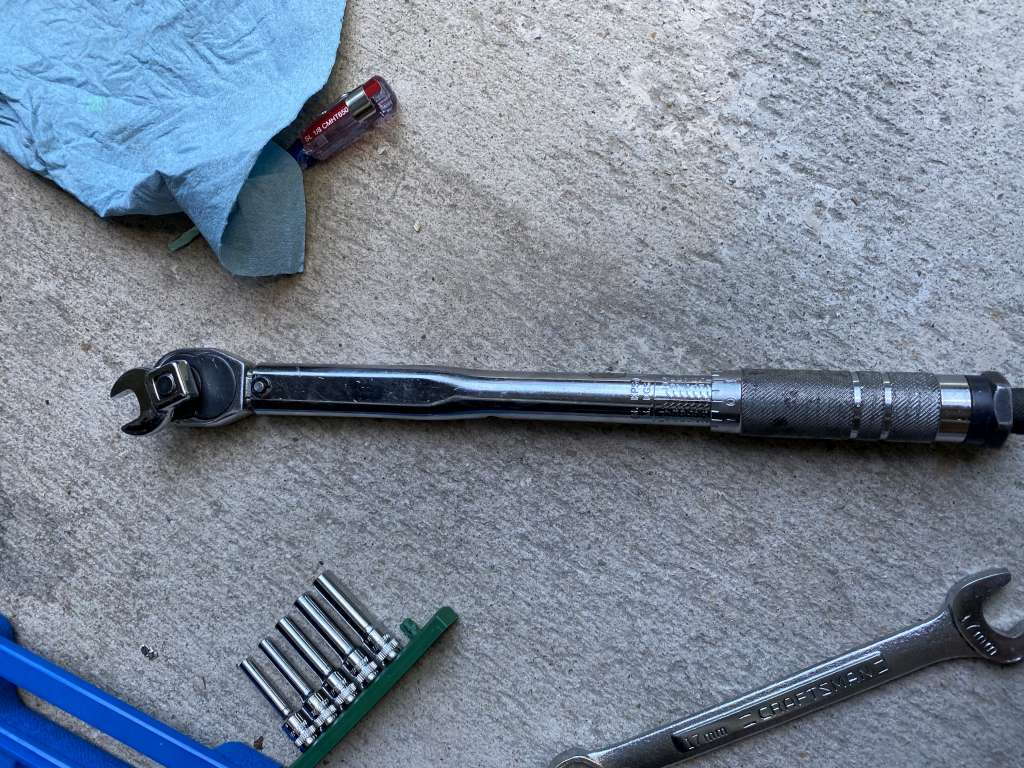
1/4" drive torque wrench
3/8" drive torque wrench
Crow foot wrench: 14mm and 17mm (3/8" drive)
Band clamp pliers (channel locks and regular pliers MIGHT work in a pinch - this is for removing the spring band clamps on coolant hoses)
Crescent wrench (or 30mm wrench) to loosen drive belt tensioner
Phillips screwdriver
Metric allen wrench set
Foxwell NT530 to reset codes and also to prime the fuel pump after you install the new high pressure pump. Note: It is possible these two procedures are not mandatory but I had the tool so I used it and followed the Factory Repair Manual procedure accordingly.
If you remove the bumper and exhaust, you will also need an assortment of 13mm and 12mm sockets and wrenches and torx bits
Parts list:
1x HPFP (comes with gasket): 9A1-110-315-06
1x Coolant lubricant (this is the OEM lubricant and is not required but very helpful for greasing coolant o-rings and rubber coolant hoses to get them back on. Alternately, you could use any silicone based lubricant from the drug-store): 000-043-205-93
1x Thermostat o-ring: 999-707-625-40
1x Thermostat housing gasket: 9A1-106-305-00
2x Metal coolant pipe to thermostat housing sealing ring: 999-707-517-41
1x Thermostat housing drain plug crush washer: 900-123-104-30
OKS 1710 thread lubricant: 000-043-303-27 (Note - this is the thread lubricant Porsche says to use for the threads on the HPFP fuel line fittings. It costs $194!!! Since the fuel lines are a compression flare style fitting, the lubricant is not a kind of "pipe sealant" and should really only be there to ensure there is no drag on the threads and that when you torque the fittings to specification, you are getting the true torque intended/required. As such, you could probably use any good PTFE-based pipe thread sealant with a temperature rating of ~500 degrees or so that doesn't dry or solidify (stays soft). I chose to use a product called "Gasoila" which can be purchased on Amazon among other places. Gasoila is a thread lubricant that can also be use as a sealant, but it doesn't dry, resists 600+ degree temps, contains PTFE, is specially formulated for use with petrol, and is affordable)
Optional Parts:
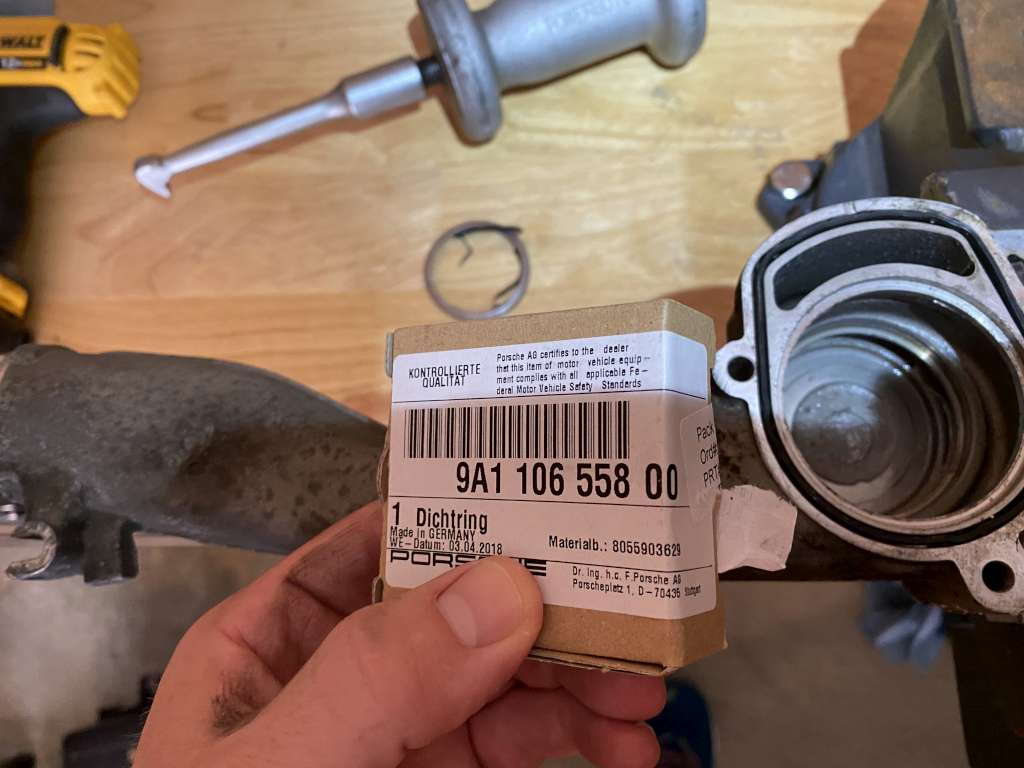
1x Thermostat sealing ring (This is a metal sealing ring that fits inside the thermostat housing for the back side of the thermostat. I don't feel these really need to be replaced but I replaced mine anyway. It is a real pain to replace and requires a slide hammer and seal driver to re-install): 9A1-106-558-00
1x Thermostat (If you decided to replace your thermostat as preventative maintenance, now is a good time because you have to remove it for this job anyway): 9A1-106-225-01
If you remove the exhaust, you will need 2x exhaust gaskets that go between the catalytic converters and the center muffler. Part number for these is: 997-111-113-30
Rubber coolant hoses can often cement themselves to the pipes they attach to and be near impossible to remove without damaging them. You only have to remove two rubber coolant hoses for this job but if you damage either of them, here are the part numbers. Note that these hoses come with new band clamps for both ends!
Small radiator hose from bottom of expansion tank: 997-106-851-34
Large hose that connects radiator to thermostat hosing: 997-106-832-32
Procedure:
Note: This was written for an "S" model. There may be subtle differences for the base and GTS models - for example, the base model has a different airbox and might not have the same electrical connector on the side of it, etc.
Place rear or both ends of car up on jack stands
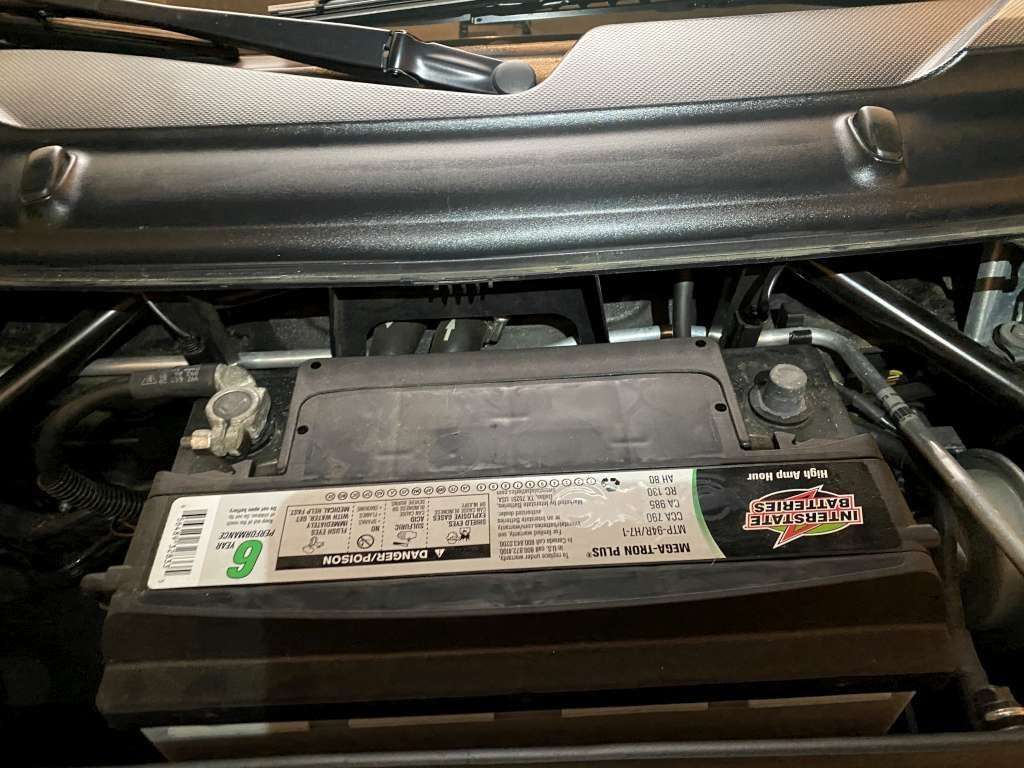
Pop the hood and trunk and keep them open throughout the procedure (since they are electronically actuated, you don't want them closed at any point after you disconnect the battery)
Remove the battery tray cover in the frunk and disconnect the negative battery terminal with 10mm socket
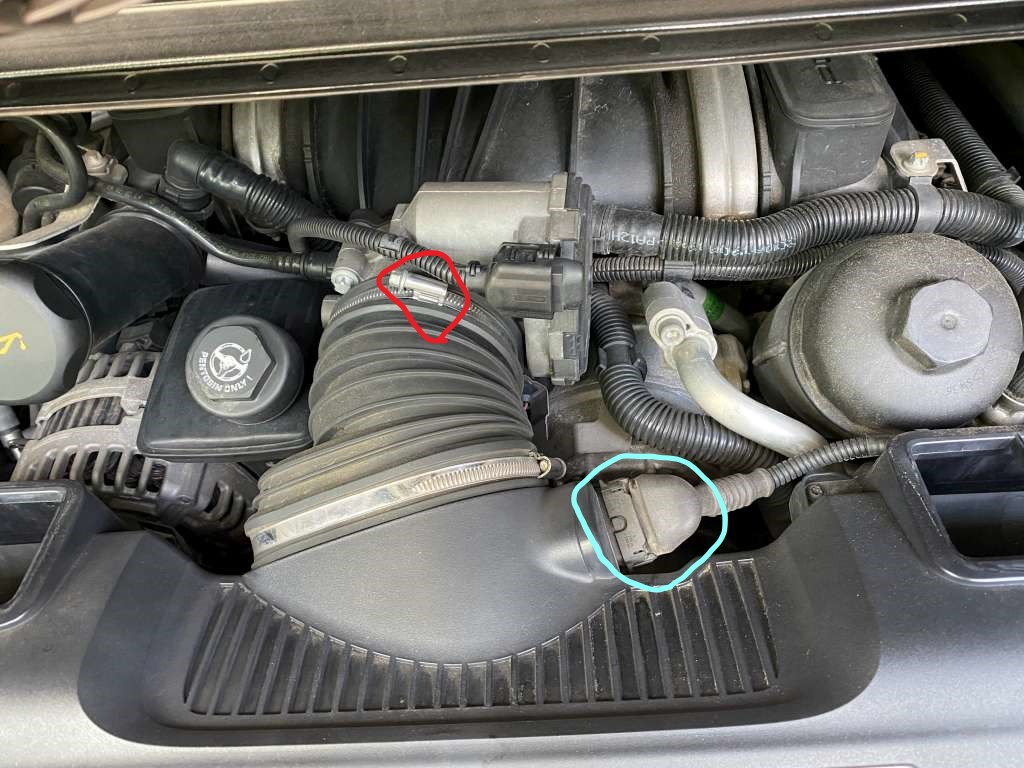
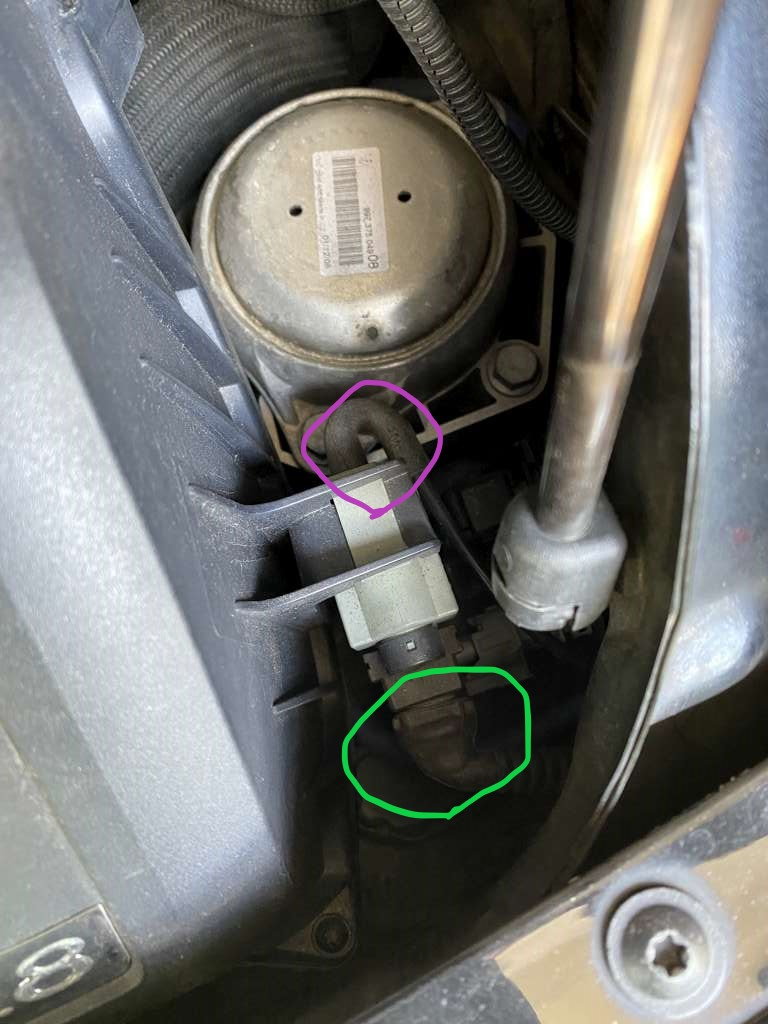
Loosen the metal hose clamp for the air-box at the throttle body (red in pic), disconnect the hose from the throttle body, disconnect the MAF air sensor (blue in pic), disconnect the vacuum hose on the far right side of the airbox (purple in pic), and unplug the electrical connector from the airbox (green in pic) then unclip the MAF plug wire from its clips on the airbox. Pull the airbox straight up and out and set it aside.
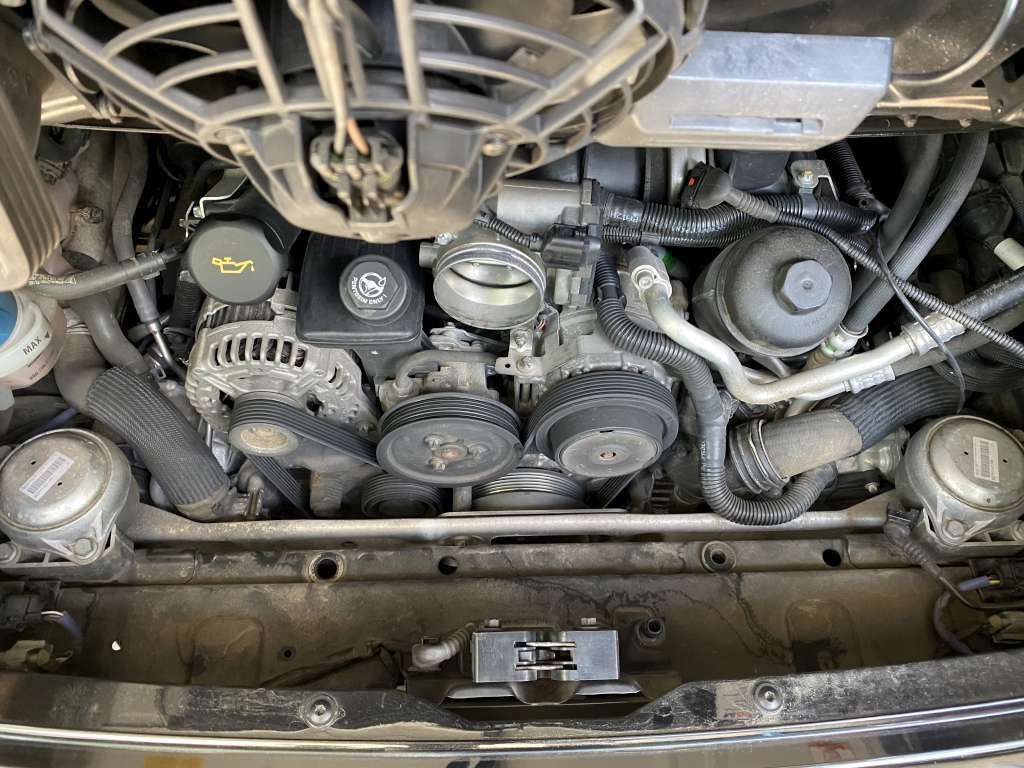
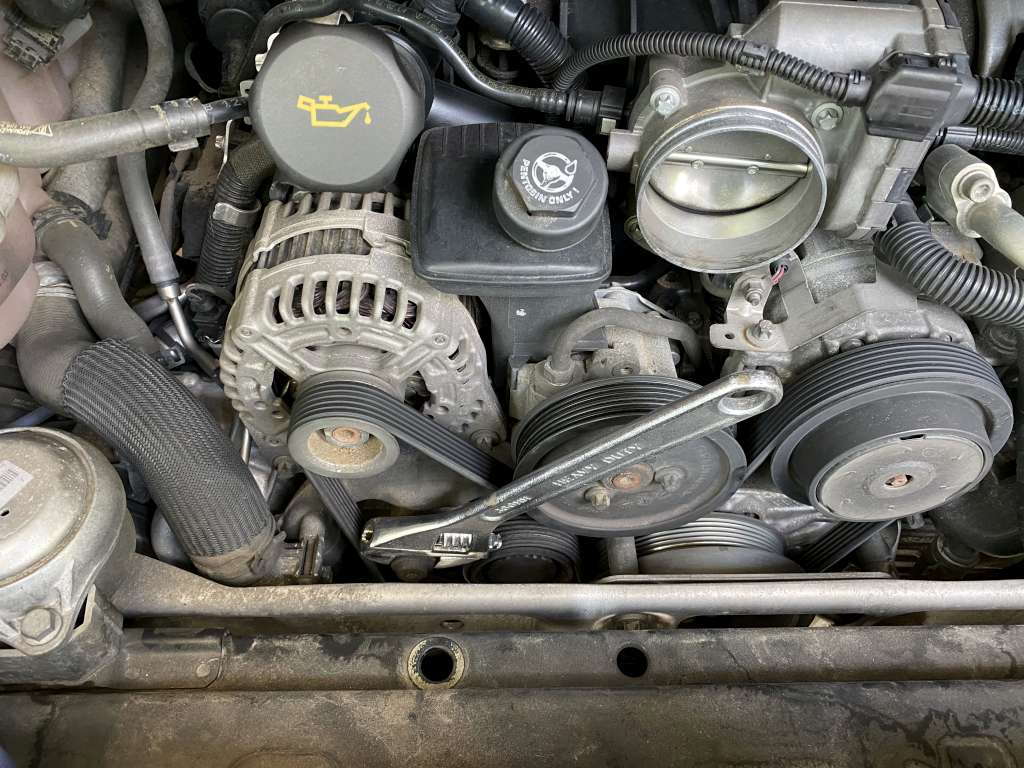
Using a 30mm wrench or crescent wrench, release the drive belt tension by moving the wrench toward the passenger side of the car, then while holding it there, remove the drive belt from the near-by pulleys, then remove the belt from the left side of the crankshaft pulley to give you room to work
9/24/2021 update: Forum member BLU997 has discovered a time-saving trick that allows you to skip the steps of draining/refilling the coolant, and also skil removing the thermostat housing and thermostat as well. To follow his technique, use the steps and phots in red below to see how it is done, then continue to my original detailed instructions below to put together the complete process.
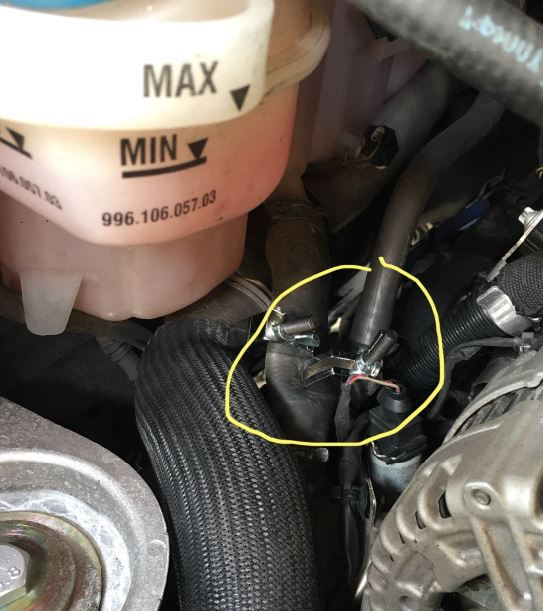
1. crimp the smaller rubber hose that goes back to the expansion tank.
2. prepare a suitable bung/plug for where the aluminium coolant pipe comes out from the water pump, I can't remember the exact diameter, electrical tape works to adjust the diameter.
3. leave the blue coolant reservoir cap on, or even pull a slight vacuum with your coolant vacuum pump. wiggle out the aluminium coolant pipe and quickly jamb in your bung/plug.
4. maneuver the alum coolant pipe out of the way.
5. undo the fuel lines, they are connected by flex hoses further up and just come away easy as you pull out the pump.
6. Change out the HPFP. remember to loose fit the fuel lines before pushing new pump back into it's home.
7 test motor and top up coolant, <1qrt needed usually.
I used 2 small line crimpers, I'm sure there are better ones available
I forget exactly what size my dropper bottle bung was, but it worked perfectly.
Now back to the regular procedure which requires coolant drain and thermostat + housing removal.
Drain engine coolant by removing the drain plug under the thermostat housing using an allen wrench. Have a CLEAN container handy for catching the coolant. It will drain several gallons, but not the entire 8 gallons the car holds. You will re-use this coolant later.
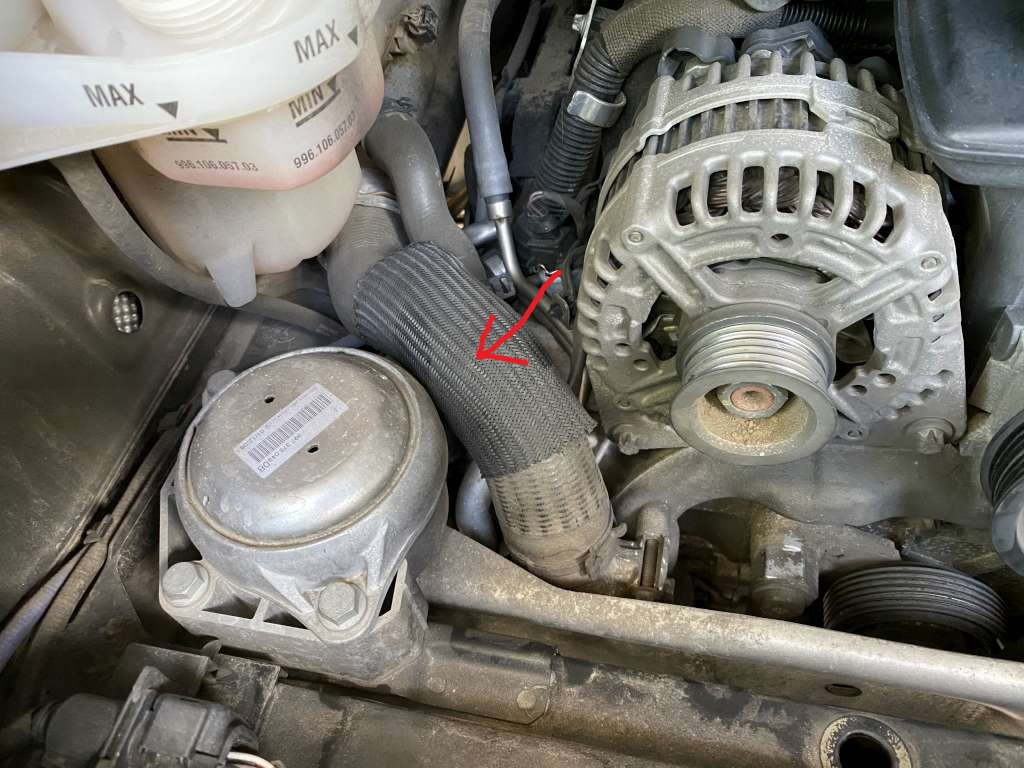
Disconnect the rear end of the large coolant hose that connects to the top of the thermostat housing by removing the band clamp and push it aside out of the way.
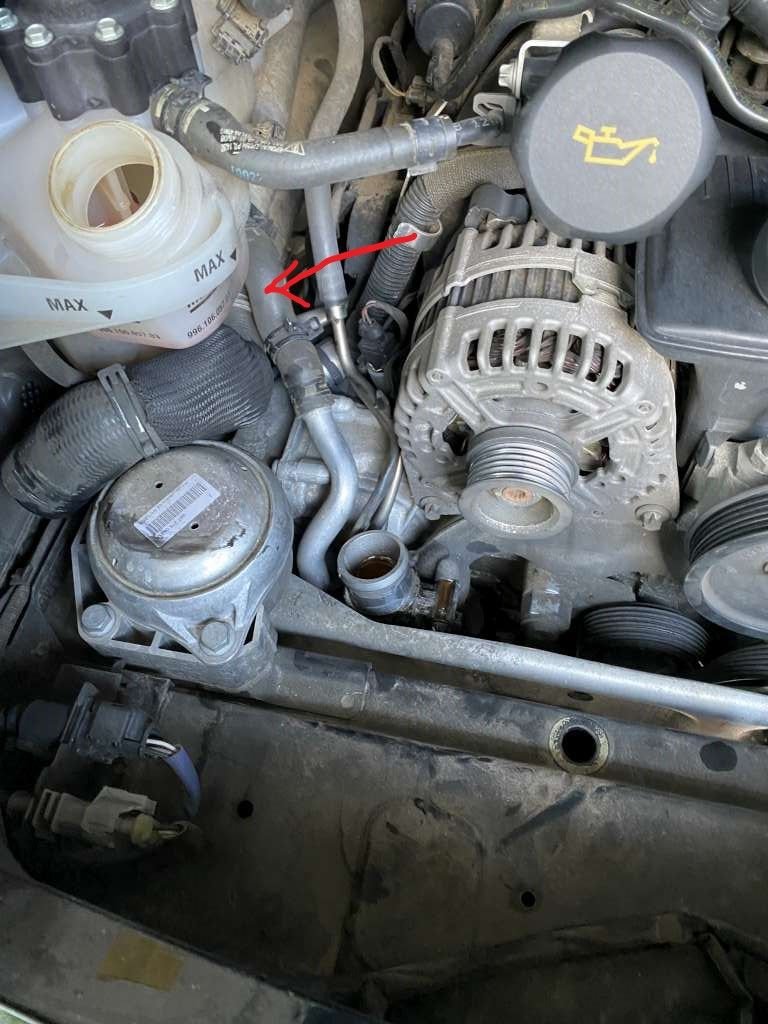
Loosen the band camps and remove the small coolant pipe that runs from the bottom of the coolant expansion tank
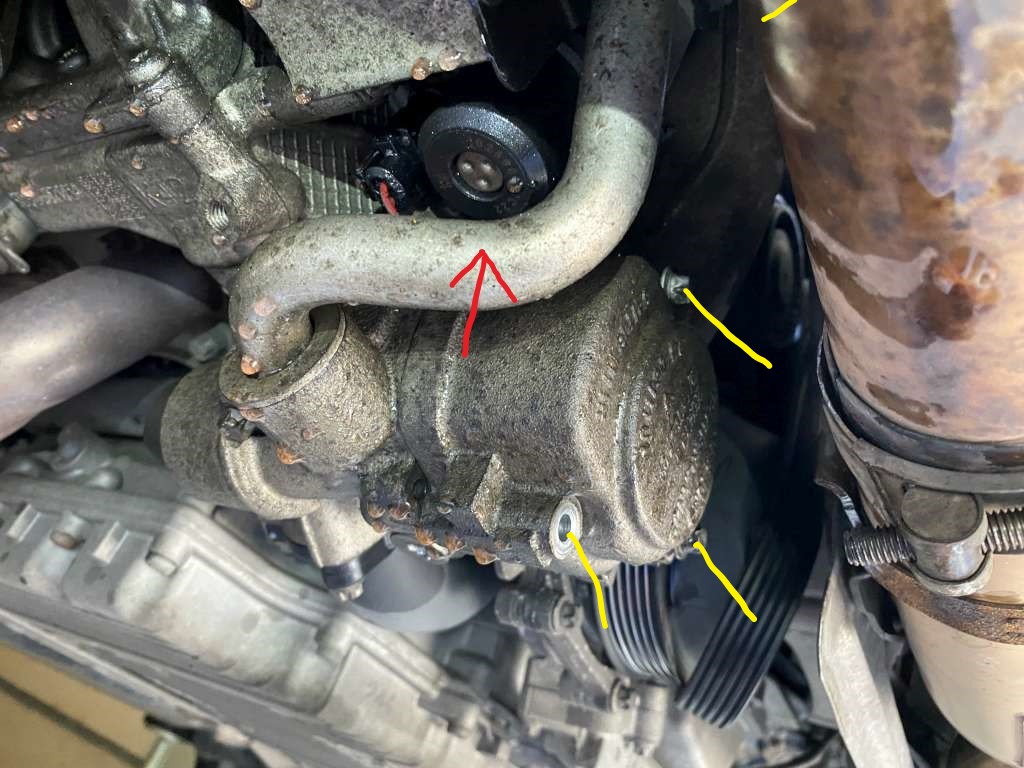
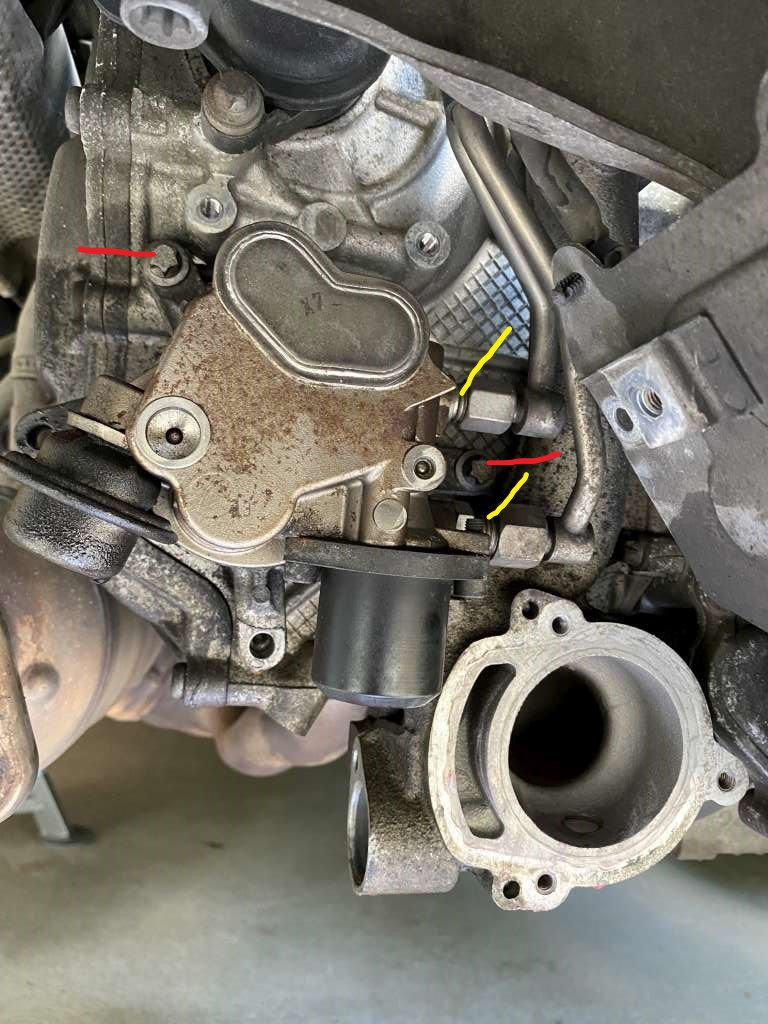
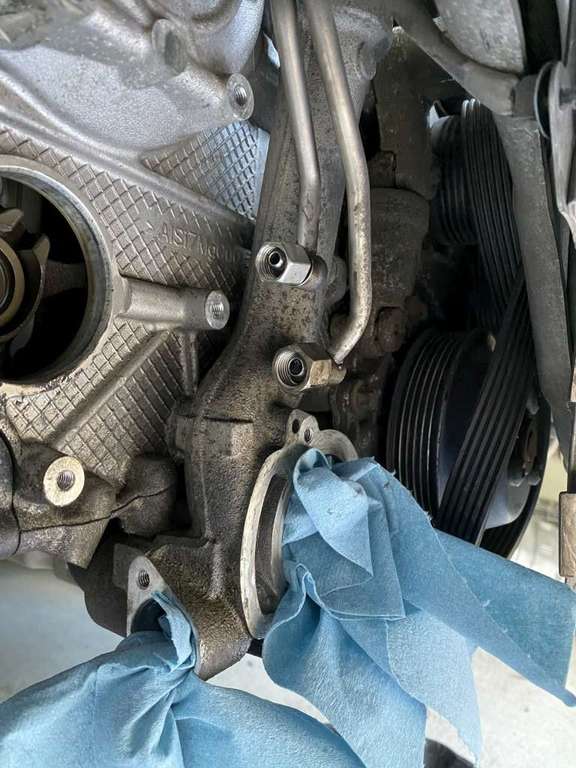
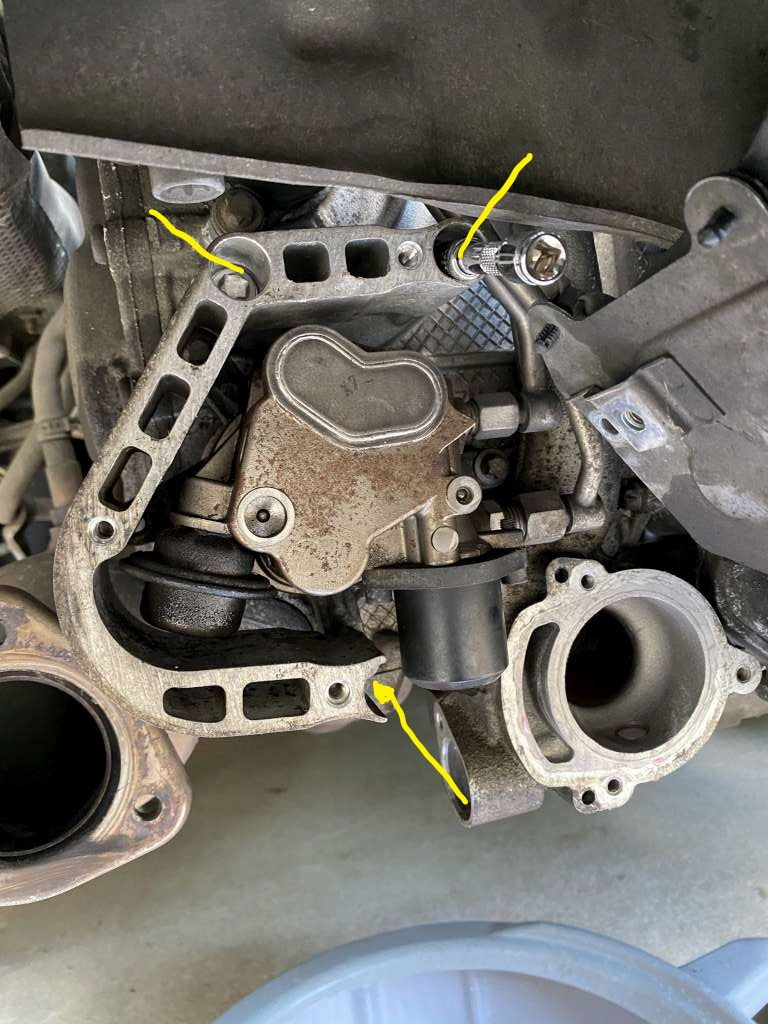
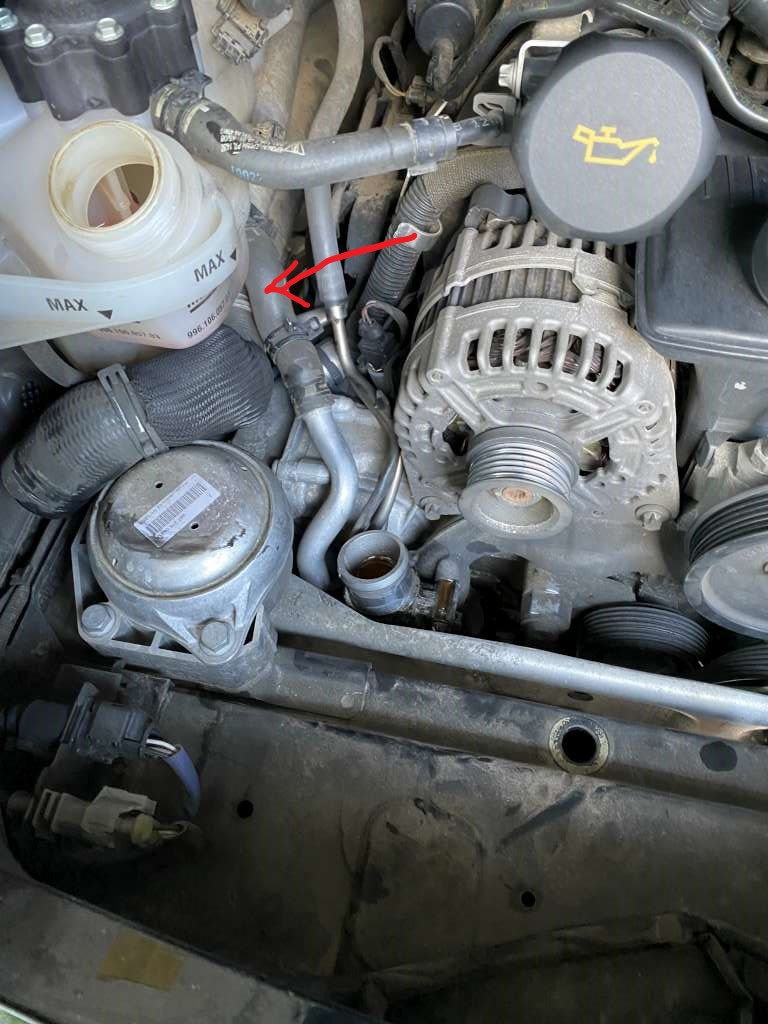
Remove the metal coolant pipe that is bolted to the left side of the thermostat housing (red arrow) by removing the two torx screws holding it in place (one right next to the end of the pipe and one further up on its support bracket)
Remove all torx screws holding the thermostat housing in place (3 at bottom of hosing and one near the top - yellow arrows)
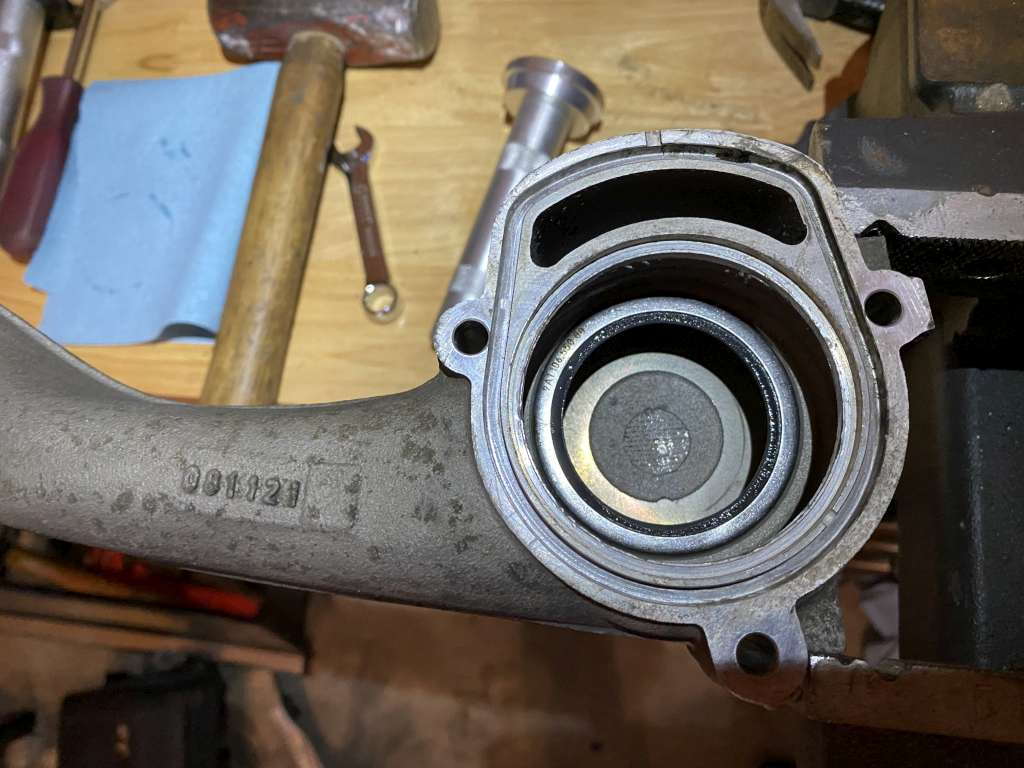
This is the hardest part of the job: Jiggle, wiggle, fiddle, and move the thermostat housing up down left and right as-required to get it to rotate to the right a bit past 45 degrees so you can get the thermostat out, and then get the housing out through the bottom of the car. My aftermarket center muffler delete prevented me from moving the thermostat housing enough to I had to remove the exhaust. Even with the exhaust removed, it was still a challenge to get it out.
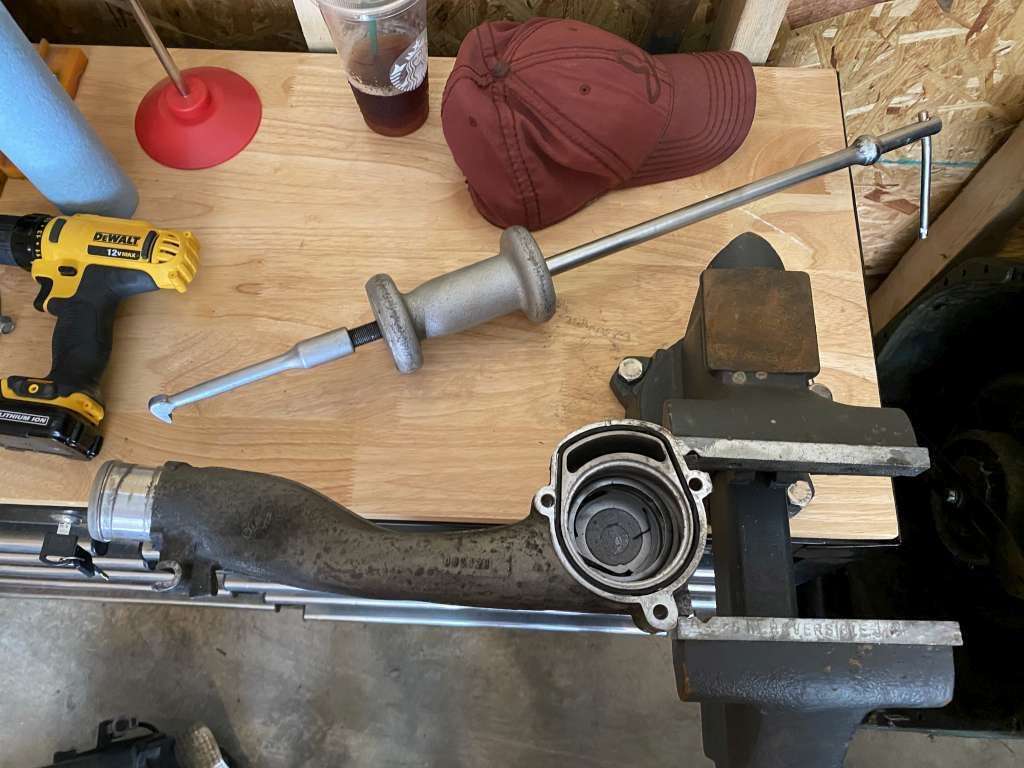
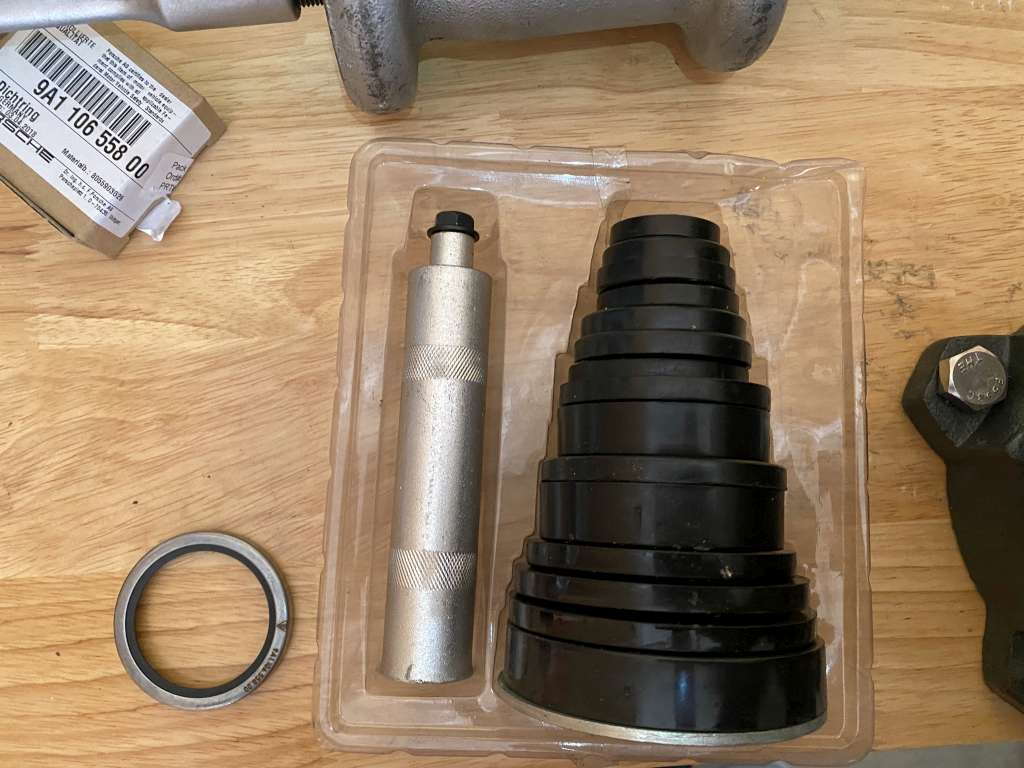
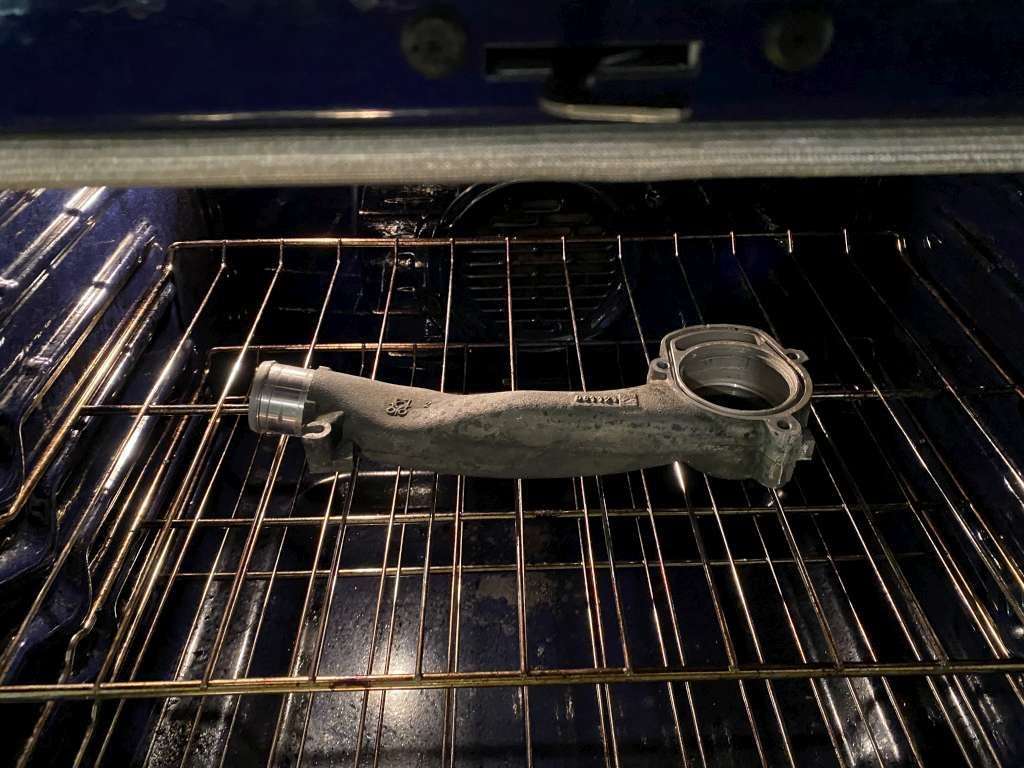
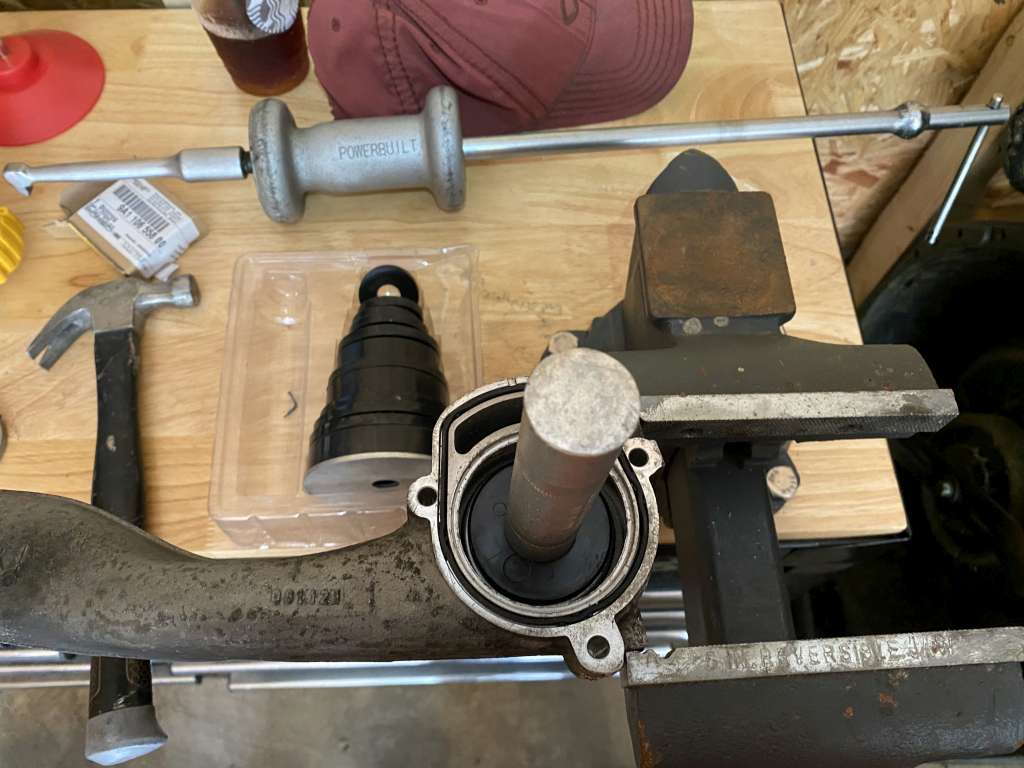
If you are replacing the inner thermostat metal gasket, clamp it in a bench vise as shown and use a slide hammer with hook to work it out. I destroyed the new gasket installing it very carefully with a seal driver, so I bought another gasket and this time I heated the housing up to 450 degrees in my oven while I put the gasket in the freezer for 20 minutes. I then put the hot thermostat housing back in the bench vise, removed the metal gasket from the freezer, put some coolant lubricant on it, and tapped it in with a seal driver. It went in this time.
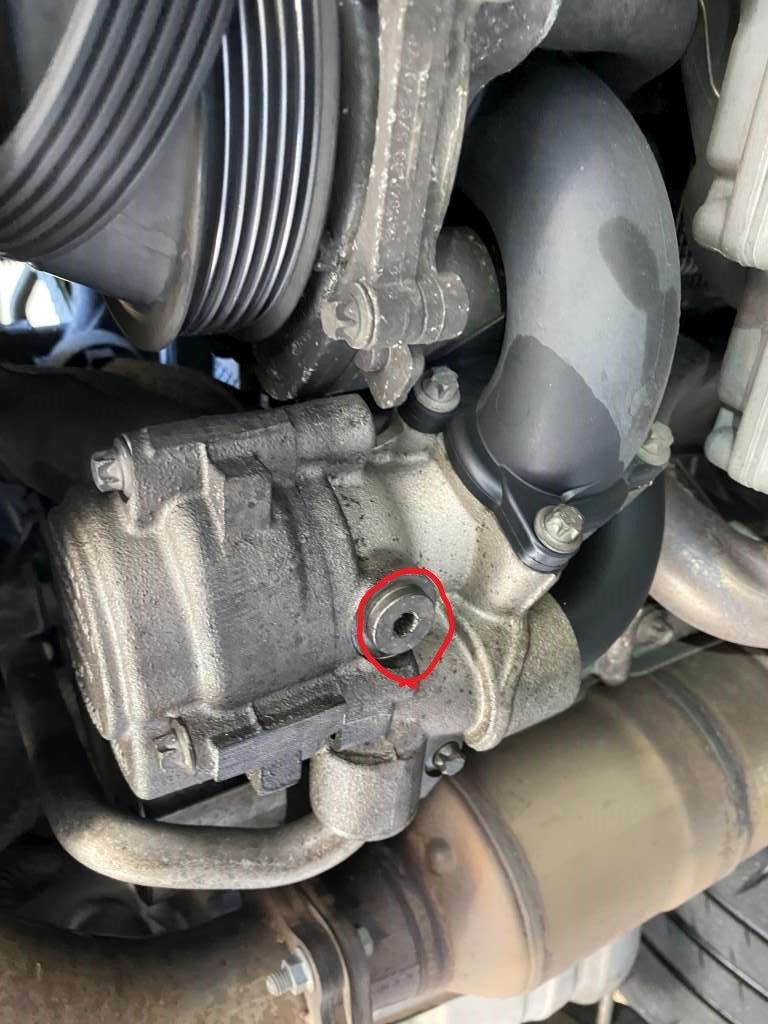
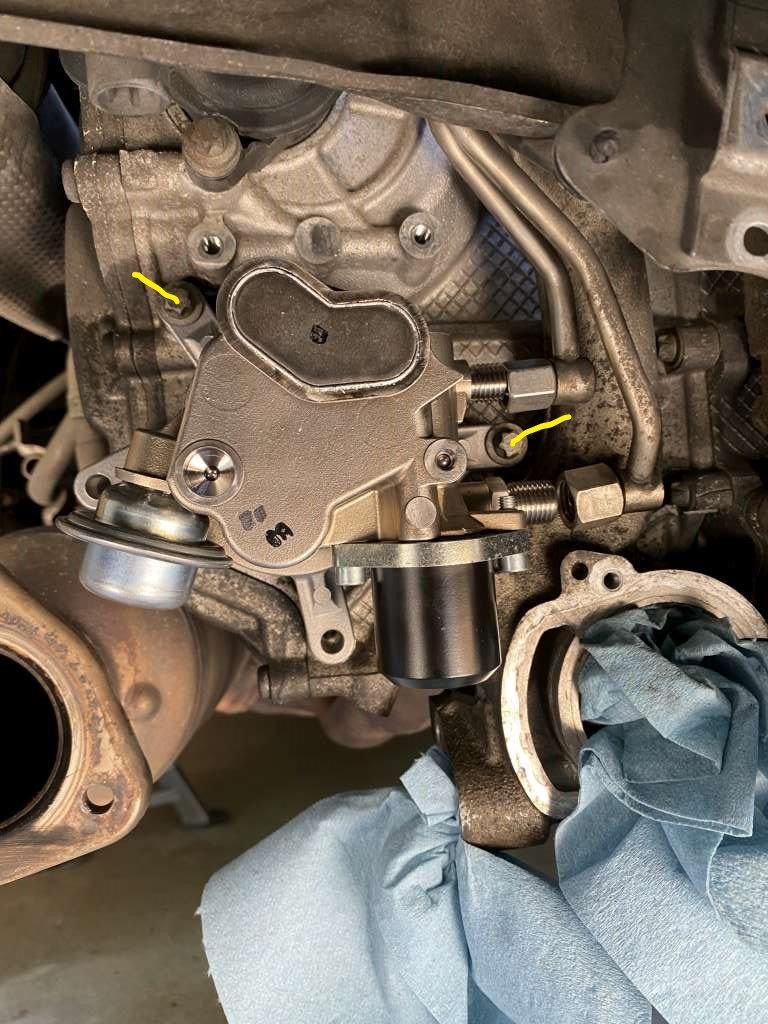
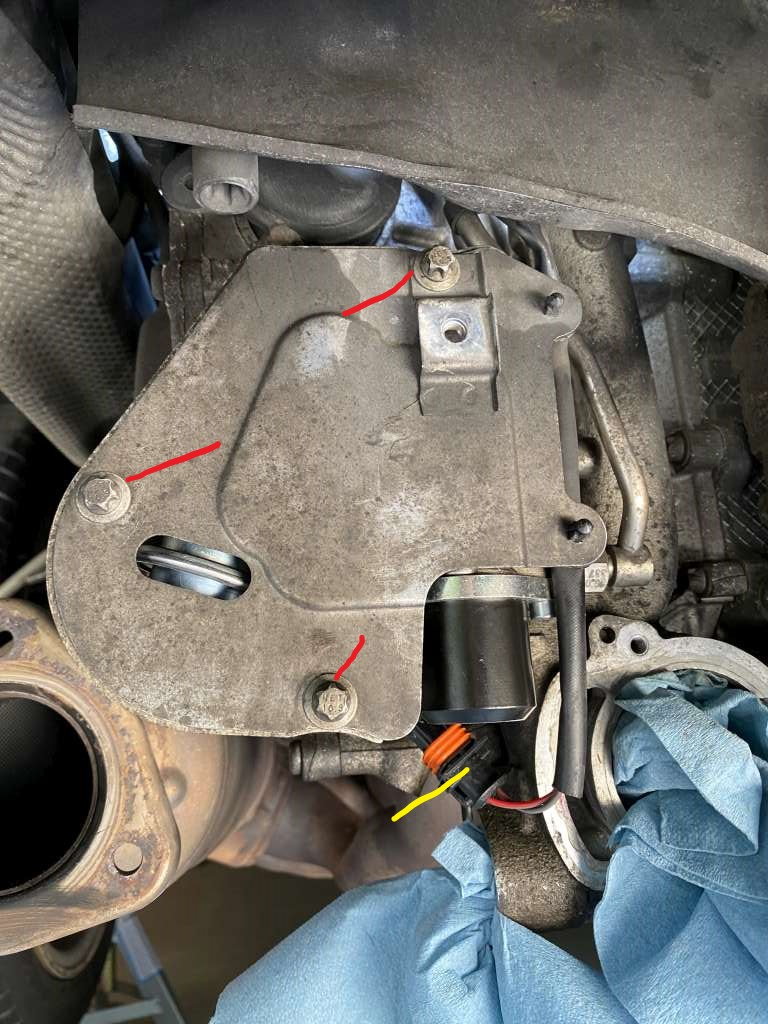
Next remove the heat protection panel from the HPFP by removing 3 torx screws (red in pic)
Disconnect the electrical connector on the HPFP and move it out of the way (yellow in pic)
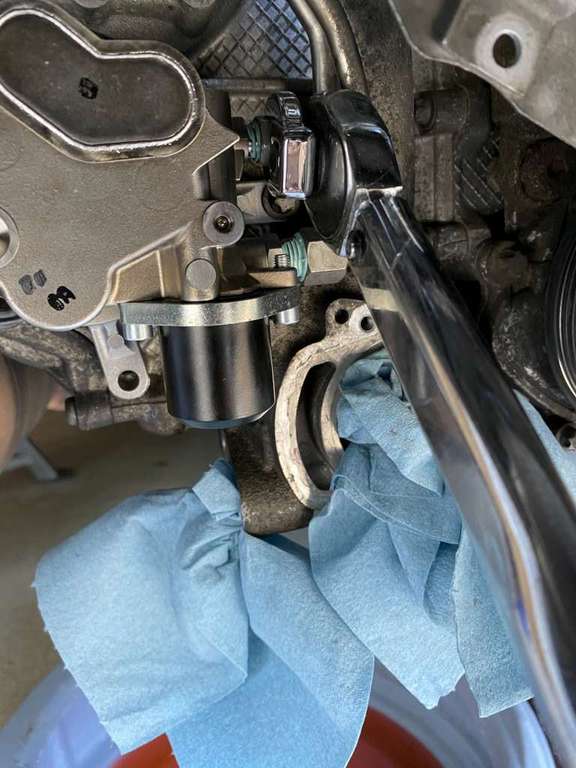
Next remove the outer cover for the HPFP by removing the three torx screws (yellow in pic). The one on the top right is tricky to reach due to interference from the engine carrier bracket
Note the number of exposed threads on both the metal fuel line fittings - take a pic and make a note of it
Remove both fuel lines from the HPFP using a wrench (14mm and 17mm). Once you get them loose with the wrench, you should be able to get them all the way off with your fingers. If you cannot, the service manual advises you to replace the lines in case the threads are damaged. Cover the fuel line ends with fingers of a glove or plastic bag and use a rubber band to keep them sealed and prevent fuel leakage. Note: There was no pressure in my fuel lines when doing this job so there was no fuel spray when loosening either of the lines. To be safe, you should keep a rag and fire extinguisher reated for fuel fires near by, and you should wear safety goggles.
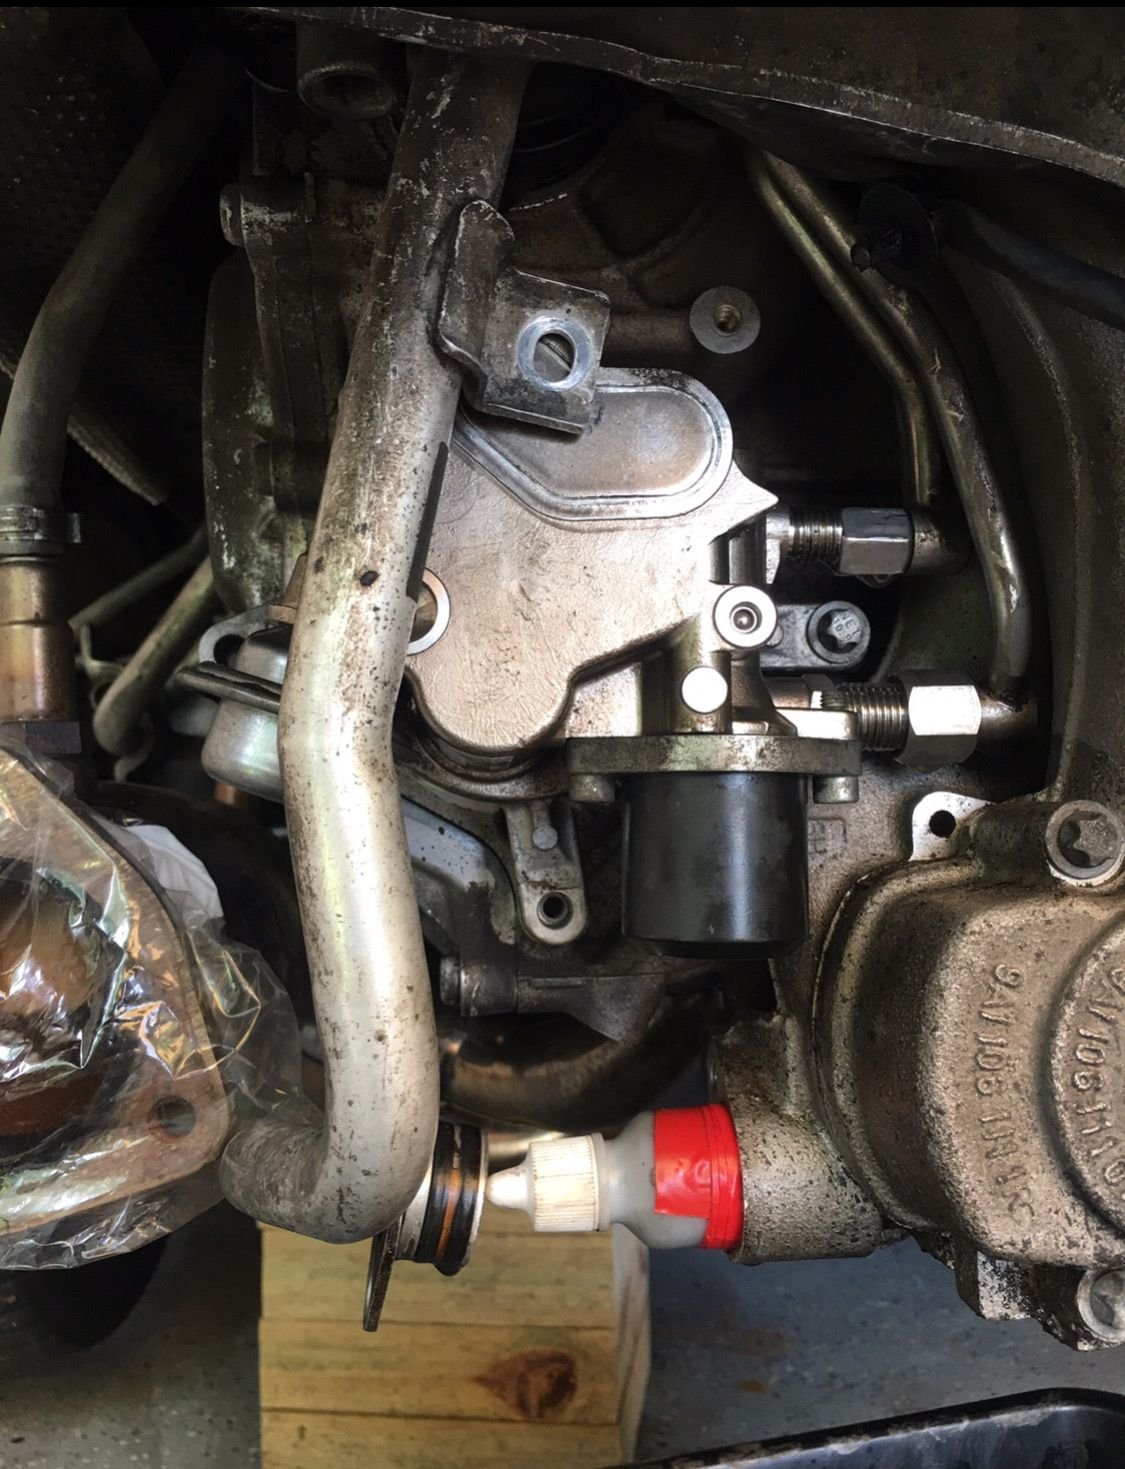
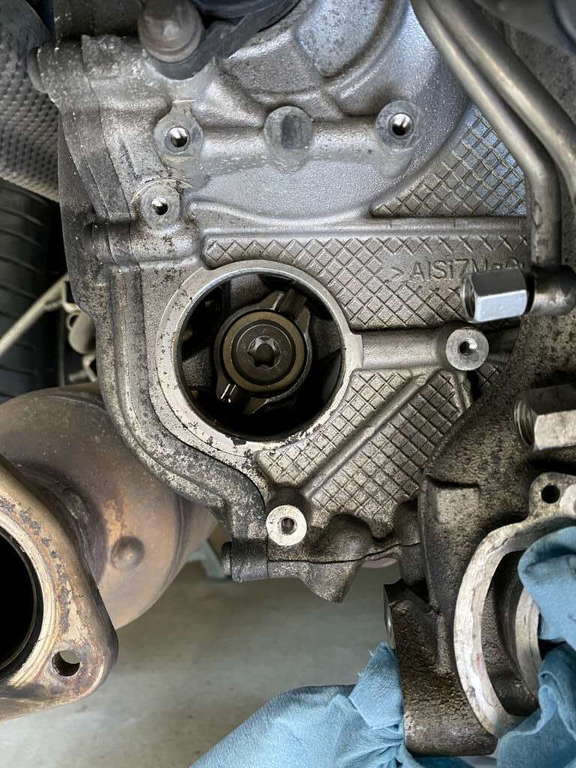
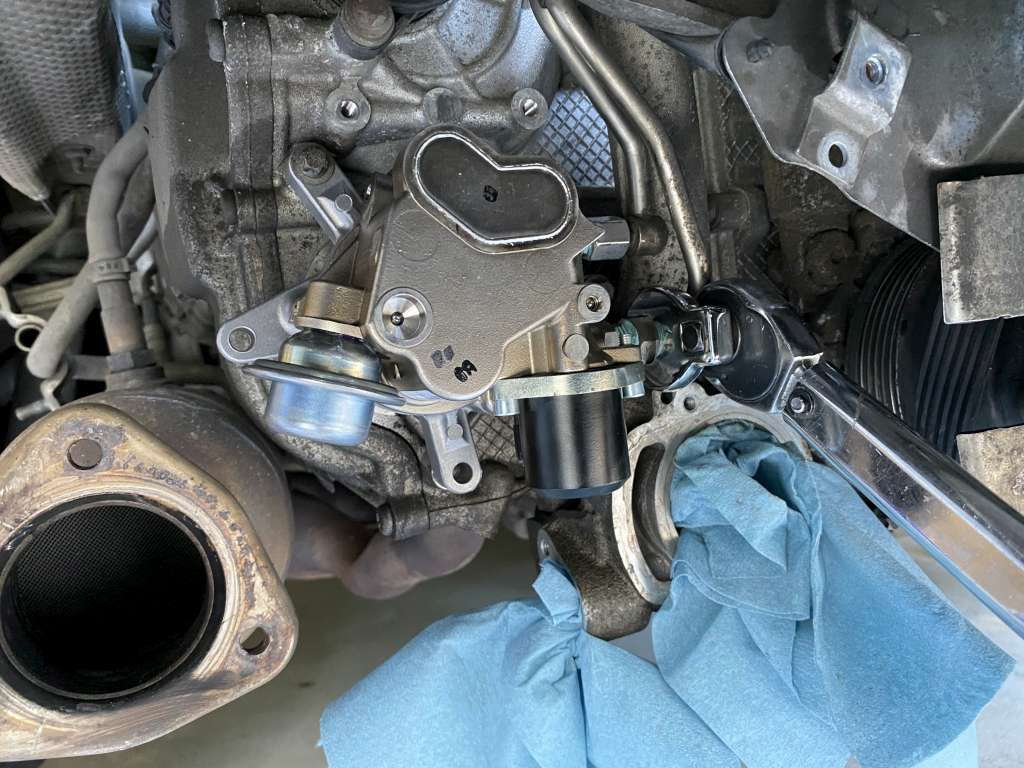
Remove the fuel pump by removing the remaining two torx screws holding it on (red arrows) and pulling it straight out
Note the orientation of the fuel pump rotor. Mark it with a marker
Orient the new fuel pump rotor to the same orientation as the old, lubricate the o-ring with some oil, then carefully push it straight into the cylinder head. With the rotor in the right orientation, it should go all the way in without a fuss. Do not push hard and do not use the bolts to force it flush into place!
Install the last two two bolts you removed from the HPFP and torque them down to 9.5 ft lbs
Next apply a LIGHT coating of gasoila to the threads of the fuel pump. You don't want to get any of it on the flared part of the fitting and you only need just enough to lubricate the threads. A little goes a long way.
Very carefully, use your fingers to thread the fuel lines back onto the pump. Do not cross thread! Do not force anything! The metal lines have a bit of wiggle to them so wiggle them while starting to thread the fittings to ensure you are getting them lined up properly. I noted that there were quite a few exposed threads on the bottom fuel line after tightening - Not to worry - the photos I took of the old pump still installed showed the same number of exposed threads so this is just how it is. Thread both fittings finger-tight ONLY. You should be able to get them nearly all the way on using your fingers and it should not be very difficult. Now check the number of exposed threads to ensure you are in the ballpark.
Now use your torque wrench and your crow foot wrench to torque the fuel line fittings down to 15 ft lbs each. Perform a final comparison of exposed threads (before vs after) to ensure you did it right.
Note: At this point in the procedure, the factory service manual advises to conduct a leak test. I waited until the end of the job before conducting a leak test, but if you want to conduct it now, scroll down to the "first start procedure" which uses the Foxwell NT530 to run the in-tank fuel pump. You will obviously need to reconnect the battery before conducting that procedure. The reason I chose not to do it at this point in the job is that running the electric fuel pump is only going to test the low-pressure line for a leak - the high-pressure line can only be tested with the engine running (and high pressure fuel pump generating pressure).
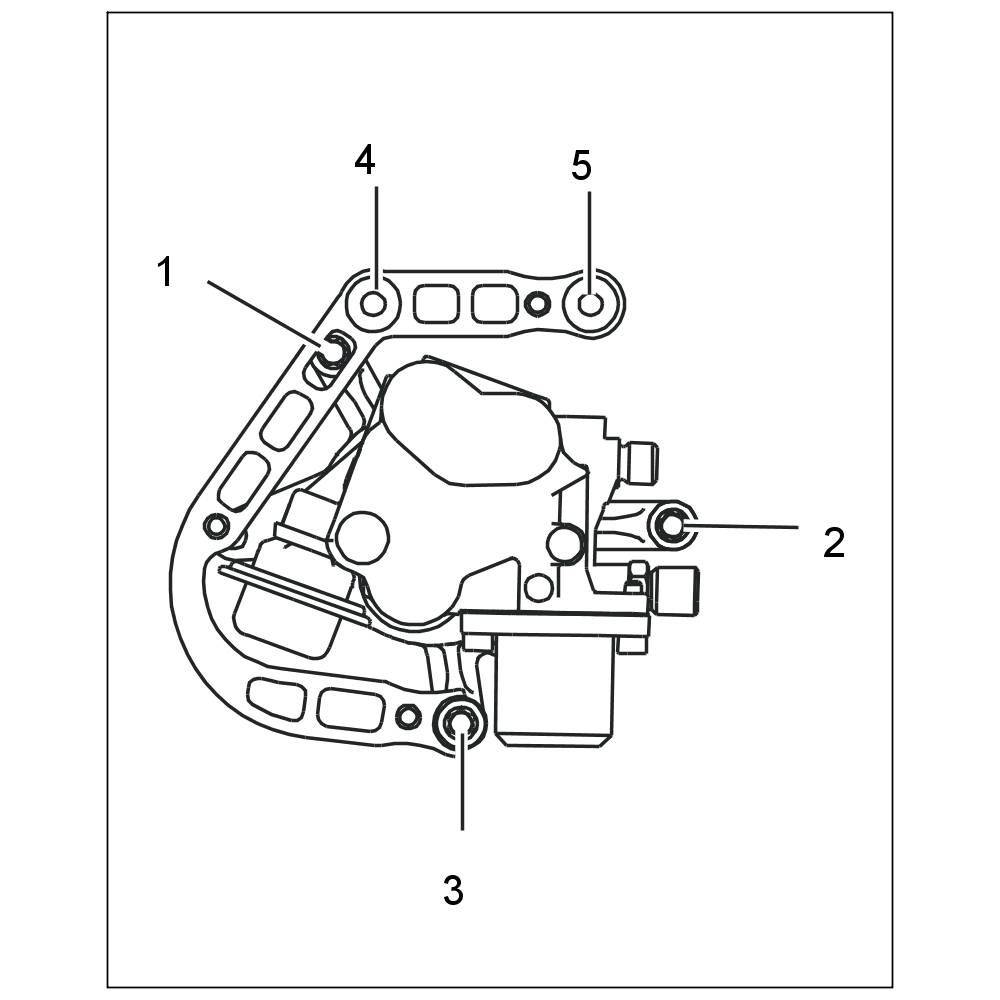
Place the HPFP cover over the pump and torque the remaining bolts to 9.5 ft lbs. Note the tightening sequence...
Reconnect the HPFP electrical connector
Re-install the metal heat shield for the HPFP and torque the bolts to 9.5 ft lbs
Re-install the thermostat and thermostat housing, using new gaskets for the thermostat and the housing, and tighten bolts to 9.5 ft lbs
Install two new rubber o-rings on the metal coolant pipe that connects to the thermostat housing, lube it with coolant lube, then insert it and torque the torx bolts to 9.5 ft lbs
Reconnect the rubber coolant line from the bottom of the expansion tank to the metal coolant pipe
Reconnect the end of the large rubber hose that connects to the thermostat housing and secure the spring clamp.
Re-install the drain plug at the bottom of the thermostat housing ensuring you use a new crush washer - torque to 19 ft lbs
Release the drive belt tension following the same procedure you use earlier and then re-route the belt around all the pulleys
Drop the airbox back in, pushing it all the way down into its rubber grommets (some silicone grease on the pins helps them slide into the grommets), then reconnect its hose to the throttle body and tighten the band clamp, reconnect MAF sensor plug, vacuum line, and electrical connector near the vacuume line. Ensure you clip the wires for the MAF sensor to the airbox so it doesn't get hit by the drive belt.
Re-fill the coolant expansion tank with the coolant you drained from the car. If the tank becomes full before all drained coolant has been poured back in, set the remaining coolant aside for now and keep the coolant expansion tank cap OFF (if it took all the coolant back into the tank, you can re-install and tighten the cap)
Reconnect the negative battery cable.
First start:
Have a fire extinguisher handy
Since the battery was disconnected, you need to allow the ECU to re-adapt the throttle body and gas pedal. Without touching the gas pedal, switch ignition to "on" but don't start the engine. Leave it alone for 60 seconds. Then switch ignition off. There are some other adaptations that are often needed after battery disconnect such as power windows, sunroof, steering angle sensor etc but I think these are covered elsewhere. I can add them here later if people want.
Next perform the "first-start" function using the Foxwell tool. This simply runs the electric fuel pump continuously, ensuring that the HPFP has fuel in the lines immediately on start. Follow these steps with the Foxwell NT530:
Switch ignition to "on" but do not start car
911 (997)
Diagnosis
Control modules
DME control system
Special functions
Special functions
First start
F3
Press F2 to start fuel pump. Now you should complete the following numbered steps within 60 seconds:
Quickly go back and look under the car with safety goggles on, looking for any fuel leaks from the fuel lines you worked with.
If you see any leaks, hit F1 immediately to stop the fuel pump.
Go back into the car and turn the key to start the engine. The engine should start immediately.
As soon as the car starts, quickly go back and look under the car with safety goggles, again checking for leaks. At this point in the procedure, with the engine running, the HPFP is now providing high-pressure (1700psi) to the fuel lines so it is critical to re-check for leaks.
If you see any leaks, immediately hit F1 and shut the engine off with the key.
If no leaks are detected, press F1 to stop the "first start" procedure, but leave the engine running.
Allow the car to idle for a couple minutes while you monitor for leaks (see note below about coolant, and if you have the cap off, ensure your coolant doesn't overflow the tank), then shut the engine off. After shutting the engine off, turn the ignition on but do not start the car, then use the Foxwell NT530 to reset the ECU trouble codes, then turn the ignition off.
If you still have coolant remaining, let the engine warm up a bit with the expansion tank cap off. When the thermostat opens, or sometime before, the coolant level should drop. Pour the remaining coolant in and put the cap on. If the expansion tank looks like it is going to overflow, shut the engine off before that happens and put the cap back on. Take the car for a short drive around the block once or twice, checking the coolant level until it drops. Once it does, allow the car to cool fully overnight and then remove the cap and re-fill the remaining coolant.
This completes the procedure.
Last edited by Hindsight2010; 09-24-2021 at 02:41 PM.
Fantastic detailed write up. Doesn't look so bad to do. My only question is why did you replace the seal in the t stat housing?
I bought everything that said "gasket" or "seal" in the Porsche parts lookup since I had not done a thermostat on a 997 before and didn't know what was truly in there. The seal in the housing is not 100% metal - it has a fibrous inner lip on it that is what actually seals against the thermostat housing. Porsche made this a replaceable item for a reason so since I had the part and everything out, I figured I might as well replace it.
Great DIY and contribution to the community! Look forward to the pump teardown.
Thoughts on replacing waterpump and thermostat at the same time? Guessing your low mileage probably didn't warrant it.
I did replace the thermostat but not the water pump. The pump is off to the other side of the engine and requires you to remove the rear engine carrier and lower the engine a bit to access it. The part is over $300 and the consensus around the forum is that the water pumps on the 997.2 are not a common failure item and are much more reliable than the water pumps on the 997.1.
Great job and thanks for taking the time to include so much detail.
Edit: Been thinking about that leaking brownish fluid you mention that was discussed in the other thread. I'm wondering if that's some sort of factory-sealed "permanent" lubricant or hydraulic fluid. According to the Technik documentation that diaphragm is a temperature compensator. Very interested to see what you find when you open it up.
Maybe I missed it in the write-up but how did you relieve the residual fuel pressure?
I�m so thankful for this DIY. I immediately called AAA and had my 997.2 towed to my preferred indie. It�s not as simple as some others suggested and beyond my skill level. Thanks so much and hopefully I�ll be back on the road soon!!
Great job and thanks for taking the time to include so much detail.
Edit: Been thinking about that leaking brownish fluid you mention that was discussed in the other thread. I'm wondering if that's some sort of factory-sealed "permanent" lubricant or hydraulic fluid. According to the Technik documentation that diaphragm is a temperature compensator. Very interested to see what you find when you open it up.
Maybe I missed it in the write-up but how did you relieve the residual fuel pressure?
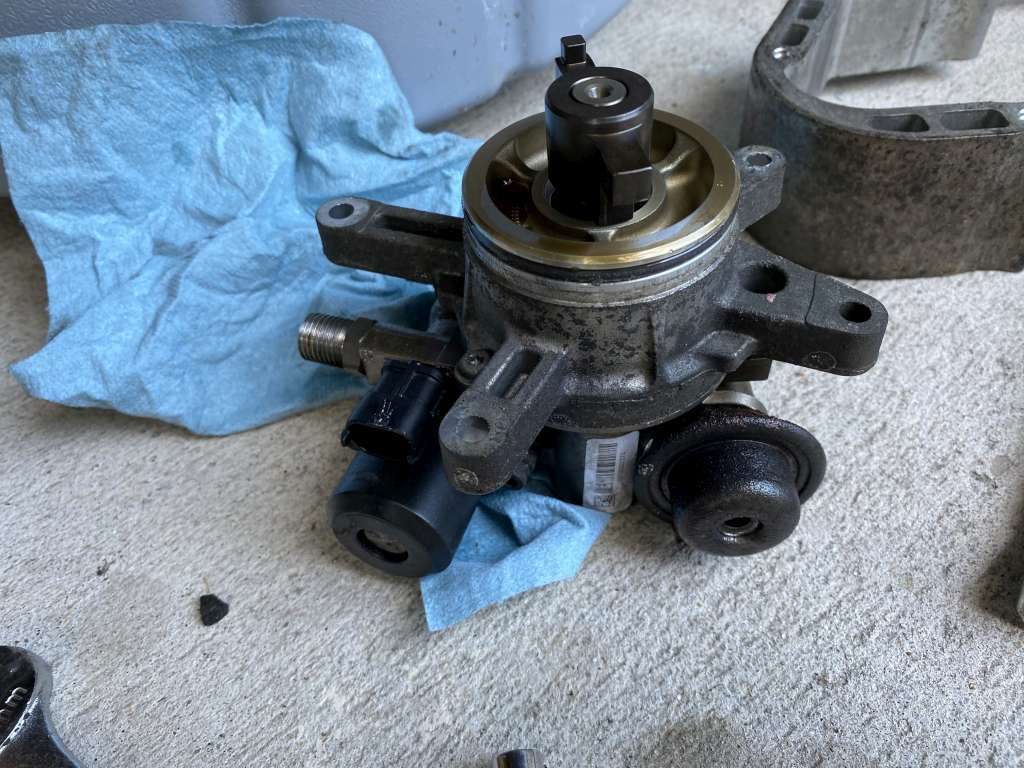
I drained the fluid from that diaphragm and put it in a little plastic baggie. You could be right - it might be factory-sealed lubricant. But the more I looked at it, the more it looked like engine oil to me.... it's just a bit runny is the only thing that gives me pause. Temperature compensator eh? Interesting.... well I took the pump partially apart and I can't see anything visibly wrong with it. There does seem to be a bit more play in the main shaft than you would imagine, but I can't see that causing the pump to fail. If I had to guess, I would guess the diaphragm itself failed. It's puking oil out the end and I'm sure it's supposed to be sealed. There is more to the pump that can be disassembled so I'll give it a shot as I get time but I still have a ton of work to do on the car before it's back on the road. I installed GT3 control arms, sway bars, all new strut bearings, monoballs, rear toe-links, drop links all around, and Ohlins coilovers. I need to set the ride height, corner balance, align it, and put the heat shield, bumper, and and belly pans back on.
To answer your question, there was NO residual fuel pressure. Another forum member who replaced his own pump noted the same. When I unscrewed the lines, barely a drop dripped out of them. Electric fuel pumps frequently have a check-valve in them that holds fuel pressure in the fuel lines and rails so the injectors can immediately fire on start, but that's like 15-30 psi. A direct injected engine has 1700psi and my guess is that the engineers deliberately do NOT put a check valve in the HPFP so your fuel lines aren't pressurized to 1700psi 24x7. Alternately, it could be because my pump failed and as such, hadn't generated any pressure for the whole drive home so there couldn't be any residual. Regardless, I usually hold a cloth over any fuel line I crack to catch the spray and have a fire extinguisher near-by.
I�m so thankful for this DIY. I immediately called AAA and had my 997.2 towed to my preferred indie. It�s not as simple as some others suggested and beyond my skill level. Thanks so much and hopefully I�ll be back on the road soon!!
You're very welcome. Knowing your limits is very wise. You can build up to this kind of job over time as you mod easier/safer components. That's how we all learned. This definitely isn't a job you want to do if you are unsure about it.

 08-02-2020, 07:53 PM