When you click on links to various merchants on this site and make a purchase, this can result in this site earning a commission. Affiliate programs and affiliations include, but are not limited to, the eBay Partner Network.
Do you know where I can purchase a pressure sensor switch for the porsche 981 boxster S PDK 7 speed? I assume replace both pressure sensor because I am in there anyways for future sake. Also, when I replace it do i need to calibrate or what is the procedure after replacement?
There are a couple of sources listed in the very first post that PV997 found. Doing a Google search on the part number (9G1.307.385.05) should yield many more sources.
While I personally would do a calibration after replacement I don't think it's strictly required.
BTW, there's no third pressure sensor so don't worry about the 0.0 readings.
So, only 2,5,6 gear will show up and when I reverse it will jolt, but here is the full information I got from the scanner for the transmission health with the P0843 code only now after clearing the DTC:
Pressure Regulator Current 1 Actual Value (mA): 47.8
Pressure Regulator Current 2 Actual Value (mA): 48.2
Pressure Regulator Current 3 Actual Value (mA): 849
Pressure Regulator Current 4 Actual Value (mA): 536.6
Pressure Regulator Current 5 Actual Value (mA): 44.8
Pressure Regulator Current 6 Actual Value (mA): 44.0
Pressure Regulator Current 7 Actual Value (mA): 0.0
Pressure Sensor 1 Actual Value (psi): 12.61
Pressure Sensor 2 Actual Value (psi): 23.96
Pressure Sensor 3 Actual Value (psi): 0.00
Ambient Pressure: 1.0156
Input Shift 1 Speed Actual Value (rpm) 371
Input Shift 2 Speed Actual Value (rpm) 146
Engine RPM Actual Value (RPM) :660
Selector - Lever Position: P Position
Distance Sensor 1 Position Actual Value (mm): -0.132
Distance Sensor 2 Position Actual Value (mm): -0.292
Distance Sensor 3 Position Actual Value (mm): 0.070
Distance Sensor 4 Position Actual Value (mm): 0.492
Activation of shift Lock Solenoid Inactive
High sight Switch 1 Actuator Power Supply Actual Value ((V): 12.78
High sight Switch 2 Actuator Power Supply Actual Value ((V): 12.73
High sight Switch 3 Actuator Power Supply Actual Value ((V):12.75
High sight Switch 4 Actuator Power Supply Actual Value ((V): 12.89
Activation of Terminal 15: On
Activation of Accelerator Pedal Position (%)
I am not sure if the Porsche 981 has a "pressure sensor 3" and a "Pressure regulator current 7"? I am using borrowing a snapon Zeus scanner maybe it is generic info? I read in one of the threads 1270 similar code and 1280 with there vehicle which eventually was a pressure sensor switch there pressure regulator current was 0.0 and pressure switch 1 was 0.0 but they had three pressure sensor switch? Base on the scan information any suggestion what to do next would help alot or any other scan information do you guys need?
Ok, so I waited until Sunday morning so there is no traffic around and I can push the car back if needed to get this diagnostic going again. I cleared the code and drove down the street and didnt even make it to the first stop sign before the instrument cluster started flashing. I scanned it again and P0843 and P17B1 showed up. This is what I see:
Pressure Regulator Current 1 Actual Value (mA): 0.0
Pressure Regulator Current 2 Actual Value (mA): 50.0
Pressure Regulator Current 3 Actual Value (mA): 849.5
Pressure Regulator Current 4 Actual Value (mA): 613.2
Pressure Regulator Current 5 Actual Value (mA): 44.8
Pressure Regulator Current 6 Actual Value (mA): 55.4
Pressure Regulator Current 7 Actual Value (mA): 0.0
Pressure Sensor 1 Actual Value (psi): 10.5
Pressure Sensor 2 Actual Value (psi): 23.96
Pressure Sensor 3 Actual Value (psi): 0.00
Ambient Pressure: 1.0156
Input Shift 1 Speed Actual Value (rpm) 551
Input Shift 2 Speed Actual Value (rpm) 238
Engine RPM Actual Value (RPM) :668
Selector - Lever Position: P Position
Distance Sensor 1 Position Actual Value (mm): 0.137
Distance Sensor 2 Position Actual Value (mm): 0.293
Distance Sensor 3 Position Actual Value (mm): -0.046
Distance Sensor 4 Position Actual Value (mm): -0.554
Activation of shift Lock Solenoid Inactive
High sight Switch 1 Actuator Power Supply Actual Value ((V): 13.43
High sight Switch 2 Actuator Power Supply Actual Value ((V): 13.41
High sight Switch 3 Actuator Power Supply Actual Value ((V):13.46
High sight Switch 4 Actuator Power Supply Actual Value ((V): 13.39
Activation of Terminal 15: On
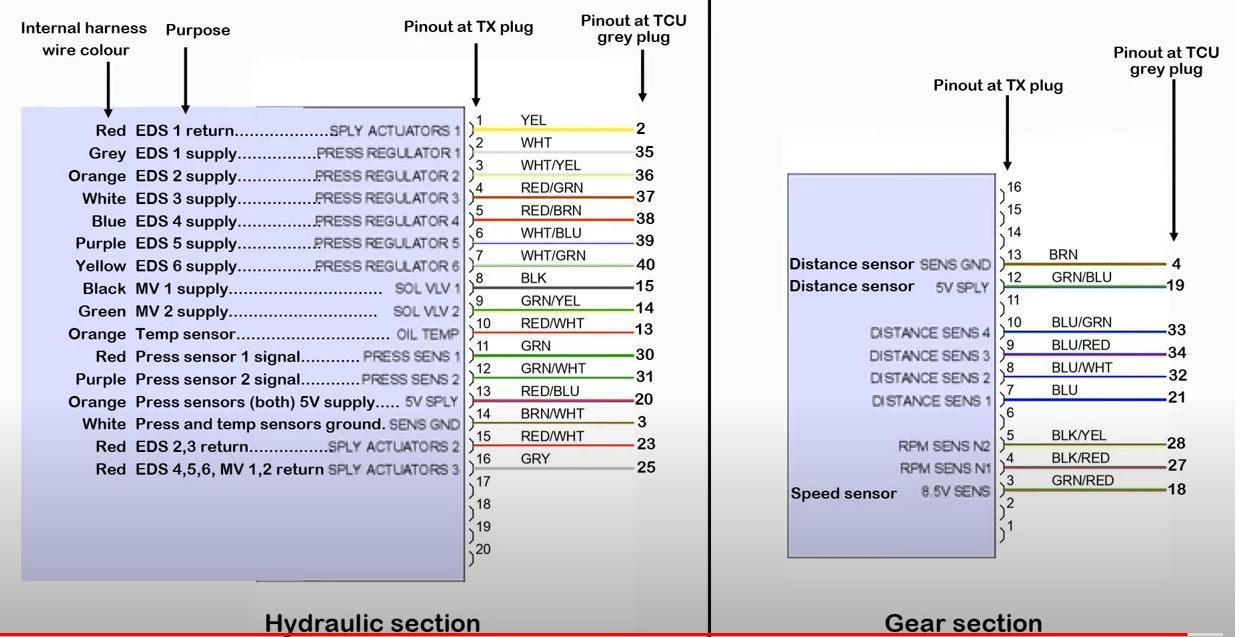
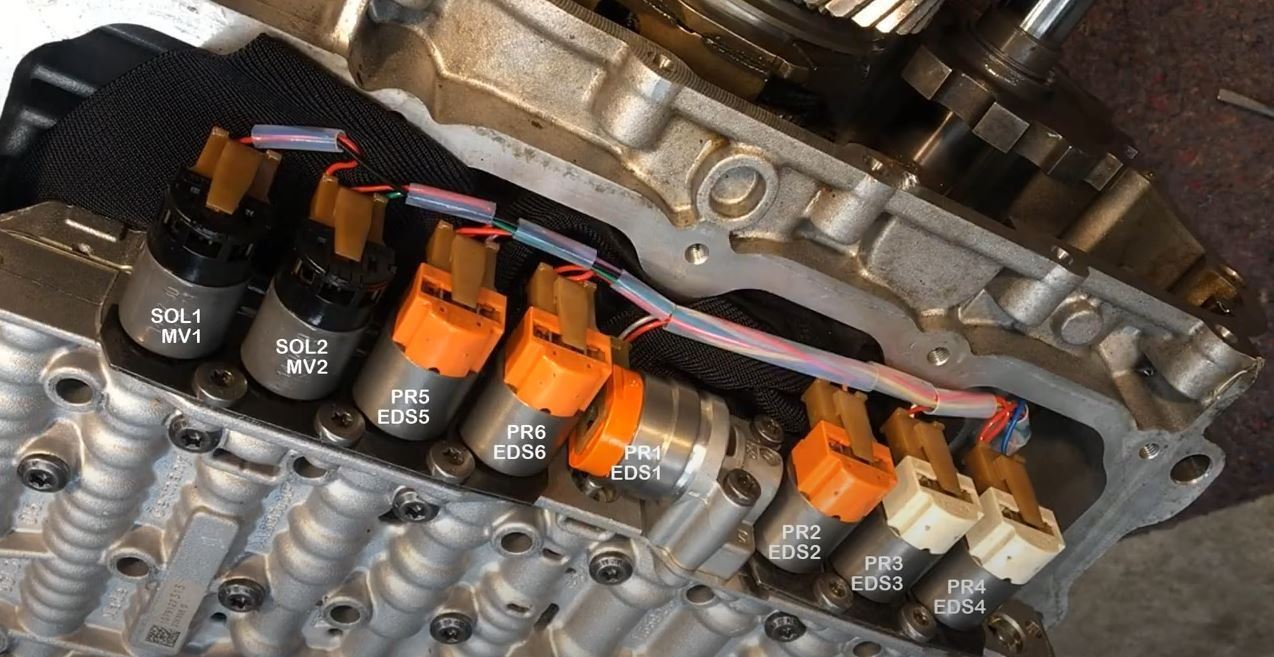
Base on the before and after information "Pressure Regulator Current 1 Actual Value (mA)" When working before failure was 47.8 mA and at failure is "0.0 mA". Pressure Sensor 1 actual value was roughly 10.50 psi in the morning today and at failure was 10.50 psi. Is both pressure sensor 1 and 2 suppose to be the same in value? Pressure sensor 1 is 10.50 psi and Pressure sensor 2 is 23.96 psi for me at cold start and at failure. Base on Jeff Richardson video I have been following for porsche PDK (Nice break down of everything for the 981 and very helpful). I tested the grey wire 2 from TCM to 35 before clipping into the harness in the transmission. To see if there is a breakage but did not see any issues using a voltmeter. Base on the diagram from Jeff video I took a crop from that particular wire will lead into PR1 EDS1? Should I change out the EDS1 (that L looking solenoid in the middle of the valve body)? Or do you still think it is the pressure sensor 1 issue? I am fairly new at this please baby step me thru the next process for diagnostics.
Ok, so I waited until Sunday morning so there is no traffic around and I can push the car back if needed to get this diagnostic going again. I cleared the code and drove down the street and didnt even make it to the first stop sign before the instrument cluster started flashing. I scanned it again and P0843 and P17B1 showed up. This is what I see:
Pressure Regulator Current 1 Actual Value (mA): 0.0
Pressure Regulator Current 2 Actual Value (mA): 50.0
Pressure Regulator Current 3 Actual Value (mA): 849.5
Pressure Regulator Current 4 Actual Value (mA): 613.2
Pressure Regulator Current 5 Actual Value (mA): 44.8
Pressure Regulator Current 6 Actual Value (mA): 55.4
Pressure Regulator Current 7 Actual Value (mA): 0.0
Pressure Sensor 1 Actual Value (psi): 10.5
Pressure Sensor 2 Actual Value (psi): 23.96
Pressure Sensor 3 Actual Value (psi): 0.00
Ambient Pressure: 1.0156
Input Shift 1 Speed Actual Value (rpm) 551
Input Shift 2 Speed Actual Value (rpm) 238
Engine RPM Actual Value (RPM) :668
Selector - Lever Position: P Position
Distance Sensor 1 Position Actual Value (mm): 0.137
Distance Sensor 2 Position Actual Value (mm): 0.293
Distance Sensor 3 Position Actual Value (mm): -0.046
Distance Sensor 4 Position Actual Value (mm): -0.554
Activation of shift Lock Solenoid Inactive
High sight Switch 1 Actuator Power Supply Actual Value ((V): 13.43
High sight Switch 2 Actuator Power Supply Actual Value ((V): 13.41
High sight Switch 3 Actuator Power Supply Actual Value ((V):13.46
High sight Switch 4 Actuator Power Supply Actual Value ((V): 13.39
Activation of Terminal 15: On
Base on the before and after information "Pressure Regulator Current 1 Actual Value (mA)" When working before failure was 47.8 mA and at failure is "0.0 mA". Pressure Sensor 1 actual value was roughly 10.50 psi in the morning today and at failure was 10.50 psi. Is both pressure sensor 1 and 2 suppose to be the same in value? Pressure sensor 1 is 10.50 psi and Pressure sensor 2 is 23.96 psi for me at cold start and at failure. Base on Jeff Richardson video I have been following for porsche PDK (Nice break down of everything for the 981 and very helpful). I tested the grey wire 2 from TCM to 35 before clipping into the harness in the transmission. To see if there is a breakage but did not see any issues using a voltmeter. Base on the diagram from Jeff video I took a crop from that particular wire will lead into PR1 EDS1? Should I change out the EDS1 (that L looking solenoid in the middle of the valve body)? Or do you still think it is the pressure sensor 1 issue? I am fairly new at this please baby step me thru the next process for diagnostics.
You almost certainly have a failed Pressure Sensor #1. Again, using a standard ohm-meter, measure resistance (cold and hot) at the forward connector. You can try to reach out to @YellowMenthol , I recently helped him with the same issue (P17B1).
You should see around 8 kOhm, please post your measurements.
pressure sensor 1 (B30 to B3) pressure sensor 2 (B31 to B3)
I am sorry I am a novice in testing, but to clarify you want me to test the resistance at the plug at the TCM the one circle in red in both pictures? Plugging the red probe from the voltmeter to B30 (circle in blue diagram 2) at the TCM wire, which according to the diagram is "PRESS SENS 1" color "green" wire? Also, plug the black probe into the TCM wire harness "SENS GND" (circle in blue in the diagram) color "BRN/WHT". Basically, we are testing the "PDK control unit" at the wire harness to the TCM circle in red first picture? Do you want me to test this when the car is started and running or when the car is off for the values? I apologize for the dumb question stjoh just want to make sure before I burn something out. Also, I appreciate your help for stepping me through this diagnostic.
No worries. You should measure the sensor in the gearbox, not the TCU. You can do it at the large TCU connector like you're showing or you can disconnect the forward plug on the transmission and measure there. Measuring toward the transmission you should see about 8kOhm between B3 and B30 on TCU or B14 and B11 on the transmission connector for Press sensor #1 (Press sensor #2 is B3 and B31 or B14 and B12). The car should be shut down. If the values look good with a cold transmission I'd warm it up and try again with it warm. Feel free to send me a PM if you want to discuss more.
Ok, so I waited until Sunday morning so there is no traffic around and I can push the car back if needed to get this diagnostic going again. I cleared the code and drove down the street and didnt even make it to the first stop sign before the instrument cluster started flashing. I scanned it again and P0843 and P17B1 showed up. This is what I see:
Pressure Regulator Current 1 Actual Value (mA): 0.0
Pressure Regulator Current 2 Actual Value (mA): 50.0
Pressure Regulator Current 3 Actual Value (mA): 849.5
Pressure Regulator Current 4 Actual Value (mA): 613.2
Pressure Regulator Current 5 Actual Value (mA): 44.8
Pressure Regulator Current 6 Actual Value (mA): 55.4
Pressure Regulator Current 7 Actual Value (mA): 0.0
Pressure Sensor 1 Actual Value (psi): 10.5
Pressure Sensor 2 Actual Value (psi): 23.96
Pressure Sensor 3 Actual Value (psi): 0.00
Ambient Pressure: 1.0156
Input Shift 1 Speed Actual Value (rpm) 551
Input Shift 2 Speed Actual Value (rpm) 238
Engine RPM Actual Value (RPM) :668
Selector - Lever Position: P Position
Distance Sensor 1 Position Actual Value (mm): 0.137
Distance Sensor 2 Position Actual Value (mm): 0.293
Distance Sensor 3 Position Actual Value (mm): -0.046
Distance Sensor 4 Position Actual Value (mm): -0.554
Activation of shift Lock Solenoid Inactive
High sight Switch 1 Actuator Power Supply Actual Value ((V): 13.43
High sight Switch 2 Actuator Power Supply Actual Value ((V): 13.41
High sight Switch 3 Actuator Power Supply Actual Value ((V):13.46
High sight Switch 4 Actuator Power Supply Actual Value ((V): 13.39
Activation of Terminal 15: On
Base on the before and after information "Pressure Regulator Current 1 Actual Value (mA)" When working before failure was 47.8 mA and at failure is "0.0 mA". Pressure Sensor 1 actual value was roughly 10.50 psi in the morning today and at failure was 10.50 psi. Is both pressure sensor 1 and 2 suppose to be the same in value? Pressure sensor 1 is 10.50 psi and Pressure sensor 2 is 23.96 psi for me at cold start and at failure. Base on Jeff Richardson video I have been following for porsche PDK (Nice break down of everything for the 981 and very helpful). I tested the grey wire 2 from TCM to 35 before clipping into the harness in the transmission. To see if there is a breakage but did not see any issues using a voltmeter. Base on the diagram from Jeff video I took a crop from that particular wire will lead into PR1 EDS1? Should I change out the EDS1 (that L looking solenoid in the middle of the valve body)? Or do you still think it is the pressure sensor 1 issue? I am fairly new at this please baby step me thru the next process for diagnostics.
I expect the zero current on EDS1 is because it has detected an error with the pressure, that being most likely from the pressure sensor 1 failure. If the TCU detects a problem with clutch 1 hydraulics (in this case it seems to be a pressure indication), it will immediately remove all power from from the pressure regulator to ensure that zero hyd pressure is applied to the clutch. So I think the zero value at EDS1 is simply a consequence of the pressure sensor failure.
To test the resistance it's definitely easiest to test at the TCU, not at the transmission plug. But when testing at the TCU, ensure you disconnect the plug. This way you are just testing the resistance of the component in the transmission and not also testing the resistance of the TCU internals in parallel.
Edit:
So I went and connected PIWIS to the project car which is fully serviceable, and should give a good idea of correct indications.
Prior to engine start:
Snip of pressure and EDS currents prior to engine start below. Pressures are absolute pressures. Don't know why they show 1.2 bar and not 1.0 bar. As you can see both are identical. Also the EDS1 and 2 current is identical. Even though no clutch activation is being requested, there is still a small current through the solenoids.
After engine start with P selected:
From this snip below it seems that as soon as the engine is started the current applied to EDS 1 and 2 is unchanged, but this results in a small difference in pressure sensed by the clutch pressure sensors as this has increased from 1.2 to 1.5 Bar. Whilst there is an increase in pressure in both clutch packs, this isn't enough to move the clutch pistons and activate the clutches themselves.
Idle, D or R selected and not moving:
From the snip below you can see that as soon as a gear is selected, the EDS1 current increases to then increase the pressure in the clutch 1 circuit. The 2.8 bar is just not quite enough to apply the clutch. I didn't take a snip as I started to get the car moving, but when I released the brake the current in EDS 1 increased to about 300-310 mA, and the pressure increased to about 3.1 bar. It surprised me how little extra current and pressure was required to activate the clutch. Also of note, when I got the car going at a speed where the clutch was fully engaged and not slipping, the current and pressure really didn't seem to increase at all from the values shown when it was just getting going.
So what do I see of your indications?
The pressure sensor 1 value seems to be wrong, which is then telling the TCU to not send any current to EDS1 so there is no chance of clutch activation. The temp here today was about 30C, so the pressures you see at the temperature being tested might be different to this. But the fact that prior to start you are seeing vastly different pressures sensed by the two clutch circuits tells me that sensor 1 is giving bogus indications.
One question, when you were doing your test drive, were you monitoring the pressure in clutch 1 the whole time and it was showing a constant value of 10.5 psi?
That's all good but you should try to disconnect the front connector and measure the resistance on the pressure sensors using a standard ohm-meter. This could tell you if there is an issue with a pressure sensor in many cases. You should see around 8 kOhm, please post your measurements.
pressure sensor 1 (B30 to B3)
pressure sensor 2 (B31 to B3)
That looks normal. Did you measure it with the gearbox up to operating temperature or just room temperature?
Ambient temperature only.
I did run the engine for 2 hours to get the gearbox oil to 60C which is the min temp to try a recalibration.
That turned out very bad. I selected calibrate with new part fitted, so it would clear the exiting data tables and in fact it cleared the whole TCU, failed to calibrate and now I have a dead TCU. Serial Number: 00000000 and a 10040 error.
So....... It got 100 times worse now....
Last edited by PWM1972; 02-01-2024 at 03:27 PM.
Reason: Updated info
Below is a quote of a post I made (#1323) that explains the best I could of what is going on in the calibration processes.
I can't find the part that you describe where it failed. Where in the calibration did it fail? In particular I'm interested in knowing if part C (shift distance calibration) was performed correctly.
The calibration with part replacement carries out all 5 routines a-e. When I've had failures where the distance sensor response was fine, it fails in routine d, the hydraulic teach in (valve body cal).
The calibration without part replacement only carries out routines c and e, that being the shift distance (DS numbers) and the clutch cal. All the other routines are ignored, so there is no adaptation delete and no cal of the valve body. If the distance sensor response is within the prescribed limits set in the TCU, I've never had this fail.
Either routine will not begin until you have the clutch fluid temp above 60C. PIWIS will list a bunch of prerequisites like park brake on and the foot brake pressed. Same prerequisites for both.
Routines are as follows:
a. Reprogramming. I don’t know exactly what is happening here, but it seems like all the adaptations are wiped. Takes about a minute.
b. Pressure sensor calibration. Engine isn’t running. Key is turned off and on a few times. Progressive instructions given by PIWIS. Does it twice that take 30 secs each with about 10 secs between each one.
c. Shift distance calibration. This is where it tests the distance sensor response. Engine is running. Takes about 7 minutes, but sometimes takes a lot less if the numbers it has stored are similar to previously held. Will change through all gears and preselections to get the distances for any possible combination. It will sit there seemingly doing nothing for long periods. This is normal.
d. Hydraulic teach in. This is the valve body cal. You don’t really know what’s going on in the background, but if it fails it will give you the individual steps of the hyd teach in and tell you which it failed on. These are the 12 steps below. Below each is the English courtesy of google translate. A german speaker might give better translations so we can have a better understanding of what is actually happening.
Note that EDS 1 and 2 are the clutch controlling solenoids. EDS 3 and 4 control overall system pressure, cooling and lubrication. MV 1 & 2, and EDS 5 & 6 control gear shifting, and don’t seem to be checked at all in this procedure.
Note that steps 2 and 3 are for the two clutches, but it doesn’t do a clutch calibration like it will do next in routine e, which is much more comprehensive. It might be just doing a calibration of EDS 1 and 2.
1. �berpr�fung druckstellar beendet pressure regulator test completed
12. einlernvorgang beedet teach-in process finished
e. Clutch calibration. It increases engine RPM and gently applies each of the clutches over and over to get adaptations of how the clutches behave. Every time I do this it will stagnate at 24% and 74% complete for a few minutes. This seems to be normal.
I gave Calibration without replacing hardware a go (twice) after performing a Reset of the TCU on a 2011 987. Both times the process failed several minutes in without letting me know which stage it was in like this. I started the process with the engine running, and was not prompted to turn it off and back on as the post above suggests will occur. I did hear the shift rods moving around but the RPM never raised above idle before the process failed. Is it time to try to run each step individually? Is that possible with PIWIS II? Or is it time to replace the TCU? The part number shown for the PDK control unit is 98761838042 - but that doesn’t come up in some parts searches I performed.
I gave Calibration without replacing hardware a go (twice) after performing a Reset of the TCU on a 2011 987. Both times the process failed several minutes in without letting me know which stage it was in like this. I started the process with the engine running, and was not prompted to turn it off and back on as the post above suggests will occur. I did hear the shift rods moving around but the RPM never raised above idle before the process failed. Is it time to try to run each step individually? Is that possible with PIWIS II? Or is it time to replace the TCU? The part number shown for the PDK control unit is 98761838042 - but that doesn’t come up in some parts searches I performed.
The information I provided regarding the calibration was specific to the 981/991. Whilst it looks in PIWIS that it's doing the same thing for a 9x7, the routines in PIWIS it's using are entirely different. What it's doing to calibrate the trans is most likely very similar, but the PIWIS indications seem to be very different for this platform. So having not ever worked with a 9x7 car, I don't really know what is going on behind the scenes. @stjoh has more experience with the platform and the PDK than anyone else I know, and might be a good person to chime in here to help.
The fact that it's clunking (the shift rod cal) when you start the cal does seem to indicate that all is good with the TCU and programming, as it wouldn't start if it wasn't programmed correctly.
I have a question though, if you clear all codes and then start the engine, do you have any codes then appear for the PDK, or does it remain clear until the failure in the cal? If no codes until after the failure, this would indicate to me that the TCU is fine, and it's something in the cal that's failing. In the 9x1 cal code it will allow the cal to start with a small number of pre-existing codes, but for the vast majority it won't even allow the cal to start. If the TCU wasn't programmed correctly I suspect it wouldn't even allow the cal to begin.
I did run the engine for 2 hours to get the gearbox oil to 60C which is the min temp to try a recalibration.
That turned out very bad. I selected calibrate with new part fitted, so it would clear the exiting data tables and in fact it cleared the whole TCU, failed to calibrate and now I have a dead TCU. Serial Number: 00000000 and a 10040 error.
So....... It got 100 times worse now....
Any thoughts on what I can do next? I assume that the .bin files required to flash the TCU are not in the PIWIS 3 Clone, so I've essentially bricked the TCU.
getting manufactured PDK box and TCU - calibration question
Originally Posted by jjrichar
So what is happening during a PDK calibration procedure?
I posted this elsewhere on Rennlist, and I thought it might be worth a repeat here as general information relating to the transmission. This information is for the 9X1 as this is the platform I'm working on. I can't be 100% sure the process is identical for the 9X7.
Having done a load of cals and looked into the PIWIS code a bit to see what is happening, here's my understanding of the two cal procedures.The calibration consists of 5 separate routines, a-e below.
The calibration with part replacement carries out all 5 routines a-e. When I've had failures where the distance sensor response was fine, it fails in routine d, the hydraulic teach in (valve body cal).
The calibration without part replacement only carries out routines c and e, that being the shift distance (DS numbers) and the clutch cal. All the other routines are ignored, so there is no adaptation delete and no cal of the valve body. If the distance sensor response is within the prescribed limits set in the TCU, I've never had this fail.
Either routine will not begin until you have the clutch fluid temp above 60C. PIWIS will list a bunch of prerequisites like park brake on and the foot brake pressed. Same prerequisites for both.
Routines are as follows:
a. Reprogramming. I don’t know exactly what is happening here, but it seems like all the adaptations are wiped. Takes about a minute.
b. Pressure sensor calibration. Engine isn’t running. Key is turned off and on a few times. Progressive instructions given by PIWIS. Does it twice that take 30 secs each with about 10 secs between each one.
c. Shift distance calibration. This is where it tests the distance sensor response. Engine is running. Takes about 7 minutes, but sometimes takes a lot less if the numbers it has stored are similar to previously held. Will change through all gears and preselections to get the distances for any possible combination. It will sit there seemingly doing nothing for long periods. This is normal.
d. Hydraulic teach in. This is the valve body cal. You don’t really know what’s going on in the background, but if it fails it will give you the individual steps of the hyd teach in and tell you which it failed on. These are the 12 steps below. Below each is the English courtesy of google translate. A german speaker might give better translations so we can have a better understanding of what is actually happening.
Note that EDS 1 and 2 are the clutch controlling solenoids. EDS 3 and 4 control overall system pressure, cooling and lubrication. MV 1 & 2, and EDS 5 & 6 control gear shifting, and don’t seem to be checked at all in this procedure.
Note that steps 2 and 3 are for the two clutches, but it doesn’t do a clutch calibration like it will do next in routine e, which is much more comprehensive. It might be just doing a calibration of EDS 1 and 2.
1. �berpr�fung druckstellar beendet pressure regulator test completed
12. einlernvorgang beedet teach-in process finished
e. Clutch calibration. It increases engine RPM and gently applies each of the clutches over and over to get adaptations of how the clutches behave. Every time I do this it will stagnate at 24% and 74% complete for a few minutes. This seems to be normal.
Thanks to all who have posted here for the amazingly detailed information. After multiple repair attempts by various shops including Atlanta Speedworks, I’m throwing in the towel and replacing the PDK box and TCU on my Cayman R. Too many intermittent failures. Plus Delaware Porsche Parts has incredibly low prices and no tax. My question - is the calibration procedure above the correct one to use for my situation? I just want to make sure my mechanic has the most up to date information.
Not important but, does anyone know why Brian left ATL Speedworks?
new PDK box part number: 9G2 300 021 4X
new TCU part number: 997 618 270 40
Thanks to all who have posted here for the amazingly detailed information. After multiple repair attempts by various shops including Atlanta Speedworks, I�m throwing in the towel and replacing the PDK box and TCU on my Cayman R. Too many intermittent failures. Plus Delaware Porsche Parts has incredibly low prices and no tax. My question - is the calibration procedure above the correct one to use for my situation? I just want to make sure my mechanic has the most up to date information.
Not important but, does anyone know why Brian left ATL Speedworks?
new PDK box part number: 9G2 300 021 4X
new TCU part number: 997 618 270 40
Thanks!
Yes, if you are replacing the transmission entirely, you will need to do the calibration with part replacement, which will include all the steps above.
Hello fellow victims of PDK durability. Ive read whole thread few times already and greatly appreciate all info that community gathered.
Boxster S 2017, 37k kilometers without track days.
I had sporadic P17XX errors for 1 year Porsche dealer just cleared errors and car was driveable for some time (sometime even months) before displacement sensor died completely (all of the values became 13.750). Porsche ask $40k for new PDK so its not the case and absolutely insane while you can buy whole car of that year for $65k.
Bought refurbished sensor from alibaba and installed it in workshop - sensor #4 was defective and sent it back to the supplier.
Bought and installed factory new sensor from some Chinese manufacturer - everything went great and PDK worked as intended for 80 kilometers / 2 rides.
I was driving slowly in first gear, then gearbox made some light metal clank with gearbox + check engine errors appeared on the dashboard. PDK internals were checked before installation of new sensor, so broken fork etc isnt the case as well.
Check engine error just disappeared - P1733 & P1737 errors remains there (sensor #3 value is stuck at 13.750).
Workshop asking me to provide them a new sensor but I cannot believe that factory made sensor may die after 1 day
Is there any cases when some harness / generator / battery / TCU may damage that sensor? It will also explain why refurbished one was not working after installation
PS: i had a 2014 Gallardo before, which had problems with same sensor due to damaged harness in the drivers door (!!!). So i guess VW remains VW after all no matter which logo is placed on the car

 01-27-2024, 10:19 AM