Notices
997 Forum 2005-2012
Sponsored by:
Sponsored by:

The Overly Detailed Guide to Installing a 997 Center Radiator Kit (and Grill Screens)

Thread Tools
 
Search this Thread
 
Old 08-19-2019 | 05:06 PM
  #16  
ALEV8's Avatar
ALEV8
Three Wheelin'
 
Joined: Apr 2007
Posts: 1,523
Likes: 71
Default

About to drop mine in any second......passenger door microswitch attempting to hijack my motivation. Parts are assembled and in the bench. Did you jack up the front only? How big of buckets did you use?
Old 08-19-2019 | 05:17 PM
  #17  
TheBruce's Avatar
TheBruce
Thread Starter
Three Wheelin'
 
Joined: Feb 2017
Posts: 1,772
Likes: 473
From: San Francisco
Default

Yea fronts only, that will also reduce the amount of coolant.

Small bucket is ok. Not much coolant comes out. Maybe a gallon.

Do do you have the magnetic grabber and T25 screwdriver for the side marker screw holes?
Old 08-22-2019 | 06:41 PM
  #18  
driggity's Avatar
driggity
Advanced
 
Joined: Mar 2019
Posts: 88
Likes: 5
From: SF Bay Area
Default

Originally Posted by TheBruce
Quick update on this project: I'm calling it a total success. I went out for a rip this weekend on the PCH and I couldn't get the oil temp over 220F, no matter how hard I hammered on it. I was previously running 245F on those stretches, and would back off once I got to that temp.

The PCH is all hairpin twisties and hills (ie cliffs) where you are mostly ins 2nd gear at high rpm. That combo would always get my temps up, presumably because not a lot of air was flowing over the rads.

Anyway, I would recommend the project to all.
Ugh, I guess I need to do this. According to the dash gauge I was at 250F going up the backside of Mt. Hamilton last week. Of course high revs, going uphill, relatively slow speeds due to the tight road, and over 90F ambient temps weren't helping matters.
Old 08-22-2019 | 07:03 PM
  #19  
sbbarnett's Avatar
sbbarnett
Instructor
 
Joined: May 2018
Posts: 130
Likes: 31
From: Portland OR
Default

Thank you for doing such a great job on this. Ordered the kit today.
Old 08-22-2019 | 10:16 PM
  #20  
lmaternick's Avatar
lmaternick
Instructor
 
Joined: Sep 2017
Posts: 175
Likes: 10
From: Winnipeg
Default

I ordered mine today as well. I can't believe how cheap these are for 997.1!! The cost to produce must exceed the retail price of these kits.
997.2....not so lucky....$1100.00.....ouch.
Great install post!!
Old 09-10-2019 | 01:54 PM
  #21  
sbbarnett's Avatar
sbbarnett
Instructor
 
Joined: May 2018
Posts: 130
Likes: 31
From: Portland OR
Default

Been working on this job on and off for a couple days - these instructions are excellent. I did make a torque cheat sheet for myself:


Last edited by sbbarnett; 09-10-2019 at 02:00 PM. Reason: JPEG fail
The following 5 users liked this post by sbbarnett:
997_flo (01-21-2022), driggity (09-10-2019), martini_mike (04-05-2020), myw (09-10-2019), TheBruce (09-11-2019)
Old 09-10-2019 | 01:58 PM
  #22  
cwheeler's Avatar
cwheeler
Rennlist Member
 
Joined: Nov 2013
Posts: 1,644
Likes: 391
Default

My, that's a long link you have.

Cw
Old 09-10-2019 | 02:17 PM
  #23  
sbbarnett's Avatar
sbbarnett
Instructor
 
Joined: May 2018
Posts: 130
Likes: 31
From: Portland OR
Default

Originally Posted by cwheeler
My, that's a long link you have.

Cw
Fixed it...
Old 09-10-2019 | 03:38 PM
  #24  
DocR's Avatar
DocR
Rennlist Member
 
Joined: Jul 2019
Posts: 194
Likes: 125
From: Sacramento, CA
Default

Amazing, this looks like a great DIY!

I think I'll give this a crack and also do the GT3 'smile' vent at the same time. If I recall, I think that's the best way to vent the center radiator airflow.

Will update once I have taken this on with results.

Rob
Old 09-10-2019 | 04:02 PM
  #25  
lmaternick's Avatar
lmaternick
Instructor
 
Joined: Sep 2017
Posts: 175
Likes: 10
From: Winnipeg
Default

I think in order to vent through the smile vent you will need to change some other bumper parts out with GT3 parts that do not come with the smile vent and centre rad kits. Could be wrong though.
Old 09-10-2019 | 05:04 PM
  #26  
DocR's Avatar
DocR
Rennlist Member
 
Joined: Jul 2019
Posts: 194
Likes: 125
From: Sacramento, CA
Default

Looks like you're correct. A few extra parts needed. I'll keep investigating.

https://rennlist.com/forums/997-foru...l#post15666541
Old 09-10-2019 | 05:12 PM
  #27  
myw's Avatar
myw
Nordschleife Master
 
Joined: Jun 2013
Posts: 5,408
Likes: 604
From: richmond hill
Default

theBruce - THANK YOU
Old 09-10-2019 | 05:19 PM
  #28  
ALEV8's Avatar
ALEV8
Three Wheelin'
 
Joined: Apr 2007
Posts: 1,523
Likes: 71
Default

Every time I get ready to execute this I can’t take the car out of service for a day......
Old 09-11-2019 | 12:05 PM
  #29  
TheBruce's Avatar
TheBruce
Thread Starter
Three Wheelin'
 
Joined: Feb 2017
Posts: 1,772
Likes: 473
From: San Francisco
Default

Glad you guys are doing this and excited to see the final results.

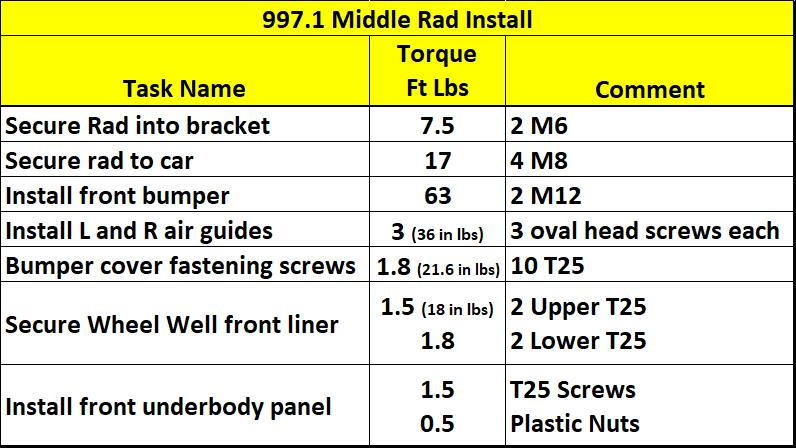
@sbbarnett nice work on the torque guides. You get the Porsche OCD Merit Badge for proper torque on the fender liner screws. I'm not worthy :-)

I've been hammering on my car for a couple weeks and still yet to see it hit 225F.

The only issue thats puzzled me is im getting some overflow from the expansion tank cap and/or bleeder valve. I thought it was my old XX.01 cap so I replaced it with the new XX.04. However the other day I saw some coolant residue around the cap again. When cold the coolant looks a bit low, when hot it looks a bit high. I dont remember that much variance before. Any ideas?? I pressure tested the system and it was fine. A minor drop after 45 mins but that might just have been a the seal on the harbor freight tester.
Old 09-11-2019 | 07:25 PM
  #30  
pitargue's Avatar
pitargue
Intermediate
 
Joined: Apr 2017
Posts: 40
Likes: 7
Default

Wow. Thank you so much for the write up.

So, what does the cutouts on the bottom of the bumper look like? Anyone have any links for pics?


Quick Reply: The Overly Detailed Guide to Installing a 997 Center Radiator Kit (and Grill Screens)


All times are GMT -3. The time now is 05:34 AM.