When you click on links to various merchants on this site and make a purchase, this can result in this site earning a commission. Affiliate programs and affiliations include, but are not limited to, the eBay Partner Network.
I was going to tackle the alternator/starter cable tonight but ended up diagnosing a cracked expansion tank instead. Sucks but actually pretty lucky I caught it.
I was cleaning the engine bay and first noticed my coolant was at the "min" line. I didnt think much of it at first but then noticed a bit of dried coolant above the water pump. I wrote that off too as maybe some residue from when the water pump was replaced a few years back. Then my tiny lightbulb went off. I put two and two together and thought I might have a problem. I started digging around the expansion tank and saw a big ol' crack in it. Yikes.
I know its a pain in the *** to replace so any tips appreciated. Is dropping the engine the only way...will I get any extra wiggle room since the alternator will be out anyway...any other write ups out there besides the Pelican DIY?
Luckily, I haven't had to tackle this one yet, so curious to get your first hand response as to how it goes. From what I've read, you don't need to drop the engine, just lower it some to create enough space to slide the tank out above it. Also, once you're all done, an AirLift device that puts a vacuum on the cooling system and then replaces all the coolant without introducing or trapping any air will make the refill and subsequent burping go much, much faster. If you don't have one and can't borrow one, Amazon Prime can get one to you before the weekend.
Luckily, I haven't had to tackle this one yet, so curious to get your first hand response as to how it goes. From what I've read, you don't need to drop the engine, just lower it some to create enough space to slide the tank out above it. Also, once you're all done, an AirLift device that puts a vacuum on the cooling system and then replaces all the coolant without introducing or trapping any air will make the refill and subsequent burping go much, much faster. If you don't have one and can't borrow one, Amazon Prime can get one to you before the weekend.
Good luck with it.
put a jack on the oil pan with a nice flat piece of wood between the jack plate and pan. remove the two nuts securing the engine mounts underneath the car. Then drop it about two to three inches and use a jack stand on the transmission for safety.
That will be enough space to get the tank in and out.
You will definitely have to do a partial engine drop. Also, the tank has to slide out to the side first as there is a mounting bracket/clip arrangement on the tank. If you have the replacement tank available before you attempt removal of the original you will see it on the top. If you don't have a cable style hose clamp removal/installation tool, I would suggest one as it makes the task much easier - as there is not much room to reach some of the clamps with long nose pliers or other tools to reach the clamps. I did not have the vacuum tool for the cooling system and had no problems with an initial "fill" of the coolant system followed by a test drive and then a burp and fill to top it off.
I've got a picture that shows the flange area on the tank that has to slide and engage into the metal clip on the underside of the engine compartment fender area. Look just to the side of the fill cap and you will see three tabs on the right side. Those tabs have to engage into the clip from underneath, the tank raised, and then slid to the left fender to snap into place.
A simple $300 to my Indy and it was done. Sometimes it’s just not worth my time to wrench. Mine wasn’t leaking but the crack was noticed when the water pump was being replaced as preventative.
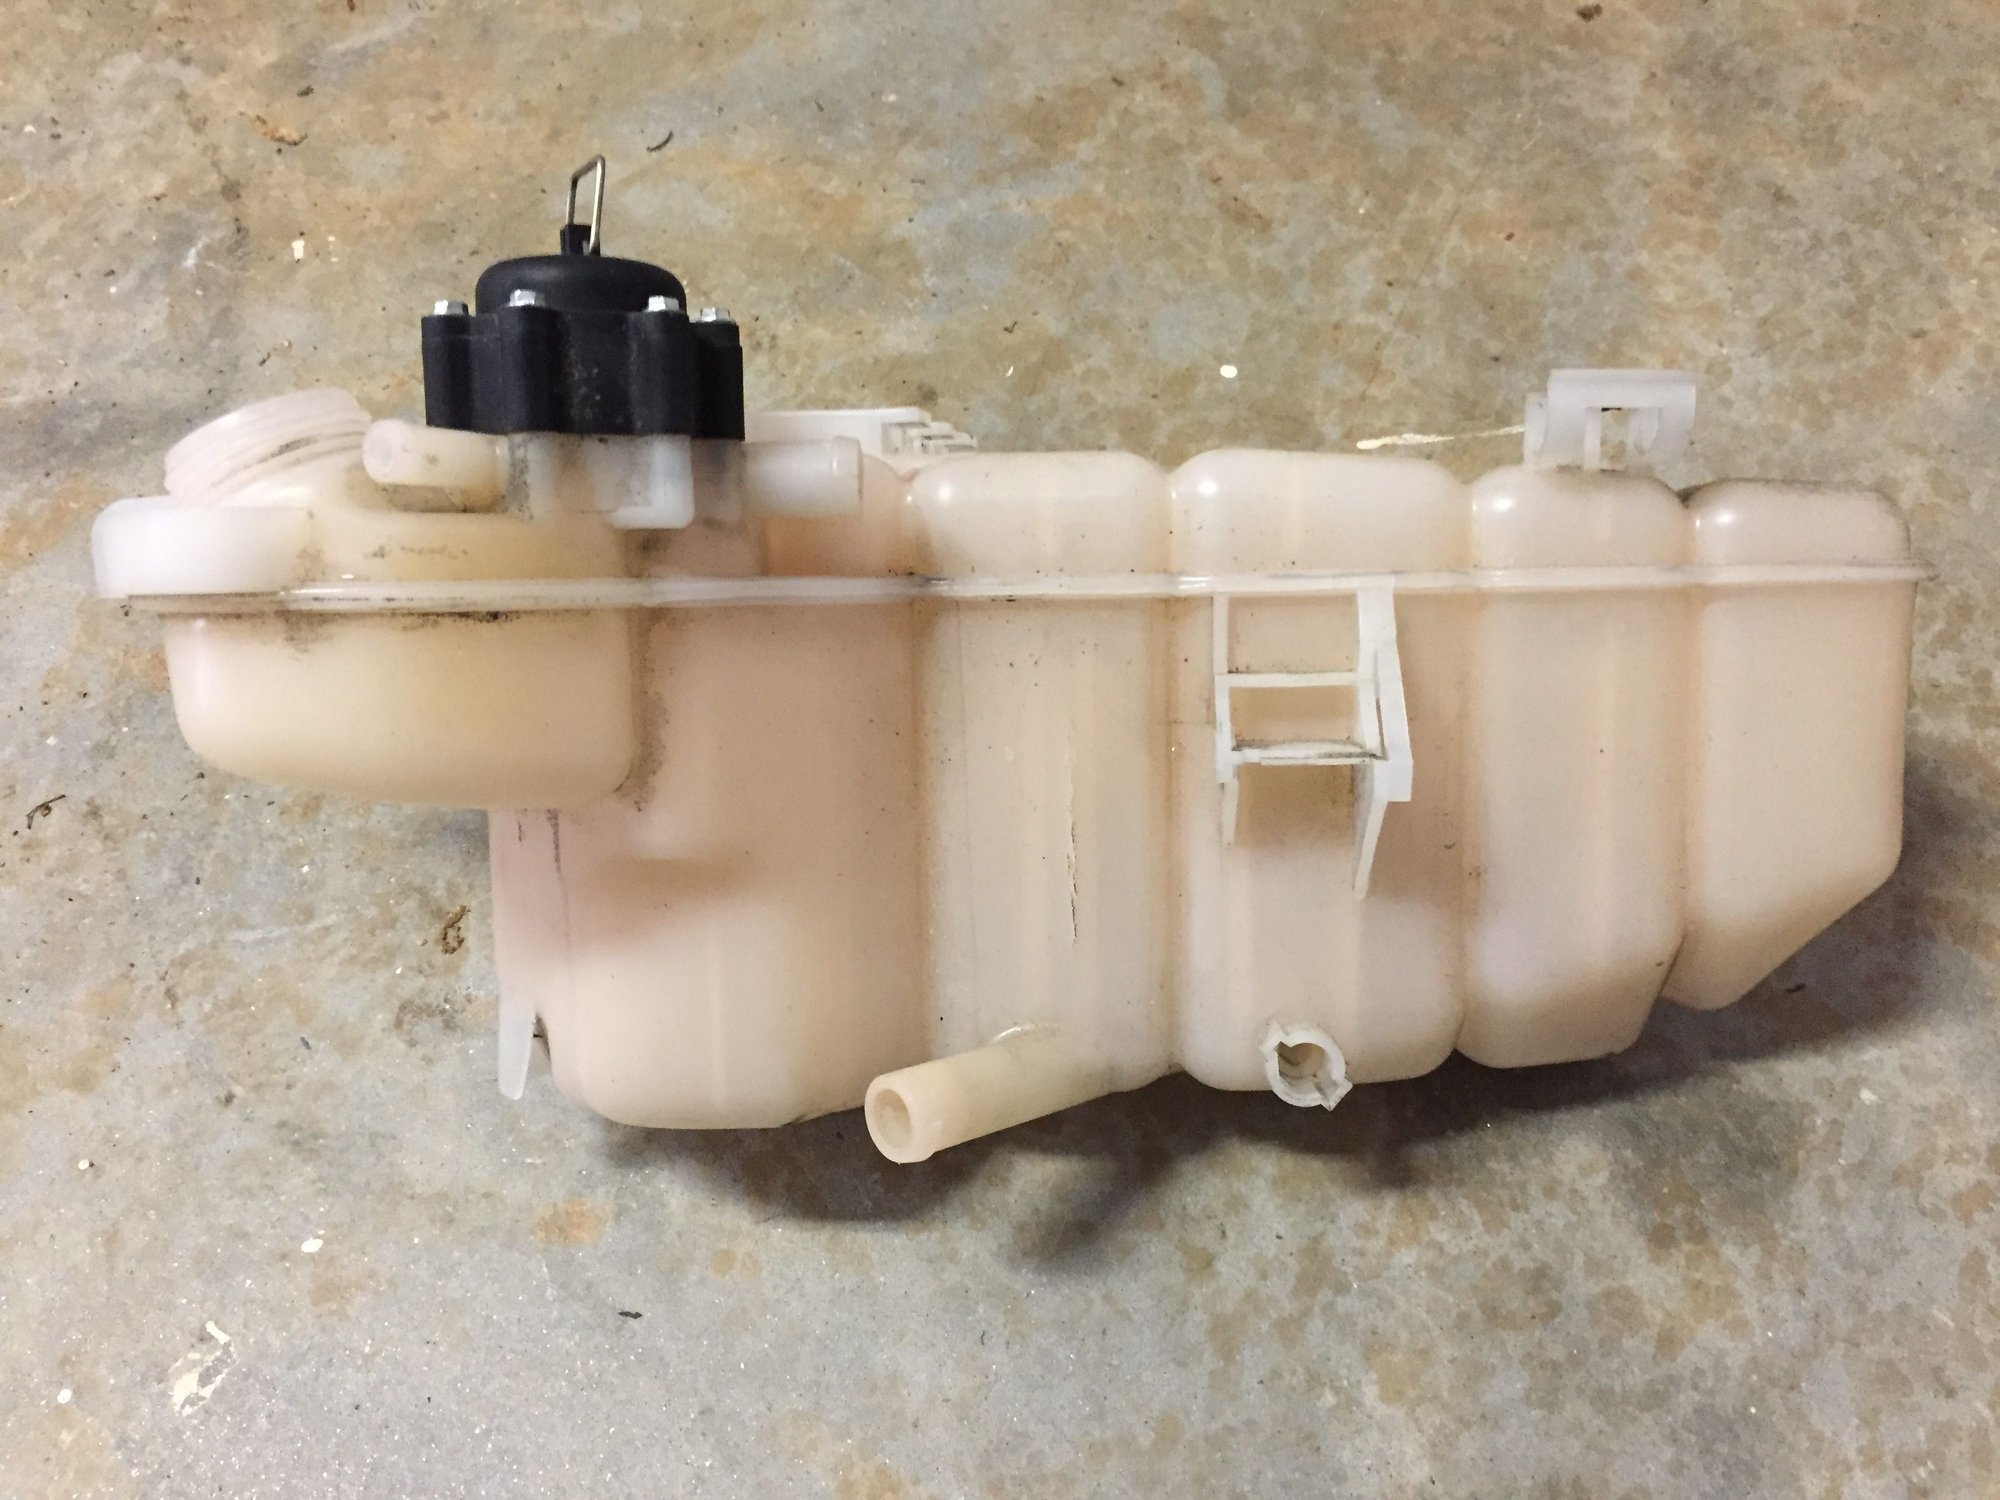
Forgot to add some pics. Might be helpful for others to diagnose theirs.
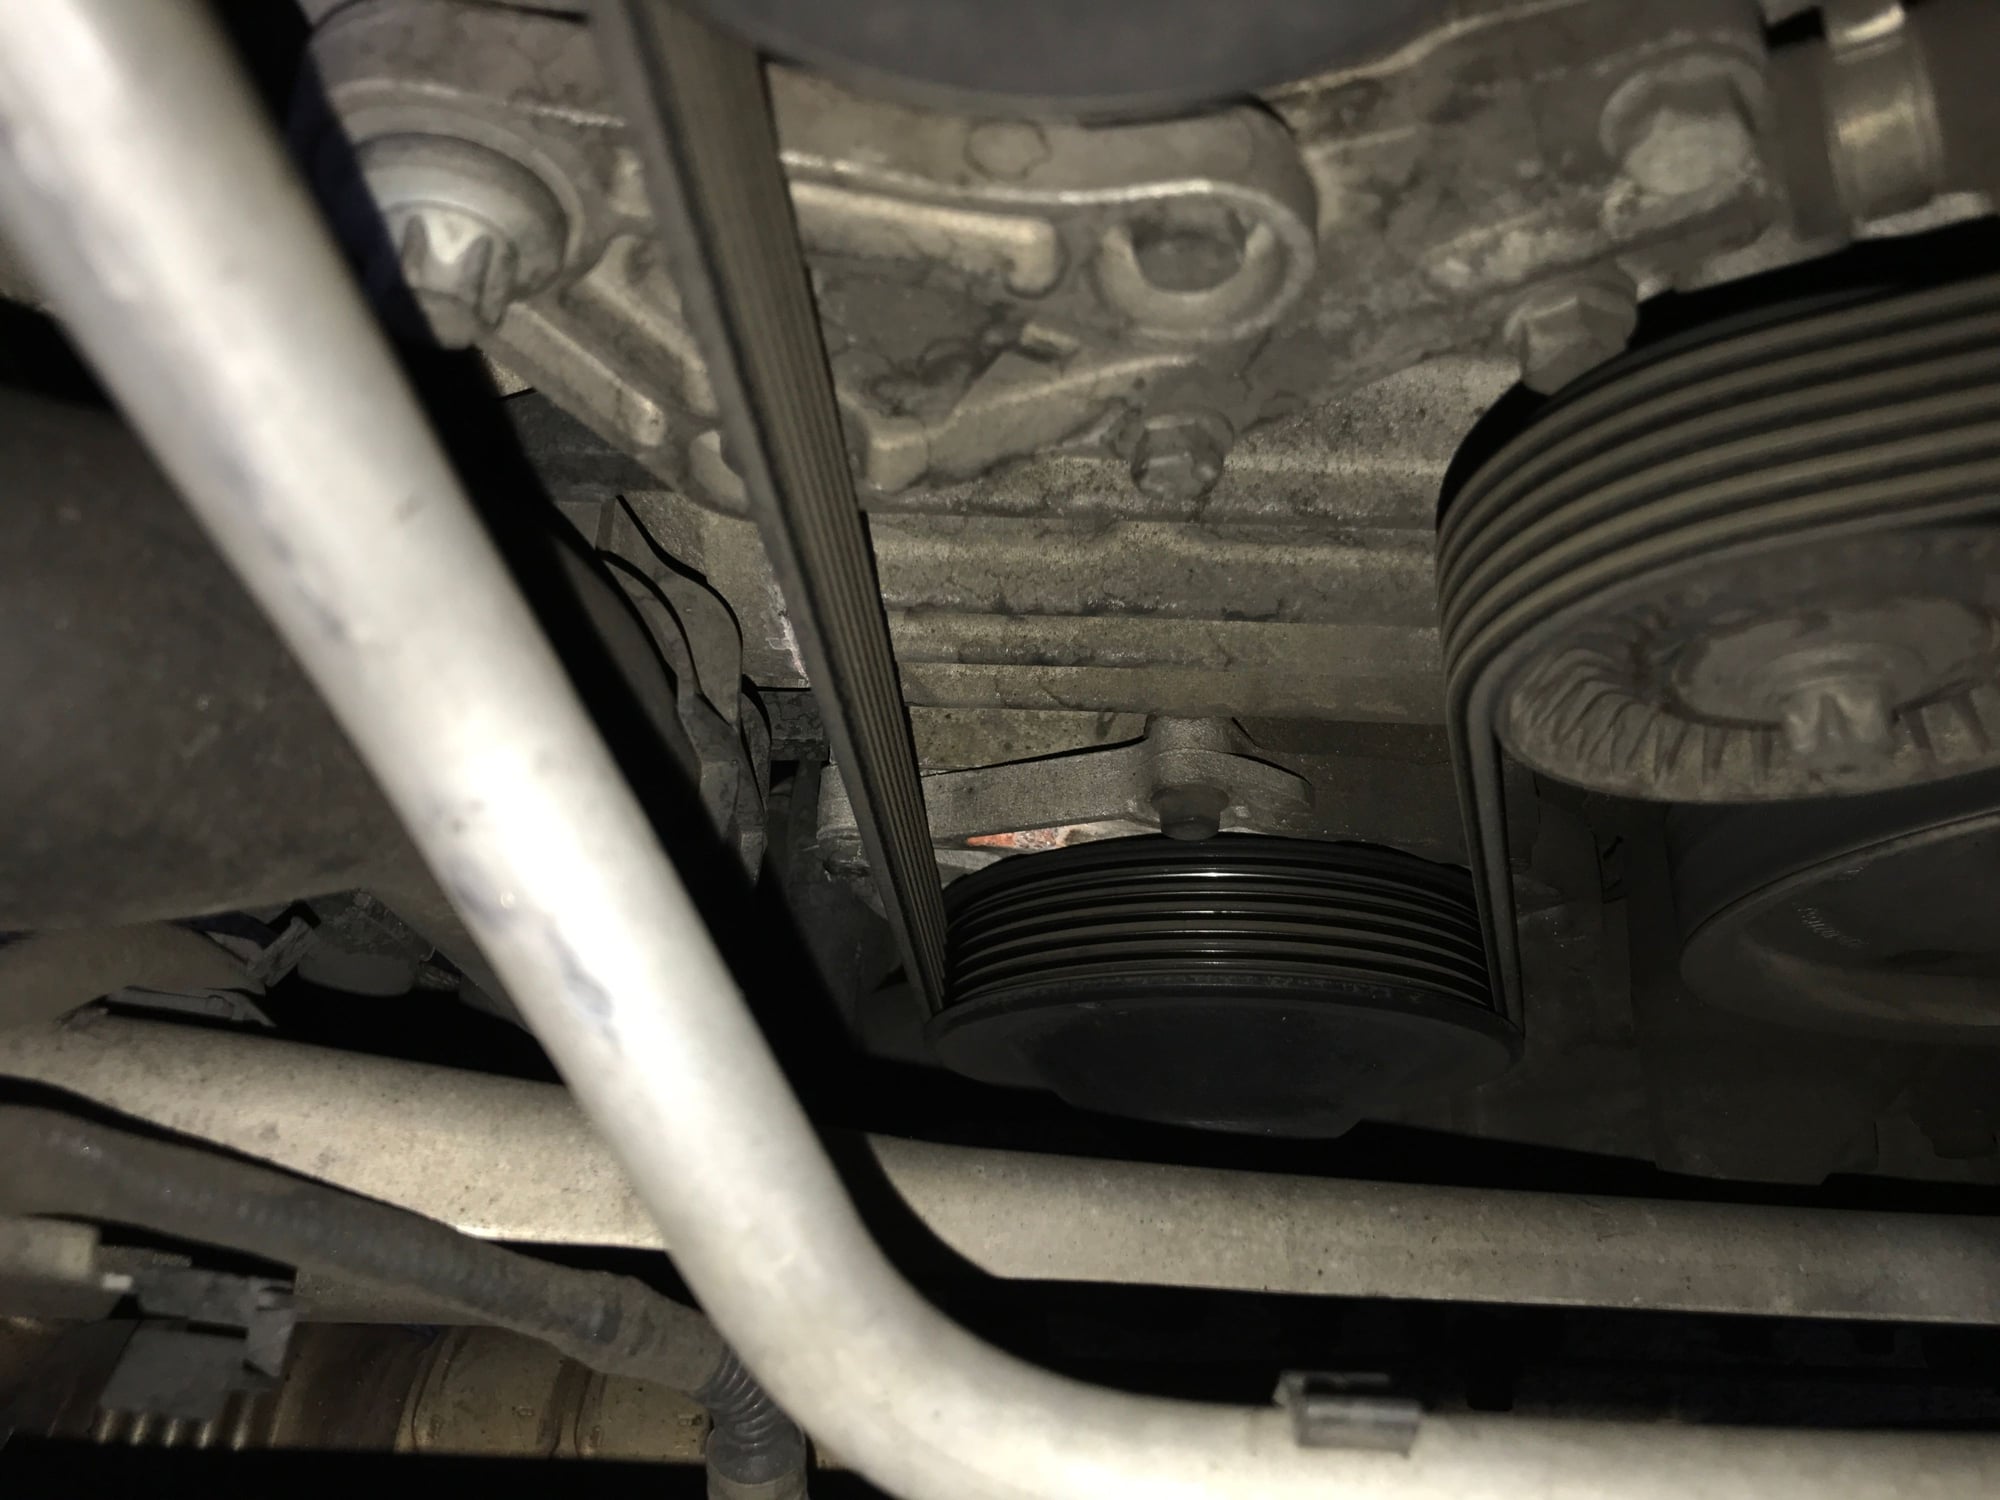
I first noticed a bit of dried coolant above the water pump.
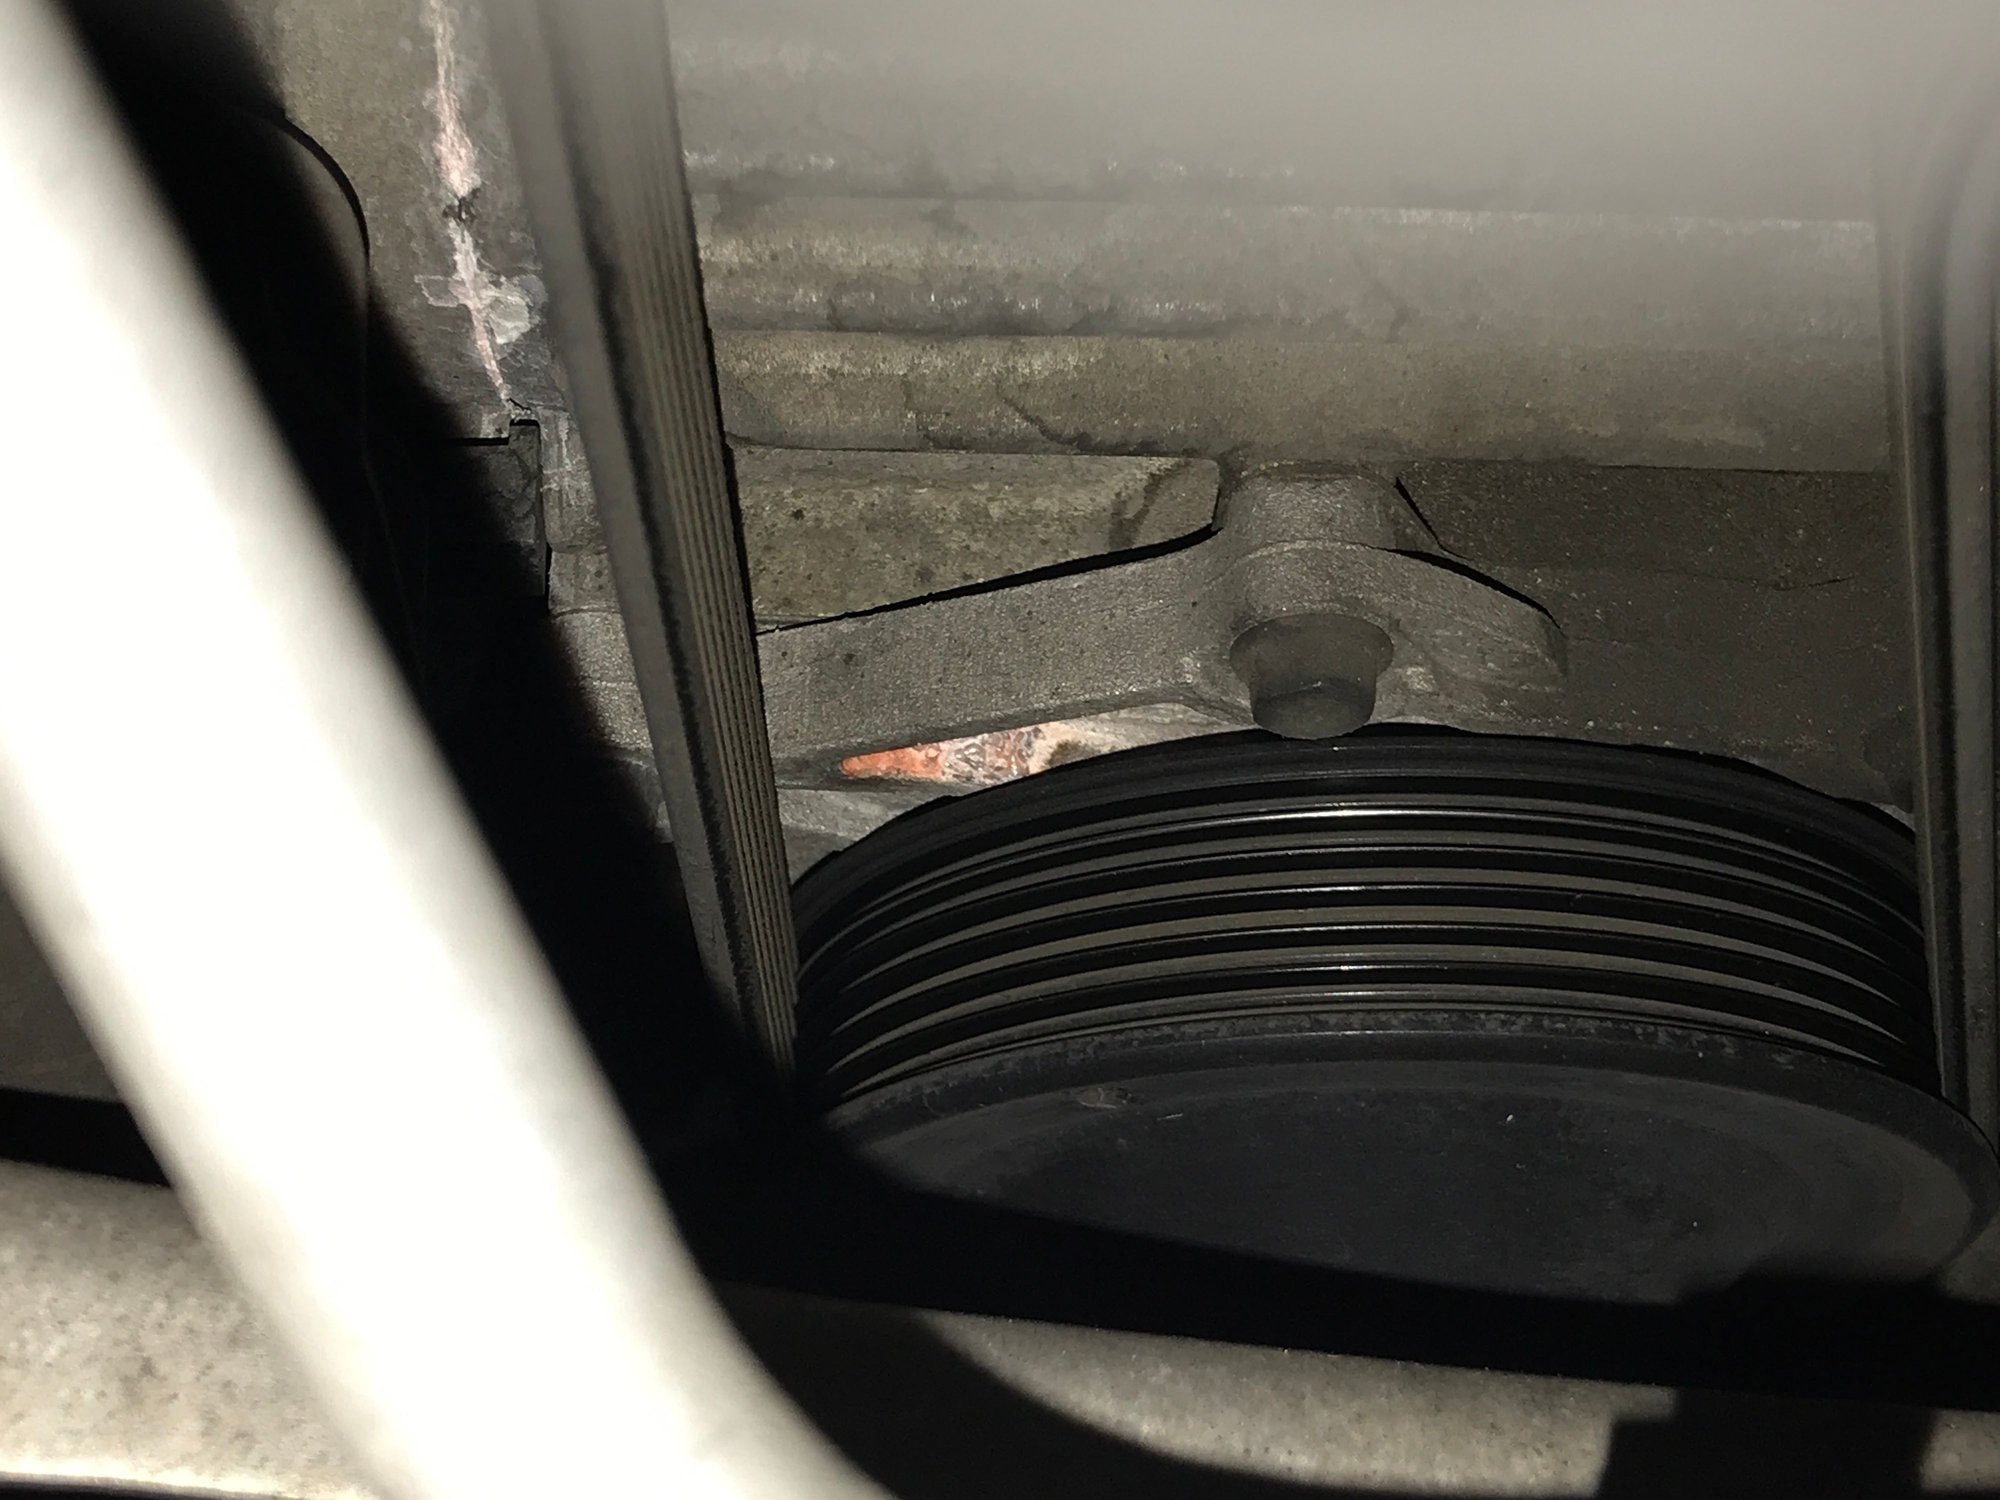
The coolant residue above didnt seem like it was from the water pump so I followed it north. Interestingly I couldn't see that trail of coolant without the flash.
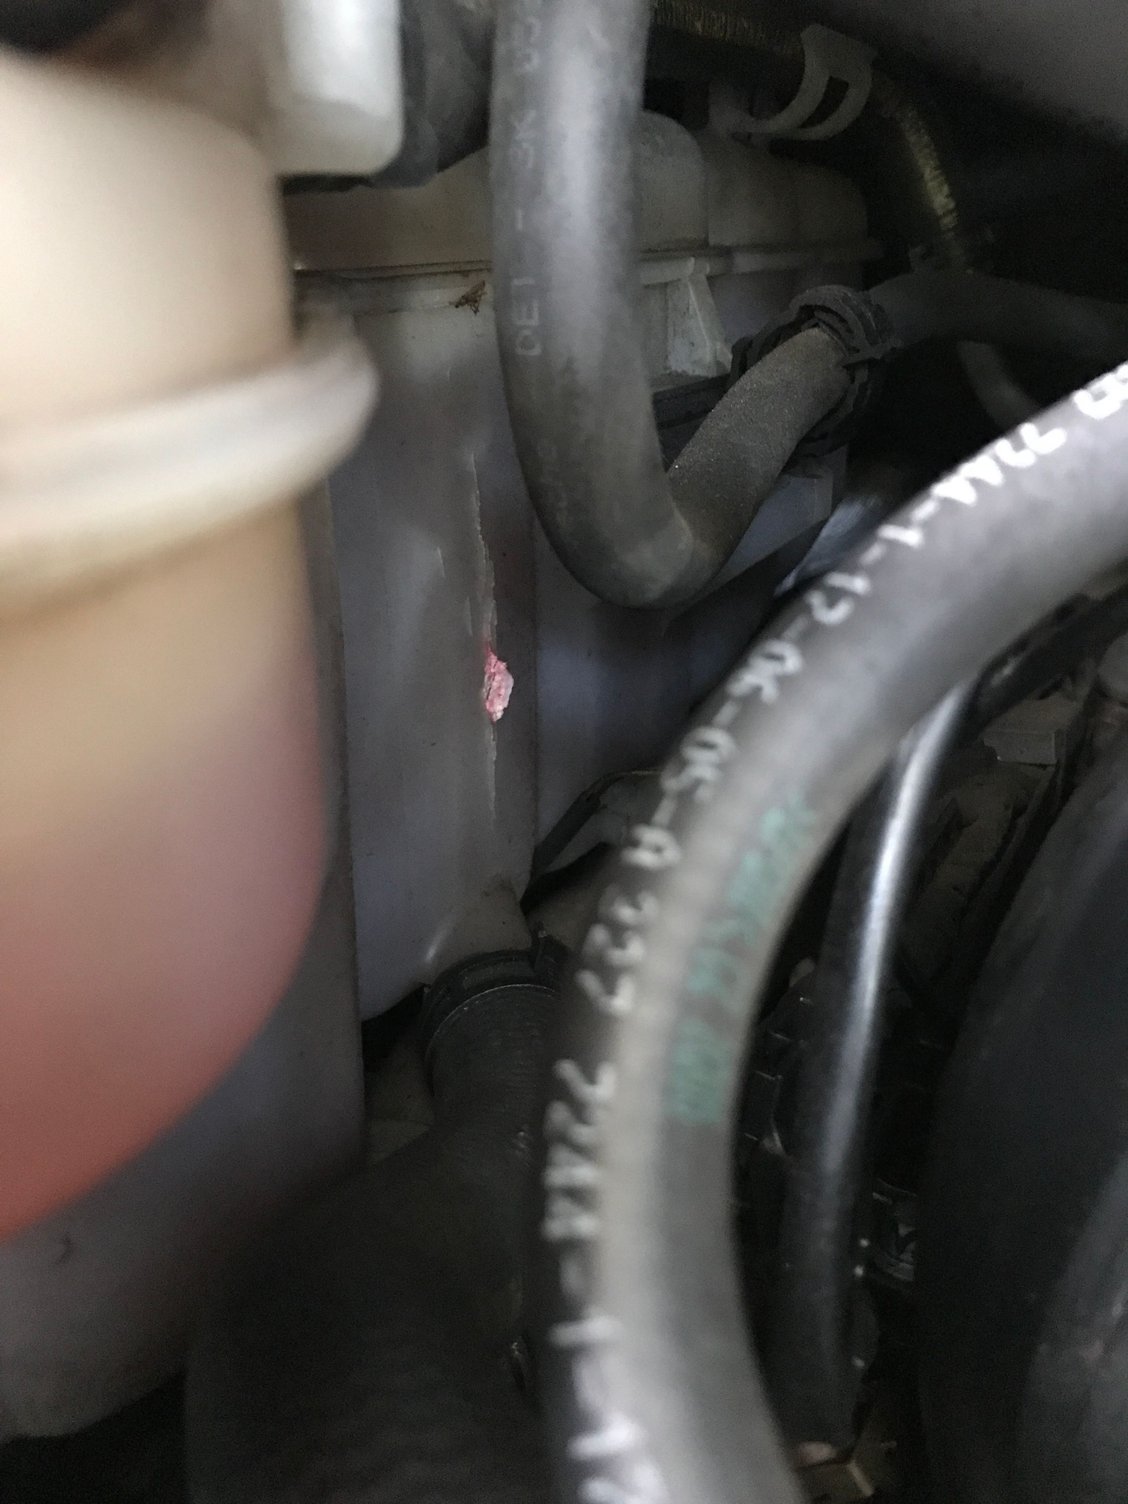
Wait what is that? Looks like bubble gum or a sticker is pealing off the expansion tank....
Forgot to add some pics. Might be helpful for others to diagnose theirs.
I first noticed a big a dried coolant above the water pump.
The coolant residue above didnt seem like it was from the water pump so I followed it north. Interestingly I couldn't see that trail of coolant without the flash.
Wait what is that? Looks like bubble gum or a sticker is pealing off the expansion tank....
Is there a regular interval for some other item or repair where this is an easy add on ? Sounds like a very logical choice for preventative care.
Seems the tank shows some fractures/crazing around 60k miles/10 years - so is pretty timely to perform the swap when water pump/thermostat is replaced as well.
Ok quick update. I spoke to my indy this morning and they were willing to have me tag team the job again with the head mechanic, like I did on the clutch. Those guys are too nice. However, @JeffBlakeslee has kindly offered his lift this weekend so im going to tackle at his house. I picked up the tank today at my local dealer for $120 and $30 for a gallon of Porsche coolant.
Thanks for everyones tips.
@mbatarga couple more questions if I may:
1. I was looking at the plastic clips on the top of the tank. I thought those just slid in the bracket on the chassis, and you just needed enough room to slide it out of that track. Are you saying they actually clip in, not slide in?
2. Ive seen some posts saying you need to lower the engine for cabs, 4's, and 996's, but should have enough room in a base 3.6. Any truth to this in your experience?
3. Is there one bolt or two that holds the tank in? I can see the one in the front but not any others.
4. I dont totally understand this step from the Pelican writeup. If you have any advice it would be appreciated. It may just be one of those "when you see it you will know" situations...
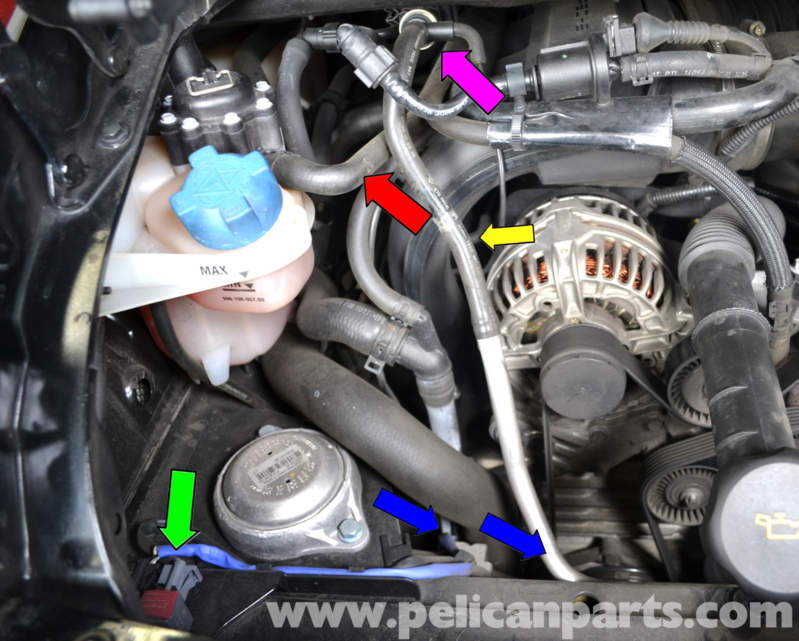
On the left side of the engine (997 only) unclip the brake booster pipe on the cross member and lay them off to the side (blue arrows). Remove the plastic lines and the cable plug from the switch over valve between the intake runners (yellow arrow). Loosen the lines for the brake booster (purple arrow). To do this remove the plastic protection, push the holder forward and pull of the line. Put the plastic protector back on right away to keep any dirt or debris out, then disconnect the vent line for the coolant tank (red arrows). Check for slack in your wiring going to the O2 sensors on both sides, and if it looks like it will be tight disconnect the wiring (green arrow).
5. Thanks for the tip on the hose clamp pliers. Will try to pick some up.
6. So to burp it after you just fill up to the max line, run the car for a bit, then pull up on the valve to bleed air out?
Thanks as usual for all the collective help. If I dont f' it up I will do a proper writeup up on the job.
6. So to burp it after you just fill up to the max line, run the car for a bit, then pull up on the valve to bleed air out?
Thanks as usual for all the collective help. If I dont f' it up I will do a proper writeup up on the job.
to burp all you need to do is put that metal clip on the black cap on the reservoir in the vertical position. it extends a seal in the black cap 'downward' opening that burp valve.
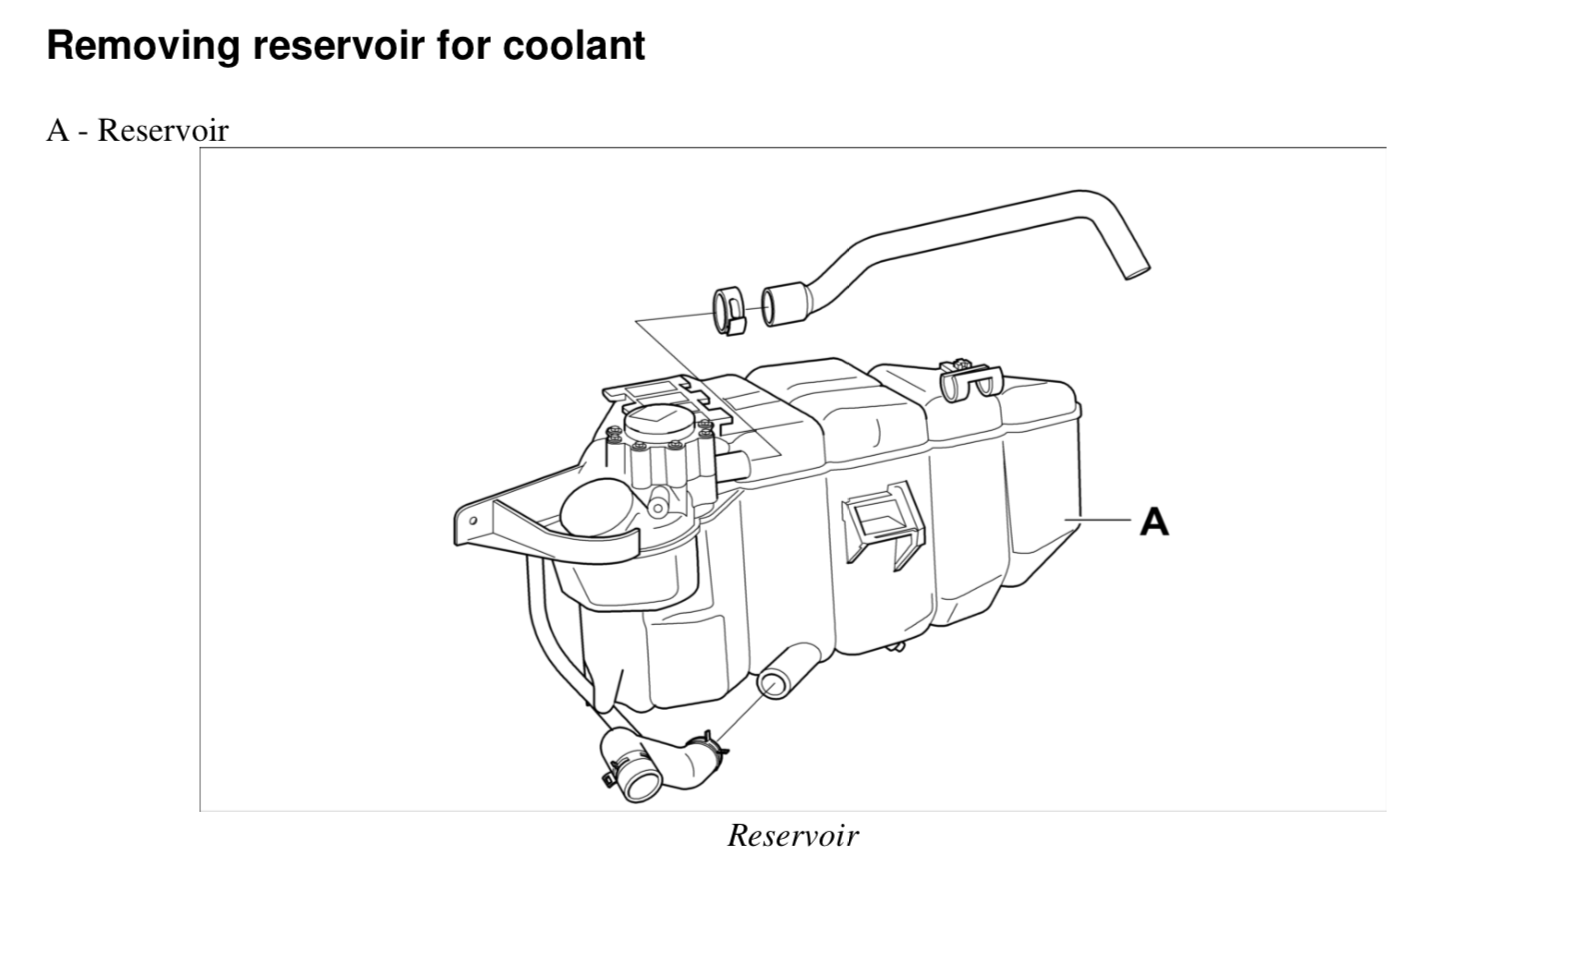
I was able to find this in the workshop manual last night. They reference it as "coolant expansion tank" in most places but call it the "reservoir for coolant" in the removal instructions. I started pulling together steps from the various tips and guides and will try to put this into a formal DIY guide when finished.
Any comments/revisions appreciated. Specifically the workshop manual talks about removing the fuel pressure line and fuel injector connectors. I've not seen than anywhere else.
3 Remove coolant from tank with turkey baster or pump. If draining via drain plug make sure to get a new seal/crush washer and retorque to 11ftlb.
Use a turkey baster or large syringe to siphon out the coolant inside the old tank. You don't have to get it perfectly dry, but just enough to where the level is at the bottom of the tank. When you lift the tank up and out of the engine compartment, the remaining coolant will drain back down through the lower hose.
Coolant Hose
1 Pull off coolant hose -1- on plastic pipe. To do this, open spring band clamp -2- . Collect emerging coolant with a cloth.
2 Remove overflow hose and supply hose from radiator on coolant reservoir. Unclip supply hose from support.
Fuel Pressure Line
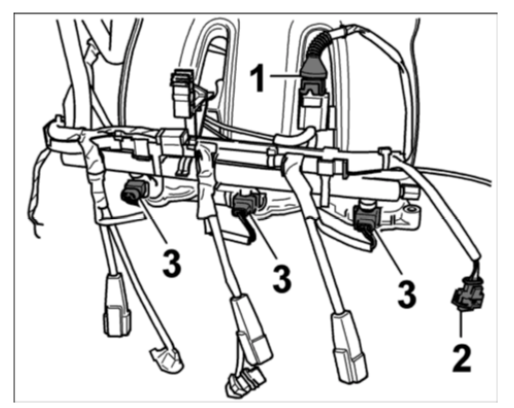
3 Unclip fuel line on plastic holder -1- and disconnect at the rapid-action coupling -2- . Absorb emerging fuel with a cloth. Remove plastic holder on coolant reservoir.
Brake Booster (Including Extra Steps from Pelican for Reference)
Note from German888:The Pelican tutorial is good but I found half the wiring and connections they say to disconnect were not necessary.
- On the left side of the engine (997 only) unclip the brake booster pipe on the cross member and lay them off to the side (blue arrows).
-Remove the plastic lines and the cable plug from the switch over valve between the intake runners (yellow arrow).
-Loosen the lines for the brake booster (purple arrow). To do this remove the plastic protection, push the holder forward and pull of the line.
-Put the plastic protector back on right away to keep any dirt or debris out, then disconnect the vent line for the coolant tank (red arrows).
-Check for slack in your wiring going to the O2 sensors on both sides, and if it looks like it will be tight disconnect the wiring (green arrow).
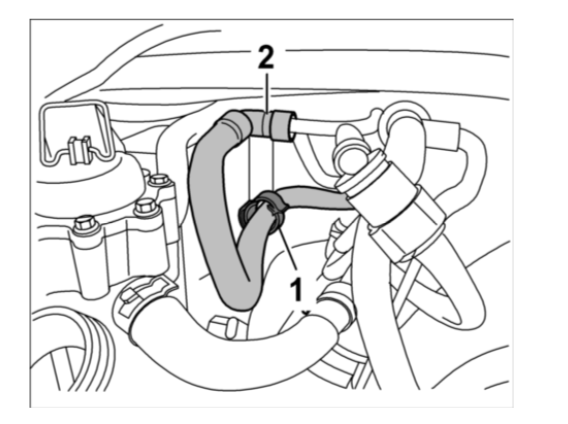
Vacuum line and coolant hoses
4 Disconnect line to carbon-canister line -1- . Remove coolant ventilation -2- on container.
Coolant hose and sensor
5 Remove coolant pump feeder hose on container -2- . Collect emerging coolant with a cloth, block flange. Disconnect cable plug for coolant-level indicator sensor, remove sensor carefully from container (bayonet lock).
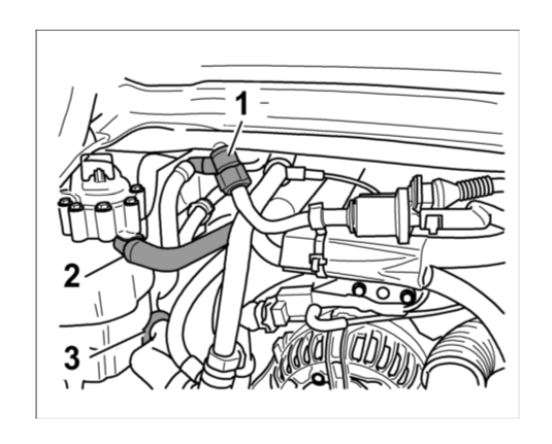
Holder
6 Unclip lines on plastic holder -1- , remove holder on fuel collection pipe and intake distributor in an upward direction.
Cable plug for fuel injectors, hall sender, cycle valve
7 Unplug cable plug for cycle valve -1- on intake distributor 1-3, hall sender connector -2- and fuel injector connector -3- . Remove cable duct from fuel collection pipe and lay it down.
Fuel distributor pipe
8 Unscrew both M6 fastening screws -1- on fuel collection pipe and position collection pipe diagonally as close as possible on the intake distributor, securing it with tie-wraps if necessary.
Lower Engine
9 Lower engine by approx. 40 mm; to do this, support the engine using a jack and retainer plate P 9592. Undo and unscrew collar nuts on engine mounting. Lower engine carefully with the jack; if necessary, have a second person assist with this task.
Note from German888: Lowering the engine was required in my case. No way the tank was coming out unless I did.
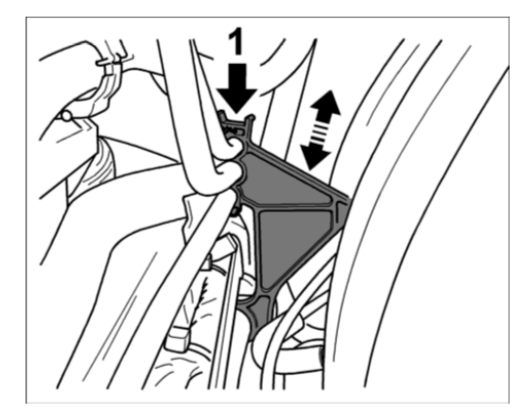
Remove tank
10 Unscrew M6 collar nut for coolant container fastening to body. Pull coolant container out of holder and engine guide until it can be released in a downward direction.
11 Guide container to the rear and at an angle out of the engine compartment.
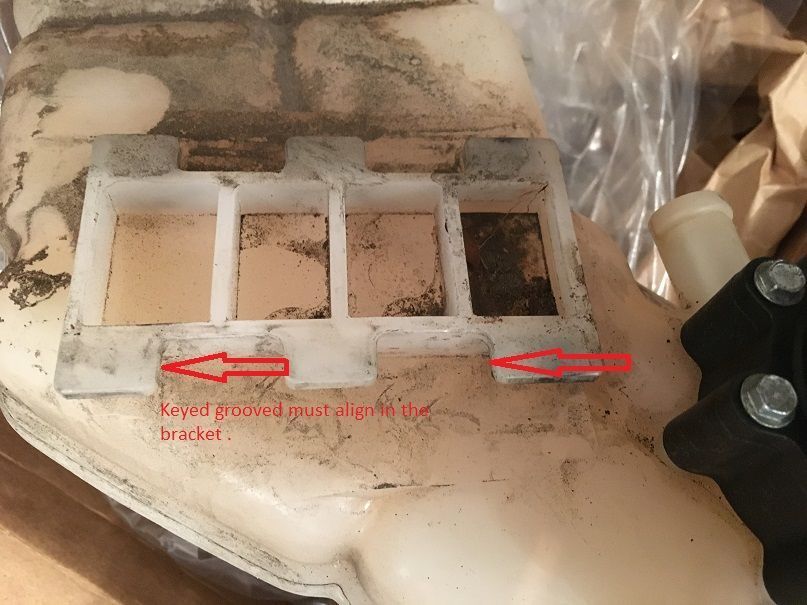
Notes from German888: The large mount on top of the tank has 3 groved teeth. Hardest part of the job is "aligning" the teeth such that the tank will release downward. If you didn't know this common sense would dictate pulling the tank towards the engine until it's clear of the mount which doesn't work. Only necessary to pull roughly 1/2" out then down. When you get the alignment correct it releases easily. Going back in is the same in reverse.
12 Absorb emerging coolant with a cloth.
Installing reservoir for coolant
Note: In order to facilitate assembly of coolant pipes and hoses smear with Kl�ber Syntheso Glep or alternatively Kl�berplus S06-100 assembly gel (available from the Porsche Parts catalogue)
1 Insert container into engine compartment, secure it in holder and guide, position and tighten M6 collar nut. Tightening torque: 10 (7.5 ftlb.) Nm
2 Raise engine in installation position with jack, position and tighten collar nuts on pins. Remove retainer plate. Tightening torque: 85 (63 ftlb.) Nm
3 Insert sensor for coolant-level indicator in container and engage cable plug.
4 Fit fuel collection pipe, position and tighten two fastening screws. Tightening torque: 10 (7.5 ftlb.) Nm
5 Reconnect cable plug for fuel injectors, hall sender and cycle valve. Position wiring harness on fuel collection pipe.
6 Clip holder into intake distributor and fuel collection pipe, secure lines.
7 Connect fuel line rapid-action coupling and clip line into holder on coolant container.
8 Connect rapid-action coupling for carbon-canister line.
9 Fit coolant hoses and overflow hose.
Subsequent Work
1 Fill coolant and bleed system
2 Install air cleaner housing 242519 Removing and installing air cleaner housing - chapter on "Installing".
3 Perform a test drive, adjusting the coolant level in the container if necessary (note minimum/maximum marking).
Out of all that, this is the best tip IMO. If I had known or thought of this when I did my 996, I probably would have had a much easier time with it. Or maybe the 996 tank is designed differently, but regardless this is important. Might also eliminate the need to undo all that fuel injection stuff.
Notes from German888: The large mount on top of the tank has 3 groved teeth. Hardest part of the job is "aligning" the teeth such that the tank will release downward. If you didn't know this common sense would dictate pulling the tank towards the engine until it's clear of the mount which doesn't work. Only necessary to pull roughly 1/2" out then down. When you get the alignment correct it releases easily. Going back in is the same in reverse.


 05-15-2018 | 01:40 AM