When you click on links to various merchants on this site and make a purchase, this can result in this site earning a commission. Affiliate programs and affiliations include, but are not limited to, the eBay Partner Network.
Has anybody tested if the power light comes on with the unit if the fiber cable isn�t connected? That�s another variable I was thinking about when mine didn�t power up, but my fix was easy enough I never got around to testing it.
Hi guys, can you send me the contact of the seller? I�m very interested but I live in the UAE... so need to know if he ships here...
thanks
The guy I interacted with from Amazon was Ron Chan. He was always very responsive and helpful with feature and install questions. His email is leica919@gmail.com. He said if you order from him directly you can save $10-15 off the Amazon price, but I had already ordered through amazon.
The guy I interacted with from Amazon was Ron Chan. He was always very responsive and helpful with feature and install questions. His email is leica919@gmail.com. He said if you order from him directly you can save $10-15 off the Amazon price, but I had already ordered through amazon.
Thanks guys, I got in contact with him ... very kind. I�ll buy the unit and install it in front booth instead of the CD charger. Anyone has suggestion on how to pass the mic from the front to the driver seat? I'm aiming to video shoot my experience!
Thanks guys, I got in contact with him ... very kind. I�ll buy the unit and install it in front booth instead of the CD charger. Anyone has suggestion on how to pass the mic from the front to the driver seat? I'm aiming to video shoot my experience!
Video DIY would be very helpful for everyone. Look forward to it.
Any reason you want to install in the frunk instead of in the center console? From my experience its simpler to install in the center console. Less wiring, less things to remove, easy to tap power, etc. There is plenty of space to stick the unit right behind where the aux power socket is in the passenger footwell. This also makes for an easy install of the mic right under the steering wheel. This gives good (not great) mic quality.
Good points thanks. So in this case I don�t touch at all the CDC as I can disconnect it from the main unit right? Or do I need to open the front trunk in any case and make the famous looping?
I installed my box and indeed the unit requires Fiber optic connection and power to light up the LED indicators.
My initial issue was a switched power source.
I took several pictures of the install and shared it with the seller since some info was missing in the instructions.
The seller asked me if I could make an youtube video but I feel it is too late now.
Here a DYI from my experience with my stock 997.1 with Bose and CD changer.
Tools required:
- Philips screw driver
- small flat screw driver
- small pick
- T20 hex
- T30 hex
- 5.5 mm allen wrench
- 7 mm wrench
- Pliers
- knife
- tape or well crow for cable management
- paper clip (USB cable holder in glove compartment)
- beer
Timeline:
15 min front trunk work
15 min PCM and foot well panels removal
15 min Fiber optic Loop extension work
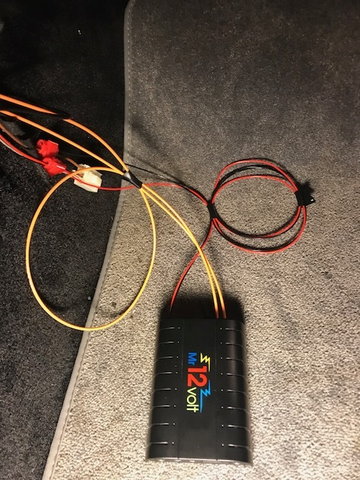
5 min power cabling to LaPower LP1604 unit and test function of fiber/power
5 min Microphone cable routing
5 min USB cable routing to glove box
10 min locating LP1604 in foot well
20 re-installing PCM, panels and cleanup
10 min test and connect, victory beer
100 min total project time.
Process: Front trunk work the CD changer fiber has to be looped in the 997. if this step was not done, the LP1604 will show connected phone and reception in display but no sound since PCM still detects the CD changer.
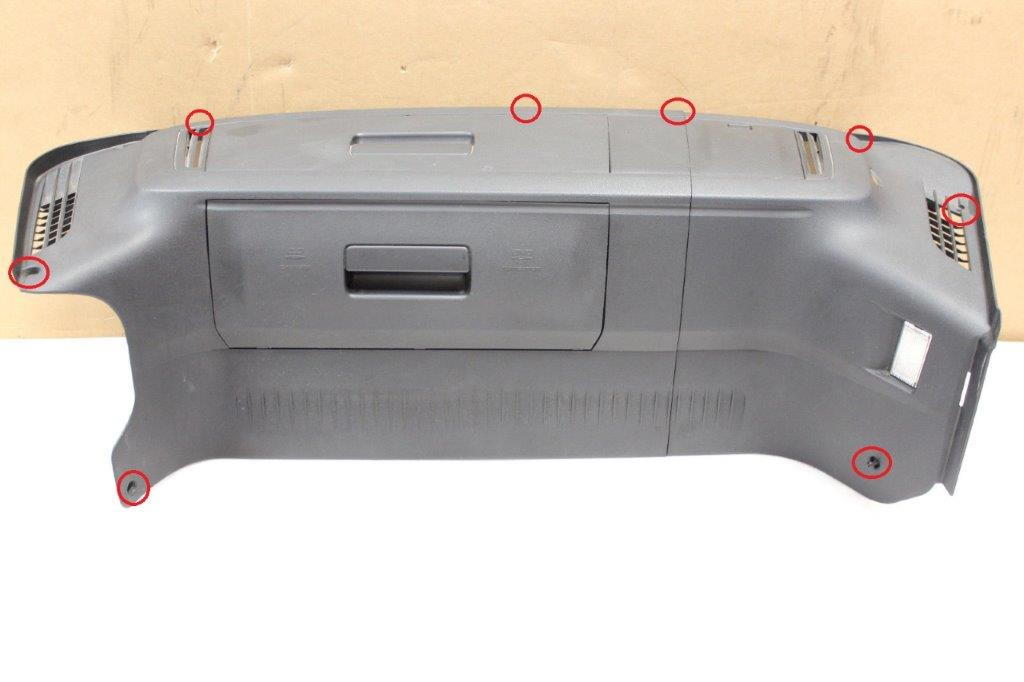
1. Open frunk and remove the rubber liner around the cover
2. locate the 8 Philips screws around the plastic cover Cover screw locations
3. Remove the three plastic covers and pull the whole cover to the side. Frunk light can be left in place since you will work on opposite side.
4. locate the fiber cable on the CD changer and unplug it with the little tab on the side.
5. use the small pick and get small white lock out between the fiber cables and remove the fiber strands from the connector
6. remove tape wrap around the fiber optic cable for a few inches to be able to loop the cables together.
7. use the provided fiber connector and connect both fiber strands together. and place secure next to CD changer. CD Changer fiber loop
8. reinstall the large cover with 8 screws, insert small covers liner and rubber seal
PCM and foot well panels removal PCM has to be removed in order to extend the fiber for the Lp1604 unit.
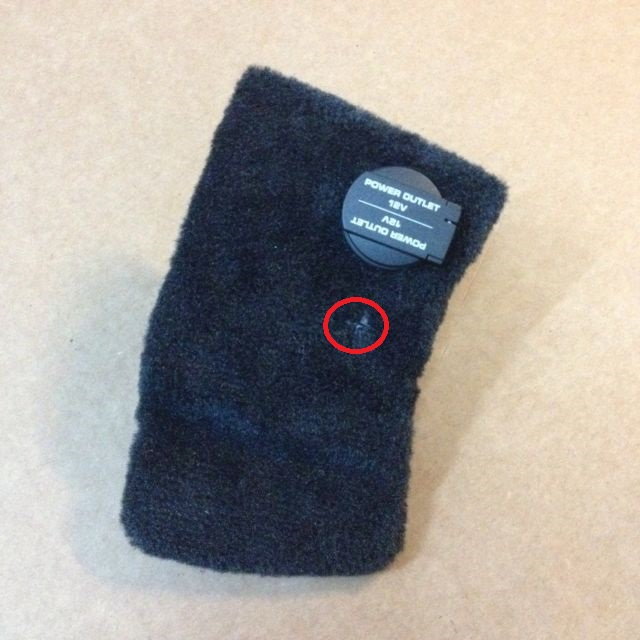
1. in passenger foot well, use the T30 hex and remove the single screw what holds the panel with the 12v power outlet, unplug the outlet. Screw location panel in foot well
2. remove the same panel on the driver side.
3. use T20 hex to remove two screws for the panel on passenger side and driver side. four screws combined.
4. Pull the panels off.
5. use 5.5 mm allen wrench and half turn the four screws holding the PCM in place.
6. use 7 mm wrench and lose the screw on the right side of the PCM for half an inch. (this holds the PCM and you wont be able to remove it with the screw in place)
7. remove PCM and unplug all cables
Video reference, he has wrong hex and wrench sizes in his video but shows the process clear.
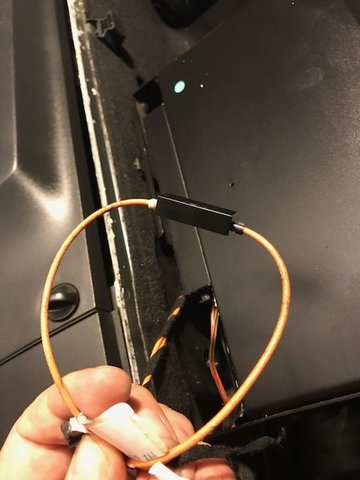
Fiber optic Loop extension work purpose is to extend the MOST fiber loop from Bose amplifier, CD changer and PCM. for the 997 we replace the CD changer and looped prior the fiber.
1. remove exiting fiber cable from cable manager behind PCM
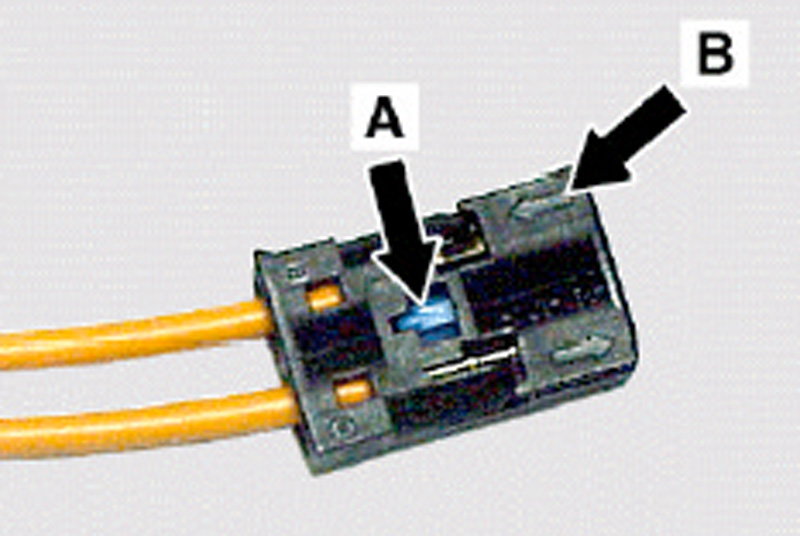
2. open the outer fiber connector on PCM, use the small pick and get small blue lock out between the fiber cables.
Example: Example:
A Blue secure lock
B UP arrow
3. remove the fiber strand with arrow DOWN from PCM connector.
4. open the outer fiber connector on one side of the LP1604 provided fiber optic cable, use the small flat screw driver and get the small blue lock out between the fiber cables.
5. remove one side of the connector completely on LP1604 provided cable
6. connect the removed DOWN arrow fiber strand cable from PCM plug to LP1604 DOWN strand with provided connector. (same connector as used for CD loop)
7. use the LP1604 fiber optic cable with UP arrow and connect it to the PCM plug.
6. press the small blue lock back in place on PCM inner fiber connector and re plug it in outer connector
7. route the LP1604 cable through the bracket behind the PCM to the passenger foot well.
Power cabling to LaPower LP1604 unit and test function of fiber/power I used the 12v power outlet in passenger foot well as source for the LP1604.
1. the 12V power outlet has three cables, we focus on constant power and mass. locate red/black, 12v not switched, and the brown mass cable.
2. use the Lp1604 provided crimp and connect the red Lp1604 cable with the red/black cable from the outlet. use the pliers to press the connector all in.
3. use the Lp1604 provided crimp and connect the black Lp1604 cable with the brown cable from the outlet. use the pliers to press the connector all in.
4. re connect PCM cables and fiber cable, slide PCM in slot.
5. connect power and previous created fiber ring to LP1604.
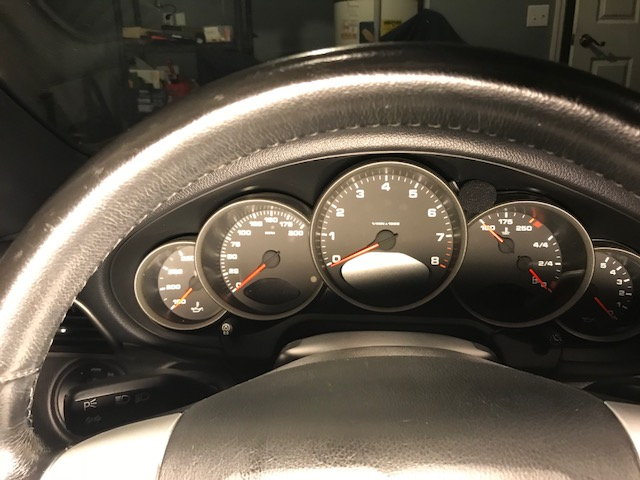
6. press PCM for radio to start. If all work was done, the unit should fire up and blue LED indicator will light up. You will need to connect your phone Bluetooth to the device "Car Kit".
7. the PCM will show your phones name on the left and reception. Change on the PCM to CD changer and BT audio will appear.
Microphone cable routing I chose the location in the dash since it's hardly visible and should be the best location for function.
1. place Micro in position and route cable along the gauge cluster to the thinnest area in front of the steering wheel.
2. use small screw driver to tuck the cable in place. Microphone in position and cable routed
3. route cable around the trim and along the removed PCM side panel.
4. route cable to passenger side over driver side foot well.
5. plug in Aux cable connector to MIC port. MIC cable connected.
USB cable routing to glove box I routed the provided AUX cable and iPhone lightning cable to the glove box. I learned later that when AUX is plugged in, the BT audio is disabled and removed it again.
1. I used a small paper clip to secure cable in glove compartment.. removed one clip side.
2. route cable through the back of the glove box down to passenger foot well.
3. plug in to USB port in LP1604
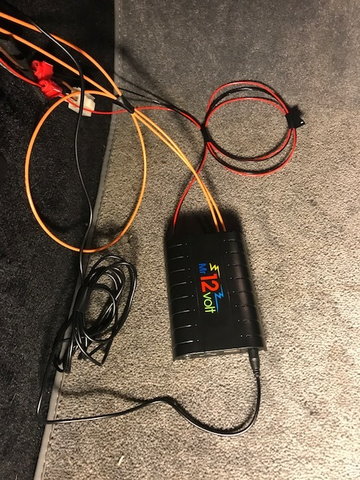
Locating LP1604 in foot well I stored the fiber, power and Microphone cable in front of bracket while LP1604 between A/C and dash bracket.
1. coil up fiber, power and microphone cable and use tape or well crow to keep them managed.
2. tuck the cable behind the dash bracket
3. located the LP1604 unit behind the AC inside the bracket to be covered by the PCM cover panels.
4. test function again before proceed to next step.
Re-installing PCM, panels and cleanup The PCM was just left lose before, all panels need to be mounted back.
1. basically reverse the steps, use 5.5 allen wrench to lock PCM, 7mm wrench, plug in panels and secure with T20, foot well brackets with T30.
2. remove garbage and tools from foot well.
Test and connect, victory beer Go through functions, test call, plug in phone to charge. Do this process with an beer in your hand.
amazing guide and content Zettinger. thanks!! I'll let you know how it goes with me!
Thanks! Hope your install goes smooth.
Originally Posted by TheBruce
well done @zettinger! awesome writeup. looking forward to your next projects :-)
Appreciate your feedback.
I acquired my 997 in December 2017 and knocked most projects out within the first - two month to get the car to my standards.
From caliper refresh/ paint over all fluid flushes and wear items replacement to Painting and replacing screws.
Since i use the LaPower unit now for a few days I need to say I absolutely love it!
From Hey Siri, skip song to hand free option, the unit brings modern tech fully integrated to the old 997.
I love how the PCM works flawless together with the LP1604, shows connected phone, callers and even the phone reception in the display.
The dash location of the microphone seems to do the trick, I had couple calls now in the car and so far no one complained about voice quality.
I installed my LAPower unit a few weeks ago and it's been working perfectly.
It may have been a firmware update to my LAPower unit but it does go into a deep sleep with the PCM now (my LAPower is connected to the 12V outlet power)
Anybody have an issue with their USB cable no longer charging your iPhone? I just noticed mine wasn't charging the phone anymore. Not sure if my cable is bad or its something with the unit. On my Land Rover those cables last about a year before they break so I bought a higher quality one for the 997. I will have to pull the unit out to see what the issue is. Luckily with it under the dash its just one screw to get access to it.

 02-24-2018, 04:21 PM