
996 TT rear spoiler problems - Help!
 04-15-2015, 07:23 AM
#61

you are absolutely correct Mark. Ever try to pull up your wing without fluid in the Rams and hoses disconnected? The spring pressure is enormous. Up puts a lot of stress on the unrepairable seals in the permanently sealed rams. Designer (not Porsche) wanted wing to fail down. But the rams were designed as totally independent hydraulic fluid systems, so if one leaks, the wing is cocked down on one side only. Really a horrible over designed and over engineered system. Someone made a ton of money off of Porsche.
which is why so many of us are waiting patiently and rooting for your electric spoiler workaround to work seamlessly. that alone will be a major acomplishment!
i remember my first movable spoiler in ( 92/93?) on a c2 and it was just that decklid that raised that was migrated onto the 993 iterations and worked similarly. all i can say about that was it was the coolest thing ever, much like electric windows were in 62 LOL. but they never failed or didnt operate exactly as they should which was similar to - ours up at 73mph and down at - 35 - so its just odd they took a completely workable system and made it the hydraulically assisted and finnicky oddity that it remains to this day !

still rootin for ya dave

 08-01-2015, 10:10 PM
#62
Emptied my pump and refilled with 50/50 pentosin/Lucas hydralic stop leak, works but seems like there might be an air bubble on the passenger side. Both sides go all the way up and retract all the way down, but the passenger side sometime is about a 1/4" behind starting and stopping with the drivers side. This is causing intermittent triggers of the wing error light.
I saw and understand the bench bleed steps, Any way to bleed without completely removing?
I saw and understand the bench bleed steps, Any way to bleed without completely removing?
08-02-2015, 08:27 AM
#63
Three Wheelin'
Emptied my pump and refilled with 50/50 pentosin/Lucas hydralic stop leak, works but seems like there might be an air bubble on the passenger side. Both sides go all the way up and retract all the way down, but the passenger side sometime is about a 1/4" behind starting and stopping with the drivers side. This is causing intermittent triggers of the wing error light. I saw and understand the bench bleed steps, Any way to bleed without completely removing?
08-10-2015, 06:32 PM
#64
Track Day

Join Date: Aug 2015
Posts: 18
Likes: 0
Received 0 Likes
on
0 Posts
We recently got our first Porsche, a 2000 996 turbo (my wife really wanted one). 350000km on the clock; the previous owner used it for a weekly commute from the Netherlands to Switzerland It's been kept in excellent repair, however the spoiler was no longer deploying and the guy never got it fixed at the dealer (the cost had something to do with that...)
Anyway, I decided to take a crack at fixing it with the info in this thread. Since the thing was stuck in the Down position, I decided to pull only the motor and pressure lines, leaving the rams in place. The system was pretty much dry...
This had me stumped for a bit. I noticed that the pump would not draw in any fluid when retracting. I took the top off the pump to examine the two cilinders, and noticed that they do not retract along with the motor drive: the shafts driving the pistons are smooth rods and not attached to the motor unit at all (perhaps that's why some people reported trouble in getting any fluid into the cilinders at all). Presumably the motor pushes the pistons out, and pressure from the springs in the rams push them back in. After pushing them in manually, I was able to refill the cilinders without any trouble. After reassembling everything, the spoiler deploys, albeit a bit crooked. At least I'll be able to detach the rams now as well, and get everything up on the workbench.
I'm still not sure about the right refill procedure: some seem to fill everything up as far as they can, then bleed to equalize. The few bits I have found of the shop manuals call for a 5ml charge of fluid in each cylinder and a rather confusing bleed procedure. Has anyone good experience with following the shop manual procedure?
It's been kept in excellent repair, however the spoiler was no longer deploying and the guy never got it fixed at the dealer (the cost had something to do with that...)Anyway, I decided to take a crack at fixing it with the info in this thread. Since the thing was stuck in the Down position, I decided to pull only the motor and pressure lines, leaving the rams in place. The system was pretty much dry...
d) With the hose ends STILL submerged in the oil.........retract the pump .......i.e. draw in a full fluid charge. KEEP the hose ends submerged.
I'm still not sure about the right refill procedure: some seem to fill everything up as far as they can, then bleed to equalize. The few bits I have found of the shop manuals call for a 5ml charge of fluid in each cylinder and a rather confusing bleed procedure. Has anyone good experience with following the shop manual procedure?
08-11-2015, 03:48 PM
#65
Track Day
Join Date: Aug 2015
Posts: 18
Likes: 0
Received 0 Likes
on
0 Posts
I did the bleeding today, the lazy way: in situ. I lowered the spoiler so that the lagging ram was just about resting at its end stop, then fully bled both rams. Only a little fluid came out. The spoiler now deploys evenly without lag to about 6.5cm / 2.5". Time will tell if and where there are any leaking rings or connections.
Now to replace the "up" microswitch and get rid of that error message...
Now to replace the "up" microswitch and get rid of that error message...
08-12-2015, 08:24 AM
#66
Three Wheelin'
I did the bleeding today, the lazy way: in situ. I lowered the spoiler so that the lagging ram was just about resting at its end stop, then fully bled both rams. Only a little fluid came out. The spoiler now deploys evenly without lag to about 6.5cm / 2.5". Time will tell if and where there are any leaking rings or connections. Now to replace the "up" microswitch and get rid of that error message...
08-12-2015, 10:21 AM
#67
RL Community Team
Rennlist Member
Rennlist Member
I did the bleeding today, the lazy way: in situ. I lowered the spoiler so that the lagging ram was just about resting at its end stop, then fully bled both rams. Only a little fluid came out. The spoiler now deploys evenly without lag to about 6.5cm / 2.5". Time will tell if and where there are any leaking rings or connections.
Now to replace the "up" microswitch and get rid of that error message...
Now to replace the "up" microswitch and get rid of that error message...
08-12-2015, 07:15 PM
#68
Track Day
Join Date: Aug 2015
Posts: 18
Likes: 0
Received 0 Likes
on
0 Posts
Nah, it's broken. I removed the switch bracket and a few parts fell out. One of the internal contact pins is broken as well. The local dealership will hopefully have the replacement switch for me tomorrow, to the tune of €50. Seriously... for this kind of money I'd expect a world class, nuclear proof ruggedized mother of all microswitches, not this fragile thingy. Some guy in Germany is laughing his *ss off...
08-12-2015, 10:50 PM
#69
Nah, it's broken. I removed the switch bracket and a few parts fell out. One of the internal contact pins is broken as well. The local dealership will hopefully have the replacement switch for me tomorrow, to the tune of �50. Seriously... for this kind of money I'd expect a world class, nuclear proof ruggedized mother of all microswitches, not this fragile thingy. Some guy in Germany is laughing his *ss off...
congrats on the re-bleed. mine is still operating properly after 5 years, but i suspect dave's e ram kit may well be in my future.
08-13-2015, 08:36 AM
#70
Three Wheelin'
Nah, it's broken. I removed the switch bracket and a few parts fell out. One of the internal contact pins is broken as well. The local dealership will hopefully have the replacement switch for me tomorrow, to the tune of €50. Seriously... for this kind of money I'd expect a world class, nuclear proof ruggedized mother of all microswitches, not this fragile thingy. Some guy in Germany is laughing his *ss off...
08-14-2015, 07:34 PM
#71
Track Day
Join Date: Aug 2015
Posts: 18
Likes: 0
Received 0 Likes
on
0 Posts
Success After dropping in the replacement switch, the error message no longer appears. I hope the refill will last a while, but now that I've done it once, it's not such a bad procedure to have to repeat every so often.
After dropping in the replacement switch, the error message no longer appears. I hope the refill will last a while, but now that I've done it once, it's not such a bad procedure to have to repeat every so often.
08-14-2015, 09:01 PM
#72
RL Community Team
Rennlist Member
Rennlist Member
Nice job.
11-17-2015, 06:54 PM
#73
Intermediate

Join Date: Nov 2015
Location: Middle of the Mediterranean Sea
Posts: 47
Likes: 0
Received 0 Likes
on
0 Posts
ok here are some pictures of the repair. sorry for short write up, just wrote this reply post in detail , hit preview and lost the write up thus hopefully the pictures explains enough of my process in my retry to post.
Basically I cut open the cylinders and replace the seals, then I Solder back the cylinders together and reassemble and reinstall in car.
Parts used:
For lines:
copper seals rings
6.2mm x 11.9mm x 1mm
$0.21 each (qty 8)
For Pump:
O-ring
13/16 x 1 x 3/32
$0.25 each (Qty 6)
Urethane Backup
13/16 x 0.050
$0.25 each (qty 4)
For Cylinders:
Metrics O-ring
7 x 2.5
$0.28 each (qty 4)
Urethane backup
5/16 x 0.050 (qty 4)
from Home depot
Brass coupling 3/8
042805446515
$4.17 each (qty 2)
Brass Pipe 3/8
042805446645
$6.57 each (qty 1)
Here are the pictures:
internal parts of pump:
Top of cylinder: remove these b4 removing cylinder from housing.
Then I place the jack housing facing down, I hold the pressure to the floor with my feet while i remove the small clip. the spring pressure will be released. lift slowly.
Then cut the cylinder at the top.
notice the internal parts:
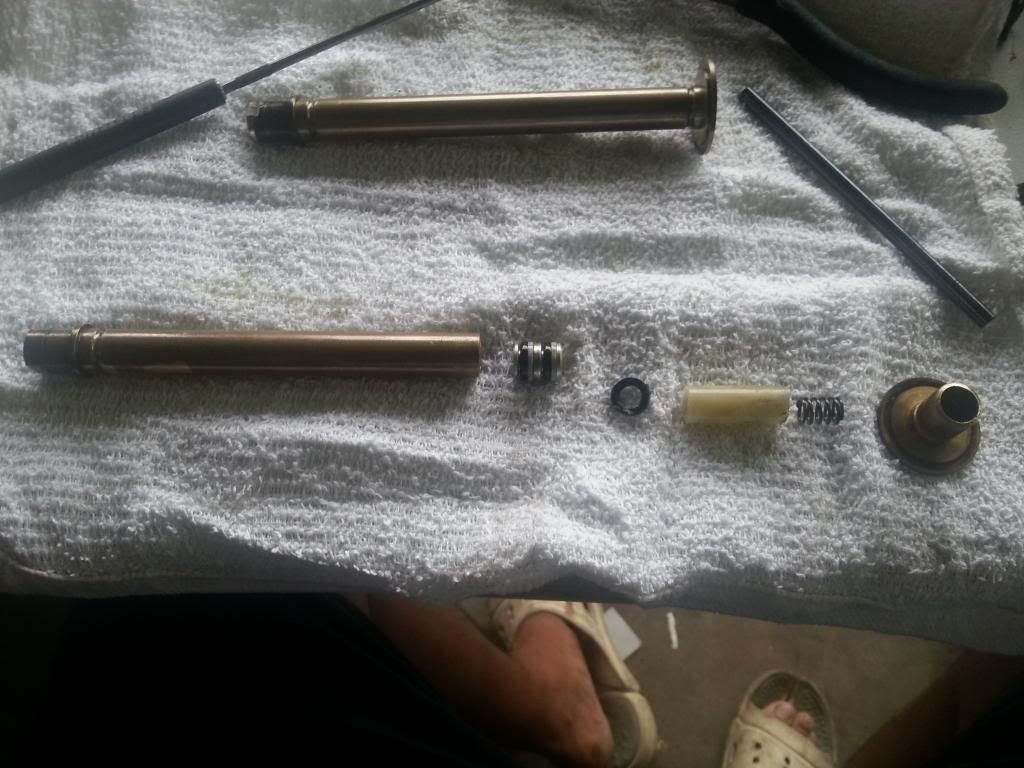
also notice the limitation to the piston. it doesn't reach to the cut section of the pipe, thus fluid doesn't rise to the area, and we dont have to have the area air tight sealed.
ok finally, take the brass pipe purchased from home depot. cut to desired length, use a step bit to drill pipe from 1/2 to 9/16, change to a reg 9/16 bit to increase 9/16 distance. once your happy with the fit and cylinder back to original length. Solder the pieces together. Hopefully you solder the cylinder without the internals inside the pipe. to keep the heat away from the seals. Once your done. screw the 2 pieces apart and install the internals. reassemble and test your repair.
My Friend's cylinders were leaking from the bottom factory press crimp. thus I clean and solder the bottom of his as well. no more leaks.
his spoiler working:
My spoiler still working after 9 months.
My failure was a breakage of the black plastic block in the "pump" that pushes the "syringes". I suspect that the syringes and also the rams get sticky with lack of use and when you next deploy the spoiler the force required to shift and unstick them is greater than the plastic block can bear. It certainly feels like the old orings sealing the syringes pistons, having become almost square in cross section, bind in the syringes "barrel". I replaced these and there is no more binding.
But I am suspecting a similar problem in the rams, so thinking it would be foolish not to open them up despite the fact that they are not leaking. Nothing was leaking, in fact, excluding a bit of wetness from the banjo bolt unions, which new copper washers will fix.
My question - having cut open the spoiler lifting rams - how easy or otherwise is it to get the actual piston out of them? It being located at the opposite end of the cut? Does one just poke it out from the "oil in" end? I can't determine whether the orifice is straight through to the piston face.
An aside, I made up a couple of black plastic blocks out of fiberglass reinforced polyurethane. Yet to see whether they hold up.
11-17-2015, 08:11 PM
#74
Klaus, in Oregon has been rebuilding hydraulics, for ten years since he came to USA, from Germany. He is well respected, with other old timer open tops and rear wings. More for soft tops...
I suppose you can replace, with any 50 cent O ring but the oil will eat into them sooner than later. Klaus has developed his own stuff, which he warrants three years. You send in your units,, get his refurbished ones back, so there is no down time. Price is reasonable as hell.
http://www.tophydraulicsinc.com/en/8-porsche
Still the electric unit being developed here is the route, I will be going.
Last edited by Orphan; 11-17-2015 at 09:59 PM.
11-17-2015, 08:18 PM
#75
Burning Brakes
Klaus, in Oregon has been rebuilding hydraulics, for ten years since he came to USA, from Germany. He is well respected, with other old timer open tops and rear wings.
I suppose you can replace, with any 50 cent seals but the oil will eat into them sooner than later. Klaus has developed his own seal, which ge warrants three years.
http://www.tophydraulicsinc.com/en/8-porsche
I suppose you can replace, with any 50 cent seals but the oil will eat into them sooner than later. Klaus has developed his own seal, which ge warrants three years.
http://www.tophydraulicsinc.com/en/8-porsche