New Project: Engine drop to do coolant fittings...
 11-04-2013, 10:56 PM
#1
Racer
Thread Starter
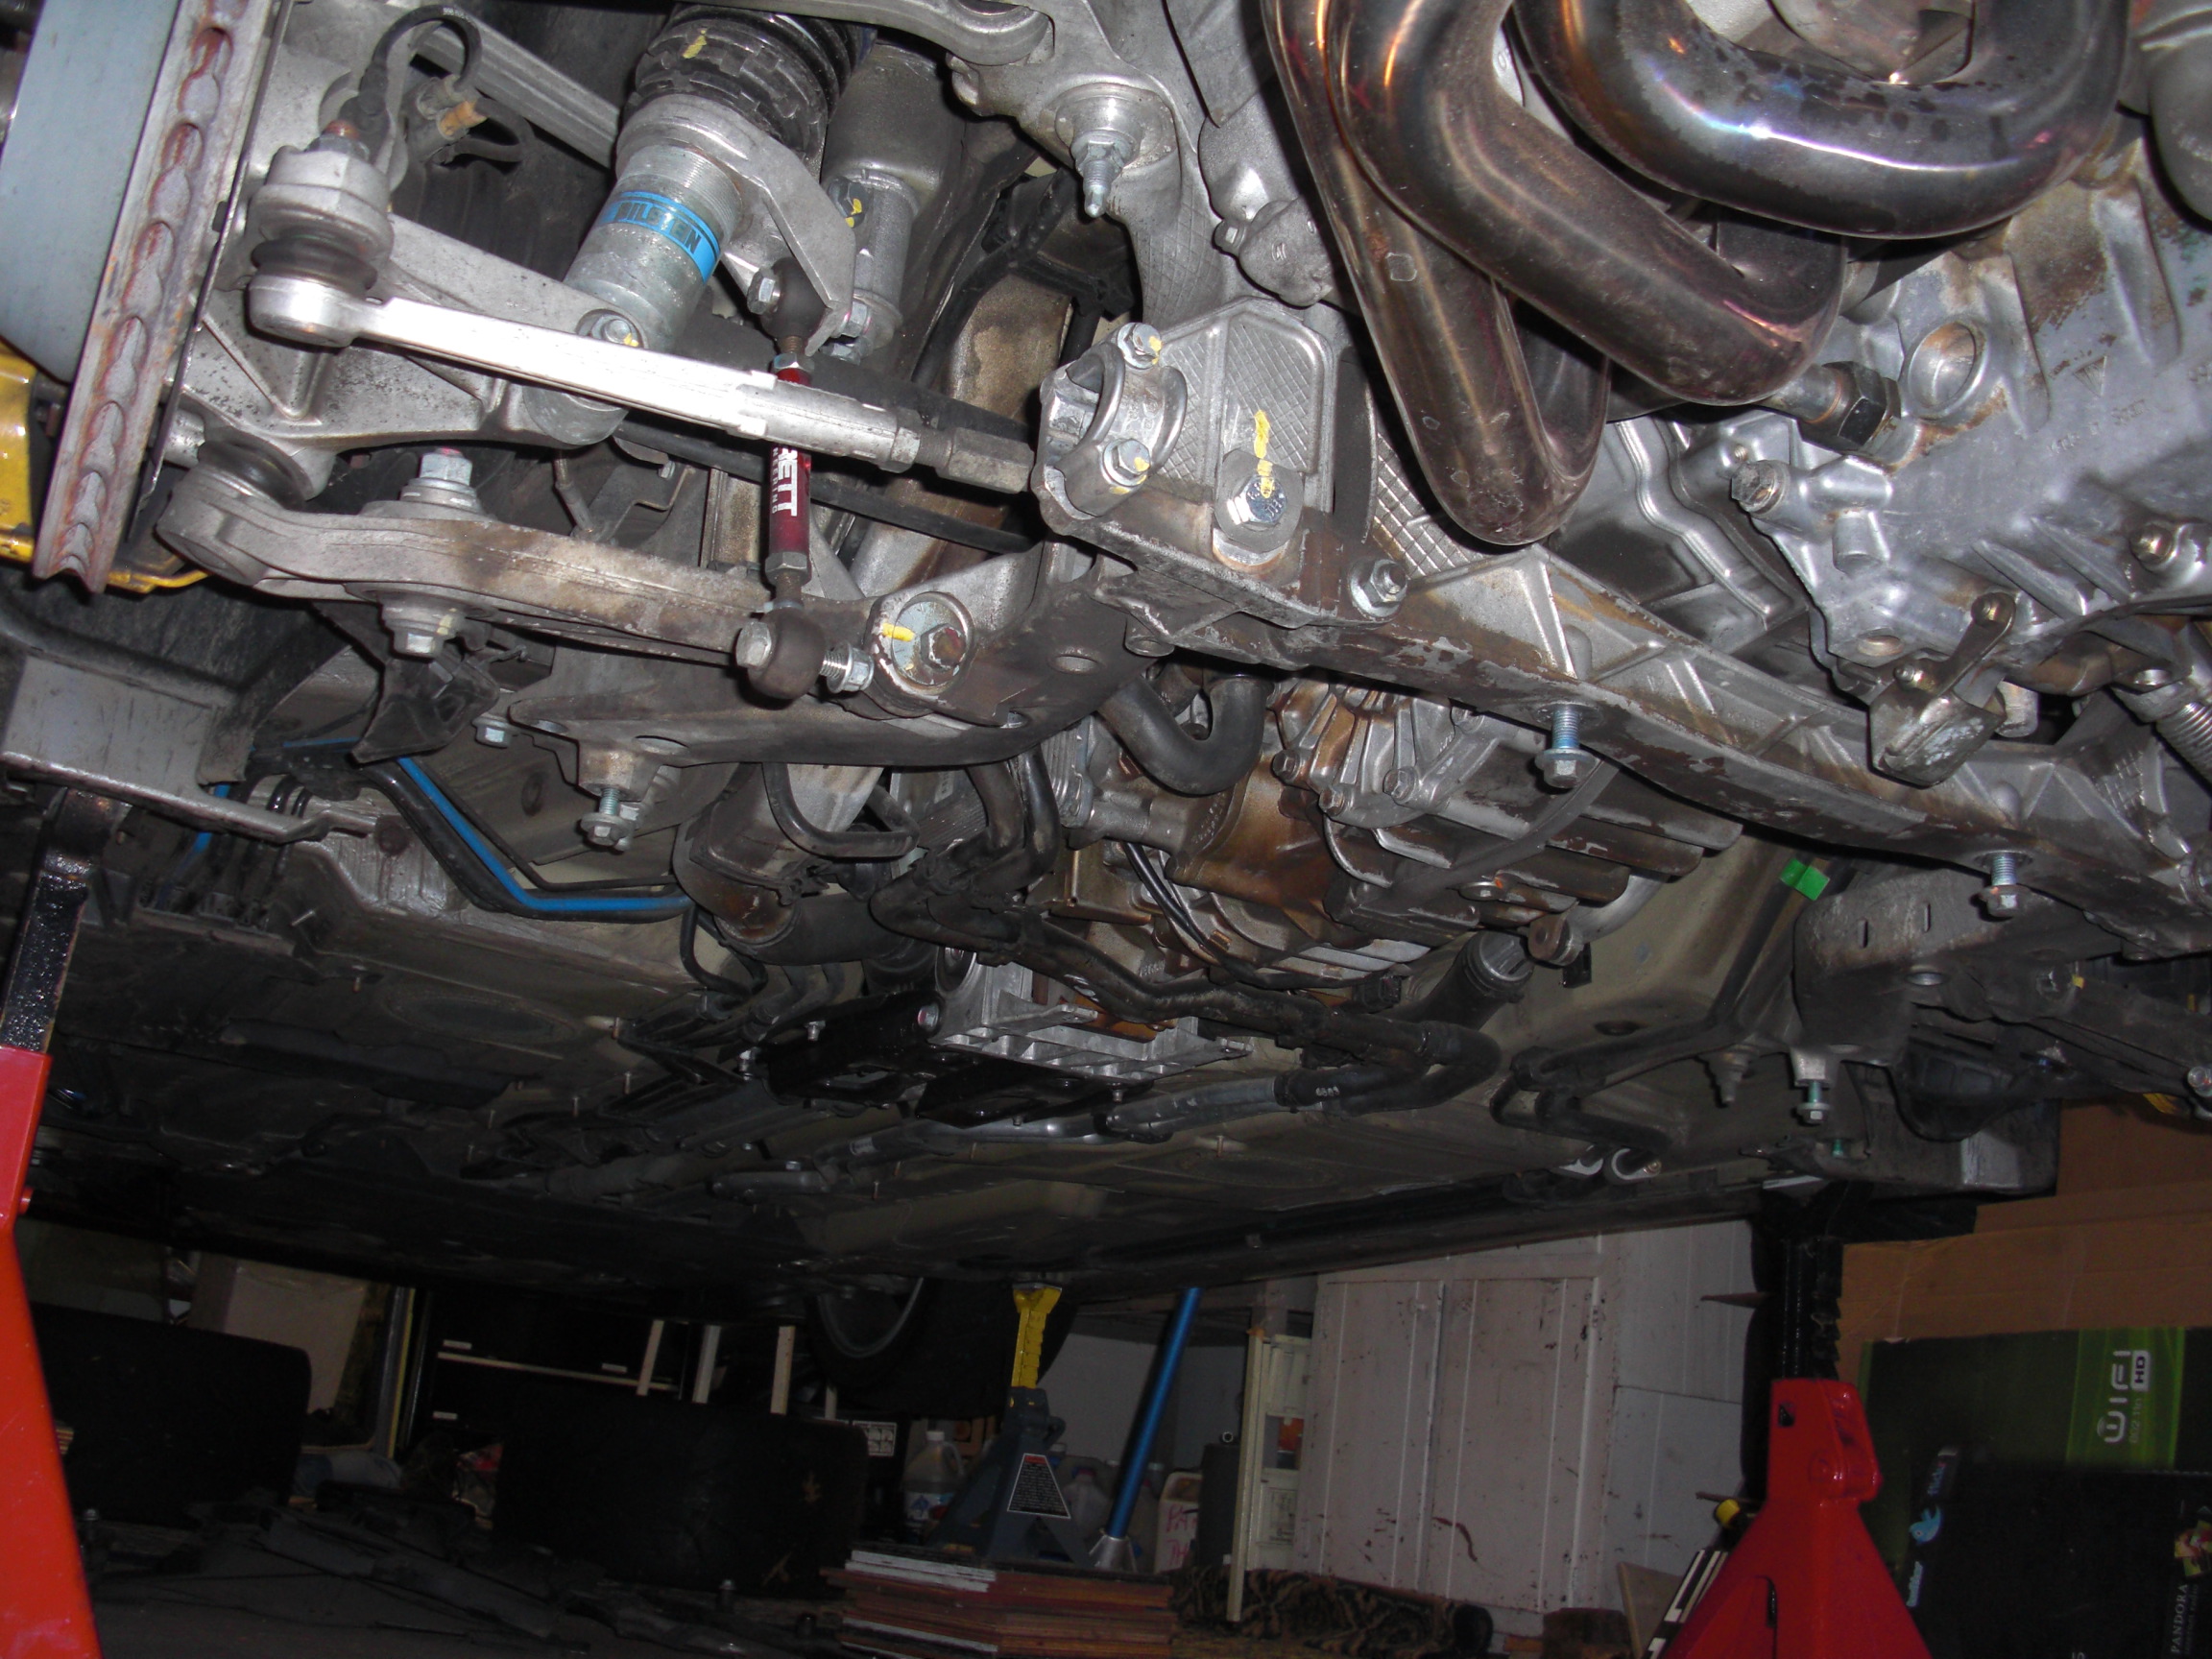
Well, I started to drop the GT3 engine yesterday to do the coolant fittings. Spent about 5 hrs, with about over 1 getting the car high enough. You can never be too careful, specially since you will be working under the car.
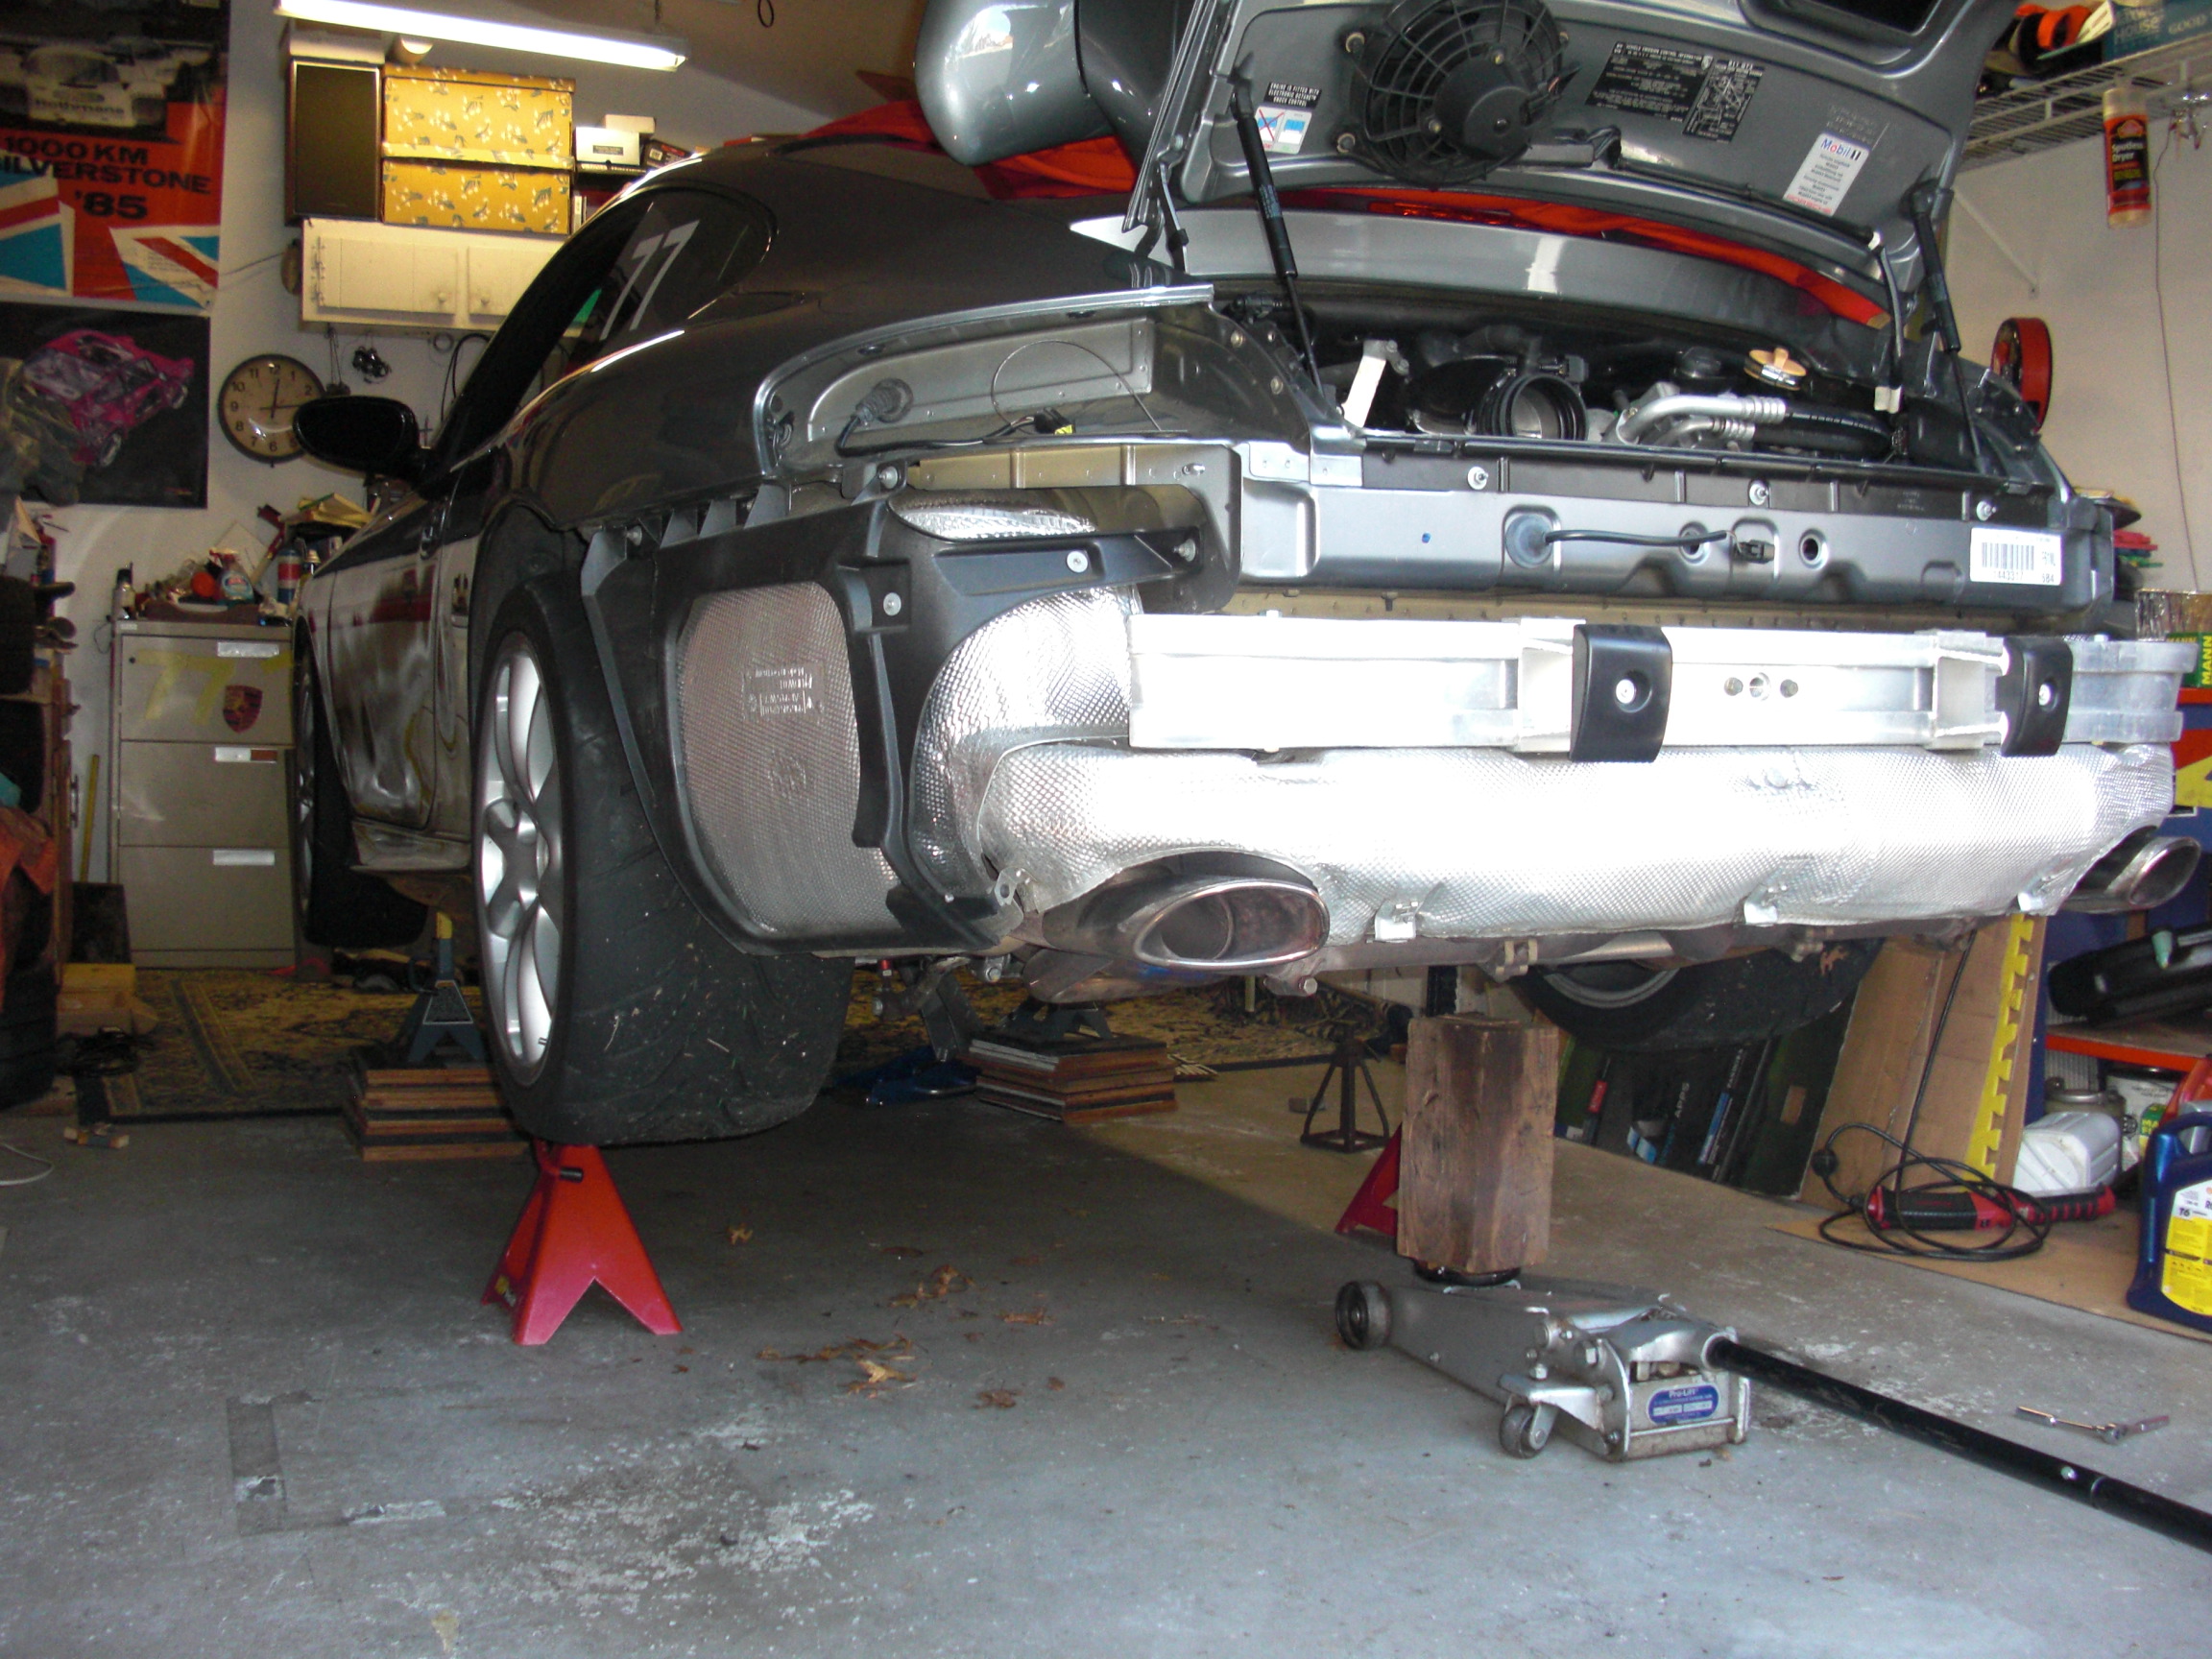
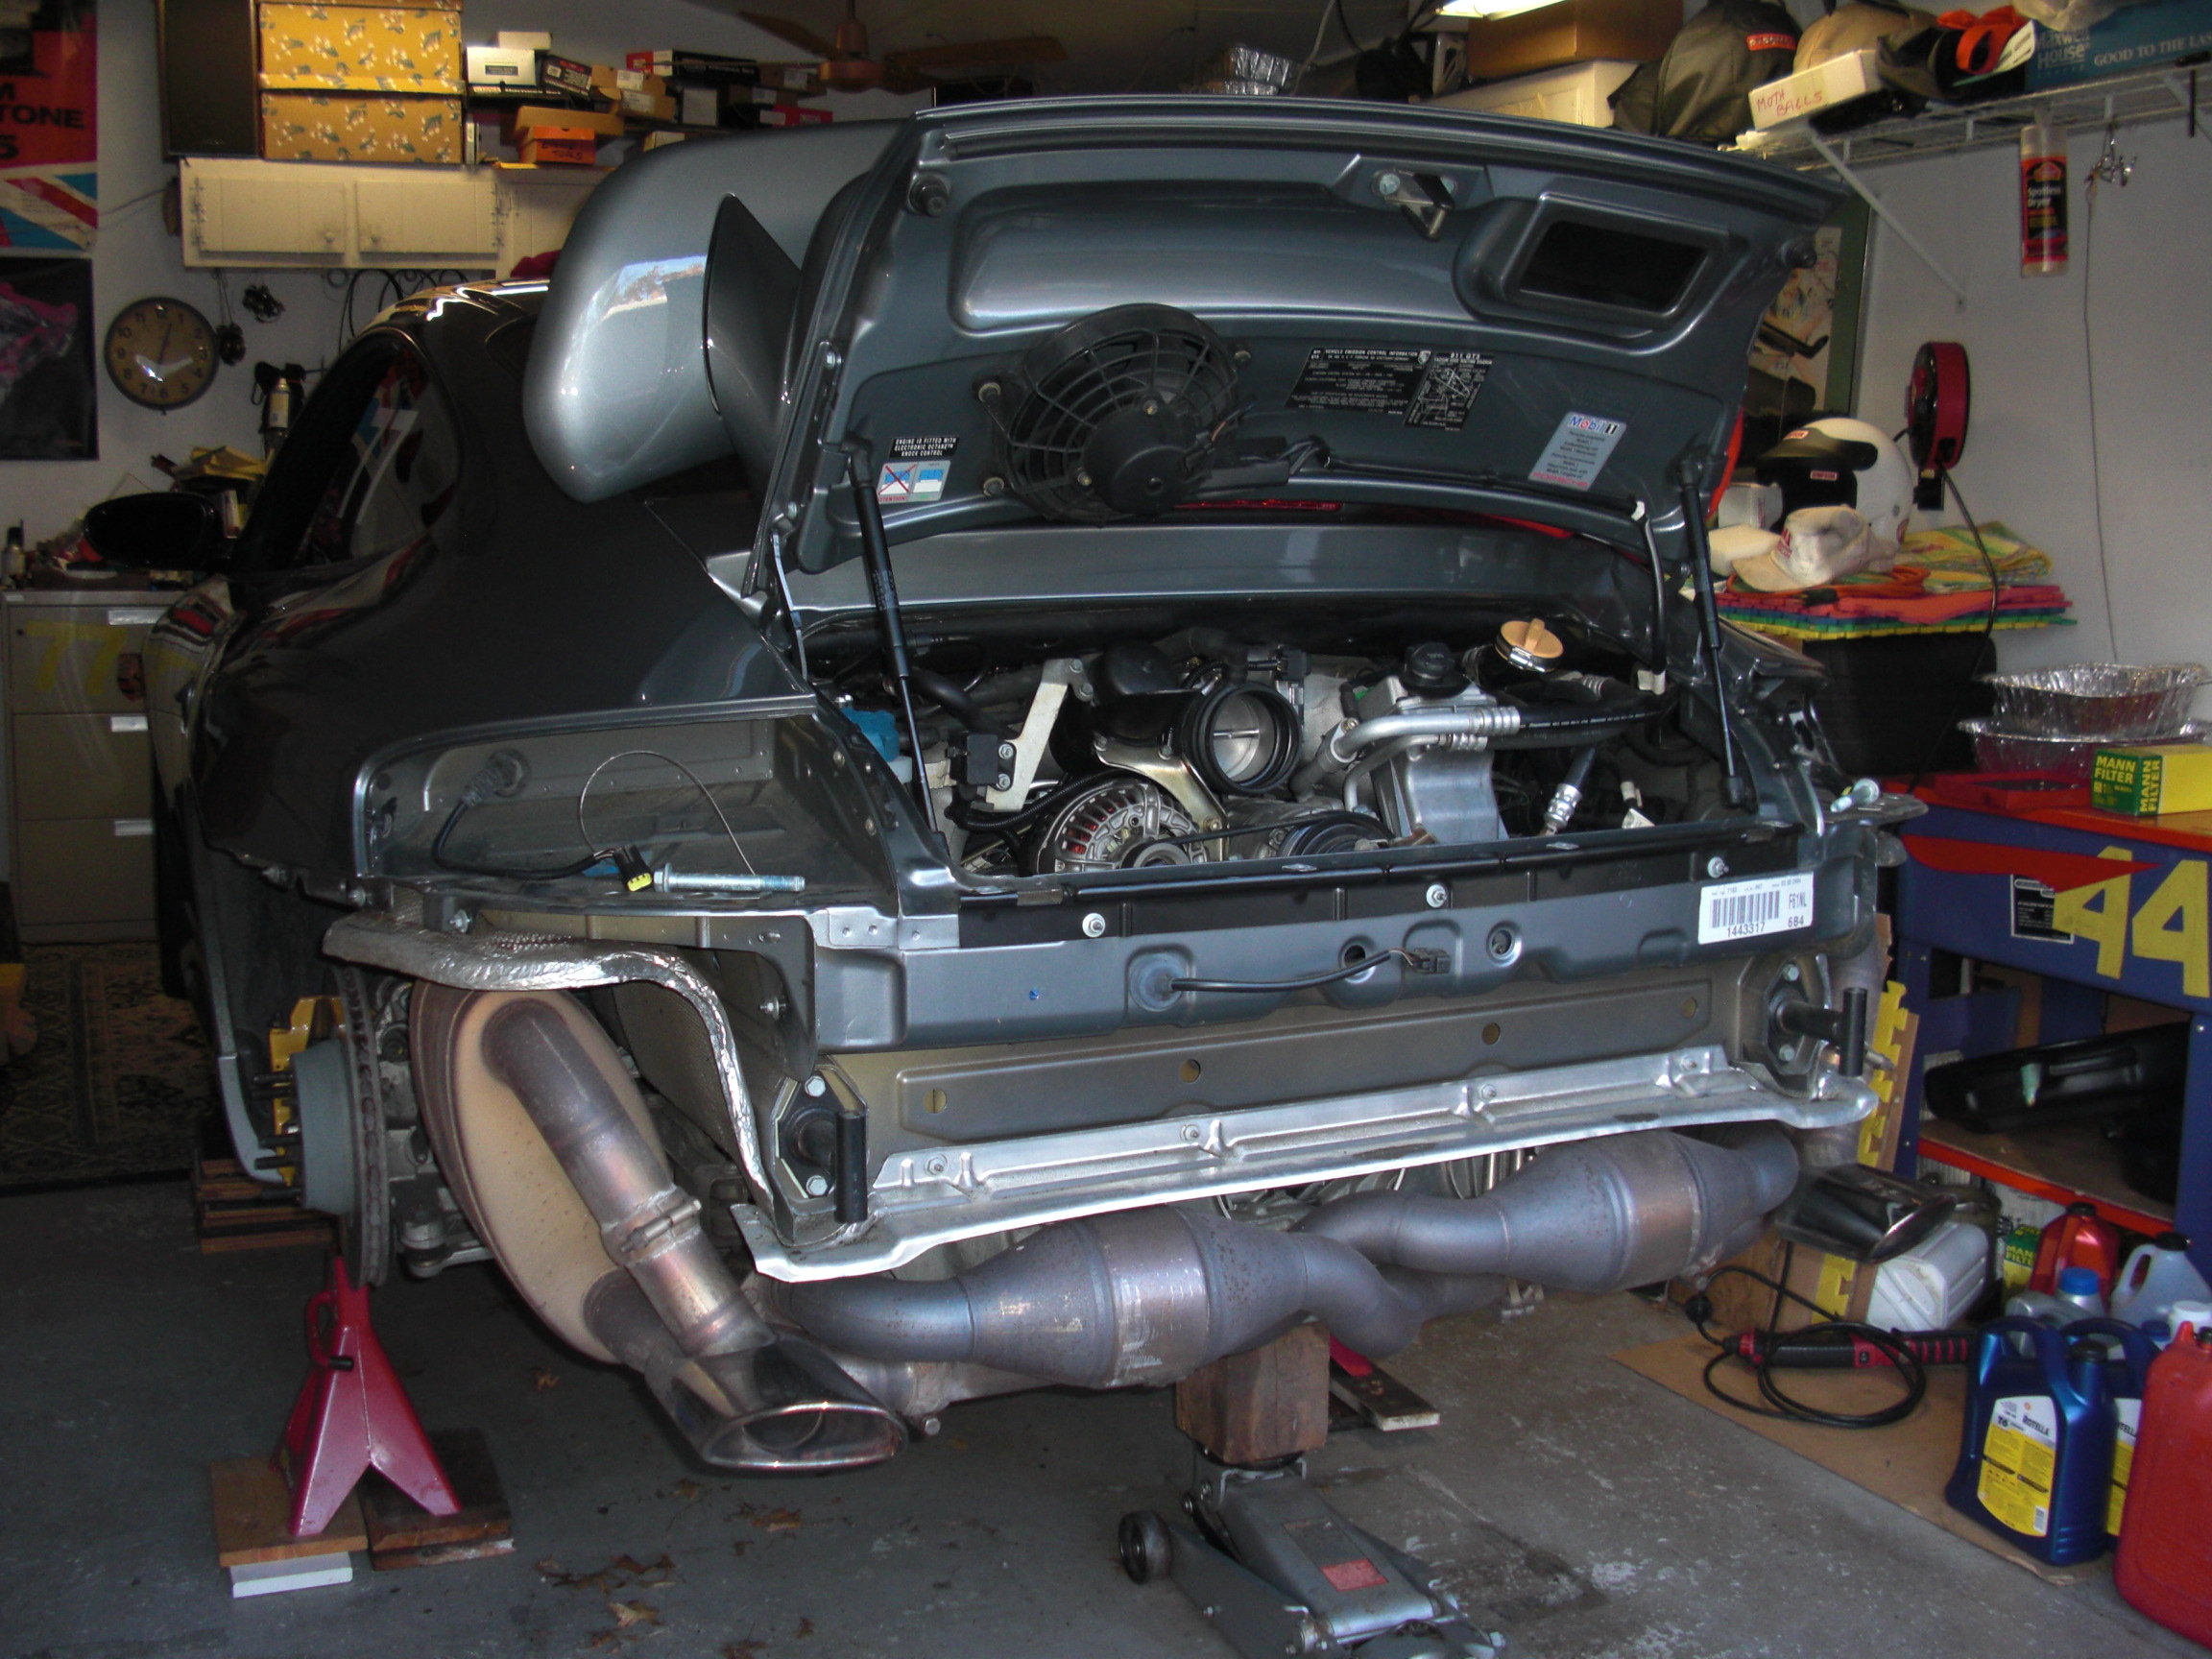
Once the car was raised and secured to about 33" from bottom of bumper reinforcement to floor, it was just a matter of removing bits piece by piece.
Undid the rear bumper, about a dozen screws. Belly pan fairings, sway bar, lower diagonals and main cross member. Air box was also removed. Evacuated the coolant system by using my pressurization/refill air driven tool (venturi effect). Makes refilling the system a breeze, but I'm getting ahead of myself.
Squirted some WD40 on main water connectors. Next steps are to undo them, loosen A/C compressor and PS pump, then electricals, trans coolant hoses, half shafts, clutch slave and starter. Any fuel and remaining coolant hoses and it should be ready to drop.
Comments from those who have done this are welcome... Including some pictures. Will try to document as I go along... Might not get to it until weekend. Please be patient... Enjoy! Lou
Well, looks like I have exceeded my quota for uploading pictures... Oh, well


 11-05-2013, 12:16 AM
#3
looking forward to seeing your 'improvement' pics!
I am dropping my engine over this winter as well to do the fittings and freshen any/all hoses/wires/etc., will try to take lots of reference pics for us GT2(and TT) guys

I am dropping my engine over this winter as well to do the fittings and freshen any/all hoses/wires/etc., will try to take lots of reference pics for us GT2(and TT) guys
11-05-2013, 09:23 AM
#5
Rennlist Member
<- I dropped my engine last winter for the welding of the pipes. Holler if you have any questions. "Audion19s" also did his the year prior. He helped me a ton. Pay it forward!
11-05-2013, 09:34 AM
#6
Race Car
Well, I started to drop the GT3 engine yesterday to do the coolant fittings. Spent about 5 hrs, with about over 1 getting the car high enough. You can never be too careful, specially since you will be working under the car.
Once the car was raised and secured to about 33" from bottom of bumper reinforcement to floor, it was just a matter of removing bits piece by piece.
Undid the rear bumper, about a dozen screws. Belly pan fairings, sway bar, lower diagonals and main cross member. Air box was also removed. Evacuated the coolant system by using my pressurization/refill air driven tool (venturi effect). Makes refilling the system a breeze, but I'm getting ahead of myself.
Squirted some WD40 on main water connectors. Next steps are to undo them, loosen A/C compressor and PS pump, then electricals, trans coolant hoses, half shafts, clutch slave and starter. Any fuel and remaining coolant hoses and it should be ready to drop.
Comments from those who have done this are welcome... Including some pictures. Will try to document as I go along... Might not get to it until weekend. Please be patient... Enjoy! Lou
Well, looks like I have exceeded my quota for uploading pictures... Oh, well
Andy: 614-747-0002, info@andymobiledetail.com
Couple of notes. The primary fuel line to the engine isn't really documented in the PDF for some reason. It's a simple 10mm bolt and then the line pulls out.
The electrical connector for the A/C compressor is a small white rectangular piece that was somewhat obscured to me. It resides tucked away on the passenger side of the motor.
I didn't disconnect the A/C compressor NOR the power steering lines. Simply removed them from the motor, wrapped them in protection and secured them off to the side in the engine bay. PS isn't that big of an issue but I have a friend who's lines kept blowing off after removal and I didn't want to chance damaging them. A/C sucks but if you keep it connected you obviously don't have to recharge the system.
There's a coolant line above / behind the main coolant lines down by the tranny cooler that's somewhat hidden make sure you disconnect it I got hung up on that one.
I marked both sides of the o2 connections just to be sure they all went back together correctly. Took pictures of them too for wire routing just to be sure even though they really connect more to the engine plate than anything else.
it's MUCH easier to get the starter in and out with the engine lowered some from it's original position. Undo all of the electrical connections for the starter, lower the engine ~5 inches and then go back and remove the starter.
You can get all the coolant fittings off of the motor by just removing the upper intake portion, however I found it easier to work with everything by removing the lower portion with harness, fuel rails and everything. Made the tear down cleaner to me just to set all of that off to the side.
11-05-2013, 10:05 AM
#7
^great notes

Trending Topics
11-05-2013, 01:42 PM
#8
Three Wheelin'
You guys are very talented. I just took my car to the local porsche race shop and paid $,$$$ lot of money to have them fix mine.
 All I can do is watch. Wow- Lou with no lift .
11-05-2013, 01:58 PM
All I can do is watch. Wow- Lou with no lift .
11-05-2013, 01:58 PM
#10
Racer
Thread Starter
Andy, thanks for the excellent information! Will reach out if I get stuck... Looks like the picture uploading issue has been resolved.
Including pictures for reference (and from different angles) for those who think about doing this... Check out collapsed main hose under reservoir while applying vacuum with refill tool drawing coolant into reservoir (venturi effect). Makes it a breeze to fill system. Great investment! Some pictures show missing items, like diagonal supports and sway bar. Will continue to document as I go along. No real surprises... I have done a few 911 aircooled drops in the past... So this is a new experience but kind of similar...
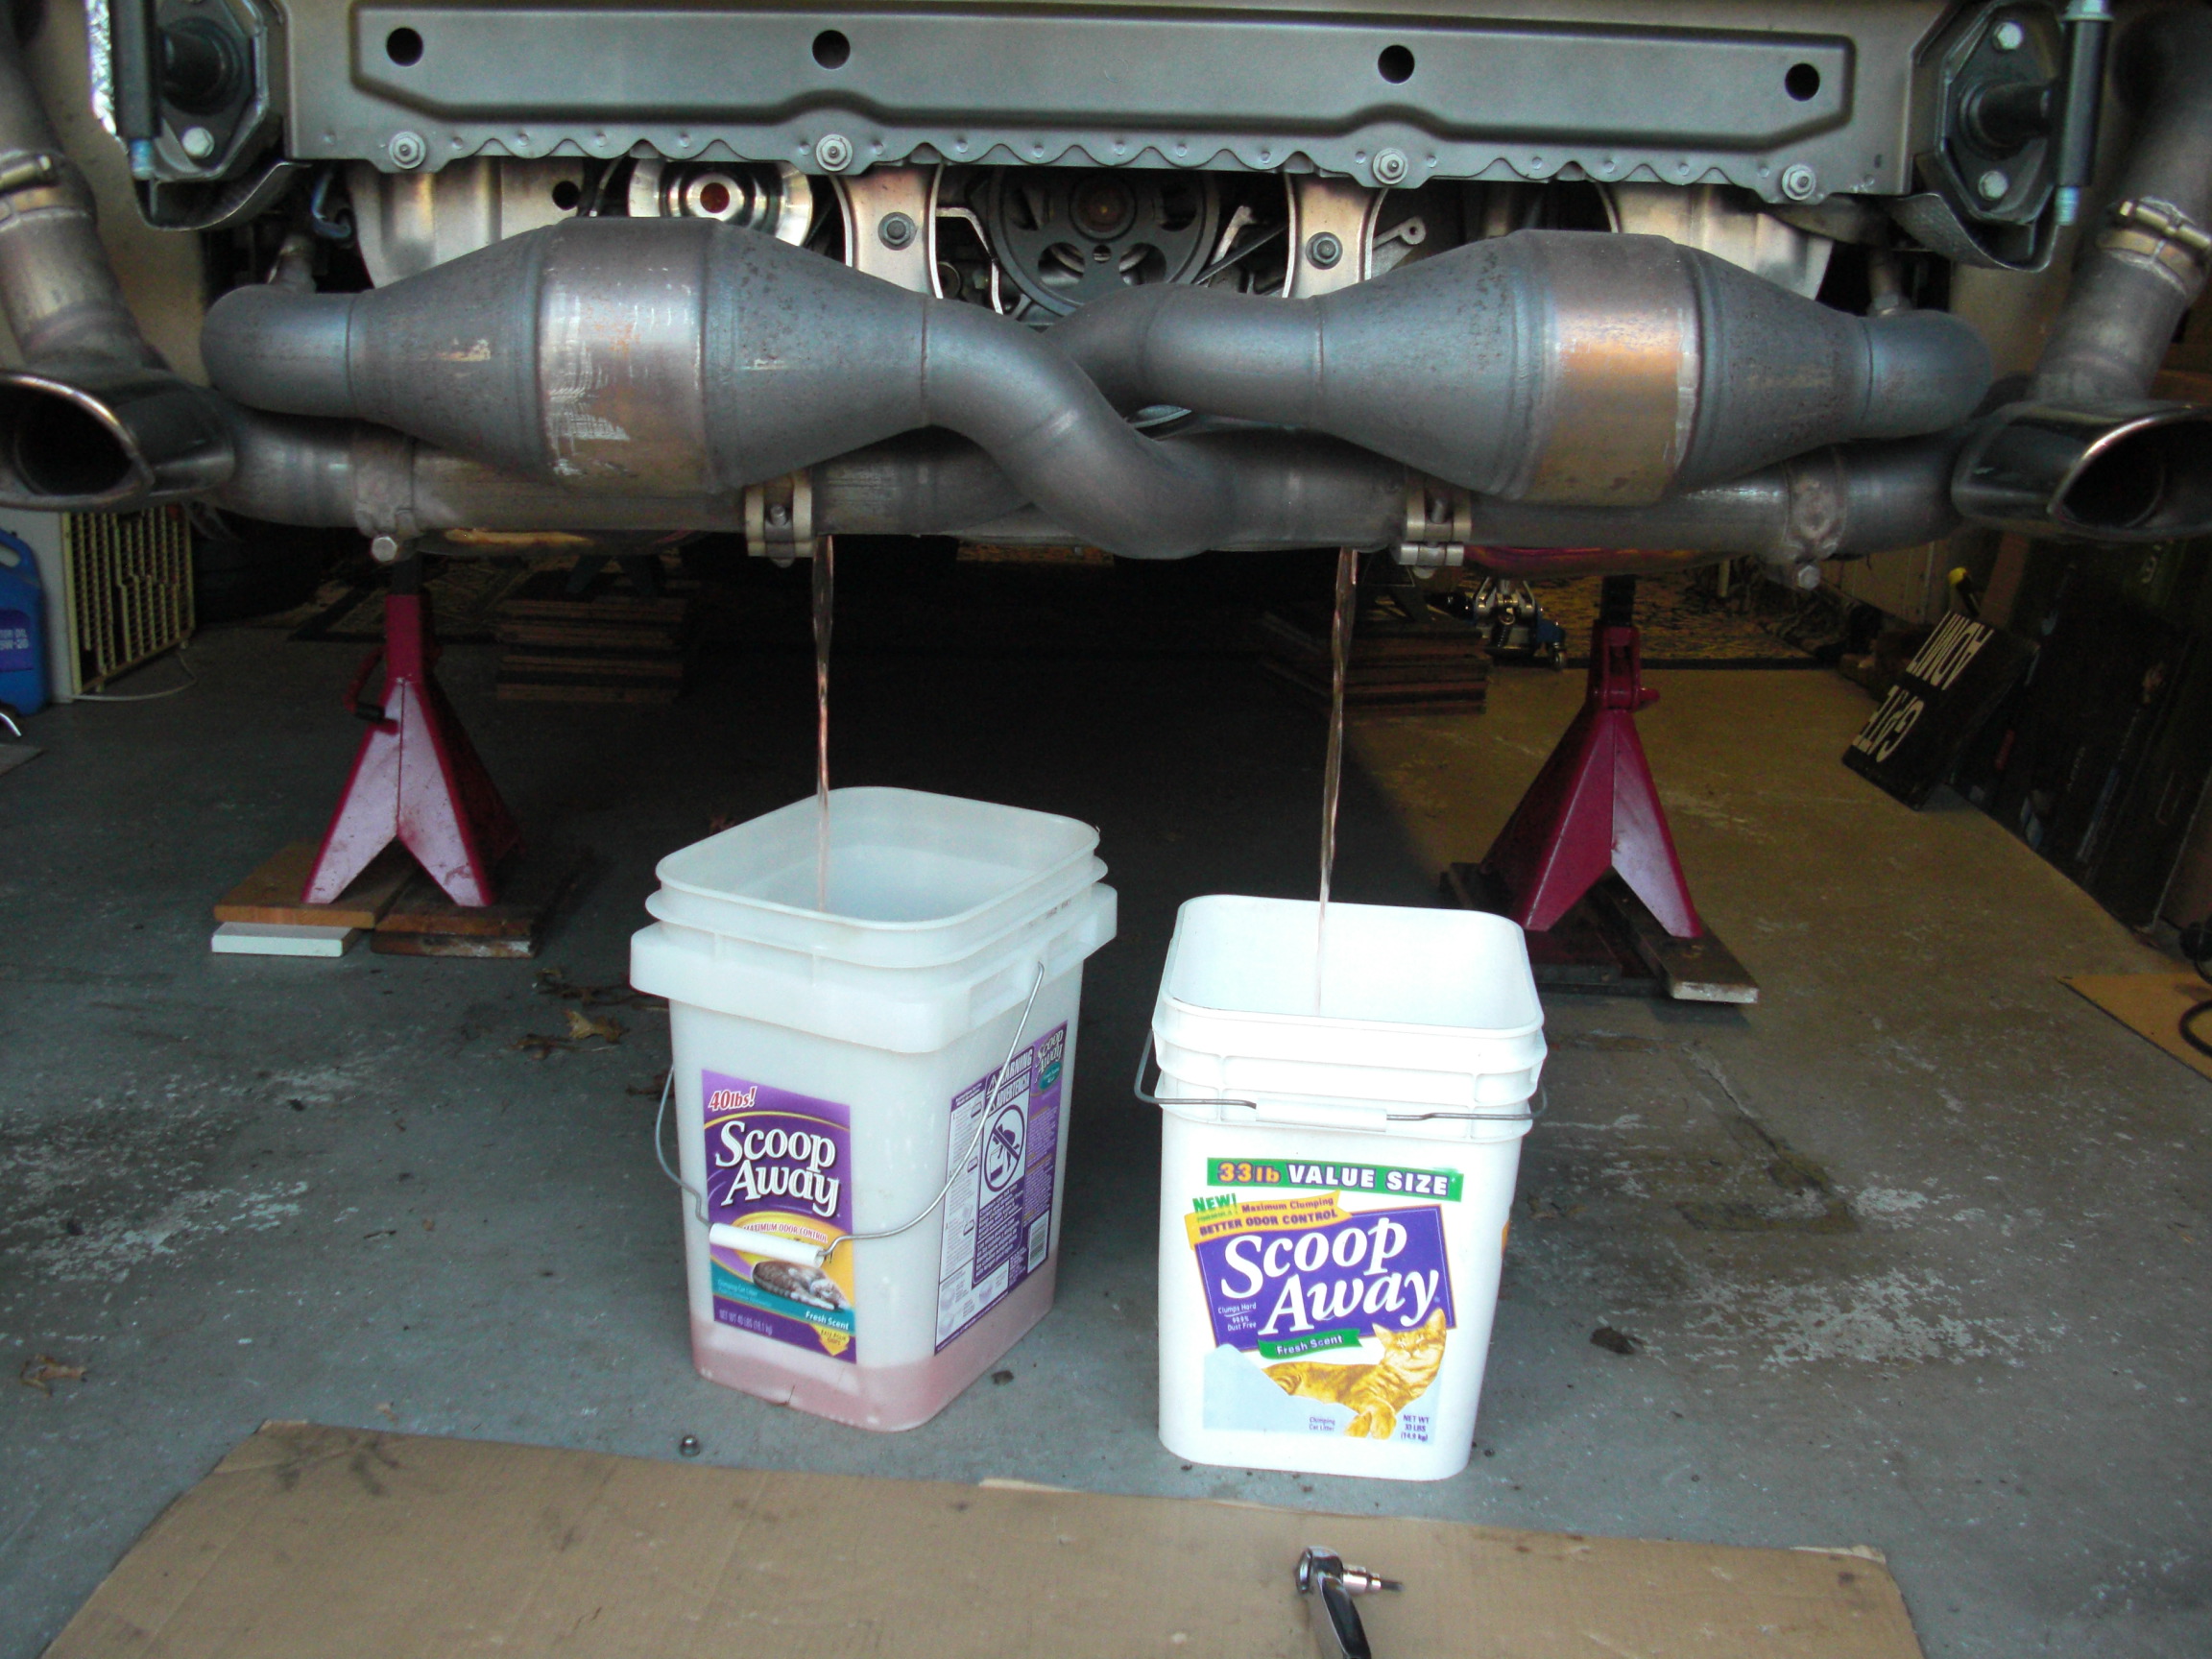
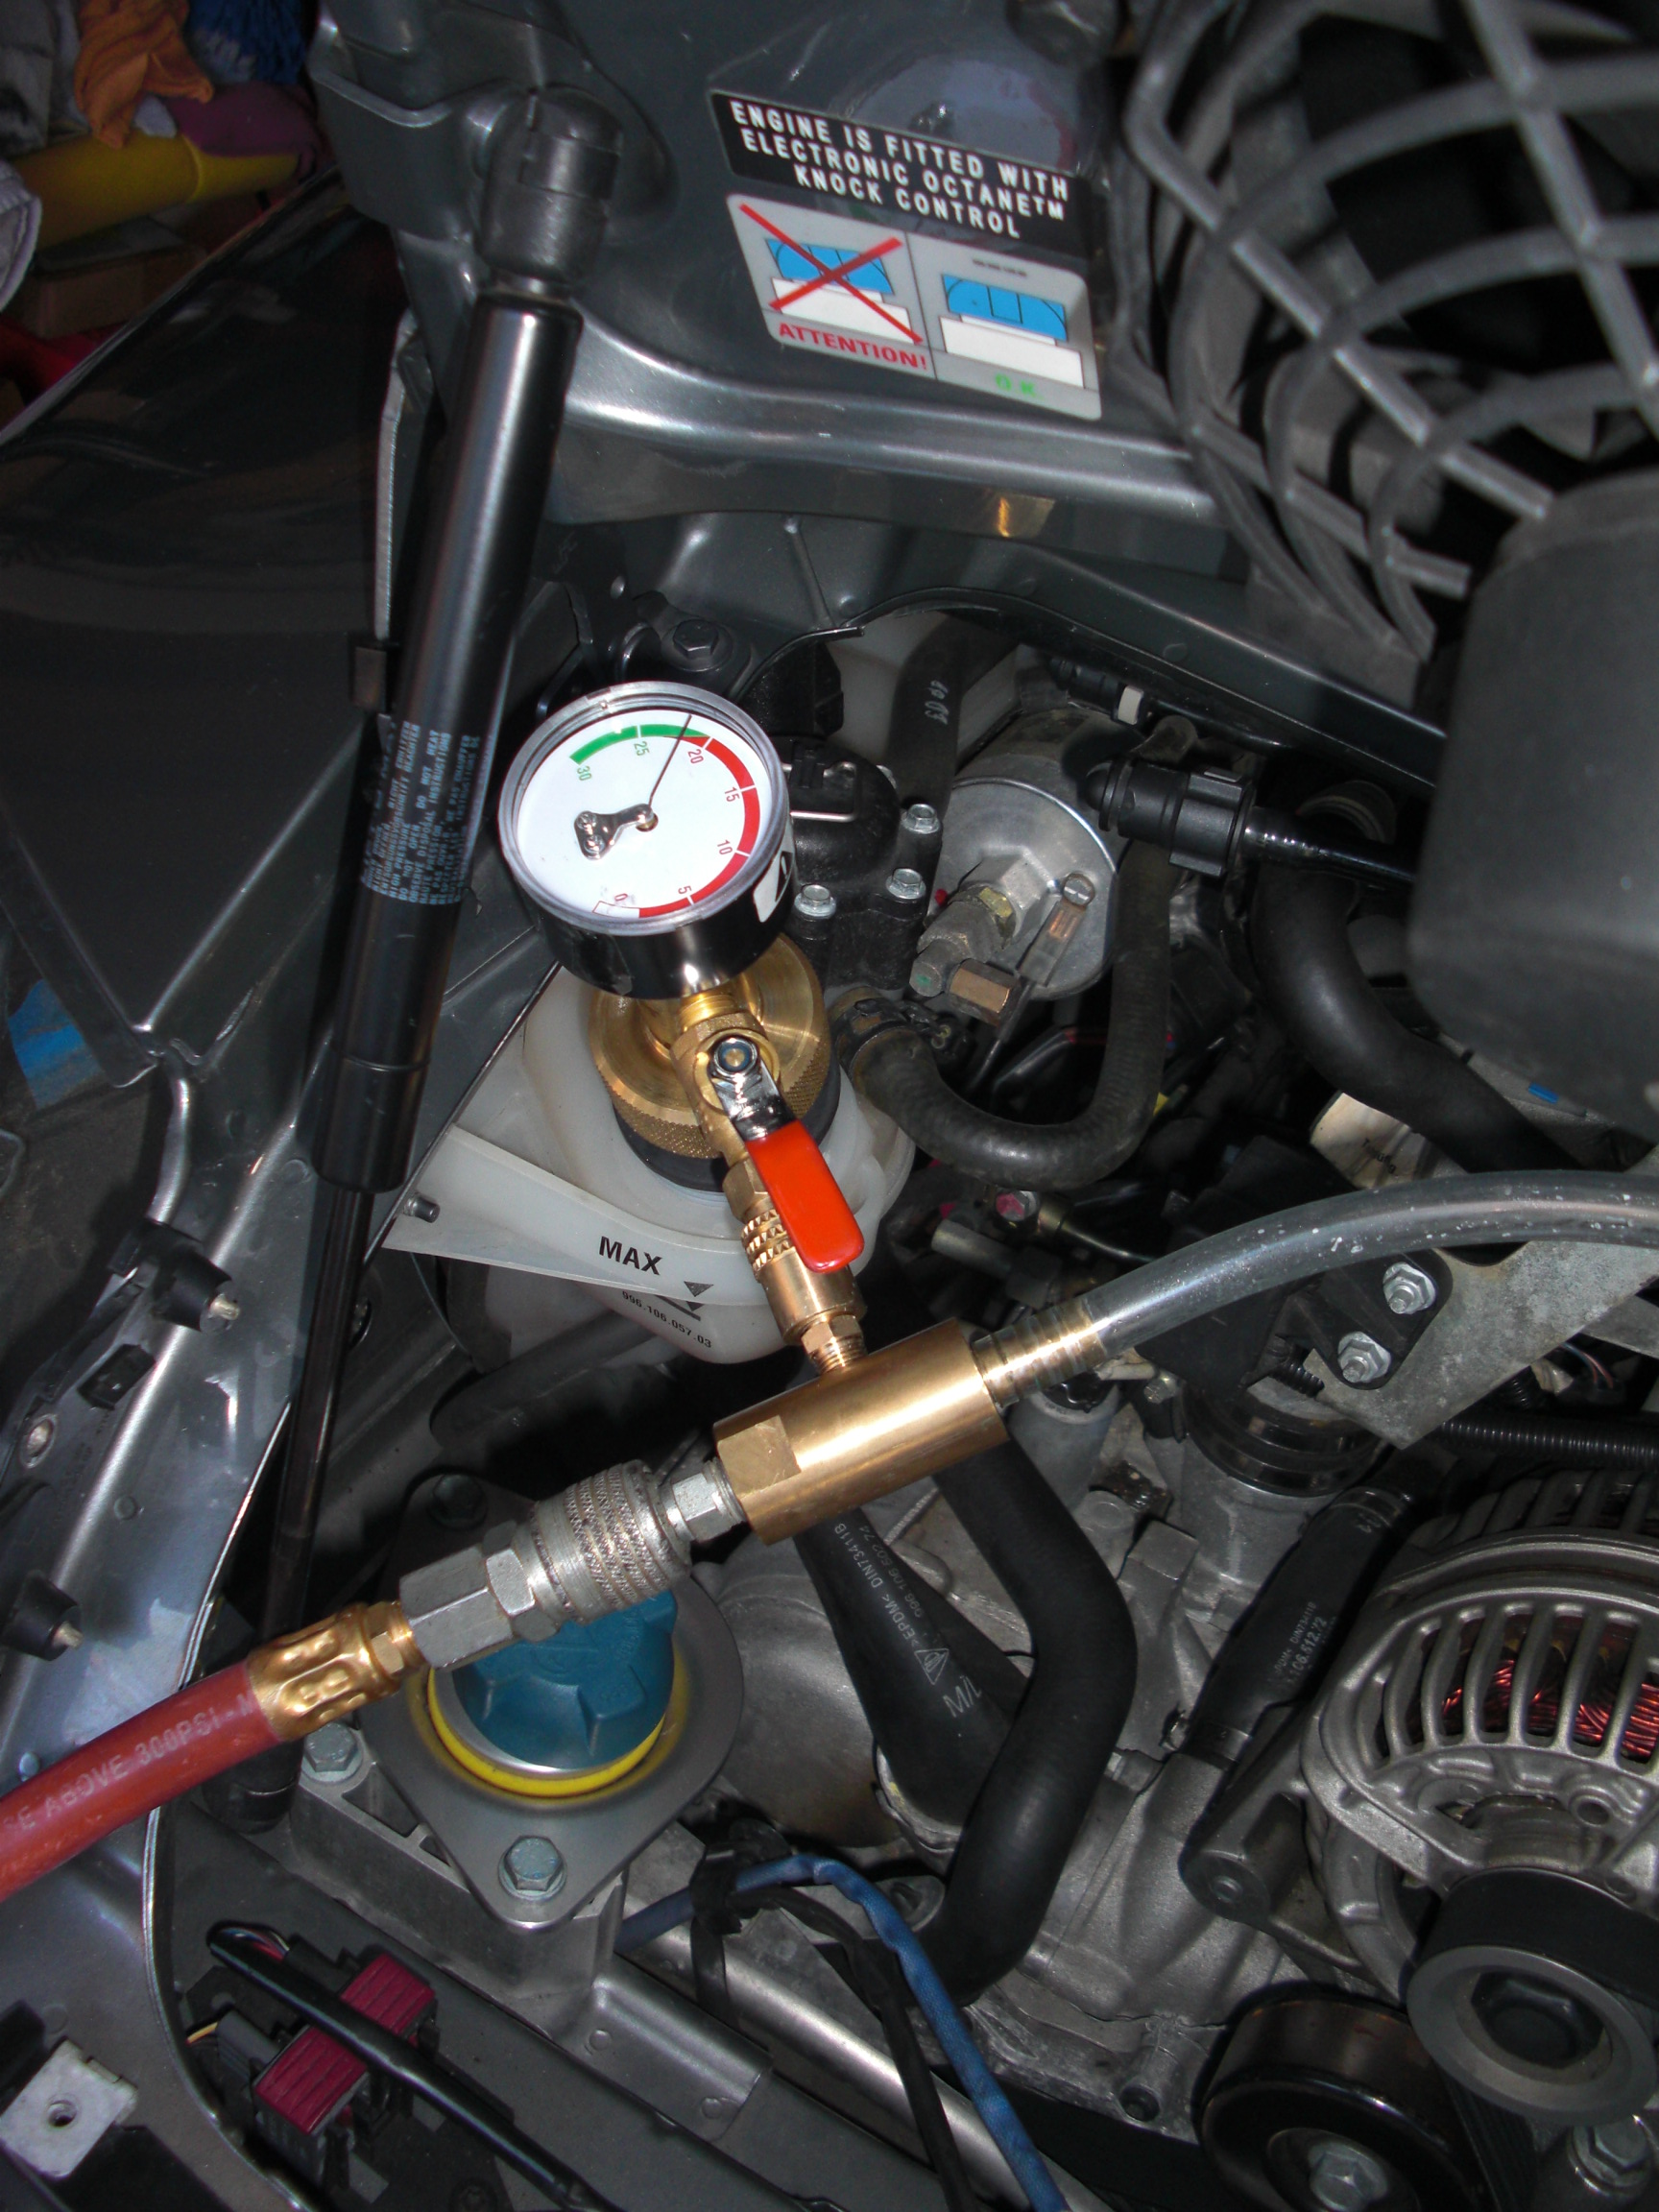
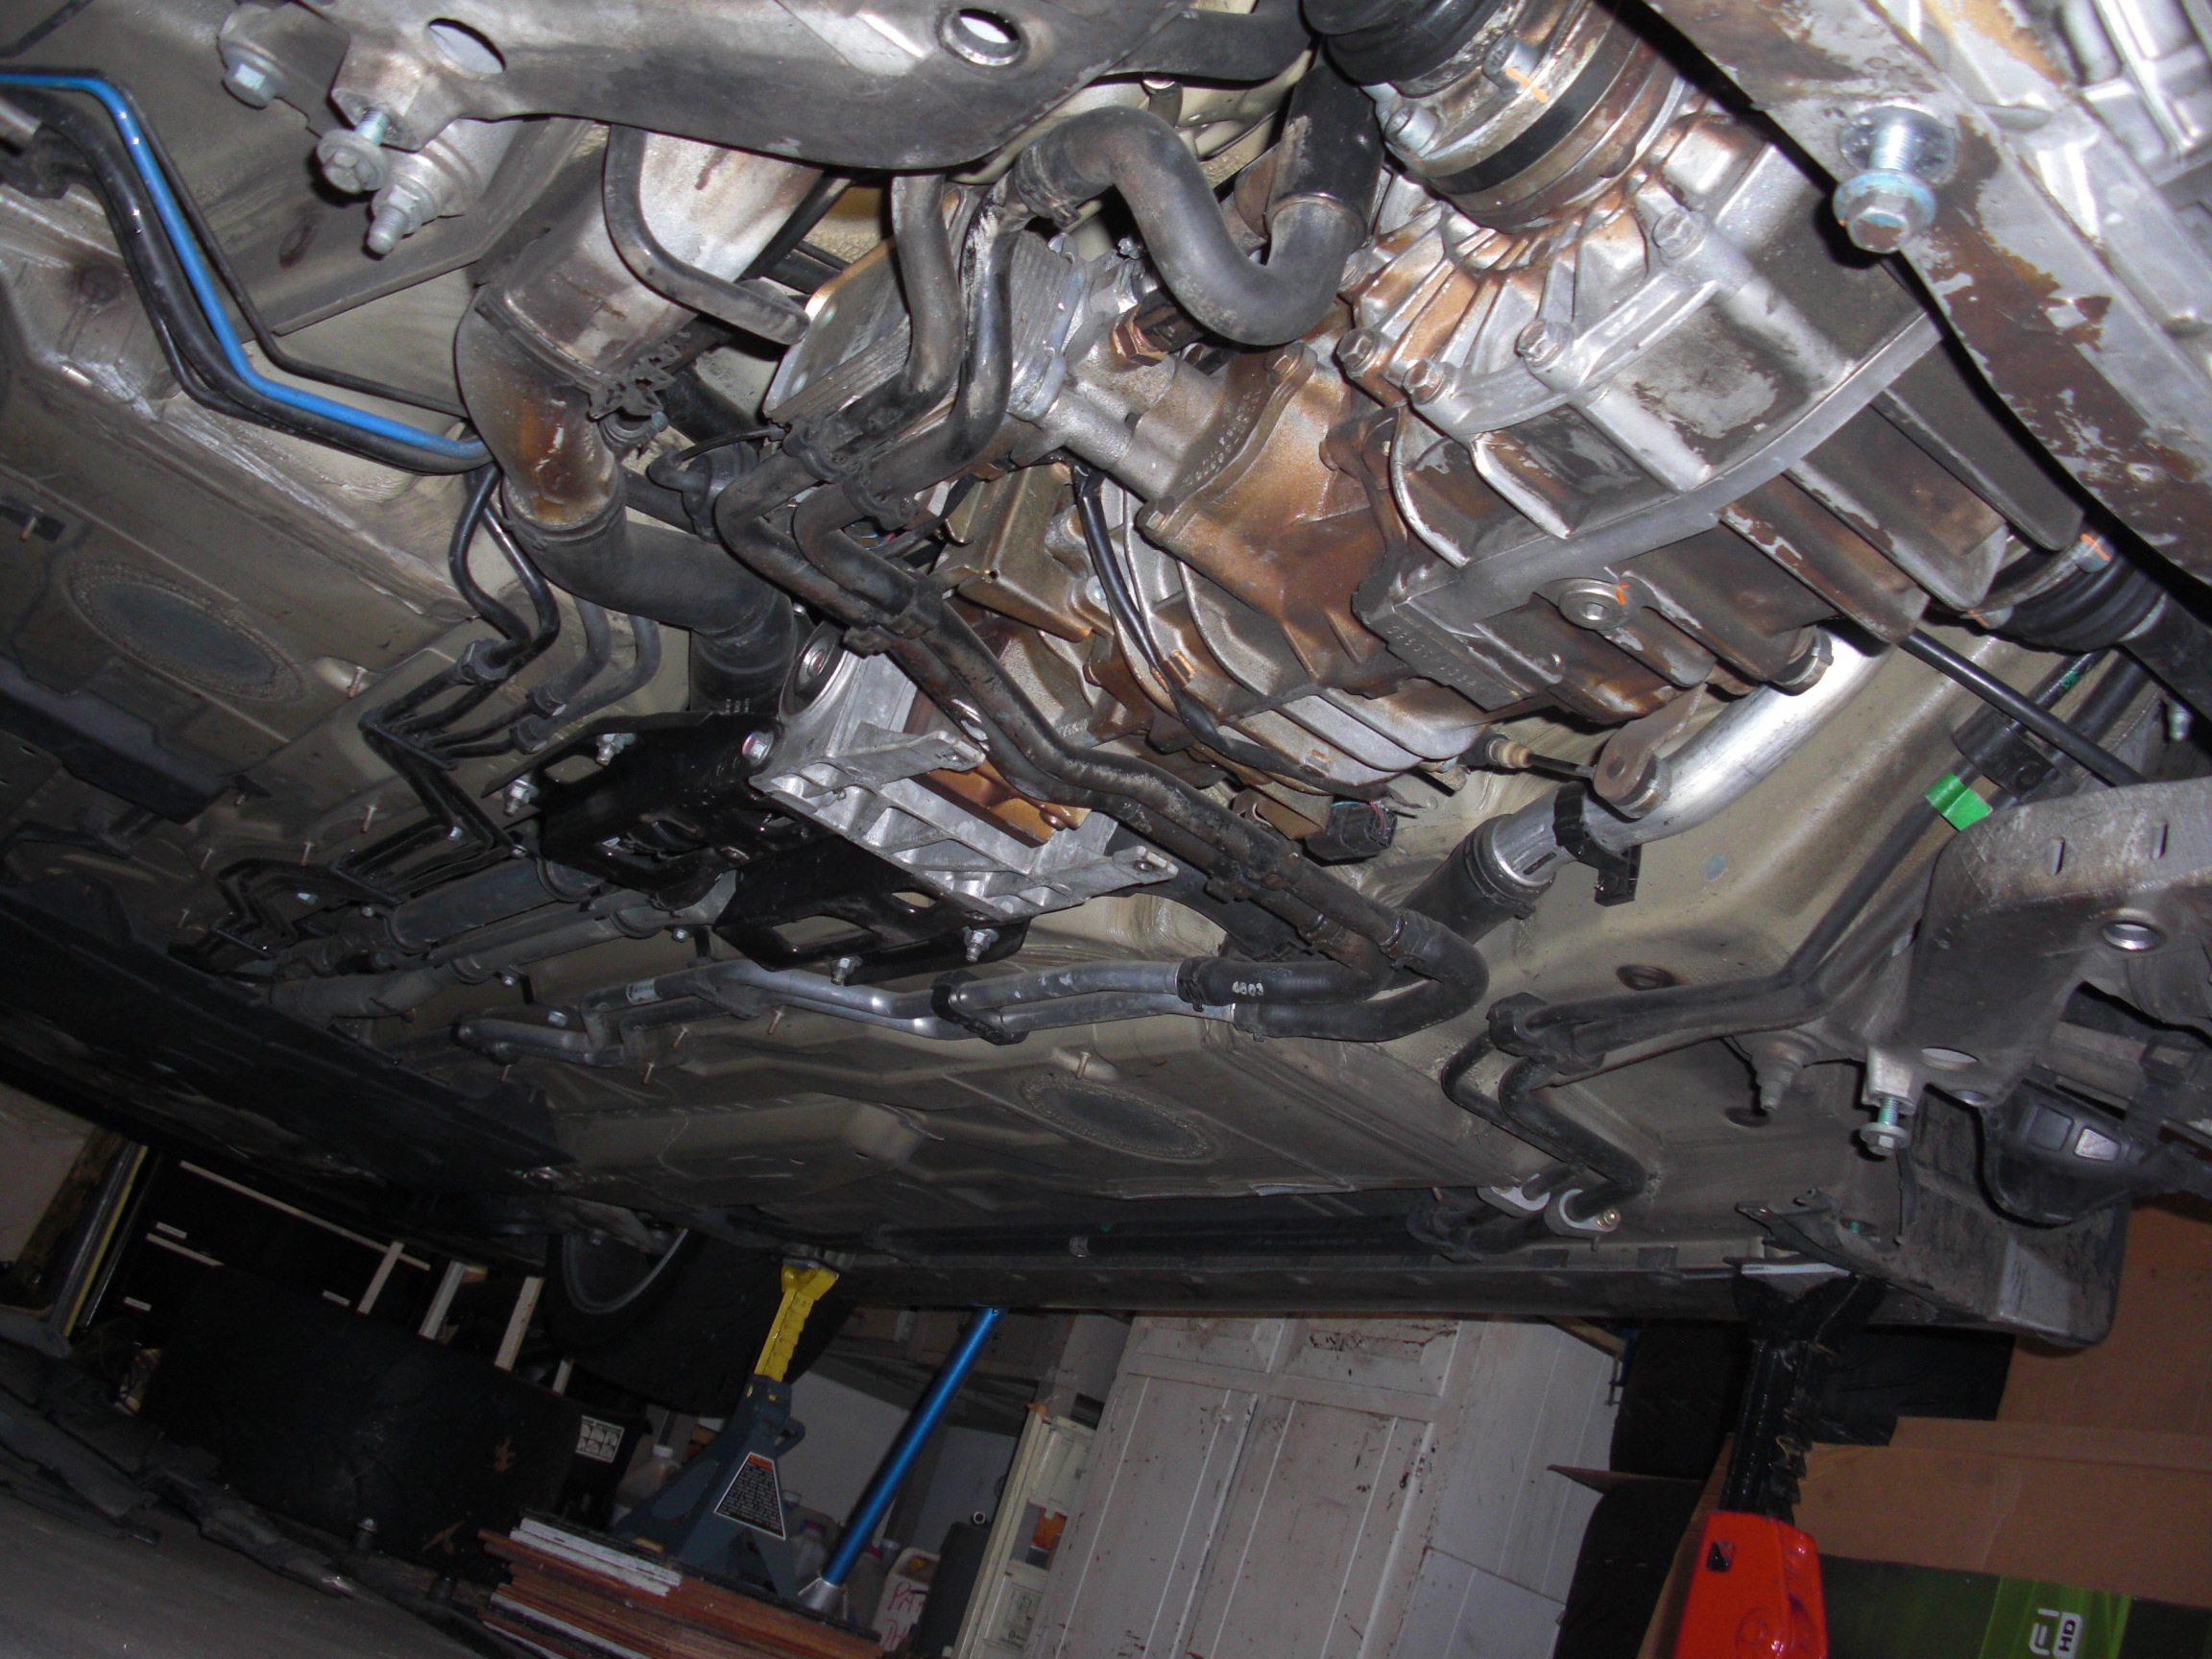

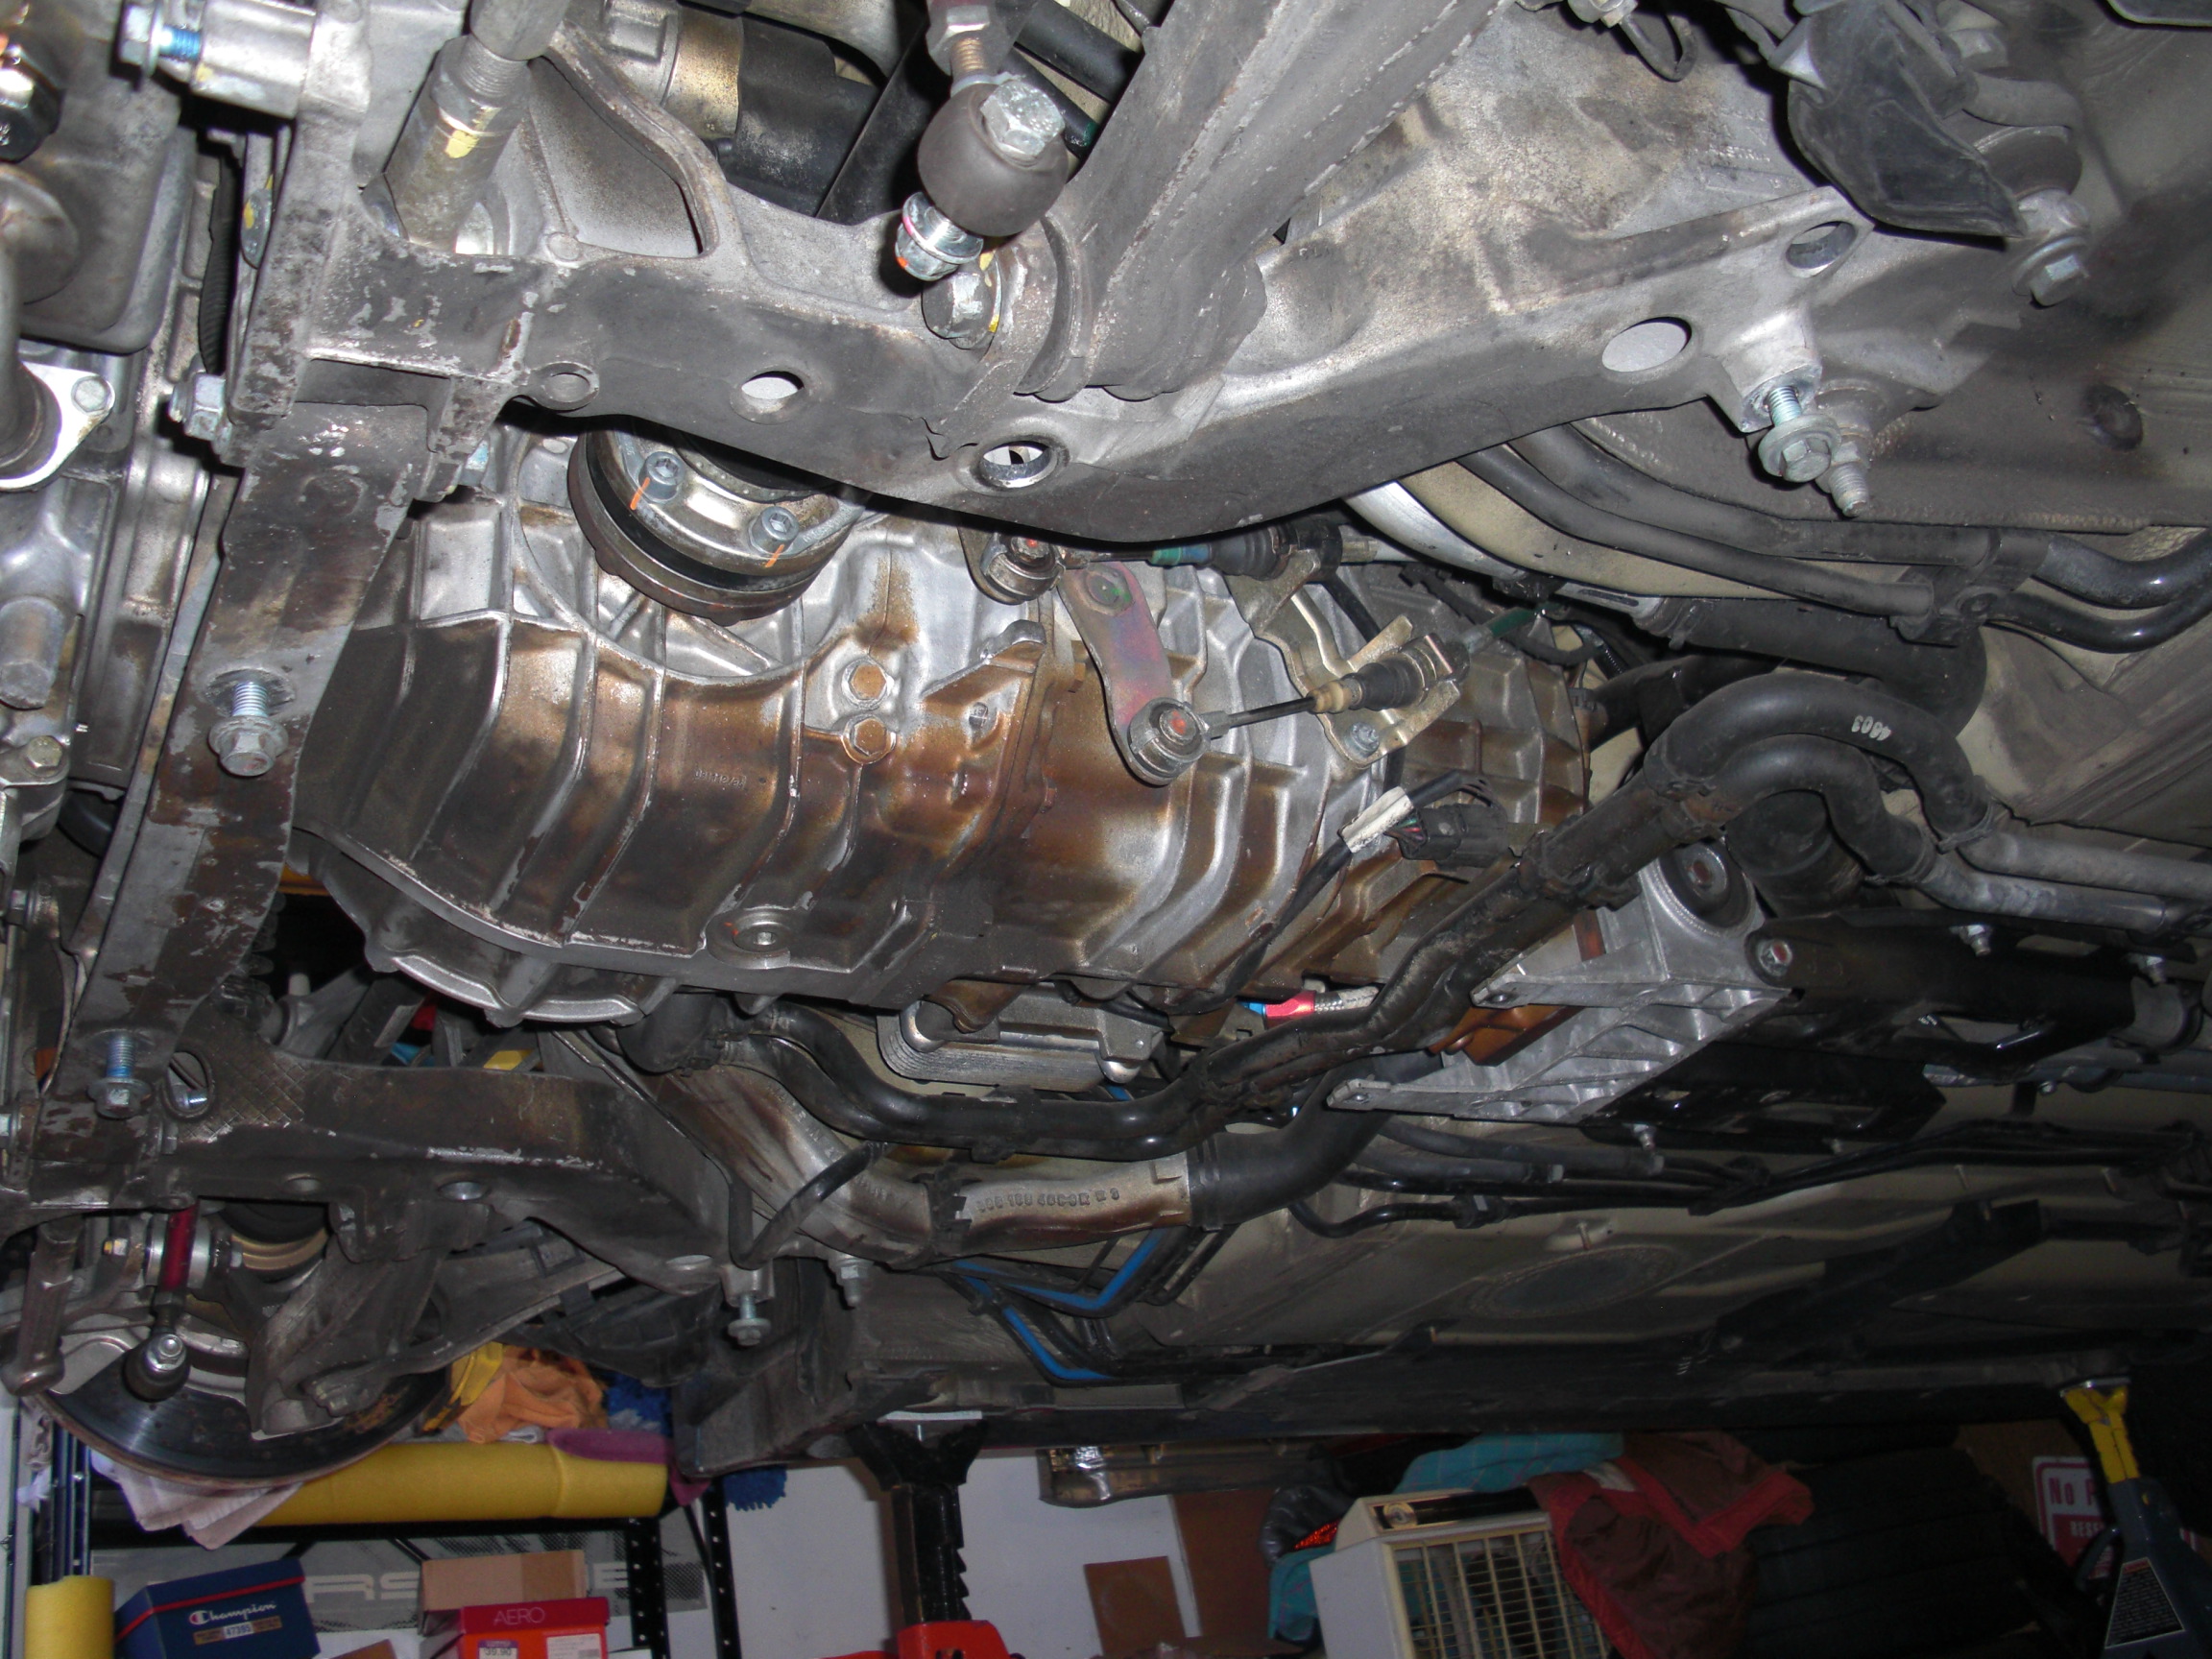
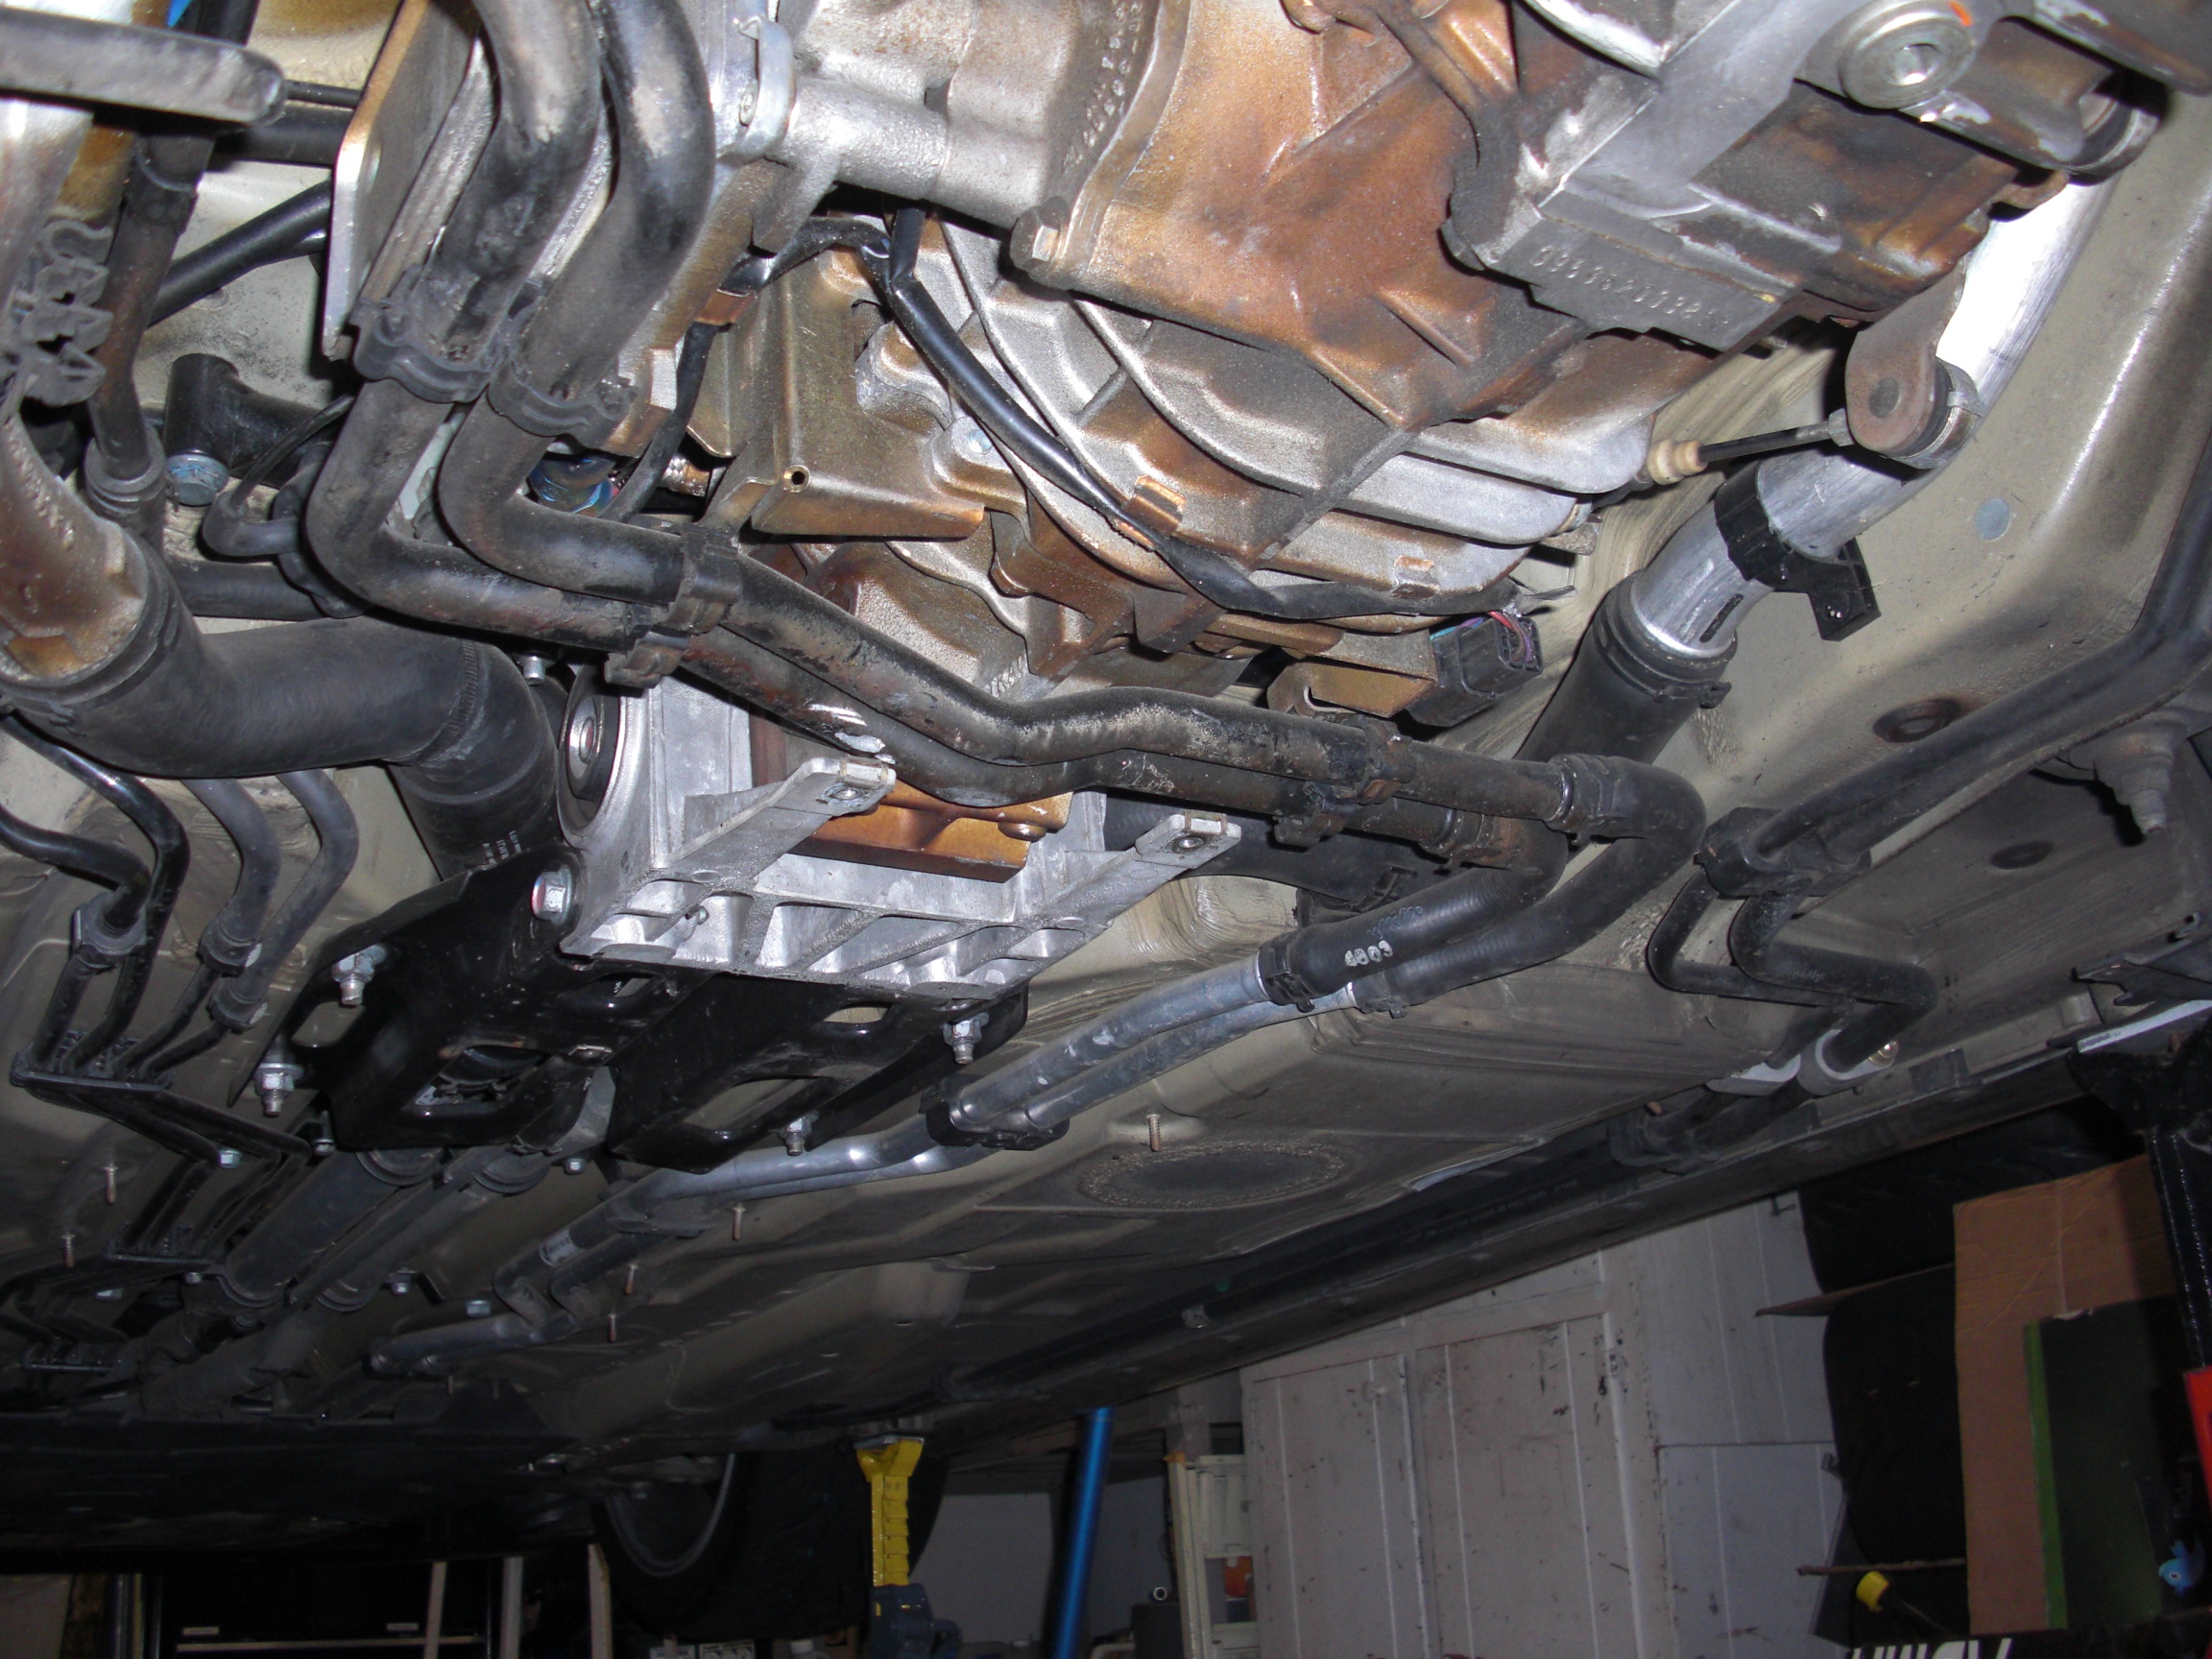
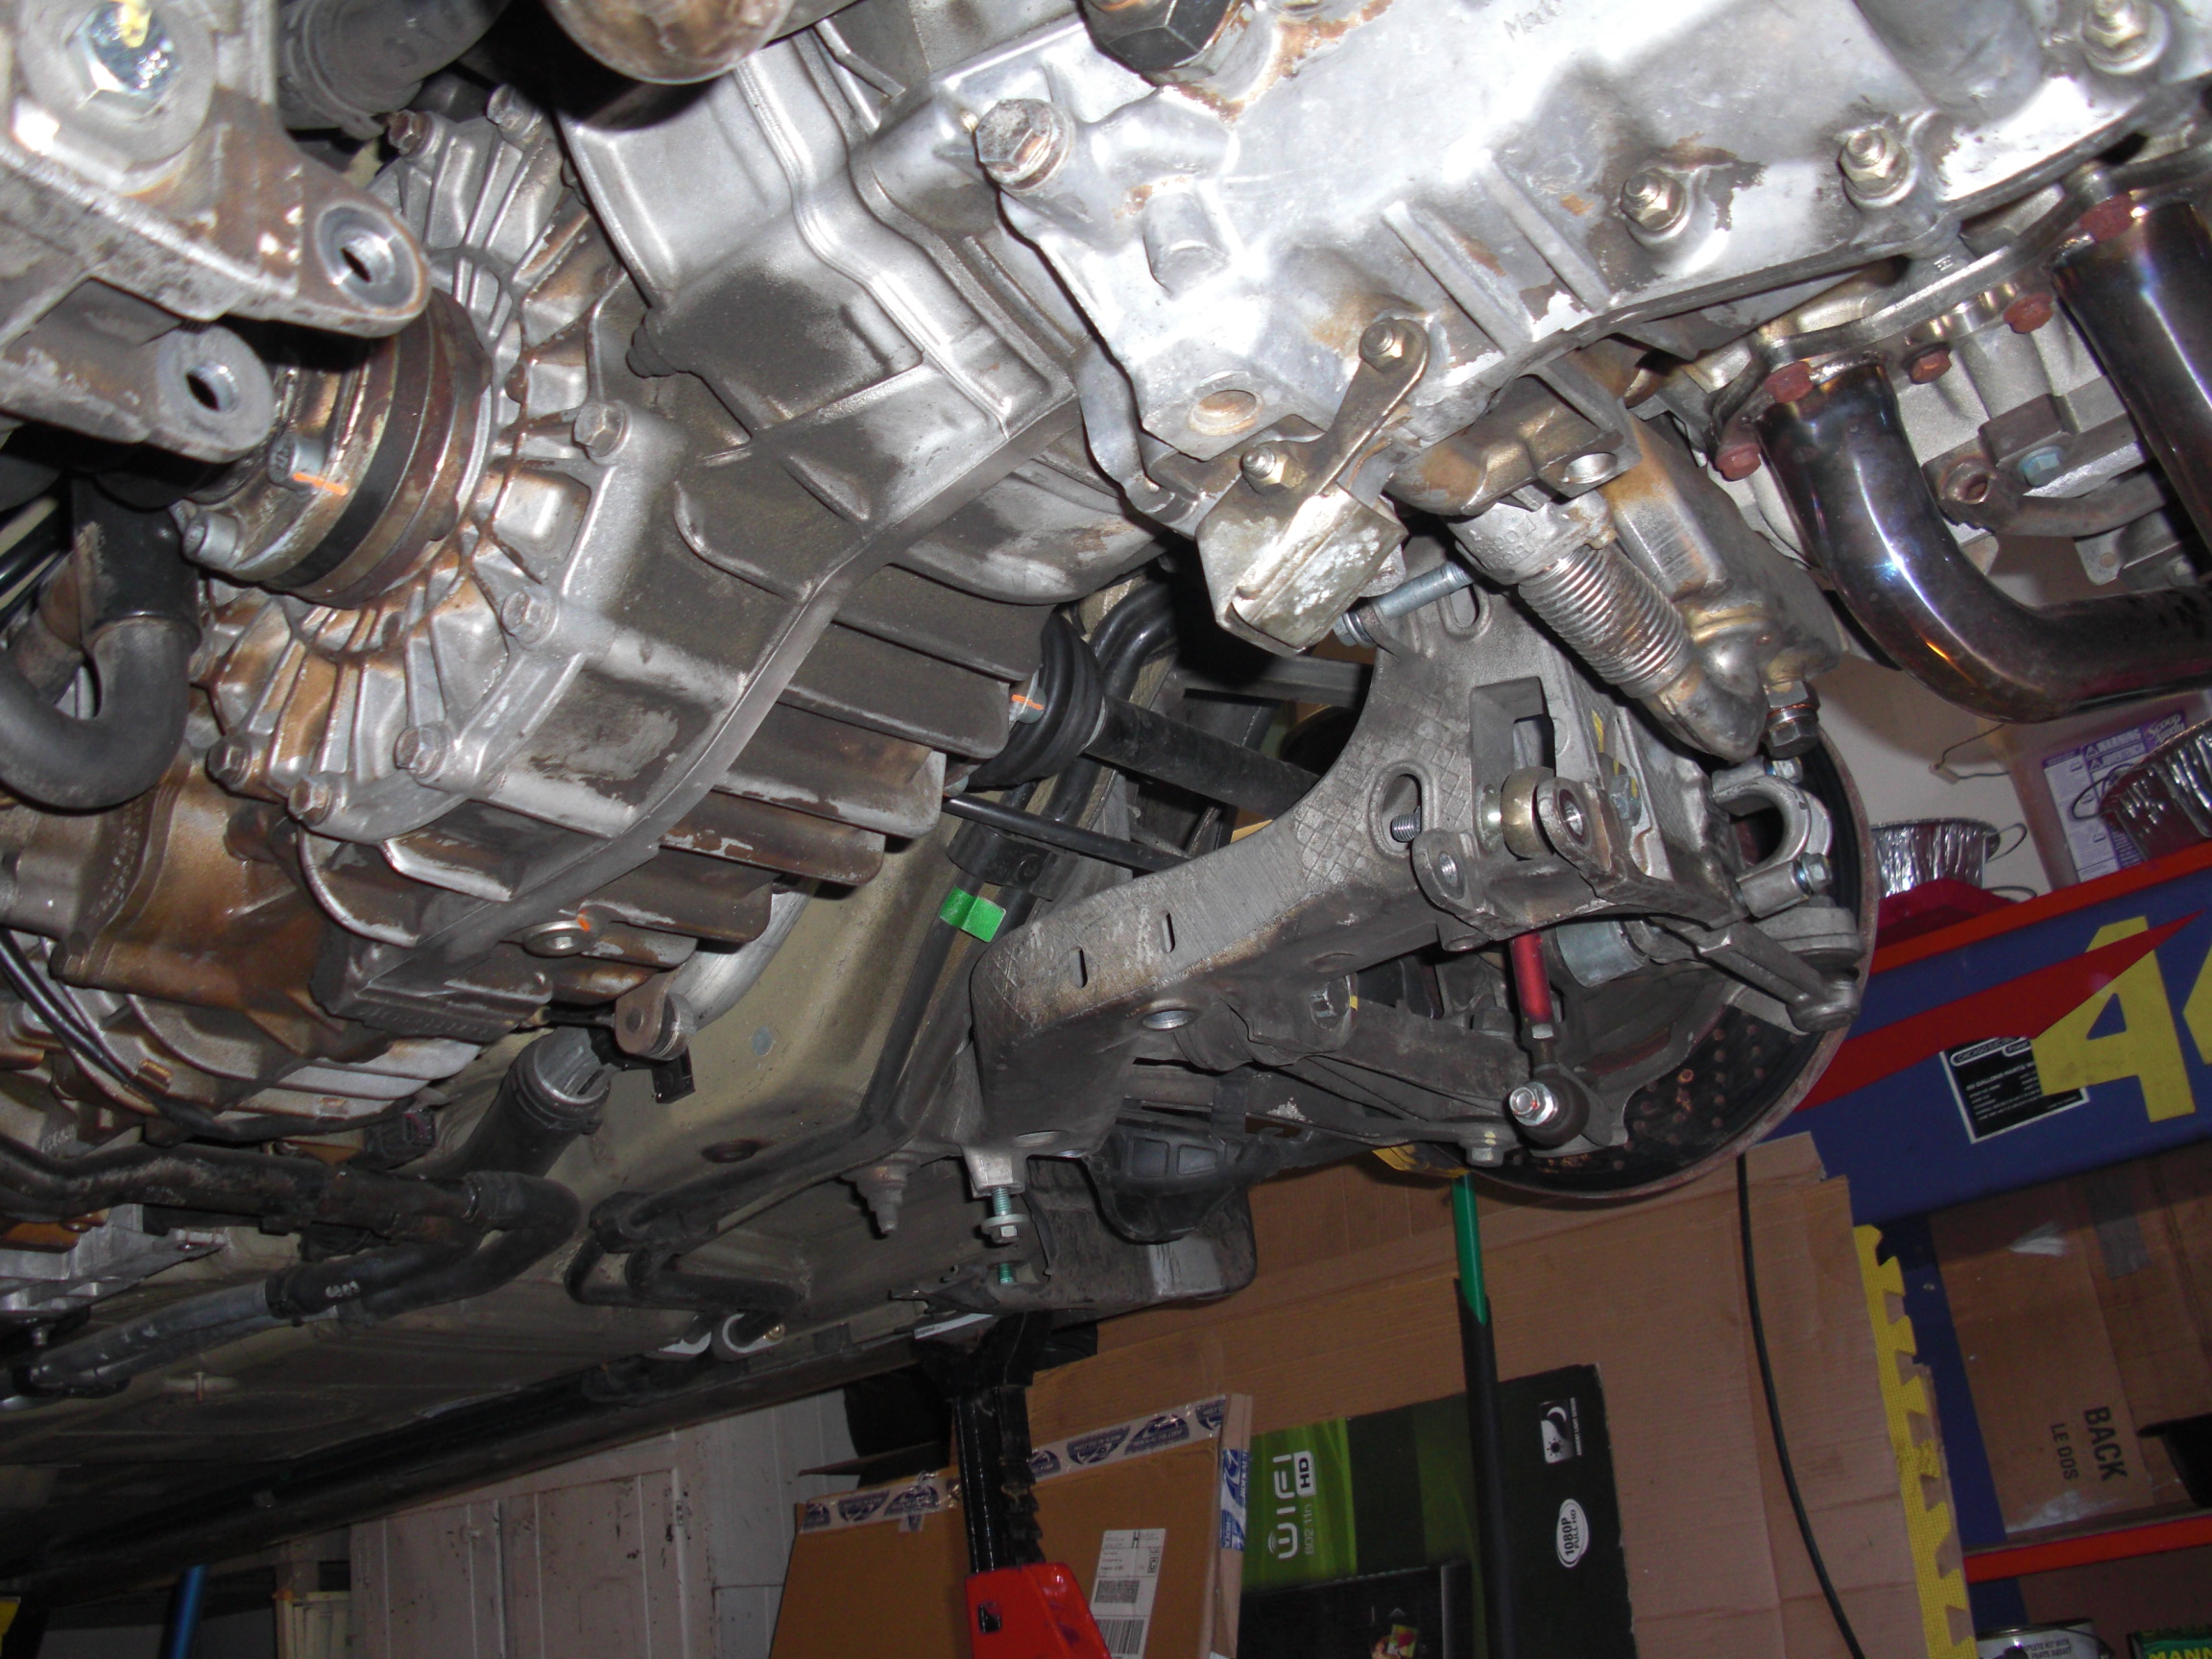
Including pictures for reference (and from different angles) for those who think about doing this... Check out collapsed main hose under reservoir while applying vacuum with refill tool drawing coolant into reservoir (venturi effect). Makes it a breeze to fill system. Great investment! Some pictures show missing items, like diagonal supports and sway bar. Will continue to document as I go along. No real surprises... I have done a few 911 aircooled drops in the past... So this is a new experience but kind of similar...
11-05-2013, 02:12 PM
#11
Nordschleife Master
Props for doing this without a lift Lou. Would be curious to hear more about your
That's the one thing that is a mystery to me, and frankly a bit scary.
Rodney, what's the going rate for the coolant fittings fix? $1,500 ish?
pressurization/refill air driven tool (venturi effect)
Rodney, what's the going rate for the coolant fittings fix? $1,500 ish?
11-05-2013, 02:45 PM
#12
Racer
Thread Starter
In addition, I will have two regular car jacks while I loosen fittings under the car. YOU CAN NEVER BE TOO SAFE!
I have a motorcycle jack and 2 regular car jacks. I have removed aircooled engines in the past by myself using this method. Just need to be careful and it helps to have a helper if available. Remember, the factory puts them in the car this way...
The tool I use to refill the cooling system is:
Very well made and relatively inexpensive as tools go (They have a plastic version also). It has two hoses that attach to gauge unit. Gauge unit has multiple adapters to fit different size reservoirs. You attach the T hose to the gauge unit and attach an air hose. Turn compressor on and it creates a vacuum in the system via venturi effect.
Close valve. Connect suction hose, open valve and coolant gets sucked into system in about 1 minute from a container. No air pockets. Just get up to temp and add a bit of coolant... Piece of cake! I usually vacuum a few times and the reservoir gets filled. Repeat to drain all fluid.
11-05-2013, 03:00 PM
#13
Racer
Join Date: Apr 2003
Location: Pa.
Posts: 364
Likes: 0
Received 0 Likes
on
0 Posts
Signing in for this one, I too have done about half dozen or so air cooled drops so paying attention in class on this for an education. Not related to the task at hand but how may miles are on your car?
11-05-2013, 03:12 PM
#14
Race Car
Aaron (loworbitsi) and I also did it with no lift. Sucks but it's not the end of the world. I made the mistake of not getting the car high enough which called for some creativity later in the process. Aaron learned from my mistake and did get his car far enough in the air. Lou yours looks plenty high. You using a motorcycle jack to lower the engine?
11-05-2013, 03:22 PM
#15
Racer
Thread Starter