
MkII AOS DIY
 01-05-2015, 03:41 PM
#1
Nordschleife Master
Thread Starter
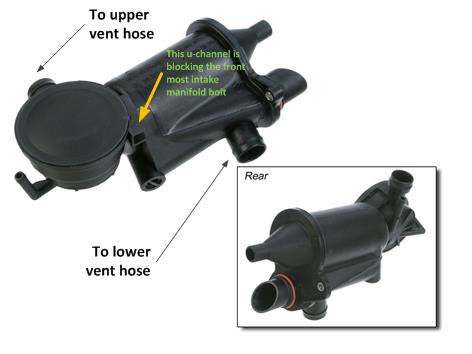
Ok, I just finished this completely and here's my write up. Hopefully it will save the next guy some time. The bottom line is I had to unbolt the AOS first so I could put a socket on the front most intake manifold bolt (not mentioned in other AOS write ups I saw). And you need to get the two AOS bolts from the bottom. Most difficult and critical parts in BOLD.
Parts I used
AOS 99610702651
Gasket 99711024700 x 3
Spring clamps 99951265009 x 3. Note this is a 997 part but they are identical to your stock spring clamps. For 996s, they've changed these to the worm-screw type, which I dislike. Just be very careful removing the spring clamps as they tend to slip and fly around. You will never find them if they do. Worse, they may fall into the intake holes or AOS engine hole if you don't cover those well.
AOS removal on a ’03 Carrera Coupe manual transmission
1. Disconnect MAF and remove the airbox, serpentine belt, throttle body, and front intake plenum
2. Push the left rubber sleeve all the way to the left, then wiggle the plenum out
3. Remove the alternator (maybe optional but I removed it to get more room)
4. Remove the vacuum line to the intake plenum and the one to the rear resonator actuator
5. Remove the vacuum elbow and changeover valve on the left intake manifold
6. Disconnect the brake booster vacuum line from the intake manifold
7. Remove the O2 sensor wires from their guiding rails or clips
8. Lower the engine (jack at its strongest point) till it’s resting on the rear subframe cross member and leave the jack there to support it
9. Disconnect the lower AOS vent hose using BOTH HANDS from the bottom
10. Move the vent line out of the way so it’s not blocking the rear AOS 5mm allen head bolt
11. Remove the rear AOS 5mm allen head bolt using a mini-ratchet + 5mm hex bit
12. Remove the front AOS 5mm allen head bolt (a mini-ratchet with a handle that bends downward)
13. Loosen and move the hose clamp on the hose (away from the AOS) that connects to the very bottom of the AOS
14. Unseat the AOS and push it a little toward the front of the car so you can put a socket on the front most intake manifold bolt (otherwise it’s blocking that bolt)
15. Remove the the front most intake runner bolt, then the remaining 5 intake manifold bolts
16. Seperate the rear plenum and remove it
17. Siphon the coolant from coolant reservoir
18. Disconnect the vertical coolant hose between the alternator and the power steering pump (so you can remove the intake manifold from the car)
19. Remove the left intake manifold
20. Disconnect the upper AOS vent hose
21. Remove the 2 coolant lines from the AOS
22. Remove AOS from the engine compartment
AOS reinstall
Reverse of the above.
Image courtesy of Atlanta Porsche Parts.
Parts I used
AOS 99610702651
Gasket 99711024700 x 3
Spring clamps 99951265009 x 3. Note this is a 997 part but they are identical to your stock spring clamps. For 996s, they've changed these to the worm-screw type, which I dislike. Just be very careful removing the spring clamps as they tend to slip and fly around. You will never find them if they do. Worse, they may fall into the intake holes or AOS engine hole if you don't cover those well.
AOS removal on a ’03 Carrera Coupe manual transmission
1. Disconnect MAF and remove the airbox, serpentine belt, throttle body, and front intake plenum
2. Push the left rubber sleeve all the way to the left, then wiggle the plenum out
3. Remove the alternator (maybe optional but I removed it to get more room)
4. Remove the vacuum line to the intake plenum and the one to the rear resonator actuator
5. Remove the vacuum elbow and changeover valve on the left intake manifold
6. Disconnect the brake booster vacuum line from the intake manifold
7. Remove the O2 sensor wires from their guiding rails or clips
8. Lower the engine (jack at its strongest point) till it’s resting on the rear subframe cross member and leave the jack there to support it
9. Disconnect the lower AOS vent hose using BOTH HANDS from the bottom
10. Move the vent line out of the way so it’s not blocking the rear AOS 5mm allen head bolt
11. Remove the rear AOS 5mm allen head bolt using a mini-ratchet + 5mm hex bit
12. Remove the front AOS 5mm allen head bolt (a mini-ratchet with a handle that bends downward)
13. Loosen and move the hose clamp on the hose (away from the AOS) that connects to the very bottom of the AOS
14. Unseat the AOS and push it a little toward the front of the car so you can put a socket on the front most intake manifold bolt (otherwise it’s blocking that bolt)
15. Remove the the front most intake runner bolt, then the remaining 5 intake manifold bolts
16. Seperate the rear plenum and remove it
17. Siphon the coolant from coolant reservoir
18. Disconnect the vertical coolant hose between the alternator and the power steering pump (so you can remove the intake manifold from the car)
19. Remove the left intake manifold
20. Disconnect the upper AOS vent hose
21. Remove the 2 coolant lines from the AOS
22. Remove AOS from the engine compartment
AOS reinstall
Reverse of the above.
- After you connect the coolant lines to the AOS and the vertical coolant hose between the alternator and the power steering pump, you can choose to refill the coolant at this point and do a pressure test (before refilling coolant) to 18 PSIG and see if there’s a any leak at the AOS and the coolant line when things are still apart
- If you use new o-rings on the AOS vent hoses, apply some o-ring grease on them. That will prevent the dry o-rings from being crushed when inserting into the AOS. Do the same to the orange o-ring at the bottom of the AOS.
- Torque the intake manifold bolts to 7.5 ftlb
- To put the rear AOS allen head bolt in place, you need to manipulate the bolt with BOTH HANDS and be careful not to drop the bolt on the cavities of the engine. It can be very difficult to retrieve the bolt.
Image courtesy of Atlanta Porsche Parts.
Last edited by Ahsai; 03-30-2015 at 02:05 PM. Reason: Added the part list
 01-05-2015, 05:25 PM
#2
Rennlist Member
Join Date: Apr 2010
Location: Ormond Beach, FL
Posts: 5,960
Likes: 0
Received 1,198 Likes
on
767 Posts
Very good writeup. That last intake bolt all the way in the back is all guess work. I had to do that completely by feel. Same goes for the AOS rear bolt. Dropped that and spent 2 days trying to find it. Also, the intake bolts had thread locker on them, so I used some in the re-install and cleaning them up. Loctite Blue (not red). Since you will be working directly over the open intake runners, two things: lift straight up and out the back, hopefully the intake o-rings will stay on the manifold, then immediately cover the intake runners with a shop towel so you don't drop something down one of the intakes! Replace the intake o-rings with new, and get a new throttle body o-ring as well. Also be prepared to break most if not all of the vacuum plastic tubing and learning how they are routed.
01-05-2015, 06:00 PM
#3
Nordschleife Master
Thread Starter
Thanks Joe. Great tips you have right there! I followed most of those but I skipped the thread locker. I just don't want to fight with thread locker next time if I have to do it again. I'll check the bolts from time to time to make sure they are tight.
Is yours also MkII? Most of the write ups were on MkI where the AOS is NOT blocking the front most intake manifold bolt so it's easier. The whole issue with MkII is part of the AOS is like an inch on top of that intake manifold bolts making socket impossible. You can use a box wrench but then you won't be able to remove the bolt (blocked by the AOS. The extra support u-channel bracket that's below the big round part which was not present in MkI AOS).
Is yours also MkII? Most of the write ups were on MkI where the AOS is NOT blocking the front most intake manifold bolt so it's easier. The whole issue with MkII is part of the AOS is like an inch on top of that intake manifold bolts making socket impossible. You can use a box wrench but then you won't be able to remove the bolt (blocked by the AOS. The extra support u-channel bracket that's below the big round part which was not present in MkI AOS).
01-06-2015, 01:24 AM
#4

Thanks Joe. Great tips you have right there! I followed most of those but I skipped the thread locker. I just don't want to fight with thread locker next time if I have to do it again. I'll check the bolts from time to time to make sure they are tight.
Is yours also MkII? Most of the write ups were on MkI where the AOS is NOT blocking the front most intake manifold bolt so it's easier. The whole issue with MkII is part of the AOS is like an inch on top of that intake manifold bolts making socket impossible. You can use a box wrench but then you won't be able to remove the bolt (blocked by the AOS. The extra support u-channel bracket that's below the big round part which was not present in MkI AOS).
Is yours also MkII? Most of the write ups were on MkI where the AOS is NOT blocking the front most intake manifold bolt so it's easier. The whole issue with MkII is part of the AOS is like an inch on top of that intake manifold bolts making socket impossible. You can use a box wrench but then you won't be able to remove the bolt (blocked by the AOS. The extra support u-channel bracket that's below the big round part which was not present in MkI AOS).
01-06-2015, 01:32 AM
#5
Nordschleife Master
Thread Starter
http://www.ecstuning.com/Porsche-200...501/ES1353321/
They last fine even after 11 yrs and I didn't have to replace them. However, the Elbows and other rubber connectors are hardened so may as well replace them. My vacuum reservoir has a small leak at the bottom of it.
The whole vacuum system is like $150 from Sunset - vacuum reservoir, 2 changeover valves, 2 "Y" connectors, 4 elbows, and about 50" of vacuum lines.
Last edited by Ahsai; 01-06-2015 at 01:48 AM.
01-06-2015, 06:18 AM
#6

I replaced the AOS on my 96 C2 2002 a couple of years ago. I don't know if there are slightly different routings of some hoses on a 2002 and a 2003, but on my car it was very, very hard to replace the AOS when lowering the engine only to the subframe cross member. Some hoses where blocking a lot of space around some of the bolts so they where insanely hard to remove and reinstall.
I have replaced the AOS once more, and then I removed the subframe cross member and lowered the engine a lot more than the first time. I think it was worth the extra effort of removing some of the cables and hoses (like when you remove the engine completely) from the engine to get it down.
Robert
I have replaced the AOS once more, and then I removed the subframe cross member and lowered the engine a lot more than the first time. I think it was worth the extra effort of removing some of the cables and hoses (like when you remove the engine completely) from the engine to get it down.
Robert
01-06-2015, 11:41 AM
#7
Addict
Rennlist Member
Rennlist Member
The one additional, and very important, step I will mention is to label and photograph as much as you can.
I didn't do this and when the time came to hook up some of the vacuum lines it was a mess.
I managed to get the car to the dealer afterwards and had them clean up my mess.
So the actual task is fairly straightforward but all of the little bits you need to finish up to complete the job are a nightmare if you don't have them clearly identified.
But hey at least now I know for the next time!
Trending Topics
01-06-2015, 01:01 PM
#9

Although I've only worked on BMW AOS's as haven't needed to change out my 996 one yet, I'm really surprised as this AOS seems like a self contained unit, that no one has bothered to just remotely located it and run additional tubing to a more accessible location. I know AOS's don't go out that much but I could see the relocation making sense for track junkies. Or even better yet, just using a more robust AOS from another car and adapting the tubing and such.
01-06-2015, 01:27 PM
#10
Drifting

Alpine,
Great idea. There was a recent thread discussing the relocate+upgrade idea for the AOS using BMW/generic parts. One Rennlister in that thread has a fix for the issue.
http://986forum.com/forums/performan...p-version.html.
The AOS is one of those nasty issues that undermines the reputation of the M96 because of the oil smoke and access issue. We need to share a better solution.
01-06-2015, 01:59 PM
#11
Nordschleife Master
Thread Starter
I replaced the AOS on my 96 C2 2002 a couple of years ago. I don't know if there are slightly different routings of some hoses on a 2002 and a 2003, but on my car it was very, very hard to replace the AOS when lowering the engine only to the subframe cross member. Some hoses where blocking a lot of space around some of the bolts so they where insanely hard to remove and reinstall.
I have replaced the AOS once more, and then I removed the subframe cross member and lowered the engine a lot more than the first time. I think it was worth the extra effort of removing some of the cables and hoses (like when you remove the engine completely) from the engine to get it down.
Robert
I have replaced the AOS once more, and then I removed the subframe cross member and lowered the engine a lot more than the first time. I think it was worth the extra effort of removing some of the cables and hoses (like when you remove the engine completely) from the engine to get it down.
Robert
It turns out the MOST difficult and critical is the rear 5mm allen head AOS bolt (the one closer to the rear of the car). Once the two AOS bolts are removed, you can lift up the AOS and then you can get a clear shot at the front most intake manifold bolt. To remove that AOS allen head bolt, you need to remove the lower vent line on the AOS first because it's blocking the bolt. To remove the lower vent line, you need to lower the engine first and use both hands to disconnect the lower vent line.
I thought about removing the cross member but I don't want to get a new alignment (may or may not be needed. Need to research more) plus I don't want to risk bending any lines such as a/c, hydraulic lines, coolant pipes, etc. I can see how easy the whole process would have been if I have another inch of room to work with.
The one additional, and very important, step I will mention is to label and photograph as much as you can.
I didn't do this and when the time came to hook up some of the vacuum lines it was a mess.
I managed to get the car to the dealer afterwards and had them clean up my mess.
So the actual task is fairly straightforward but all of the little bits you need to finish up to complete the job are a nightmare if you don't have them clearly identified.
But hey at least now I know for the next time!
I didn't do this and when the time came to hook up some of the vacuum lines it was a mess.
I managed to get the car to the dealer afterwards and had them clean up my mess.
So the actual task is fairly straightforward but all of the little bits you need to finish up to complete the job are a nightmare if you don't have them clearly identified.
But hey at least now I know for the next time!
I replaced everything in the photo (except the rear plenum) for $150 or so.
Took me half a day to remove and half a day to put it back in but that's including new AOS, new vacuum system (valves, hoses, vacuum reservoir), new alternator, new starter cable, new o-rings on the AOS vent hoses, new oil filler tube, new coolant hose, etc. Also including all the time trial-and error on the impossibles and 45 min fishing the rear AOS bolt that fell into one of the cavities on the top of the engine. It's important to use BOTH hands to insert that bolt.
If you follow the steps above, I expect one can do the AOS in 4hrs or less. The trick is to not waste time and energy on the impossibles
If I were to do it again, I'm pretty confident I can do it in a few hrs.
01-06-2015, 05:13 PM
#12
Nordschleife Master
Thread Starter
Although I've only worked on BMW AOS's as haven't needed to change out my 996 one yet, I'm really surprised as this AOS seems like a self contained unit, that no one has bothered to just remotely located it and run additional tubing to a more accessible location. I know AOS's don't go out that much but I could see the relocation making sense for track junkies. Or even better yet, just using a more robust AOS from another car and adapting the tubing and such.
Alpine,
Great idea. There was a recent thread discussing the relocate+upgrade idea for the AOS using BMW/generic parts. One Rennlister in that thread has a fix for the issue.
http://986forum.com/forums/performan...p-version.html.
The AOS is one of those nasty issues that undermines the reputation of the M96 because of the oil smoke and access issue. We need to share a better solution.
Great idea. There was a recent thread discussing the relocate+upgrade idea for the AOS using BMW/generic parts. One Rennlister in that thread has a fix for the issue.
http://986forum.com/forums/performan...p-version.html.
The AOS is one of those nasty issues that undermines the reputation of the M96 because of the oil smoke and access issue. We need to share a better solution.
Last edited by Ahsai; 01-06-2015 at 05:36 PM.
01-06-2015, 05:19 PM
#13
Drifting
The complication with a remote AOS is arranging a drain-back for the condensed oil. If you read the link I gave above, that was discussed by the inventor of the improved system as he patiently critiqued my fumbling attempts to propose a generic alternative to the porsche AOS .
01-06-2015, 05:24 PM
#14
Nordschleife Master
Thread Starter
Yes, I had read the link and understood the issues. Probably overkill for a street car though. A working stock AOS does not seem to create problems for street cars as far as I remember on the forums.
01-07-2015, 02:58 PM
#15
Nordschleife Master
Thread Starter
The complication with a remote AOS is arranging a drain-back for the condensed oil. If you read the link I gave above, that was discussed by the inventor of the improved system as he patiently critiqued my fumbling attempts to propose a generic alternative to the porsche AOS .