
MkII 996 vacuum line routing and related components
 12-22-2014 | 01:35 PM
#1
Thread Starter
Nordschleife Master
Joined: May 2005
Posts: 7,328
Likes: 68
I'm in the process of replacing my AOS and the starter cable so I have the left intake manifold off the engine ('03 C2 coupe manual transmission). While I'm in there, I decided to refresh my vacuum system and replace all the vacuum lines, the rubber Y's and elbows, the vacuum reservoir, and the two changeover valves. All that for only $130. The stock vacuum line is available from Porsche for a few bucks per meter and you need about 1,200 mm. You can also replace them with your favorite vacuum hoses. I stay with stock lines since they hold up surprisingly well and they are light and less bulky.
Stock vacuum hose line P/n 00004320501 (1m)
I just want to document the info here hopefully helping the next guy.
My stock vacuum lines are still in very good shape as far as I can tell but the problems are all the "Y" and elbows. They are not sealing the best. Also, the vacuum reservoir is leaking slowly while tested with a hand vacuum pump. I also tested the changeover valves and they are all good.
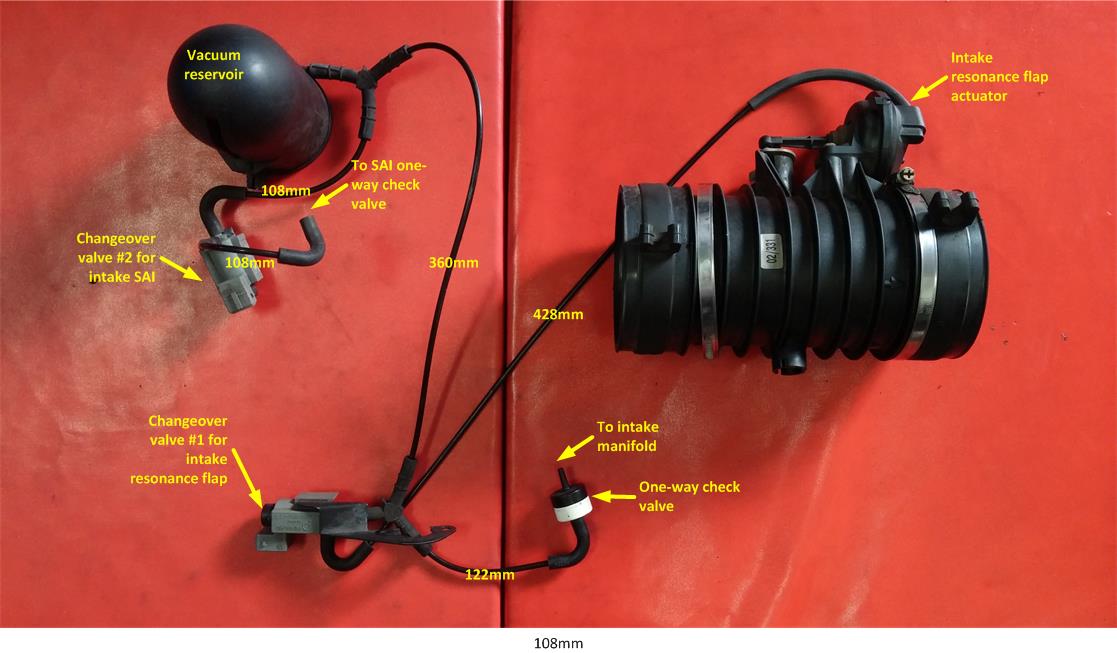
The system is very simple. The vacuum is supplied to the one-way check valve from the intake plenum then it branches off to the vacuum reservoir and changeover valve #1, which powers the intake resonance actuator when electrical power is supplied.
The vacuum reservoir then supplies vacuum to changeover valve #2, which powers the SAI one-way check valve that opens whenever the SAI pump is running.
To check the system quickly, you can use connect a hand vacuum pump to the black/white valve and create vacuum. Then you power each changeover valve and you should hear the resonator flap rotates and the SAI valve moves as well.
To check whether the WHOLE system holds vacuum, remove the black/white valve and connect the pump there and start pumping. Vacuum level should stay once you reach some vacuum level and stop pumping.
Stock vacuum hose line P/n 00004320501 (1m)
I just want to document the info here hopefully helping the next guy.
My stock vacuum lines are still in very good shape as far as I can tell but the problems are all the "Y" and elbows. They are not sealing the best. Also, the vacuum reservoir is leaking slowly while tested with a hand vacuum pump. I also tested the changeover valves and they are all good.
The system is very simple. The vacuum is supplied to the one-way check valve from the intake plenum then it branches off to the vacuum reservoir and changeover valve #1, which powers the intake resonance actuator when electrical power is supplied.
The vacuum reservoir then supplies vacuum to changeover valve #2, which powers the SAI one-way check valve that opens whenever the SAI pump is running.
To check the system quickly, you can use connect a hand vacuum pump to the black/white valve and create vacuum. Then you power each changeover valve and you should hear the resonator flap rotates and the SAI valve moves as well.
To check whether the WHOLE system holds vacuum, remove the black/white valve and connect the pump there and start pumping. Vacuum level should stay once you reach some vacuum level and stop pumping.
Last edited by Ahsai; 04-04-2015 at 03:08 PM.
The following users liked this post:
wyowolf (09-02-2024)
12-22-2014 | 02:41 PM
#3
Thread Starter
Nordschleife Master
Joined: May 2005
Posts: 7,328
Likes: 68
See my design here http://www.garagejournal.com/forum/s...&postcount=140
Last edited by Ahsai; 12-22-2014 at 03:02 PM.
12-22-2014 | 04:11 PM
#5
Racer
Joined: Nov 2012
Posts: 284
Likes: 1
From: Alberta, Canada
 12-22-2014 | 04:28 PM
#6
Thread Starter
Nordschleife Master
Joined: May 2005
Posts: 7,328
Likes: 68
12-22-2014 | 04:38 PM
#7
Racer
Joined: Nov 2012
Posts: 284
Likes: 1
From: Alberta, Canada
Or try this Finding Engine Vacuum Leaks With A Cigar - YouTube haha
Yea, that would be the "manual" mode on my contraption
(now i have to add a switch) 
Trending Topics
 12-24-2014 | 05:04 PM
#9
Racer
Joined: Aug 2011
Posts: 290
Likes: 17
From: Wisconsin
Great write up Ahsai. I've been struggling with codes p0491 & p0492. Knowing that you replaced all that for about $130, I may do the same. The dealer has tried, but been unable to make the codes go away. They replaced a hose they thought was cracked, which made the whirring noise I heard at 80+ mph go away, but the codes still came back.
12-24-2014 | 07:00 PM
#10
Thread Starter
Nordschleife Master
Joined: May 2005
Posts: 7,328
Likes: 68
Great write up Ahsai. I've been struggling with codes p0491 & p0492. Knowing that you replaced all that for about $130, I may do the same. The dealer has tried, but been unable to make the codes go away. They replaced a hose they thought was cracked, which made the whirring noise I heard at 80+ mph go away, but the codes still came back.
Do you hear your SAI pump running at all? Your codes indicate that both banks dont see fresh air. Once you remove the parts I show here, you can attach a vacuum pump directly to the SAI metal one-way check valve on top of the engine, apply power to the changeover valve and blow in the hose that's connected to the SAI pump (after disconnectimg it from the SAI pump end). If you can blow through, the SAI valve is working and the fault is likely at the rest of the system where you can test each part individually.
12-24-2014 | 08:06 PM
#11

5th Gear
Joined: Apr 2012
Posts: 5
Likes: 0
Hi,
I was also getting those codes and found some leaks and a bad solenoid using a hand pump - see rennlist.com/forums/996.../802749-quest-of-the-vacuum-leak.html
I cleared the codes but they soon came back. When installing some Fabspeed cat bypass pipes, I found that one of my cats was loose and was hitting the O2 sensor.
For me, I think this was causing these codes. The codes are gone but I have a new one due to the cat bypass.
Steve
12-24-2014 | 10:09 PM
#13
Racer
Joined: Aug 2011
Posts: 290
Likes: 17
From: Wisconsin
Yea, I got all the parts from Sunset www.porschepartshub.com
Do you hear your SAI pump running at all? Your codes indicate that both banks dont see fresh air. Once you remove the parts I show here, you can attach a vacuum pump directly to the SAI metal one-way check valve on top of the engine, apply power to the changeover valve and blow in the hose that's connected to the SAI pump (after disconnectimg it from the SAI pump end). If you can blow through, the SAI valve is working and the fault is likely at the rest of the system where you can test each part individually.
Do you hear your SAI pump running at all? Your codes indicate that both banks dont see fresh air. Once you remove the parts I show here, you can attach a vacuum pump directly to the SAI metal one-way check valve on top of the engine, apply power to the changeover valve and blow in the hose that's connected to the SAI pump (after disconnectimg it from the SAI pump end). If you can blow through, the SAI valve is working and the fault is likely at the rest of the system where you can test each part individually.
04-10-2015 | 11:07 AM
#14
Rennlist Member
Joined: Oct 2014
Posts: 6,795
Likes: 1,169
From: L.I. NY
"Dealer receipt basically says (paraphrased) checked SAI pump, checked checked SAI valve, checked RKAT values, pressurized system and checked for leaks, replaced hose."
That's shorthand for "We didn't do **** except replace a cheap vacuum hose, but we charged you a crazy price for it, and also for the time we spent not finding any problems - but the book said it should take 3 hrs. @ $150/hr. so..."
That's shorthand for "We didn't do **** except replace a cheap vacuum hose, but we charged you a crazy price for it, and also for the time we spent not finding any problems - but the book said it should take 3 hrs. @ $150/hr. so..."