When you click on links to various merchants on this site and make a purchase, this can result in this site earning a commission. Affiliate programs and affiliations include, but are not limited to, the eBay Partner Network.
Thanks for the write up. Since my car has 125K on it I'm going to change this and the water pump over the winter. While in there what soft hoses should also be replaced that are listed in this diagram? 4, 12, 5, 13, 20? Am I correct to assume that 2, 10 & 11 come with a new AOS? Is 18 the piece that is easily broken?
Hi kpl, I found all my hoses still in good shape so I only replaced hose #20. In addition, I also replaced the following parts:
- 19 (x2), 18, 15, 22 (x3 - one on #4 and two on #5). Yes, 18 is the piece that's easy to break but mine was still strong. I replaced it anyway hence also replacing 15, 19's and 20 at the same time. 15 is the Oetiker type (one-time use) from the dealer. You can use a NORMA 8-16mm worm-drive clamp to substitute.
I reused the 14's (but you may want to replace these with NORMA 8-16mm worm-drive clamps as well) and the hose clamp at the very bottom of the AOS (not in the diagram). I took my chances reusing those clamps and so far they seem to be sealing fine.
Please let us know how it goes as I'm curious if you also face the same challenges I mentioned in my 1st post.
Doing the water pump the same time is good. You have overlap steps of removing the airbox, serpentine belt, lowering the engine and draining the coolant.
THANKS! are 4 & 5 hard plastic lines as opposed to rubber?
That's correct. 4 is corrugated since it needs to bend during removal/install. It snakes through between the intake runners of the intake manifolds). 5 is smooth but both are hard plastic.
Started the process today. All of the work from the top went very quickly. I'm now stuck trying to figure out how my AOS is mounted from the bottom. I'm trying to disassemble everything while I wait on parts to arrive later this week.
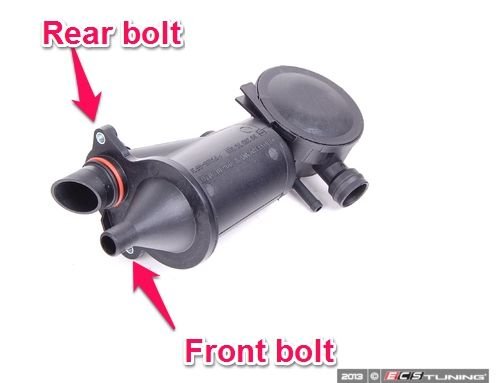
First strange point is that I don't appear to have 5mm hex bolts attaching the AOS...the front AOS bolt is a standard 10mm bolt (not hex), and I can't seem to find the rear bolt - not exactly sure what I'm trying to find, but I can't feel any 5mm bolts back there Is it typical to have the electrical lines running under the lower vent hose?
Maybe the shop that replaced the AOS (by the PO) a few years ago didn't attach it with the correct fasteners?
I've never done the job before....but I do save some pictures when I see good ones....and sometimes that includes 911 pictures....here is one that I have, hope it helps!
It's possible the previous installer didn't even fit the rear bolt as that's the most difficult bolt in this job. Yes, somehow Porsche engineers found it totally appropriate to run electrical wires there to capture the AOS and block you in every way.
The 10mm bolt may be nothing as long as the threads and length are correct.
Just to clarify my terminology of front and rear. Can you feel if the rear bolt is there based on the pic below?
Originally Posted by spruden
Started the process today. All of the work from the top went very quickly. I'm now stuck trying to figure out how my AOS is mounted from the bottom. I'm trying to disassemble everything while I wait on parts to arrive later this week.
First strange point is that I don't appear to have 5mm hex bolts attaching the AOS...the front AOS bolt is a standard 10mm bolt (not hex), and I can't seem to find the rear bolt - not exactly sure what I'm trying to find, but I can't feel any 5mm bolts back there Is it typical to have the electrical lines running under the lower vent hose?
Maybe the shop that replaced the AOS (by the PO) a few years ago didn't attach it with the correct fasteners?
I've never done the job before....but I do save some pictures when I see good ones....and sometimes that includes 911 pictures....here is one that I have, hope it helps!
The electrical lines shown in PW's photo are under the AOS hose nipple on my car and what a PIA it is to release the hose clamp with those wires under there. My fingers are still numb.
I am doing mine right now with the trans out and working from the flywheel end of the engine. I discovered late today that I can just reach that rear bolt from the back of the car, reaching past the coolant tank, so am going to give that a shot tomorrow. No way I can handle that bolt from under the car at the flywheel and keep what is left of my sanity.
Spruden, if you lower the engine to the max and your hands are not too big, you could reach that bolt from the side with just your fingers, right below the fuel rail. Or you can try what Rockhouse mentioned.
Oh boy, looks this is like a big 9-DIY on a 10 scale, assuming 10 is for the ISM bearing/Engine rebuild job... I just hope my AOS will last a while longer, if not I will have to take it to dealer or a good Porsche Indie and pay the price... At that time, it may make sense to also do the IMS/RMS upgrade. WOW, you guys are tough DIY'ers, good job!
It's not bad...just takes time. The two AOS bolts on your Mk I are different and they're a lot easier to remove so no fear.
Originally Posted by Botsy67
Oh boy, looks this is like a big 9-DIY on a 10 scale, assuming 10 is for the ISM bearing/Engine rebuild job... I just hope my AOS will last a while longer, if not I will have to take it to dealer or a good Porsche Indie and pay the price... At that time, it may make sense to also do the IMS/RMS upgrade. WOW, you guys are tough DIY'ers, good job!
 01-08-2015, 04:19 PM


 Is it typical to have the electrical lines running under the lower vent hose?