Huge oil leak
 05-30-2014, 06:43 PM
#16
Advanced
Thread Starter

Join Date: May 2014
Location: EL PASO, TX
Posts: 85
Likes: 0
Received 0 Likes
on
0 Posts
 05-30-2014, 06:53 PM
#17
Rennlist Member
[QUOTE=Pcargo;11403484]Just got back from the garage it's not the oil sensor. It looks like the valve cover gasket because the leak does not go above it in the pics you can see only the upper control arm is covered in oil and when looking at the valve cover it looks like half the gasket is sticking out
Things will probably be fine after mounting a new plug.
If you lose the plug again someone may have re-sealed that side and used too much sealant. A thicker layer of sealer can make the hole too big for a proper interference fit. If that is true it also can make the cam bearing clearances a little loose.
05-30-2014, 07:15 PM
#18
Former Vendor
 05-31-2014, 12:39 AM
#19
I gotta say I've been (and still am) on the fence re: Jake, but the comment that was offered up by him in regard to this post was a definite plus column one for me. Plenty of people willing to help and help the OP figure out that the green cam plug was missing but the extra (and I assume important) bit to check on the camshaft itself was a very nice bit of info to share here. This is what adds A) value to this site and B) gets people to potentially use Jake when needed as opposed to some of his other posts which generally get some people excited, some scared and some very turned off. I honestly have no idea how big of a deal this particular situation is or had the potential to be but felt the knowledge shared was good. Keep it coming and it will be repaid in spades.
06-03-2014, 02:20 PM
#20
Advanced
Thread Starter
Join Date: May 2014
Location: EL PASO, TX
Posts: 85
Likes: 0
Received 0 Likes
on
0 Posts
Update: Got the cam plug part in yesterday installed it in less than 2 minutes, cleaned up the mess made by the oil and topped off the motor. Turned on the motor let it idle for a few minutes all is good no leaks then went to go run a couple of quick errands checked on the car all is good still. Decided that since car is running good lets test it, got on it at a stop light shortly after started smelling burnt oil again stopped at my local Oriellys to get a couple of quarts of mobil 1 before heading back home (btw they are sale for $6/qt). Noticed that it started leaking again got home and the same thing trail of oil going up the driveway and pool of oil starting to form at the same place as before. I jacked up the car and sure enough the cam plug is missing again. So I keep blowing out cam plugs when I give the car a good amount of throttle, why? I am going to have to agree with fpb111 theory on previous person that worked on it got to liberal with the sealant on the valve covers.
06-03-2014, 02:25 PM
#21
Former Vendor
Sealant or some other obstruction has blocked the drain between the cam cover and head just behind this plug. This is causing the oil pressure to be elevated, which dislodges the plug. This is typical after someone reseals cam covers and uses too much sealant, thats why I asked earlier about the cam covers being resealed. This is inline with the fpb111 theory and we see it occur often here.
06-03-2014, 02:29 PM
#22
Advanced
Thread Starter
Join Date: May 2014
Location: EL PASO, TX
Posts: 85
Likes: 0
Received 0 Likes
on
0 Posts
Sealant or some other obstruction has blocked the drain between the cam cover and head just behind this plug. This is causing the oil pressure to be elevated, which dislodges the plug. This is typical after someone reseals cam covers and uses too much sealant, thats why I asked earlier about the cam covers being resealed. This is inline with the fpb111 theory and we see it occur often here.
06-04-2014, 09:54 PM
#23
Rennlist Member
The cam covers are also the upper cam bearing caps. You need to rig a way to hold the cams in place while you pull the cover. I haven't done one yet. But doing it with the engine in the car will be more difficult. Do a search someone has probably figured a way to make it work.
You could make a tool like Dharn55 did, http://www.renntech.org/forums/topic...hreaded-plugs/ that would hold them in place. There are also pics of someone's wooden clamps that go over the cam cover bearings to hold them while working on the engine.. Not sure if you need to go that far for a "quick" reseal.
You could make a tool like Dharn55 did, http://www.renntech.org/forums/topic...hreaded-plugs/ that would hold them in place. There are also pics of someone's wooden clamps that go over the cam cover bearings to hold them while working on the engine.. Not sure if you need to go that far for a "quick" reseal.
06-05-2014, 03:19 PM
#24
Advanced
Thread Starter
Join Date: May 2014
Location: EL PASO, TX
Posts: 85
Likes: 0
Received 0 Likes
on
0 Posts
The cam covers are also the upper cam bearing caps. You need to rig a way to hold the cams in place while you pull the cover. I haven't done one yet. But doing it with the engine in the car will be more difficult. Do a search someone has probably figured a way to make it work.
You could make a tool like Dharn55 did, http://www.renntech.org/forums/topic...hreaded-plugs/ that would hold them in place. There are also pics of someone's wooden clamps that go over the cam cover bearings to hold them while working on the engine.. Not sure if you need to go that far for a "quick" reseal.
You could make a tool like Dharn55 did, http://www.renntech.org/forums/topic...hreaded-plugs/ that would hold them in place. There are also pics of someone's wooden clamps that go over the cam cover bearings to hold them while working on the engine.. Not sure if you need to go that far for a "quick" reseal.
06-11-2014, 04:46 AM
#26
Advanced
Thread Starter
Join Date: May 2014
Location: EL PASO, TX
Posts: 85
Likes: 0
Received 0 Likes
on
0 Posts
Everyone keeps saying that this can be done with the engine in place, but has anyone ever done it before? So far I have been ok with doing this I'm at placing the cam holder tool in place and about to take the cam cover off before stopping for the day.
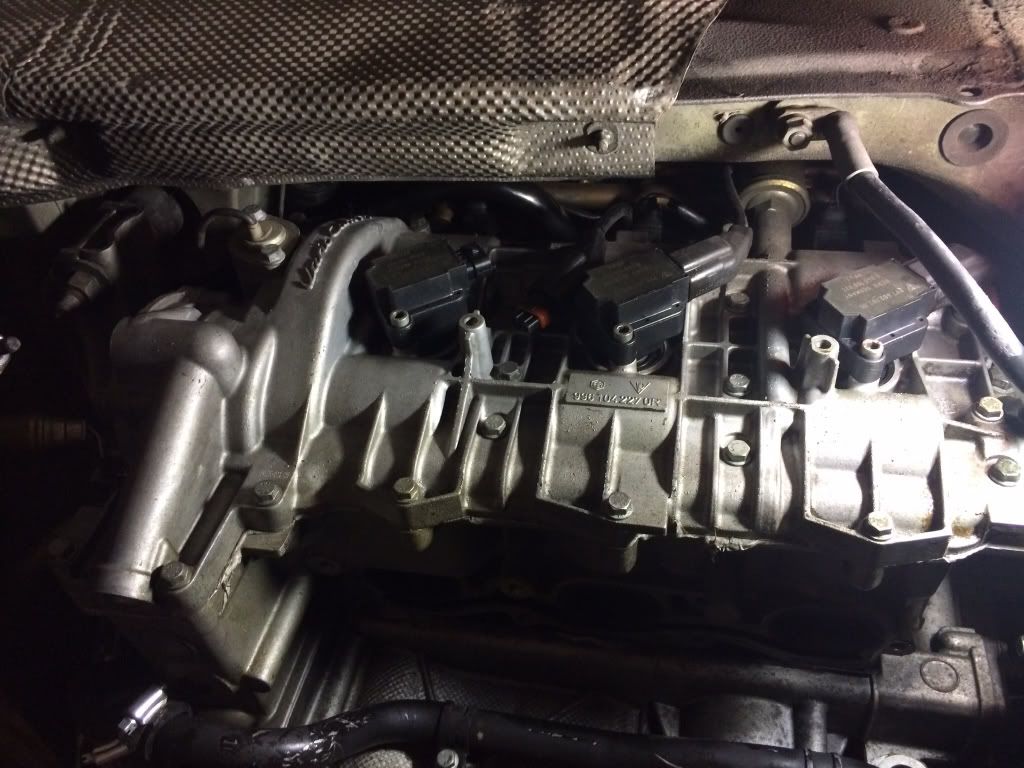
So far what has to be taken off: muffler, muffler bracket, header, air intake box, muffler support bracket (has been the most difficult to reach so far), heat shield for coils, coils, ground cable, cam plugs. The only thing left is placing the holder tool, the cam sensor, secondary oil pump and the rest of the cam cover bolts. I've manage to be able to do this so far by not taking off the rear bumper, muffler heat shields and rear wheels.
So far what has to be taken off: muffler, muffler bracket, header, air intake box, muffler support bracket (has been the most difficult to reach so far), heat shield for coils, coils, ground cable, cam plugs. The only thing left is placing the holder tool, the cam sensor, secondary oil pump and the rest of the cam cover bolts. I've manage to be able to do this so far by not taking off the rear bumper, muffler heat shields and rear wheels.
06-11-2014, 09:28 AM
#27
Former Vendor
Yes this can be done in the car, and I have done it. The issue is you'll fight with everything so because of that I have learned to pull the engine. I can do it faster and better with the engine out, but that's me. I have learned to go for the better result even if it's a more difficult approach.
Your list of things to remove is pretty close..
Your list of things to remove is pretty close..
06-11-2014, 09:55 AM
#28
Rennlist Member
Join Date: Apr 2010
Location: Ormond Beach, FL
Posts: 5,812
Likes: 0
Received 1,092 Likes
on
702 Posts
One suggestion that might help is to lower the engine a bit. Support the engine with a jack (carefully), undo the two motor mount nuts (18mm) and lower the engine. Continue to support it with the jack. I found that working around the engine, lowering it as much as possible make access a little bit better. I also found that removing the rear bumper helps a lot. It is not difficult and takes about ten minutes. You are a brave soul for going in like this on the valve cover(s). Looking forward to hearing how the project goes. Good luck!
06-11-2014, 05:47 PM
#30
Advanced
Thread Starter
Join Date: May 2014
Location: EL PASO, TX
Posts: 85
Likes: 0
Received 0 Likes
on
0 Posts
One suggestion that might help is to lower the engine a bit. Support the engine with a jack (carefully), undo the two motor mount nuts (18mm) and lower the engine. Continue to support it with the jack. I found that working around the engine, lowering it as much as possible make access a little bit better. I also found that removing the rear bumper helps a lot. It is not difficult and takes about ten minutes. You are a brave soul for going in like this on the valve cover(s). Looking forward to hearing how the project goes. Good luck!