Notices
996 Forum 1999-2005
Sponsored by:

996 4S Front Diff Rebuild

Thread Tools
 
Search this Thread
 
Old 10-21-2013, 03:58 PM
  #16  
Topaz330ci
Burning Brakes
 
Topaz330ci's Avatar
 
Join Date: Aug 2009
Location: Ottawa, Canada
Posts: 1,073
Likes: 0
Received 1 Like on 1 Post
Default

Originally Posted by KrazyK
Well thats just fing great, bro. If we didnt have enough 996 bs problems, now us C4S owners can add this to the list of failures to fear.
Relax.... It doesn't happen to all of them.
Old 11-09-2014, 07:09 AM
  #17  
ricola
3rd Gear
 
ricola's Avatar
 
Join Date: Apr 2009
Posts: 3
Likes: 0
Received 0 Likes on 0 Posts
Default

Hi,
Appreciate this is an old thread but I replaced by diff side bearings and still have some noise (which disappears momentarily on lift off). I removed the cardan shaft and the noise completely disappeared on power but then was worse on lift off. I'm thinking it may be the pinion shaft bearings? I inspected the best I could without tearing apart but couldn't get enough torque to take the pinion nut off. I put it back together knowing at least it wasn't about to explode but I would like to get rid of the noise. Did you make up some sort of fixture to take the pinion shaft nut off which locks the output flanges? Any advice would be great!

Thanks,
Rich
Old 11-09-2014, 10:47 AM
  #18  
Dharn55
Drifting
 
Dharn55's Avatar
 
Join Date: Sep 2005
Location: Glenview, IL
Posts: 2,528
Received 173 Likes on 107 Posts
Default

I am interested to know if you have a parts list for this rebuild?
Old 07-27-2015, 09:43 PM
  #19  
tjj7ff
Intermediate
 
tjj7ff's Avatar
 
Join Date: Jul 2006
Location: Virginia Beach, VA
Posts: 25
Likes: 0
Received 0 Likes on 0 Posts
Default

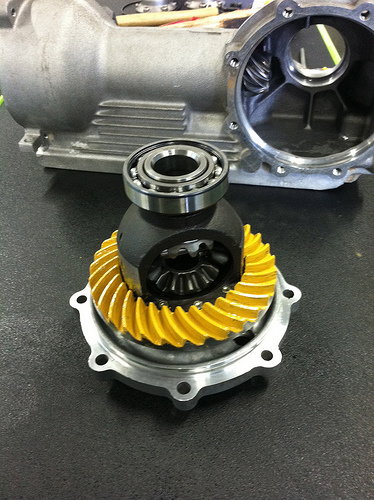
I'm in the process of tearing down my front diff. from a MY 03 996 TT in order to rebuild it. Can anyone comment on how the pinion nut was removed as well as a part list for rebuilding the unit? Any advice would be very much appreciated!

Best Regards,
Tim
Old 06-17-2016, 09:47 AM
  #20  
cologne73
6th Gear
 
cologne73's Avatar
 
Join Date: Jun 2016
Posts: 6
Likes: 0
Received 0 Likes on 0 Posts
Default

Hi,

I know, this is an old thread, but this includes my problem. Thus, I give a try and hope someone, who did the rebuild, reads this and can support me!

I need to reassemble the side bearing cover and the housing (these two parts)


My concern is to correctly push the bearing (foreground) into the housing (backgroung) without damaging the housing!

Can I simply do this tightening the 8 screws connecting the cover with the housing or do I need a special "pressing" tool for this??

Any help is very welcome !!

Thanks

Marco
Old 06-17-2016, 09:48 AM
  #21  
cologne73
6th Gear
 
cologne73's Avatar
 
Join Date: Jun 2016
Posts: 6
Likes: 0
Received 0 Likes on 0 Posts
Default

Hi,

I know, this is an old thread, but this includes my problem. Thus, I give a try and hope someone, who did the rebuild, reads this and can support me!

I need to reassemble the side bearing cover and the housing (these two parts)


My concern is to correctly push the bearing (foreground) into the housing (background) without damaging the housing!

Can I simply do this tightening the 8 screws connecting the cover and the housing or do I need a special "pressing" tool for this??

Any help is very welcome !!

Thanks and greetings from Germany!

Marco
Old 06-17-2016, 10:29 AM
  #22  
Paul Waterloo
Rennlist Member
 
Paul Waterloo's Avatar
 
Join Date: Jul 2013
Location: Wilbur by the Sea, FL
Posts: 2,806
Received 216 Likes on 139 Posts
Default

Marco-

If the same component is going back in the transmission that was taken out, there should be no issues. I assume you changed the bearing? There was most likely some very thin shims behind it to properly space it to the casing, but don't know for sure as it is a single row, deep groove ball bearing.

The outside diameter of the bearing is a clearance fit to the inside diameter of the housing, and if it's the same component group that came out with exception of the bearing, it should be no issue.

I would think there would be NO pre-load on that bearing, but an axial clearance to the housing. So just install and tighten away. If it binds up before the flange bottoms out, then something isn't right.

Good luck! Ciao!
Old 06-17-2016, 11:05 AM
  #23  
cologne73
6th Gear
 
cologne73's Avatar
 
Join Date: Jun 2016
Posts: 6
Likes: 0
Received 0 Likes on 0 Posts
Default

Hi,

and thanks for the reply!

You are right, the bearing was changed, but there were no shims!

When I put the cover with the assembly back on the housing, there is a resistance
between the bearing and the housing! That made me feel, that it needs to be pressed in somehow! I can not just push it in by hand!!
Old 06-17-2016, 01:47 PM
  #24  
white out
Three Wheelin'
 
white out's Avatar
 
Join Date: Jun 2012
Location: San Diego
Posts: 1,392
Received 5 Likes on 3 Posts
Default

Use bolts of the housing to press it back in. But go evenly by tightening the bolts on opposite sides (like you would install a wheel.) Tighten them in stages; first time around half way, second 3/4, third seat, fourth torque to spec. This will press the housing back in evenly.
Old 06-17-2016, 02:28 PM
  #25  
dporto
Rennlist Member
 
dporto's Avatar
 
Join Date: Oct 2014
Location: L.I. NY
Posts: 6,778
Received 1,153 Likes on 790 Posts
Default

As with any press fit bearing, putting it in the freezer overnight before the install, will make it go in much easier
Old 06-17-2016, 02:31 PM
  #26  
Paul Waterloo
Rennlist Member
 
Paul Waterloo's Avatar
 
Join Date: Jul 2013
Location: Wilbur by the Sea, FL
Posts: 2,806
Received 216 Likes on 139 Posts
Default

Originally Posted by dporto
As with any press fit bearing, putting it in the freezer overnight before the install, will make it go in much easier
That's a great idea and what should be done.

Additionally, clean the housing where the bearing sits very well with some brake cleaner and scotch bright pad or something of the sort. This will polish it and remove any high spots. Clean it very well after this before installation.
Old 06-18-2016, 04:59 AM
  #27  
cologne73
6th Gear
 
cologne73's Avatar
 
Join Date: Jun 2016
Posts: 6
Likes: 0
Received 0 Likes on 0 Posts
Default

Thank you for all the replies!

I will put it in the freezer then and tighten it like @white out described! Cleaning of course is a must!

Does anybody know the torques?

Should I apply any sealant between cover and housing?

Thanks again!
Old 07-08-2016, 02:01 PM
  #28  
cologne73
6th Gear
 
cologne73's Avatar
 
Join Date: Jun 2016
Posts: 6
Likes: 0
Received 0 Likes on 0 Posts
Default

Sorry to push that up, but i´m prior to do the assembly and and support would help me!

1.) Is sealant required

2.) Torques of the bolts

Thanks, Marco
Old 07-08-2016, 02:23 PM
  #29  
dporto
Rennlist Member
 
dporto's Avatar
 
Join Date: Oct 2014
Location: L.I. NY
Posts: 6,778
Received 1,153 Likes on 790 Posts
Default

Do yourself a favor and get this book:

http://www.theknowledgegruppe.com/in...96-automobile/

You'll wind up using it every time you work on your car...
Old 07-08-2016, 02:29 PM
  #30  
cologne73
6th Gear
 
cologne73's Avatar
 
Join Date: Jun 2016
Posts: 6
Likes: 0
Received 0 Likes on 0 Posts
Default

Nice book,

but does it cover also the assembly of the front diff!

The front diff is generally not available in parts...

More important ist the question:

Do I need any sealant?


Quick Reply: 996 4S Front Diff Rebuild


All times are GMT -3. The time now is 08:23 AM.