When you click on links to various merchants on this site and make a purchase, this can result in this site earning a commission. Affiliate programs and affiliations include, but are not limited to, the eBay Partner Network.
How To Replace Leaking Rear High Pressure Power Steering Hose 1999 996
Replacing a Rear High Pressure Power Steering hose on a 1999 Porsche 996 Carrera 2...
Recently after a drive in my 1999 Porsche 996 I spotted some kind of fluid dripping from the engine on the passenger side. I couldn't immediately figure out if it was oil or water but since this car had never leaked anything since I'd bought it I was quite alarmed and frankly a bit scared. I've always said, almost anyone can buy a Porsche, but only the dedicated can maintain one.
The fluid that was dripping was kind of like oily water, and that just scared me even more as I immediately began thinking of the dreaded oil/water mixing syndrome. Well, after eliminating what things were definitely not in that area of the car I kind of figured that it was one of the power steering hoses since it seemed to be coming from above the variocam unit. Next I checked the power steering fluid level and lo and behold it was bone dry. At first I thought, that's not so bad, could certainly be worse. Well no, it is bad. The Pentosin power steering/clutch fluid used in this car is highly flammable and basically can set the car on fire should it land on the exhaust pipe.
With the airbox removed I could see my leak was coming from what I identified as the high pressure line. I immediately took to the internet to see if anyone had posted a tutorial on how to swap out the leaking hose, and sadly I basically found next to nothing. A week after emailing the service manager for an estimate at one of few Porsche dealers where I live, and still getting no response, I decided it was time to take matters into my own hands.
Disclaimer: I am not a mechanic, I am a musician. I have owned a 1973 914, a 1985.5 944, a 1987 944S, and now this 1999 996, and I've never let anyone work on my car If I didn't have to (and that's been never). I believe if you have the right tools, knowledge, and the right mindset anyone can do most of the basic work you'll probably ever need to do on any decent Porsche.
So here we go...
First of all I got the part from Porsche, I got the correct, genuine part, and it's basically no more money than anywhere else. I also got a container of Pentosin.
1) Disconnect your battery.
2) Disconnect the MAF sensor from the airbox.
3) Remove the airbox.
4) Slightly loosen the bolts on the power steering pully.
5) Remove the serpentine belt (24mm).
6) Remove the power steering pully.
7) Remove the throttle body unit. The throttle body is 4 bolts, two electrical connections, an air hose, and one line that'll stay connected. Put the throttle body off to the side and wrap it in a towel or something so it doesn't get damaged.
8) Remove the plenum, which is a fancy word for the air tube behind the throttle body. It's got four hose clamps.
9) Drain (which in my case I didn't have to) the upper power steering fluid reservoir and remove it by turning the ring counter-clockwise. No tools necessary, use your hand, it comes off easily.
Easy enough so far, right? Well here comes the difficult parts of this job, the reason why Porsche gets the big bucks...
10) Remove the AC compressor. Three bolts must be removed. All three are 13mm.
Remove the two front bolts.
Now here comes just about this whole job...The world-renowned rear bolt on the AC compressor.
This is how I did it:
Tools:
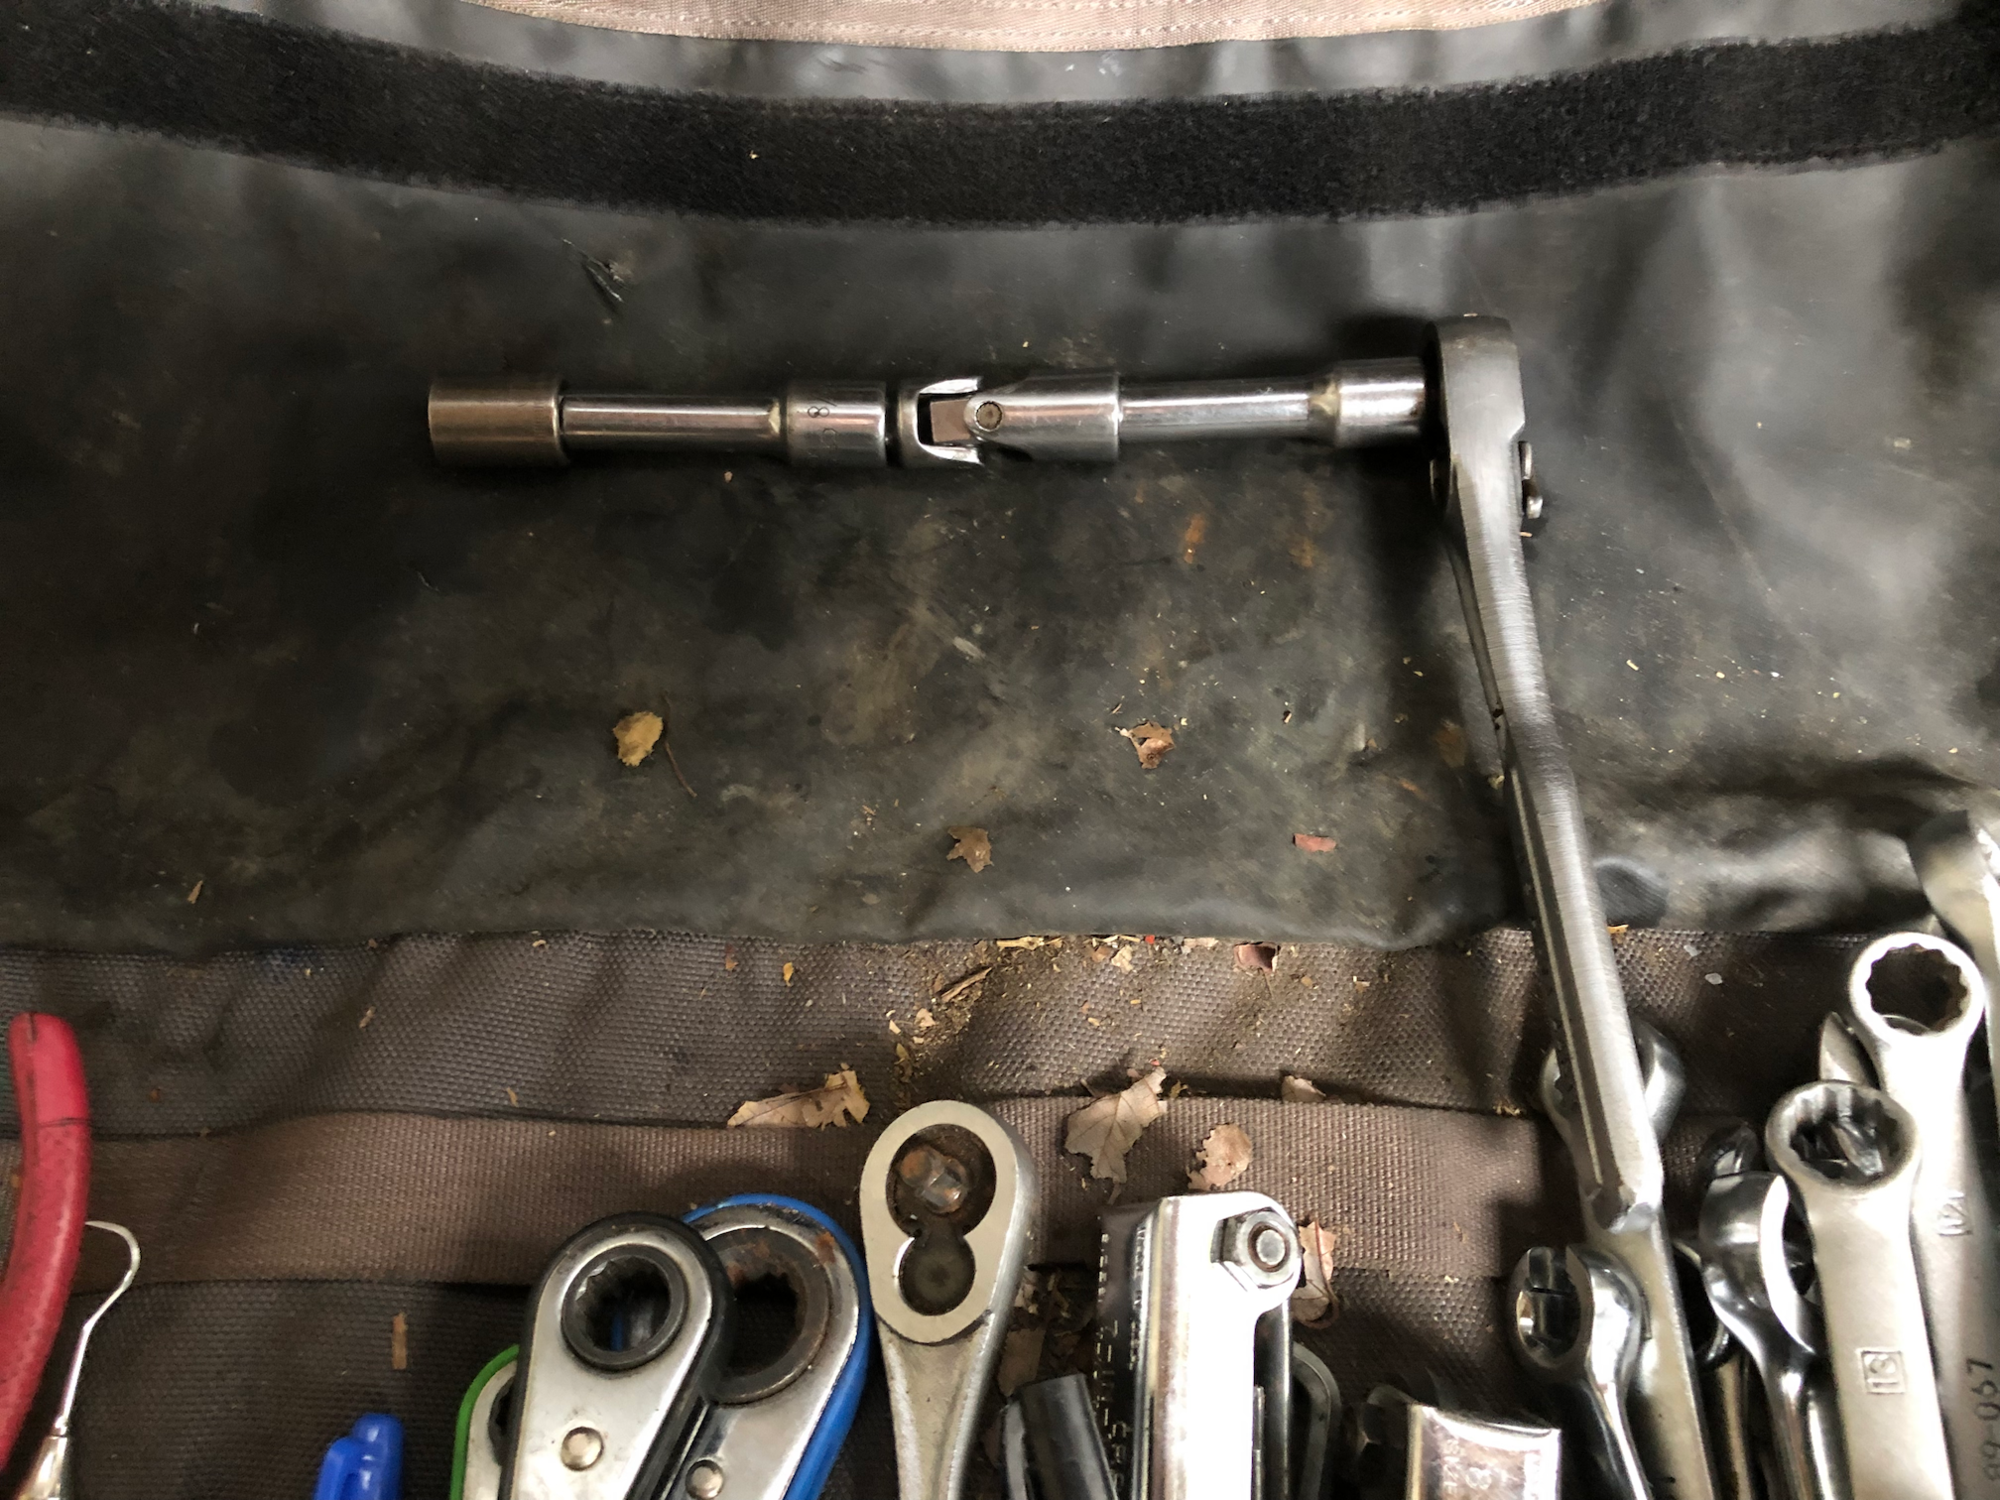
A short, lean 13mm socket for a 1/4" drive, a 1/4" universal, an 8" extension for 1/4" drive, an adapter 1/4" to 3/8", and finally a 3/8" ratchet.
With your right hand feed the ratchet set-up through the space between the manifold at cylinder #4 and 5. Place the heat sensor (you'll easily see it) out of the way for more room to work.
With your left hand reach through where the throttle body/plenum was and feel for where the third bolt is on the rear of the AC compressor.
IMPORTANT: Get the socket set squarely onto the bolt before proceeding. Do not proceed until you have achieved this.
Remember, if you strip this bolt GAME OVER.
I actually put my left hand in to hold it square on the bolt while my friend spun the ratchet with two hands.
Slide the AC Compressor out, disconnect one measly wire and place the AC unit on the ledge of the engine bay.
REMEMBER: If you get discouraged or frustrated, walk away and come back, have a friend help, use the tools I said to use, get it to sit square on the bolt. Oh and I also used some liquid wrench ( don't know if it really helped or not). IT CAN BE DONE I PROMISE YOU.
11) Remove the leaking high pressure hose.
Use a 17mm open end wrench to remove the line where it attaches to the power steering pump. Collect any fluid that comes out. Even though it's called a high pressure line, it won't come out spraying all over the place. But it's nasty stuff so don't let it get on anything else.
Now for the other end...
*make sure for this next step that you are working with the same high pressure line or you'll have to replace the return line too.
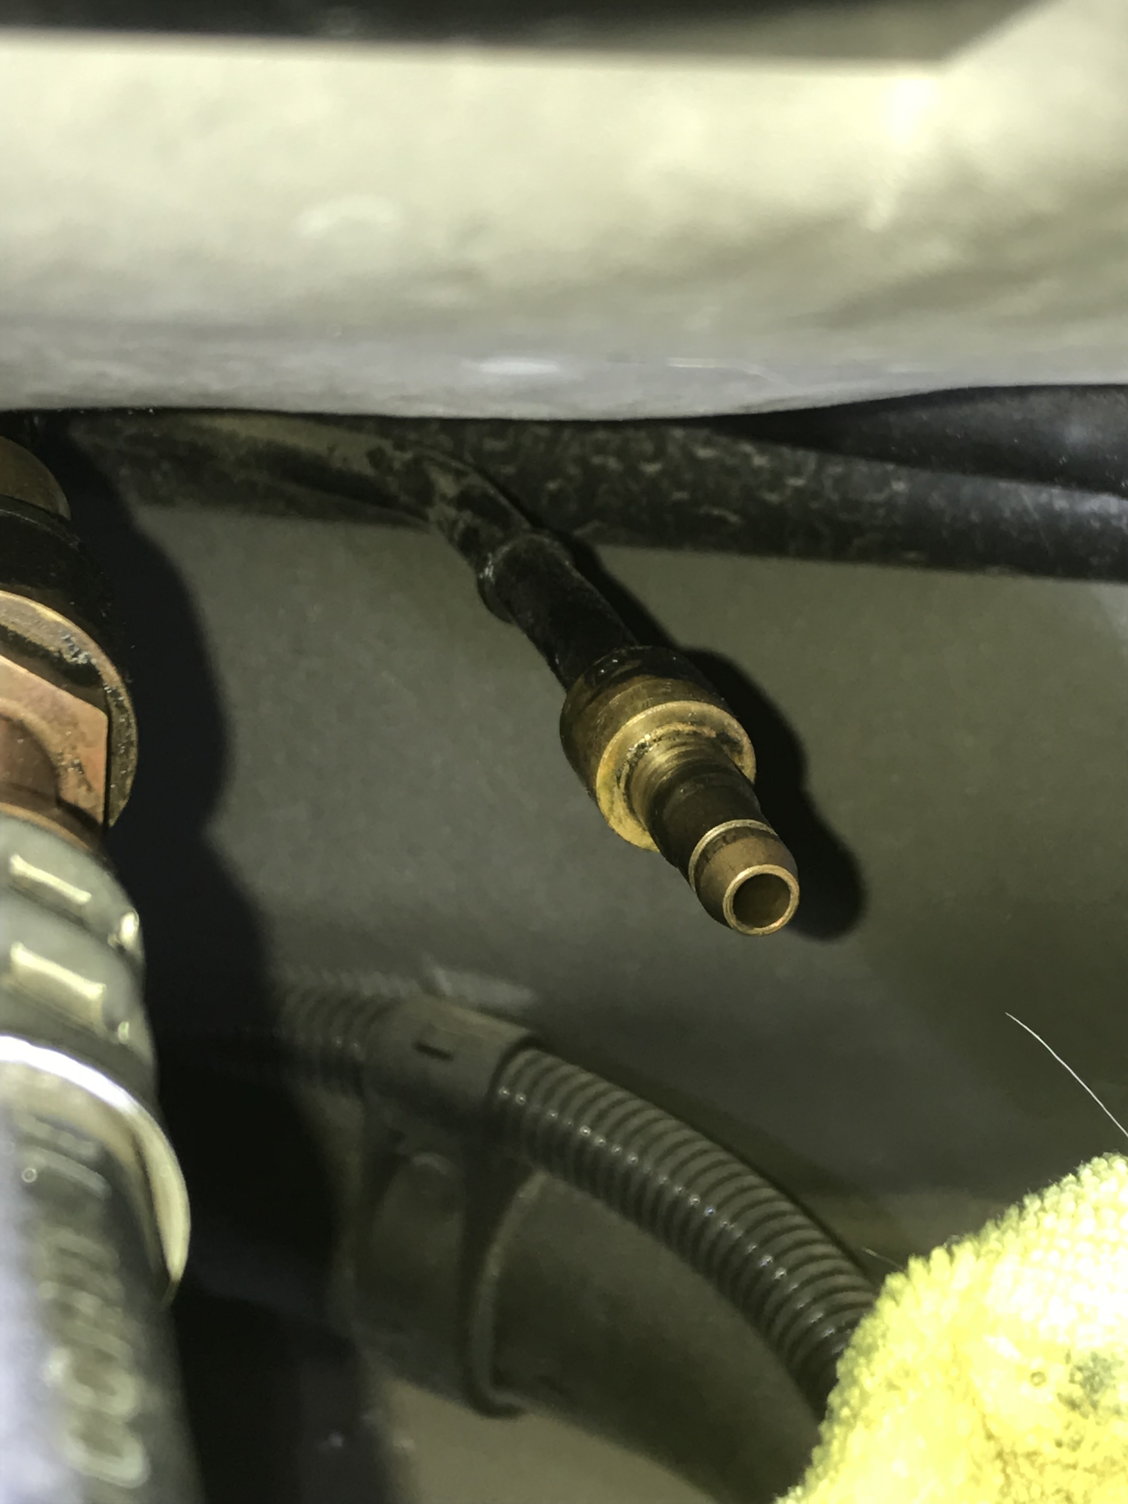
Get a small hack saw (I used the finest blade from my Sawz-All) and by hand, cut the copper line closest to you and just before the connection. You're not keeping the leaky line anyway and this will allow you to use the closed end of a wrench (15mm) on the part of the connection closest to you.
With the closed end of the 15mm wrench on the part of the connector closest to you, hold it still while with another 15mm open end wrench turn the connection closest toward the front of the car clockwise. This part took a little while for me to do. Don't get frustrated, I did it and so can you. Make sure you're ready for a little fluid to spill.
When you've disconnected this you have basically finished the job (in a way).
12) Connect up the new line, I snaked it through to the rear connector, then attached it first at the pump (17mm) and then to the rear connector (again two 15mm's). *I removed the connector end (you'll see which I mean) from the new hose line and reused the old connector (already in place on the line), no leaks at all. You may want to remove this part on the new line before you get it into place.
Put everything back together in reverse. Sorry, it's just too much to write but I'll say this... I think you'll be suprised how fast everything goes back together.
Top off the Power steering fluid and go for a test drive.
Check for leaks.
None?
Now pat yourself on the back and think twice before emailing Porsche for a service quote.
Last edited by ThomasJorgensen; 09-05-2012 at 10:26 PM.
Excellent DIY above. I just went through this process on my 2004 C4S with a leaky high pressure Power Steering line, and here are some additional details that will hopefully help out anyone else that is going to attempt this repair.
At some point Porsche decided to change from metric bolt heads to Torx E-series bolts - really inconvenient when you don't have a set in your shop (why would you). Handy tip #1 - The magic size needed to remove the PS pulley, and AC compressor is an E12, so get one before you start.
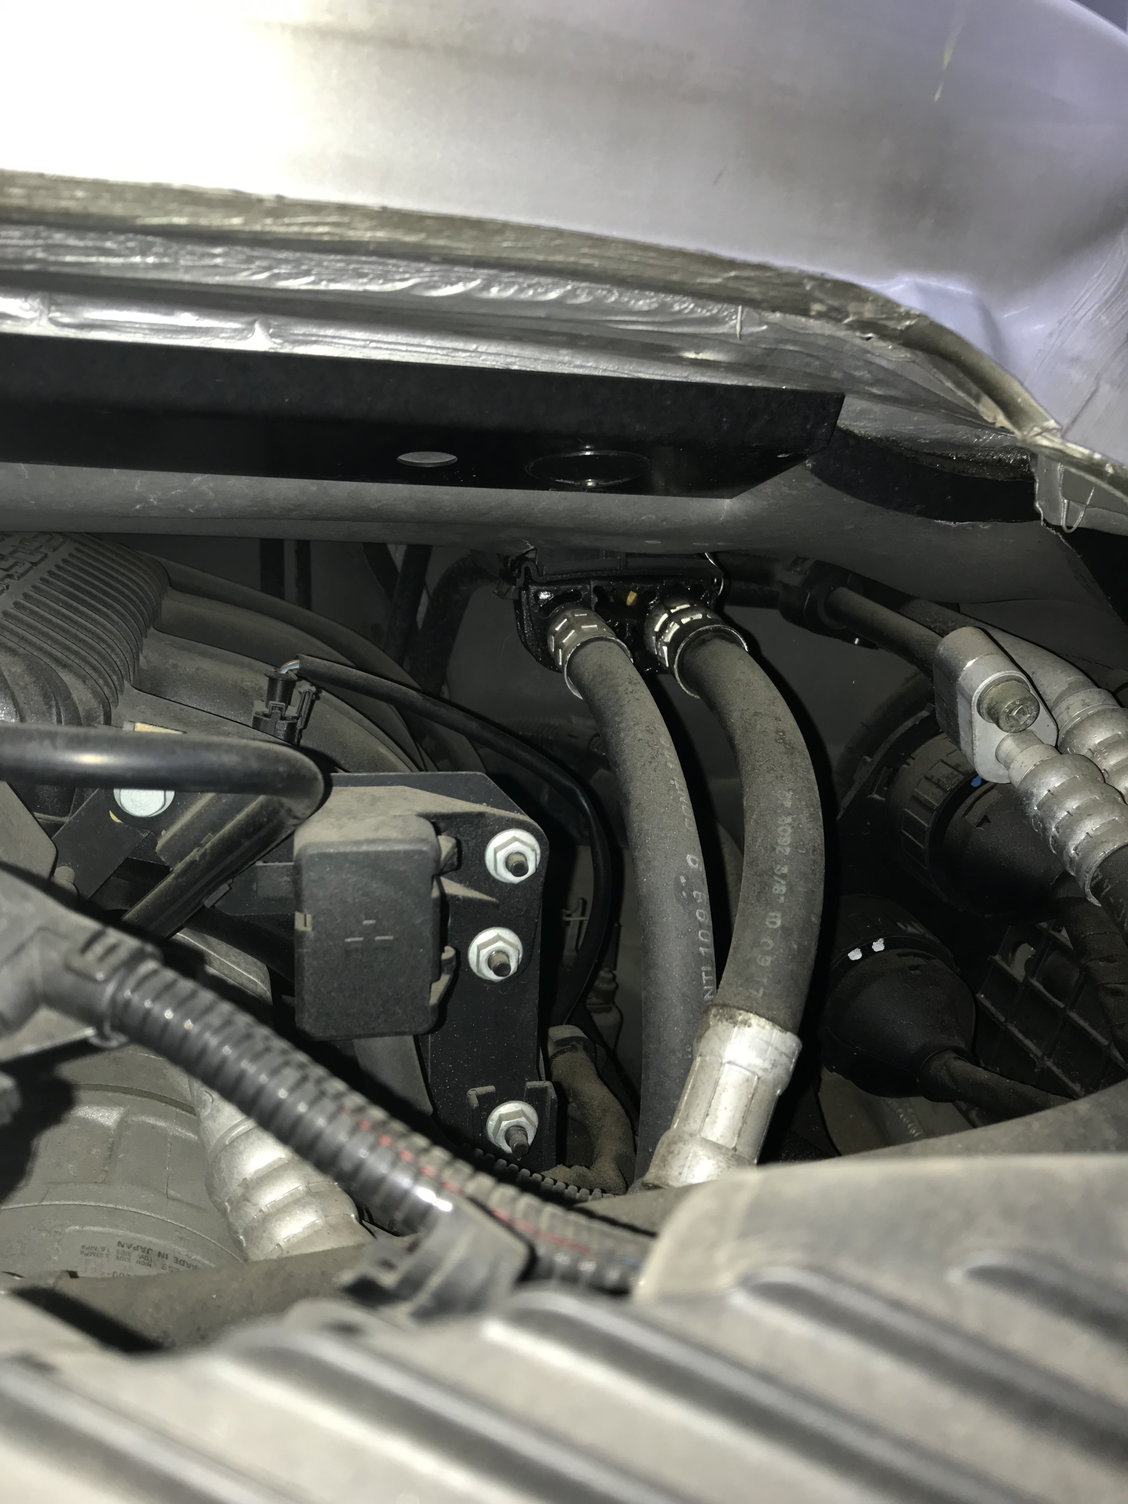
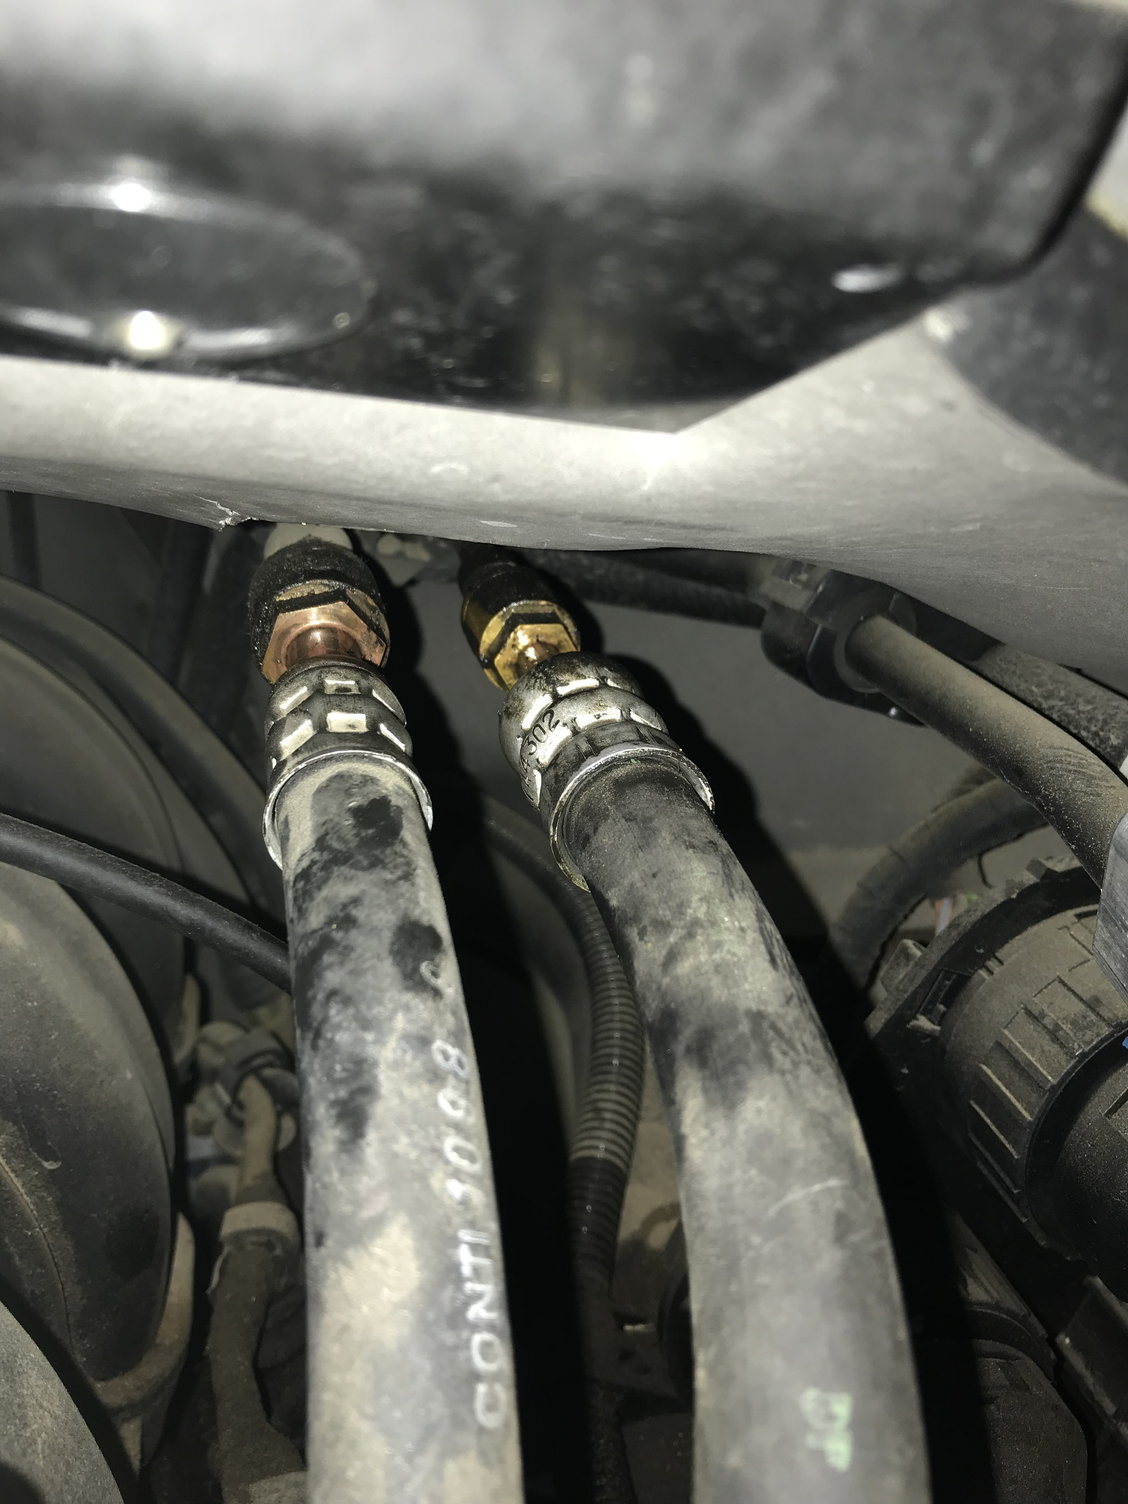
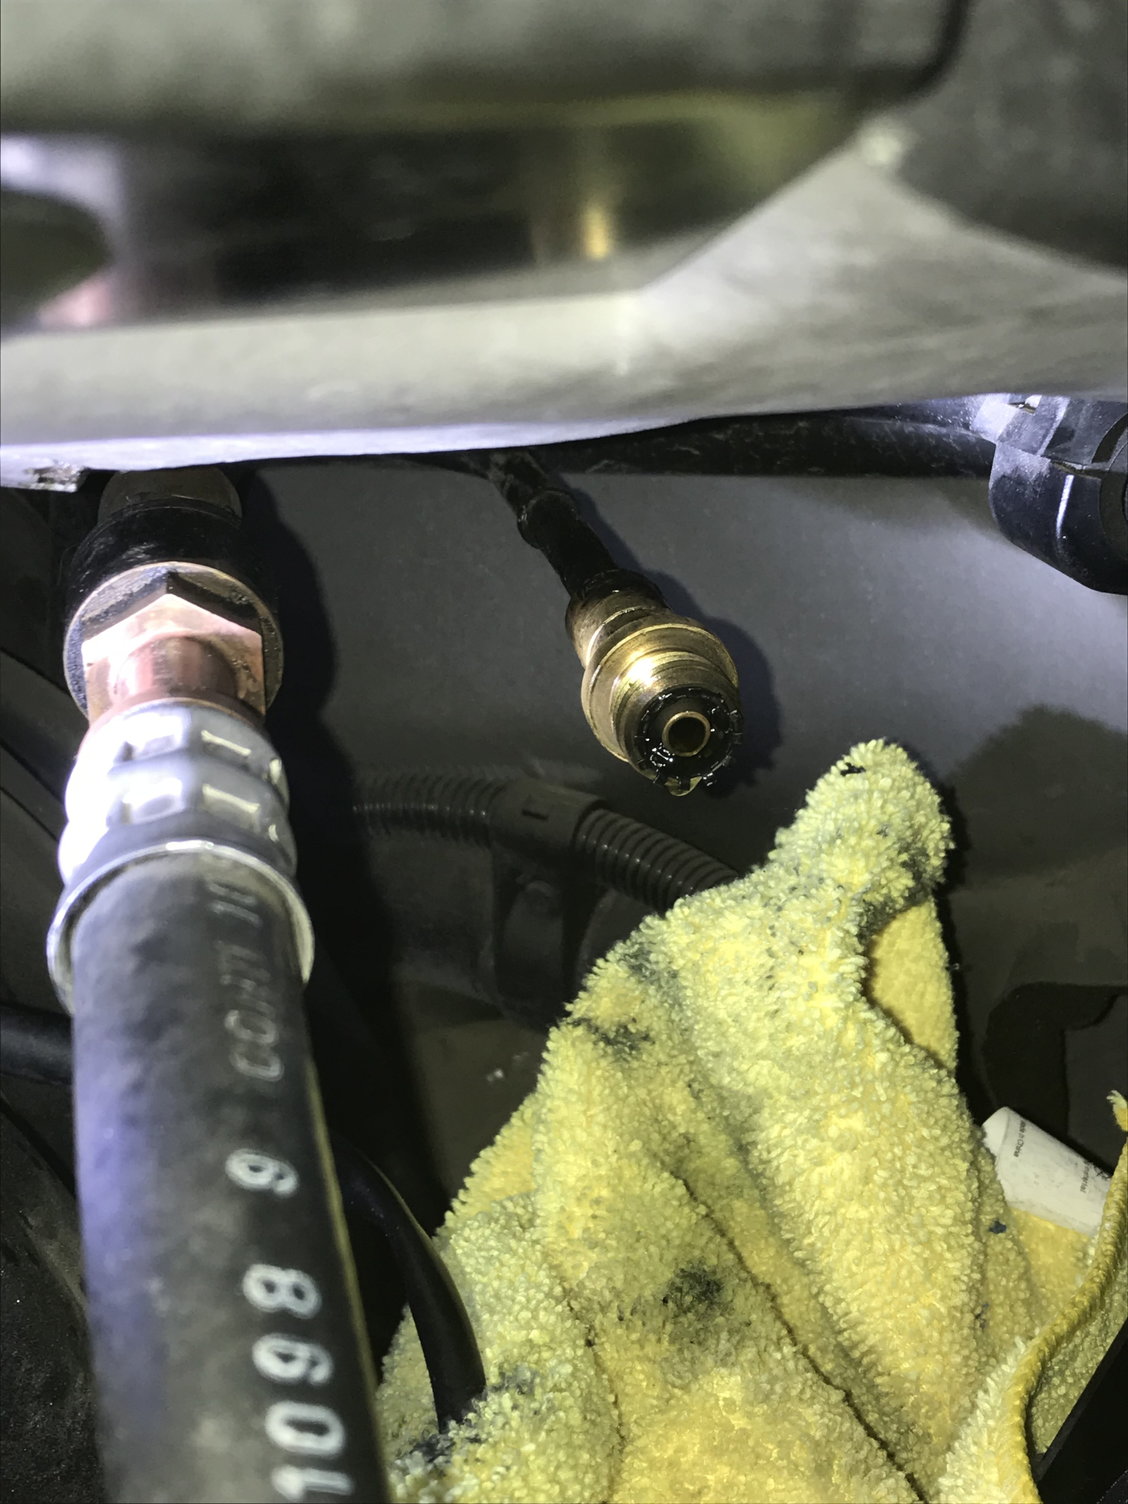
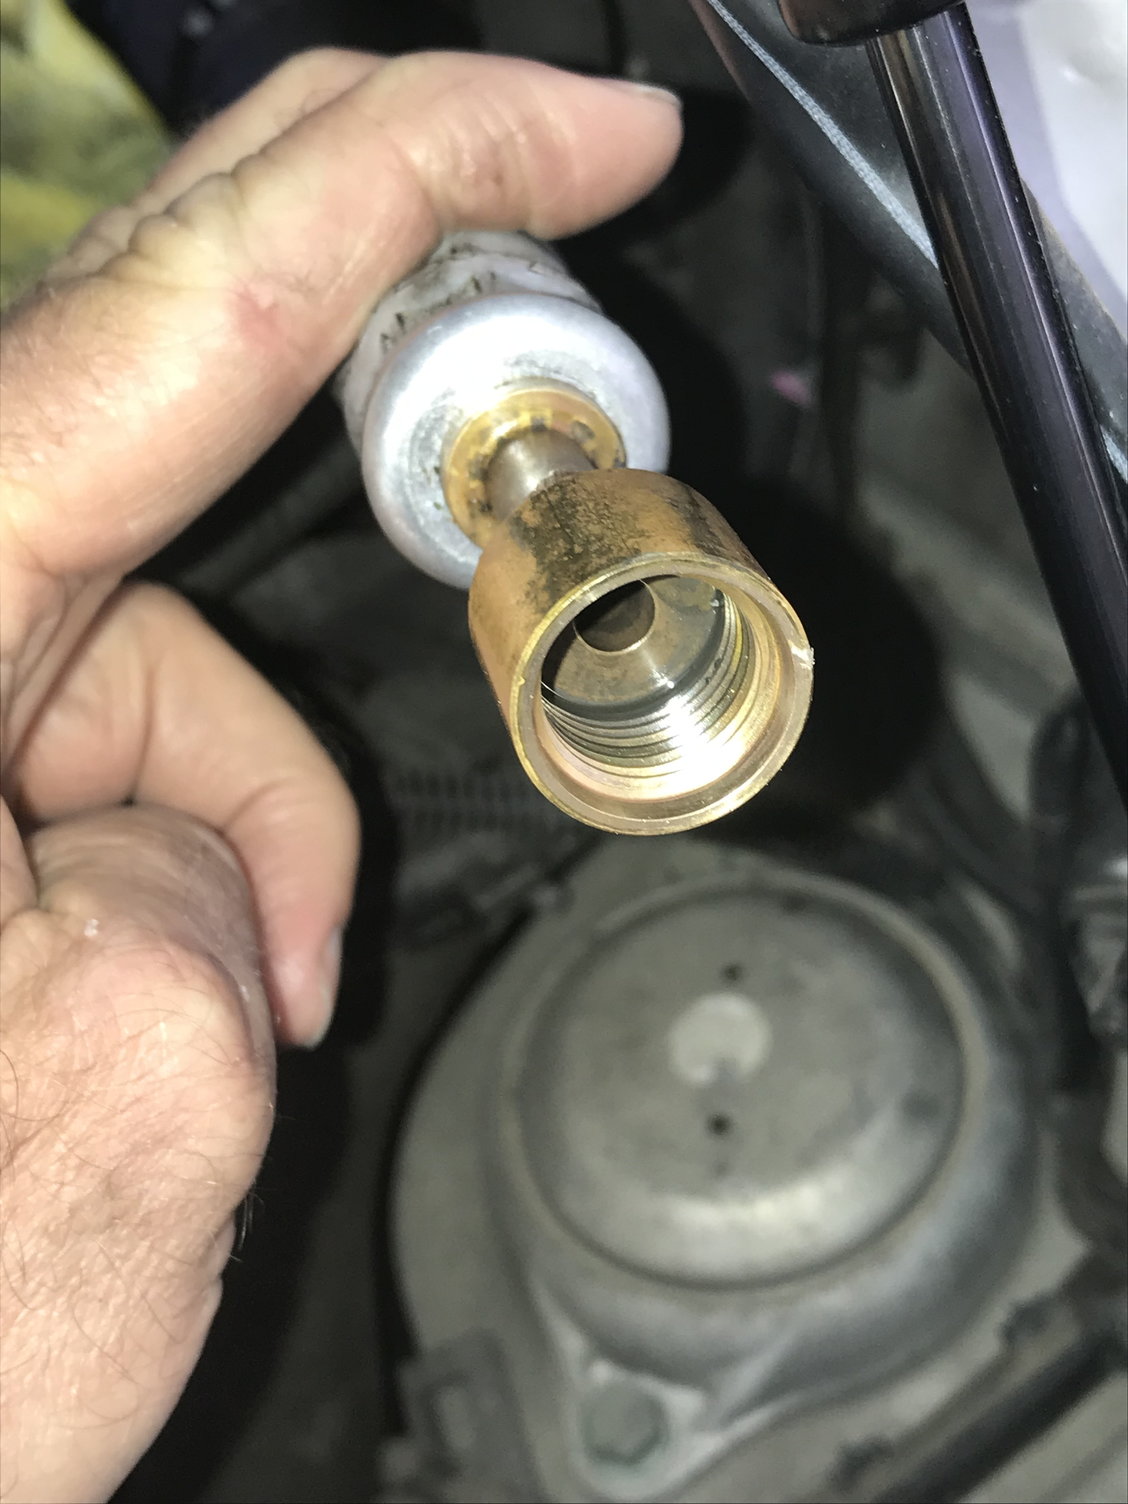
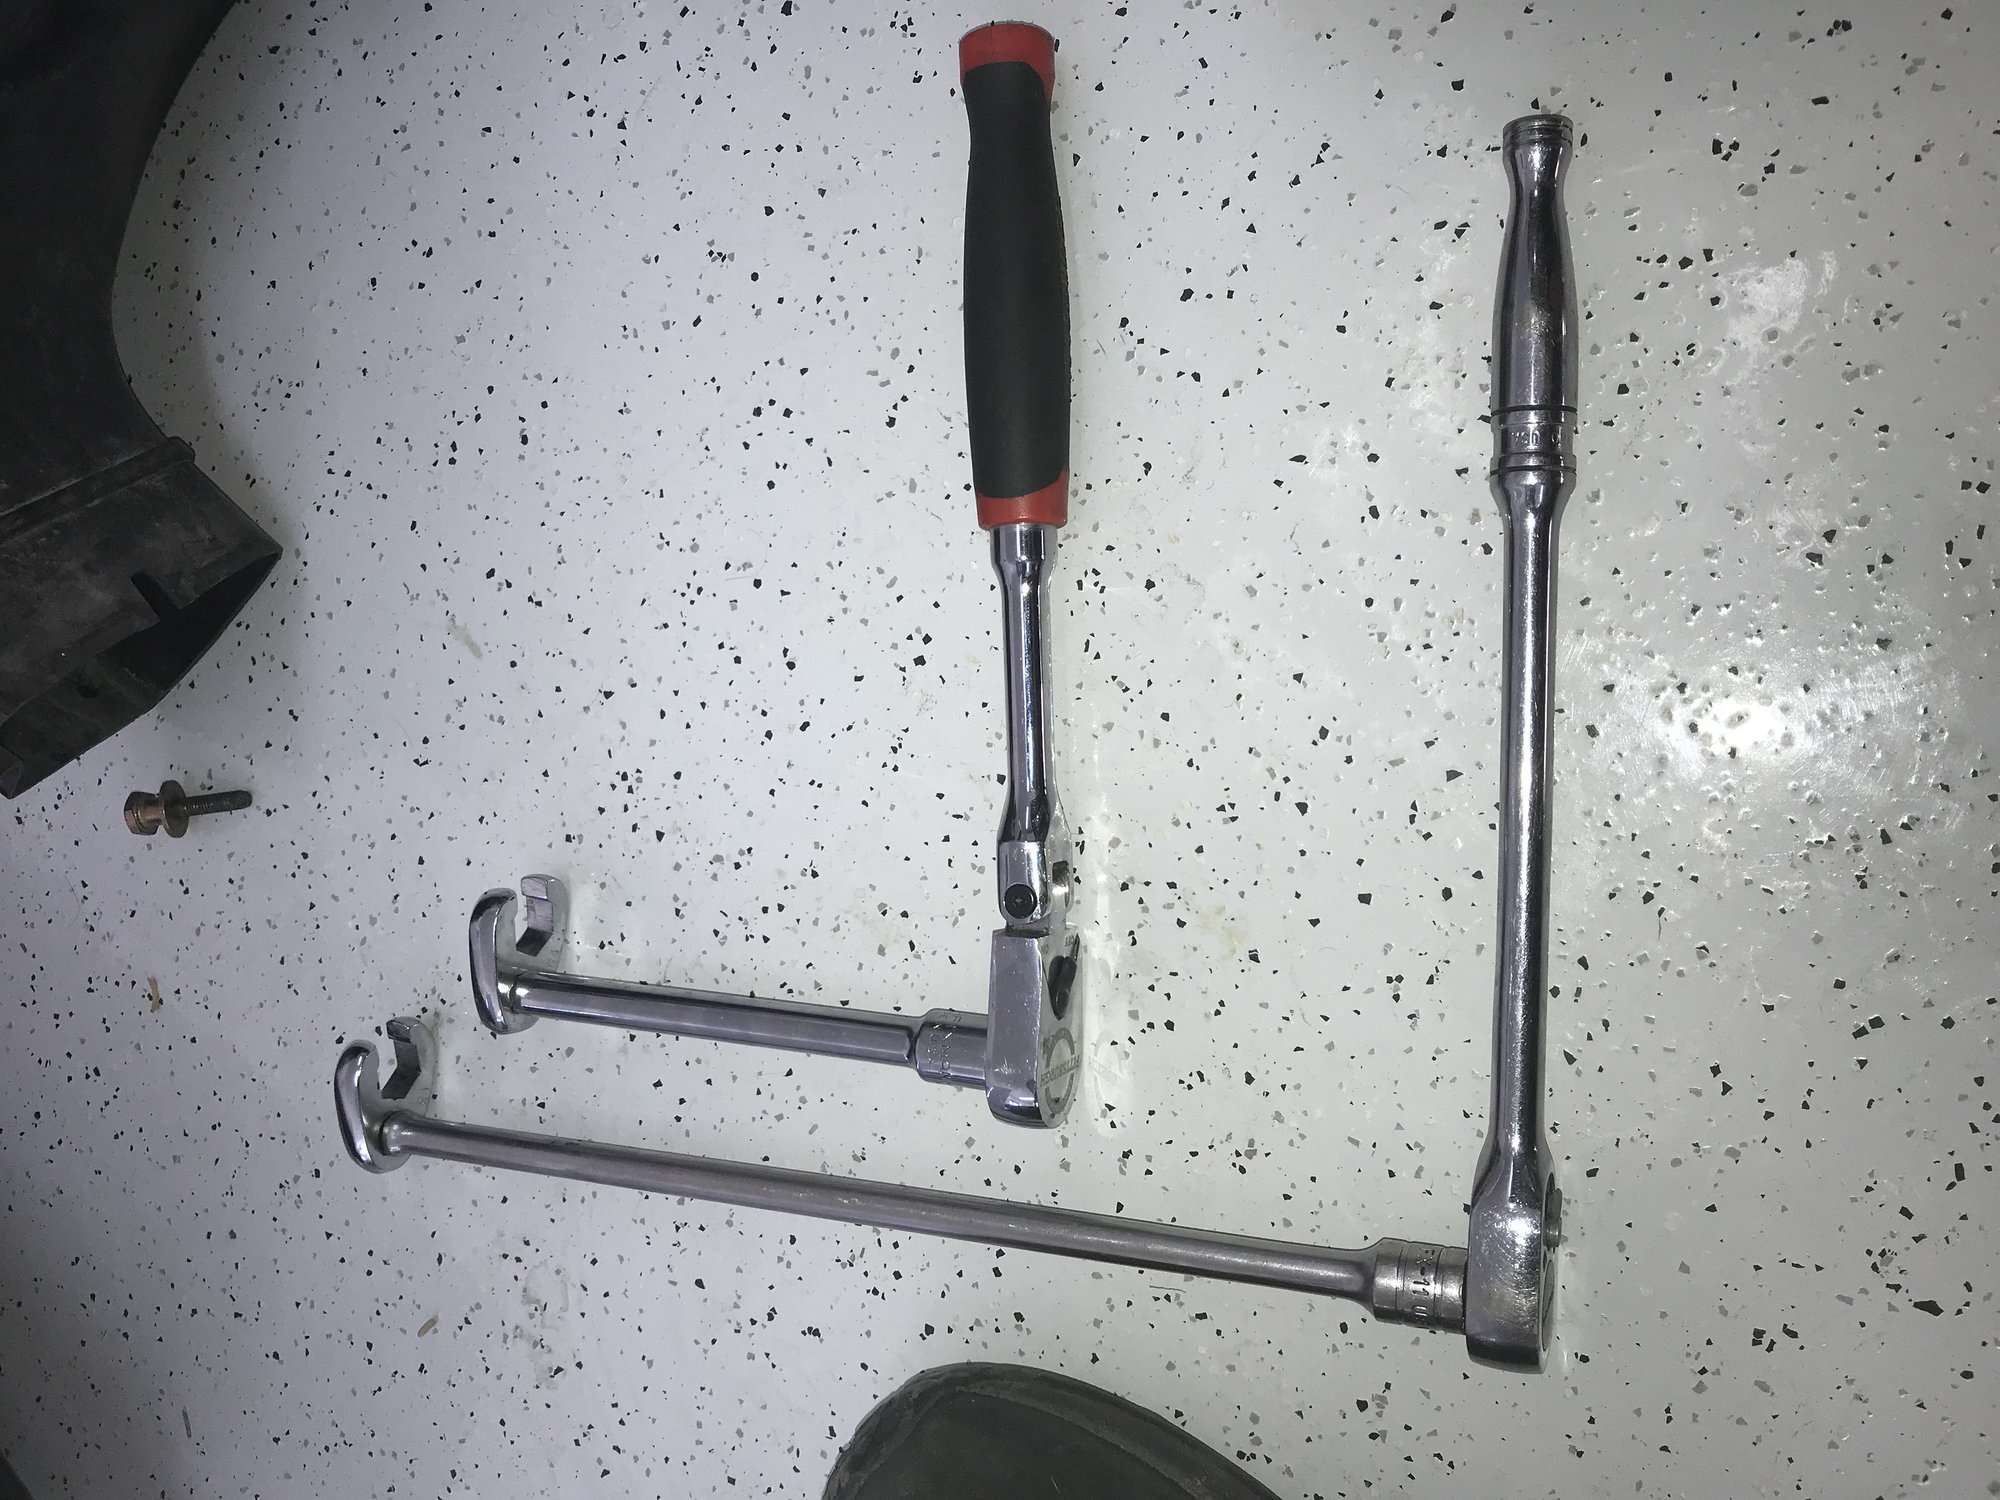
When it comes to the fitting on the PS line that connects to the front of the car, this is another spot where some specialty tools will really come in handy - so that you don't have to saw anything off and possibly get metal shavings into the PS steering fluid. Handy Tip #2 - What you'll need to get those fittings apart is a combination of a flare nut wrench and a crows foot wrench - both 15mm size. This is the only combination of wrenches that I found that will generate enough torque to get these brass fittings apart while at the same time keeping the wrench on the end and not stripping the brass nut by slipping off when you apply the force needed to undo the connector - especially in the confined space in the rear end of a 911. Have a look at the pictures below which show how best to position the tools to get the connector apart, and what you'll find inside. Took these once the old line was out of the car to make it easier to see what you're dealing with.
I ordered the replacement PS line from PelicanParts, and it came with a new connector attached and ready to go. Once it's time to reassemble this fitting, you simply push the line from the front of the car into the new hose until you hear a "click", and confirm the fitting is seated by gently trying to pull them apart.
All of the bolts holding the AC compressor on are E12, even that nasty one in the back, but it is achievable. You may have trouble getting an E12 socket on the front right bolt on the AC compressor, since Porsche added a little raceway for some of the wires coming back from elsewhere in the engine which blocks the socket from firmly seating on the bolt. Now you'll be looking for an E12 box and wrench, hoping to find one at your local Auto parts store - but of course they don't carry these in stock. Never fear, Handy Tip #3 - a 3/8" box end wrench is exactly the right size to tackle an E12 nut - who knew?
Anyway, I hope the above helps someone along the way. Happy tinkering!
I was working along these same steps trying to get to the Bank 2 (4-6) Chain Tensioner for replacement. But once the 3 bolts were removeed I could not get the A/C compressor to move forward enough to give me working clearance. The same p/s brakcet is in in the way of the tensioner.
How do you get the A/C compressor to move forward more that 3-4 inches? Am I missing something?
Oh and for what its worth if you go in from above between the 4-5 intake runners, the A/C rear bolt is pie. Just remove a small round rubber gromet that holds a temp sensor and you have a straight shot at it with an extension and a regular 13mm socket.
To get it back in, place it in the hole BEFORE you slide the compressor back in its location and hold it up with an extendable magnet. Insert the front two bolts loosely, remove the magnet, reat bolt slides into its hole, wiggle compressor while starting bolt. Not bad at all
I just could get the dern thing forward enough to work below it. Again what am i missing?
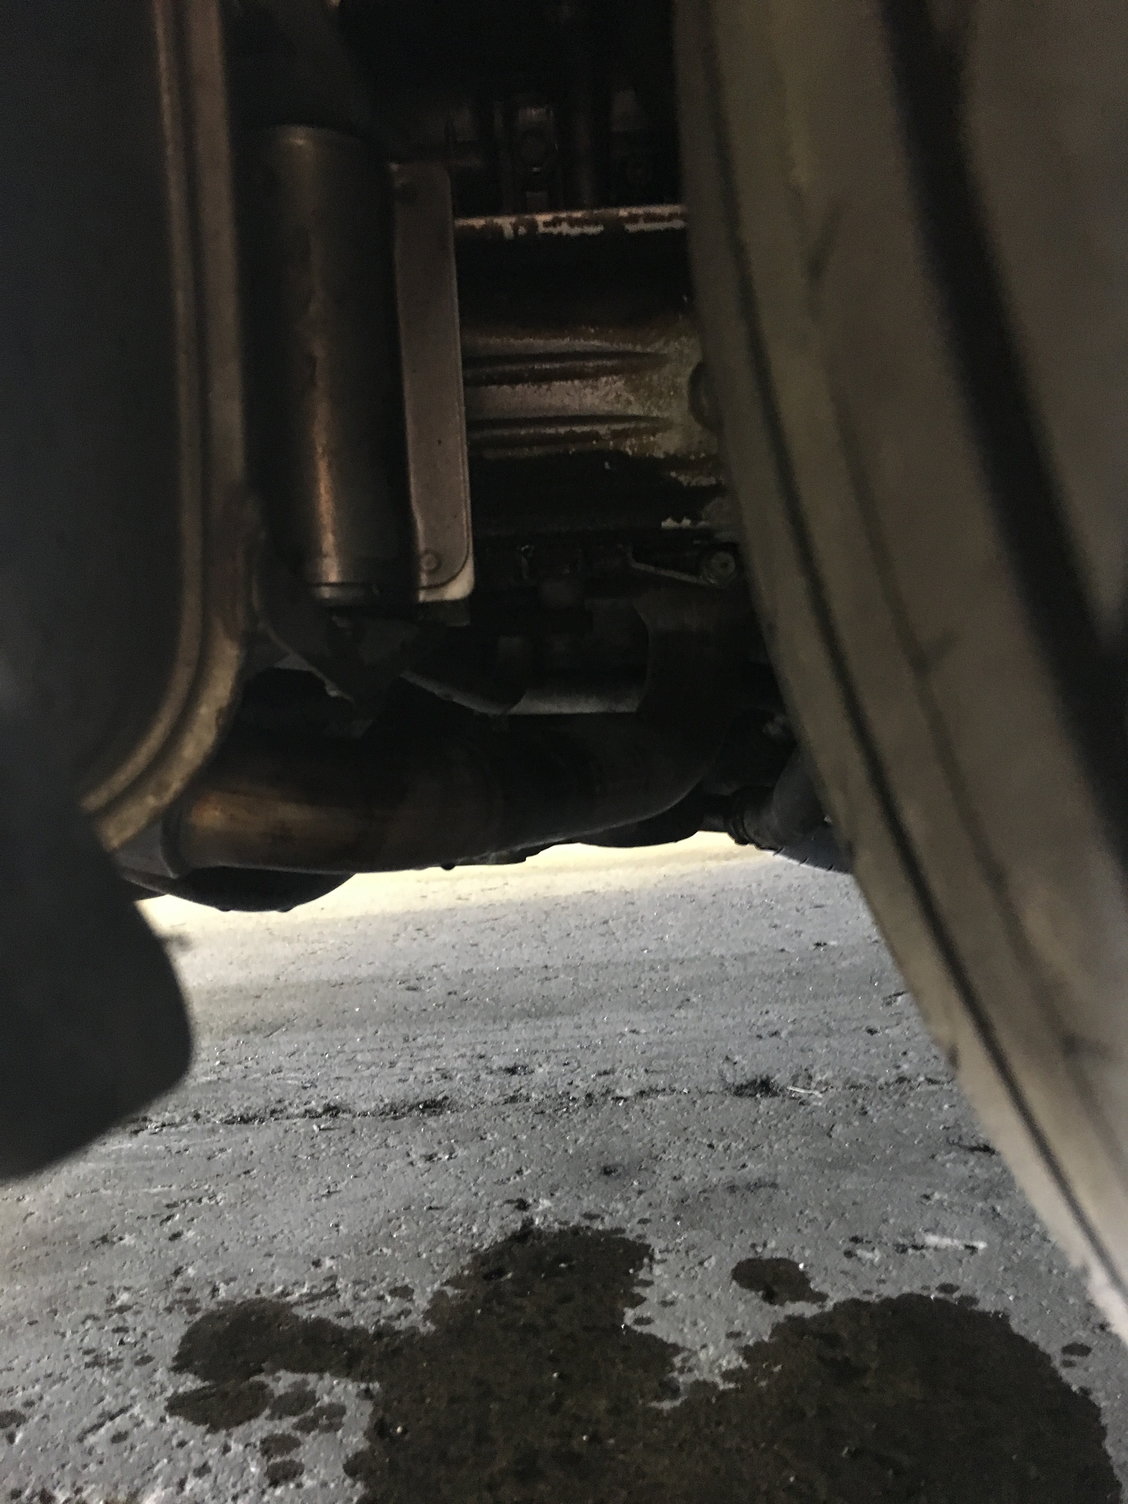
so I just came across a leak in my ps line as well.
Leak from back rear passenger side Ps line on right is leaking. Is there something I can wrap the line in just drive to the shop?
How do you release the line from the holder?
rhanks in advance. Only had the 996 cab a few weeks.
so I just came across a leak in my ps line as well.
Leak from back rear passenger side Ps line on right is leaking. Is there something I can wrap the line in just drive to the shop?
How do you release the line from the holder?
rhanks in advance. Only had the 996 cab a few weeks.
Yes but couldn't see how to release the lines from the plastic clip holder. I was trying to see if I can release and tape just to get to a shop. Either way the clip releases from the left side, it just seems to drop down and then this allows you to remove the rubber and expose the bolts in the picture...since Im new to this car I didnt want to damage anything.
It appears my line was just loose, I was able to spin it by hand...strange...I still need to get some smaller wrenches so i can get in there and tighten...hopefully I can go to a toolstore tomorrow....thanks for all the info!
[QUOTE=Mdnyte;14327471]It appears my line was just loose, I was able to spin it by hand...strange.../QUOTE]
Not sure, but I don't think those joints are ever so tight around the lines that the hoses to/from engine won't rotate around the lines through the firewall.
I read some good things about this - http://www.rescuetape.com/
Available at Lowes, Home Depot and Walmart
^^This is exactly what I would recommend^^ It's silicone based and sticks to itself - it's great stuff for all types of semi-permanent repairs, and it will definitely hold just to get it to a shop. Before doing that though, I'd also make sure the fittings are tight!That "holder/clip thingy" is very simple - there's a catch on the right side that if you squeeze it, it will release and the bottom will swing down and release the lines. Make sure the car is cool when you do this, as the PS fluid gets hot... good luck
I just finished replacing this hose on my 2001 C4 following the guidance in this thread. Thanks everyone for this extremely helpful information! The brass connection for the pressure line was far too tight to crack with the flare and crowfoot combination, even using a penetrating oil. I ended up cutting the line with a saw as the O.P. did, and using a small impact wrench to finally crack open the connector.
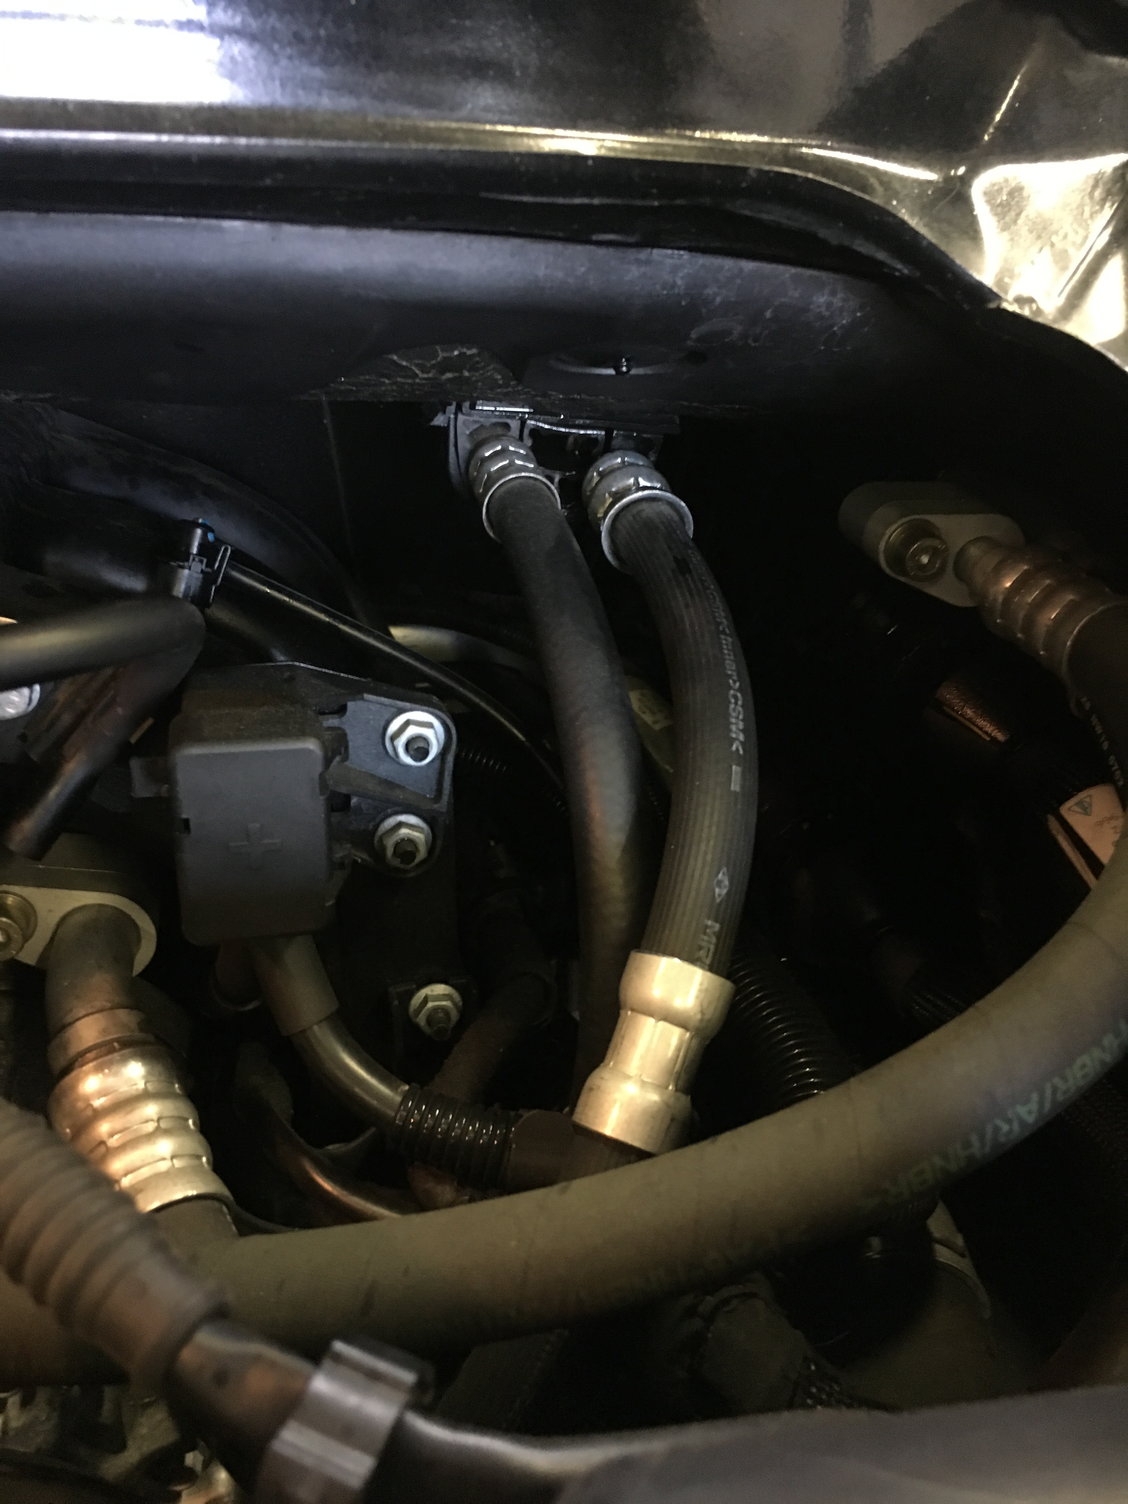
I wanted to note a couple things that could be useful to future readers. First, my A/C compressor turned out to be a bit different. See my first image below. Fuel Chiller lines (center left in image)
Note the two extra lines coming in to the back of the assembly (the two rubber C's). It turns out that Turbos and some C4's have a fuel line chiller as part of the A/C system, so those are fuel lines. You disconnect them via the fat 17mm nuts on the rubber side of the connection.
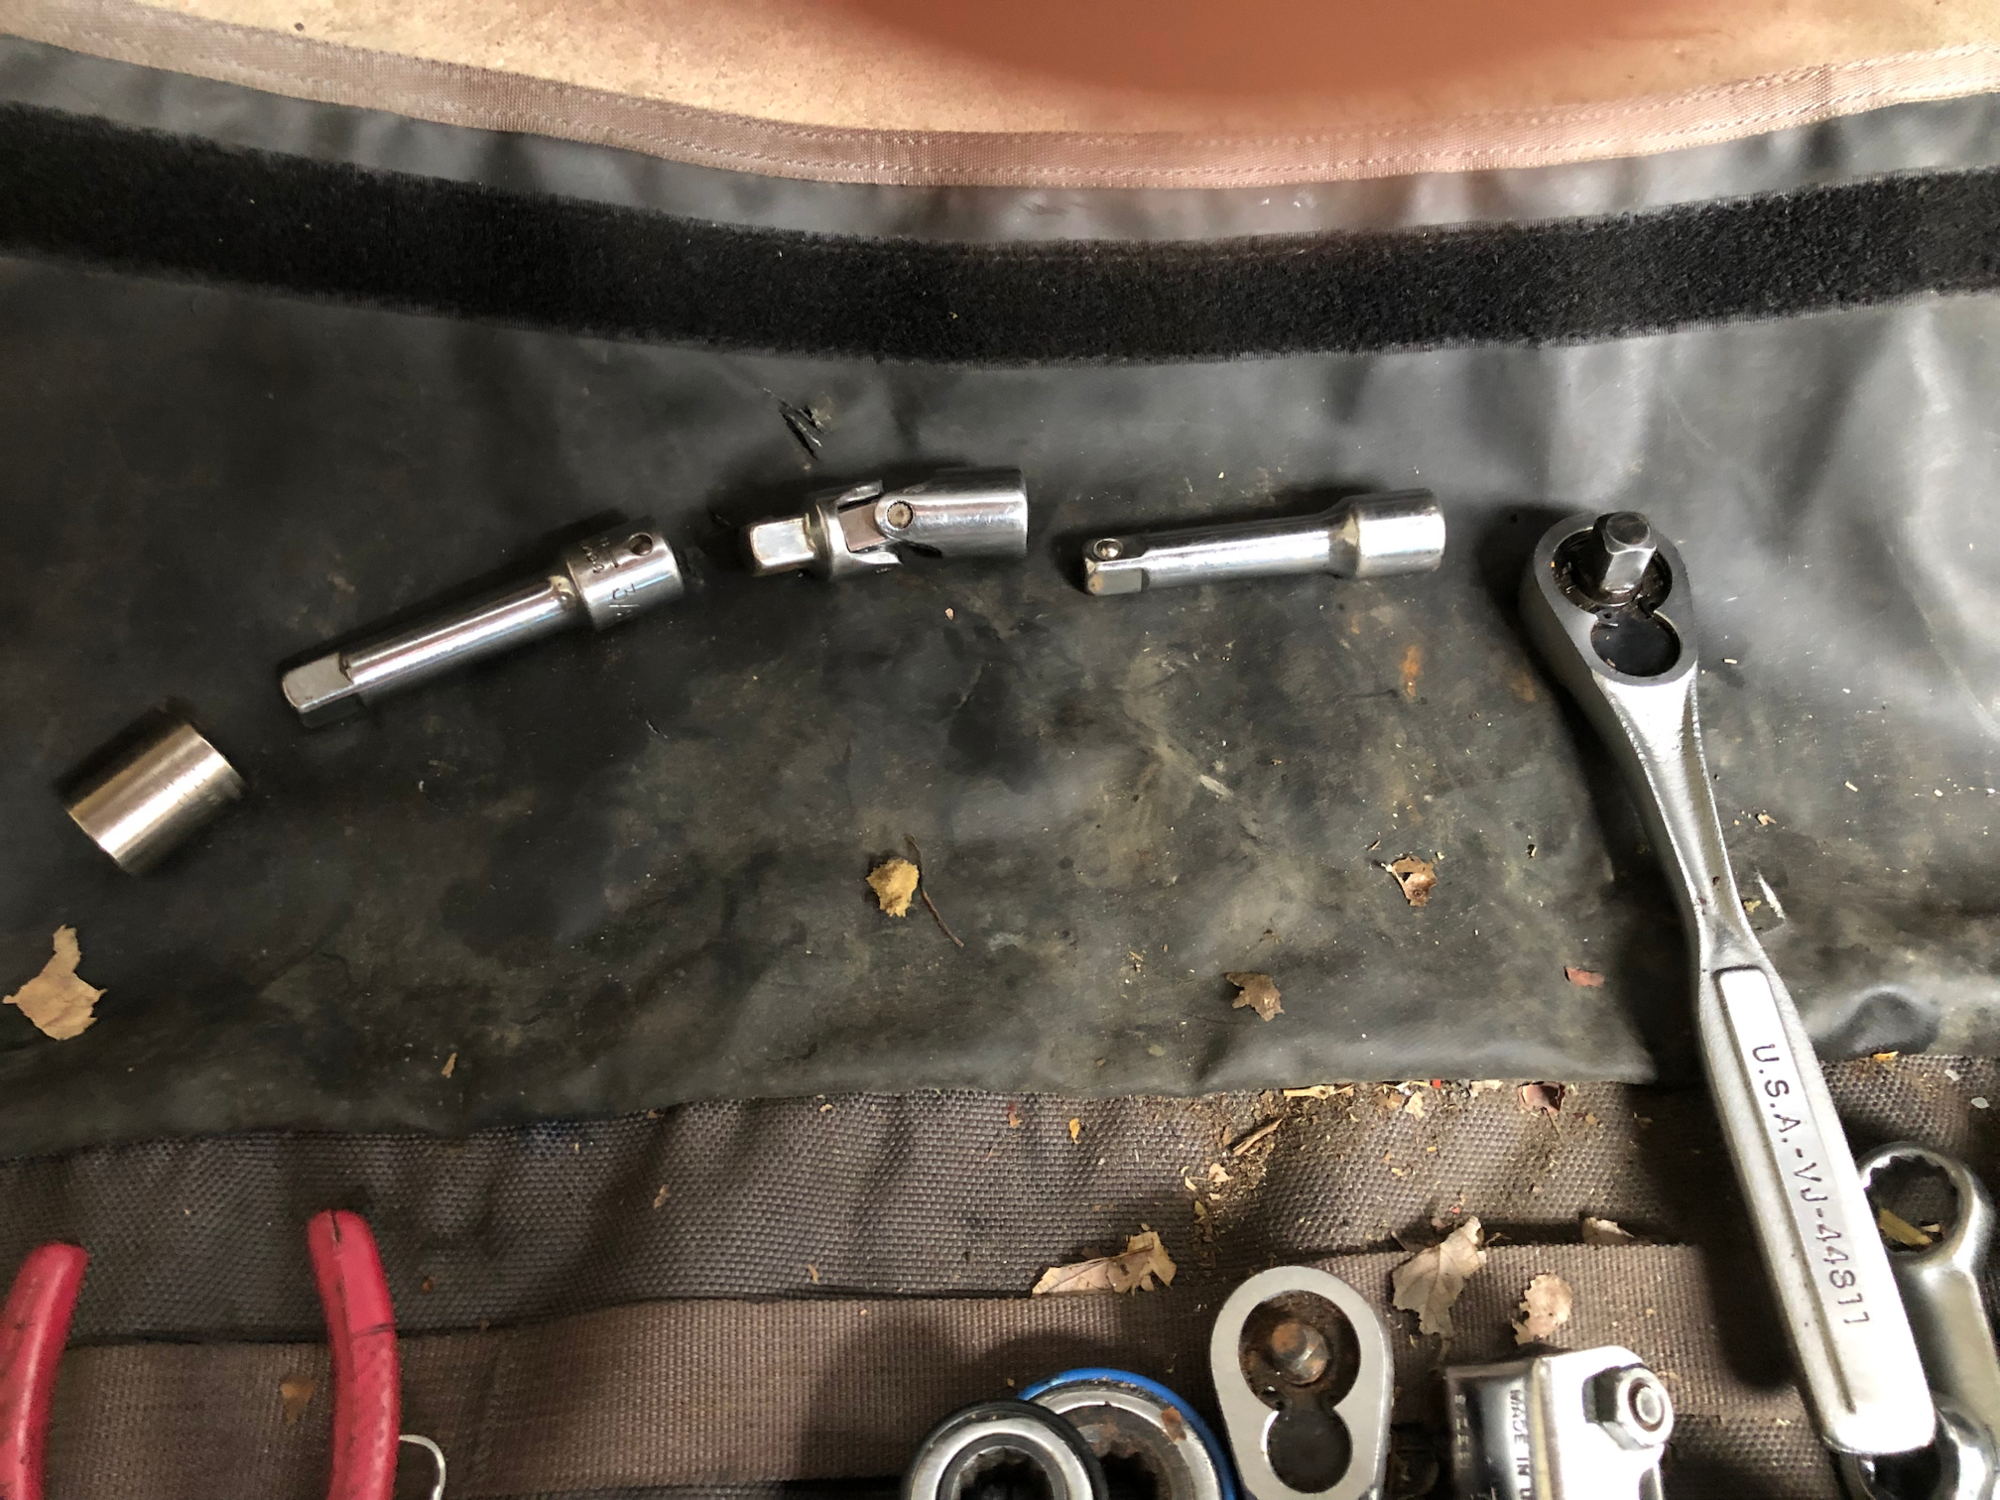
The other bit of information I would offer is the set up I used to remove the rear A/C bolt, also pictured below. I used all 3/8" parts. I put a universal joint between two equal length extensions. The extensions are each 2 1/2" long end-to-end, the narrow part of the extension is 2" long. This set up worked great and the bolt came out and went in very easily. I threaded it down through the intake as instructed, and used an inspection mirror to see it fully seated on the bolt before turning it.
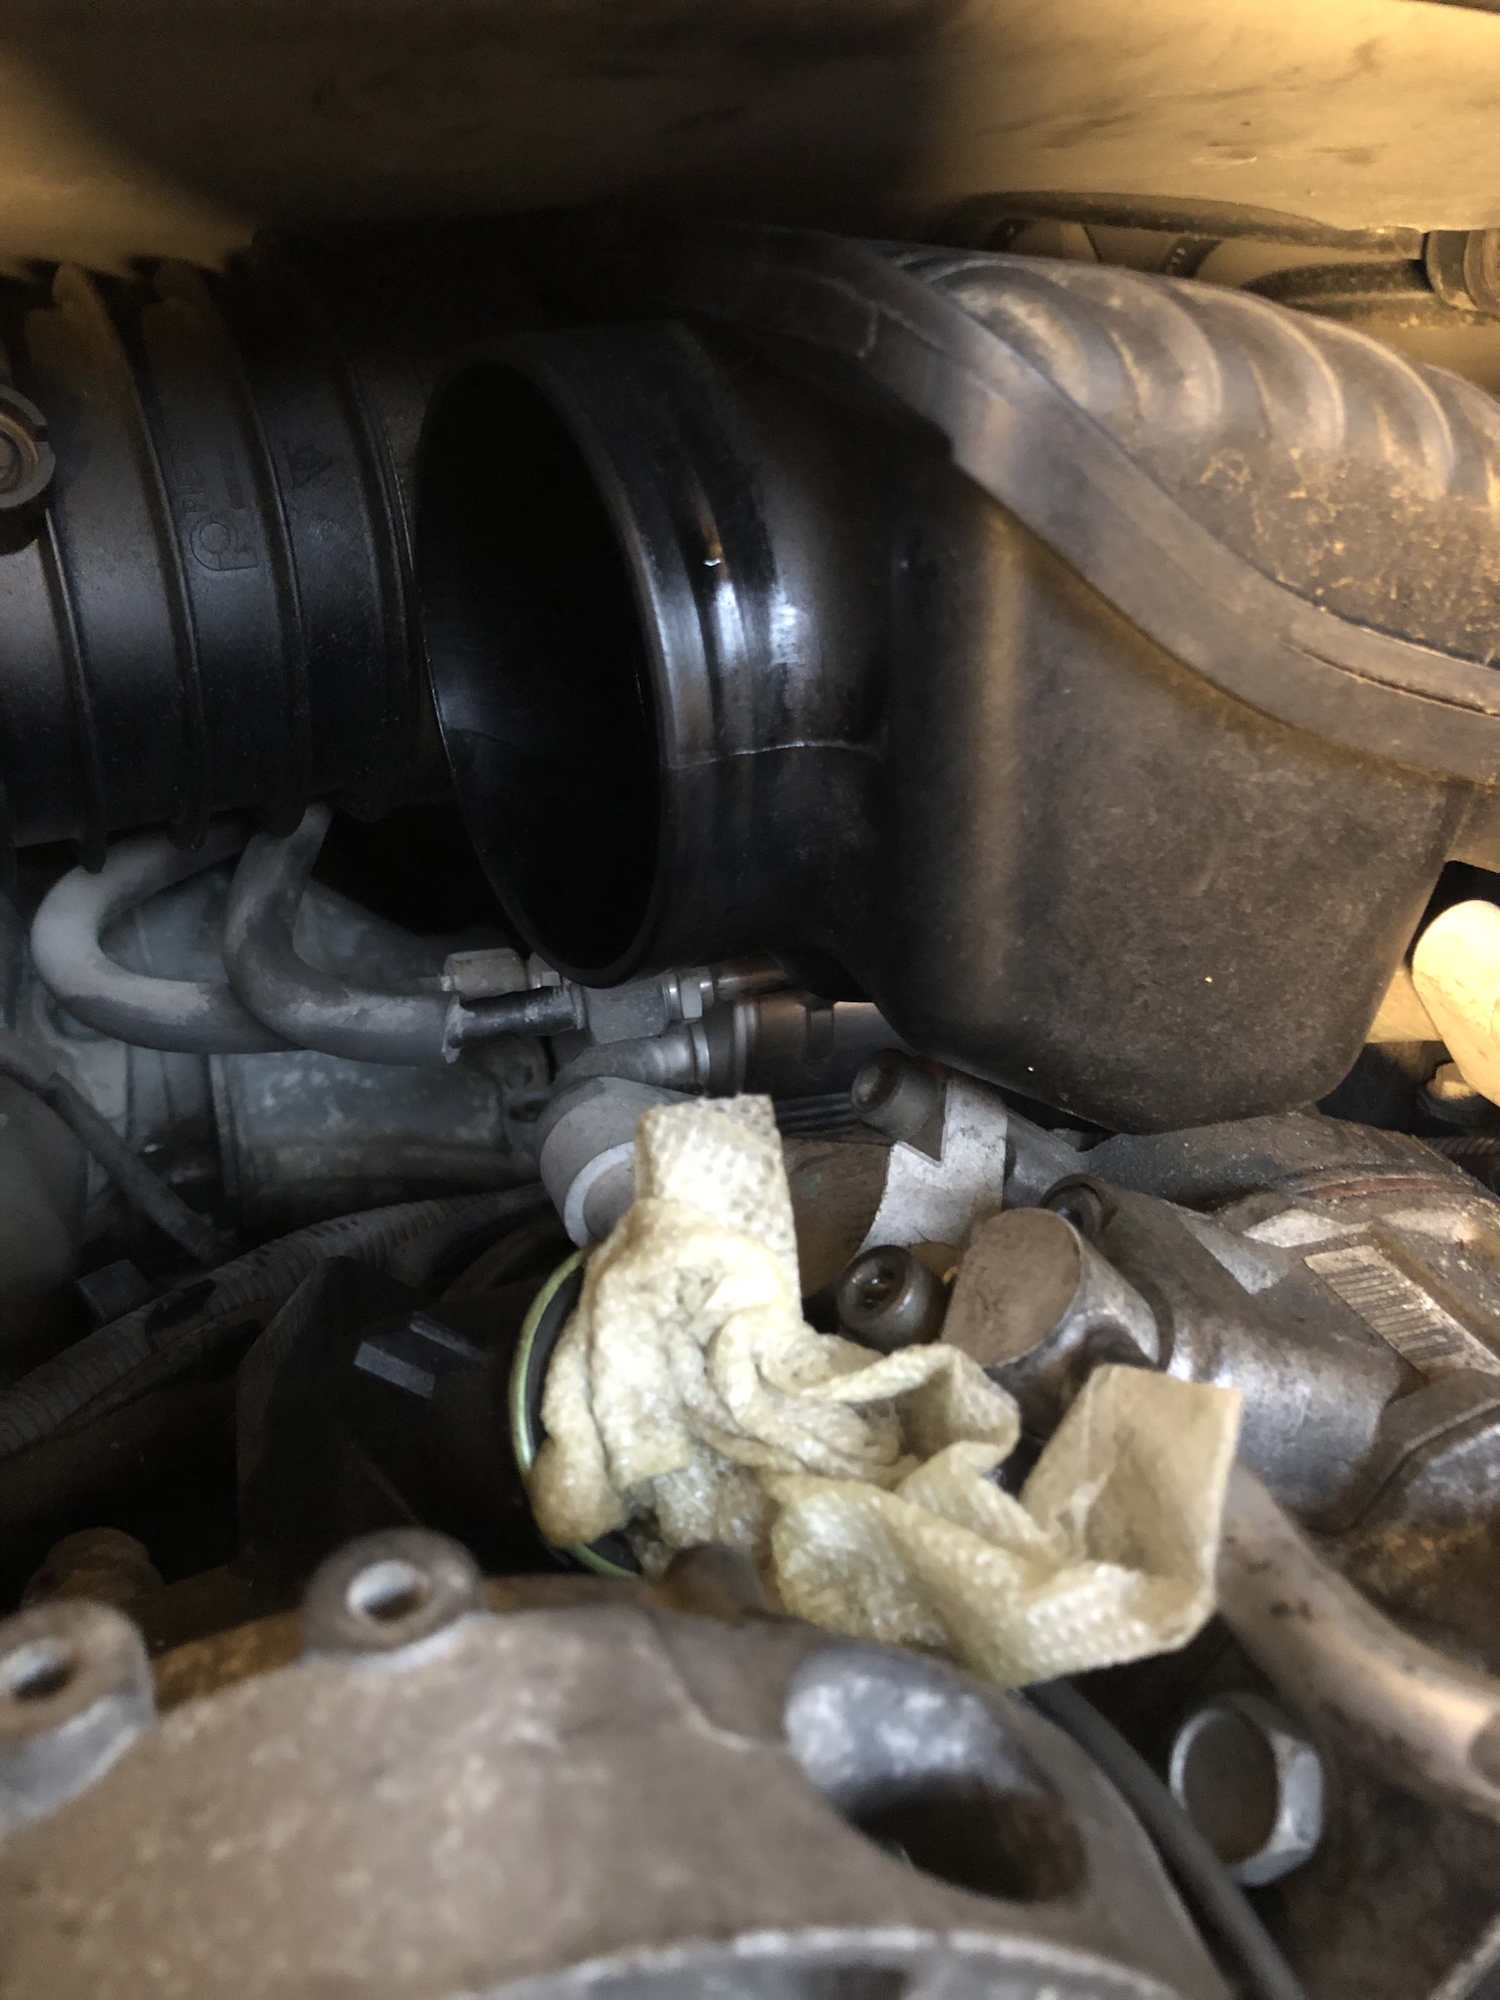
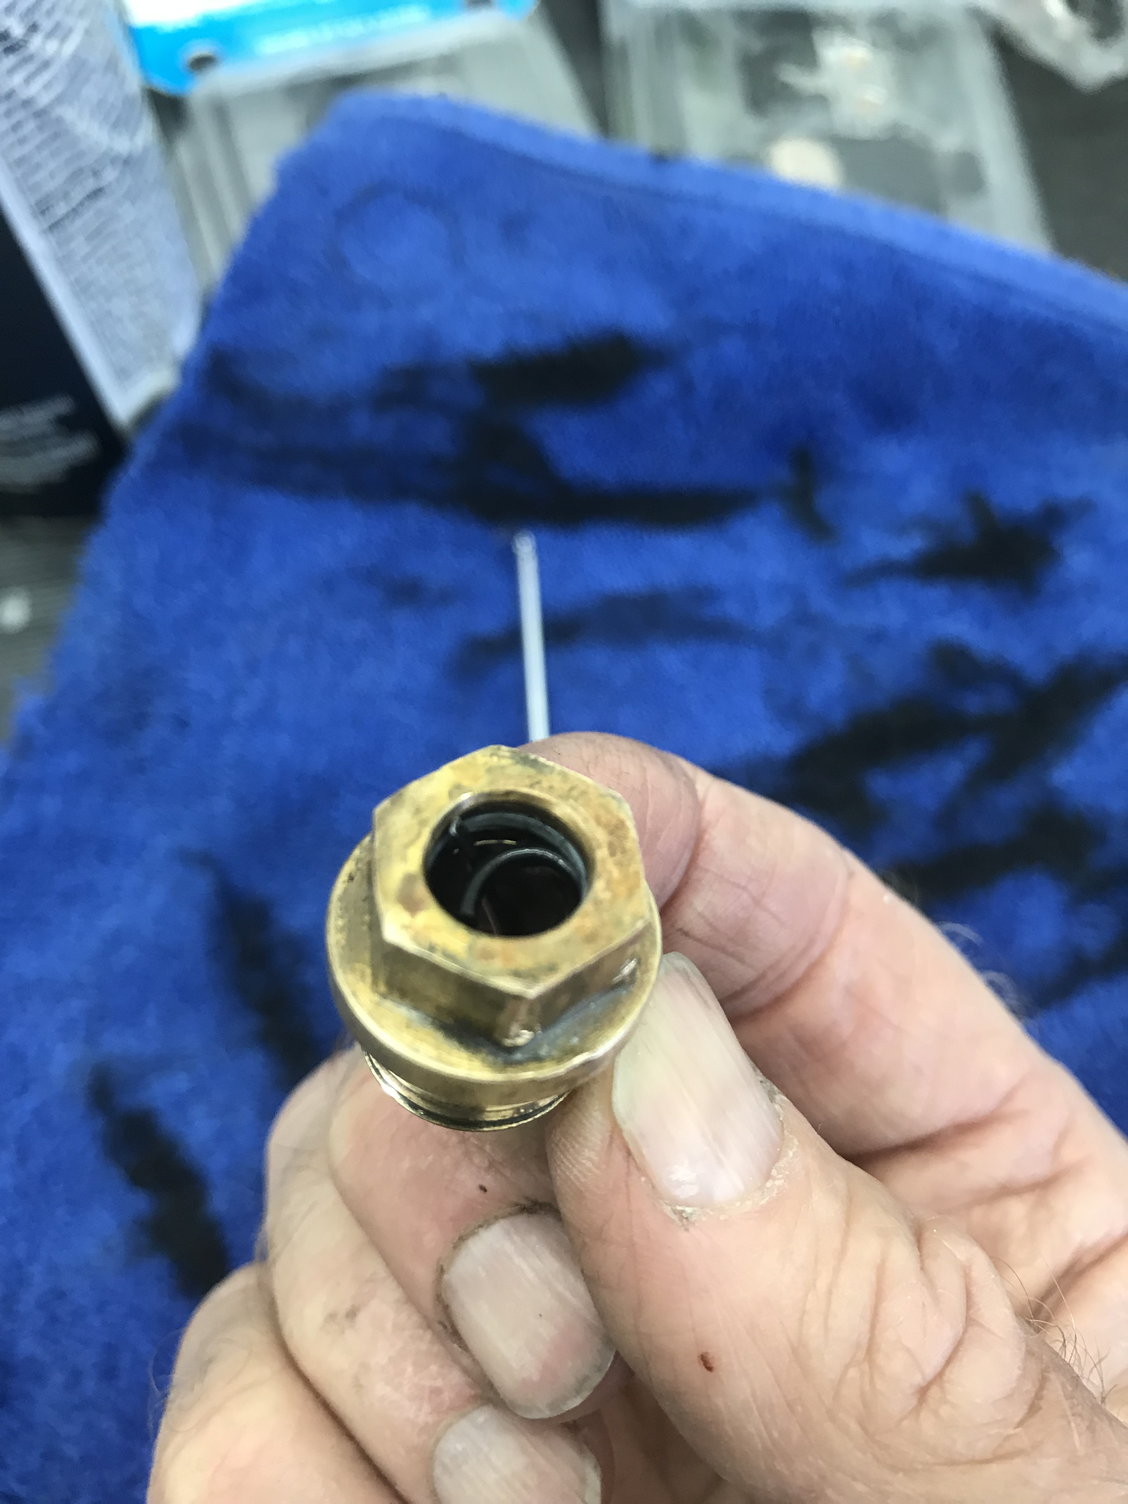
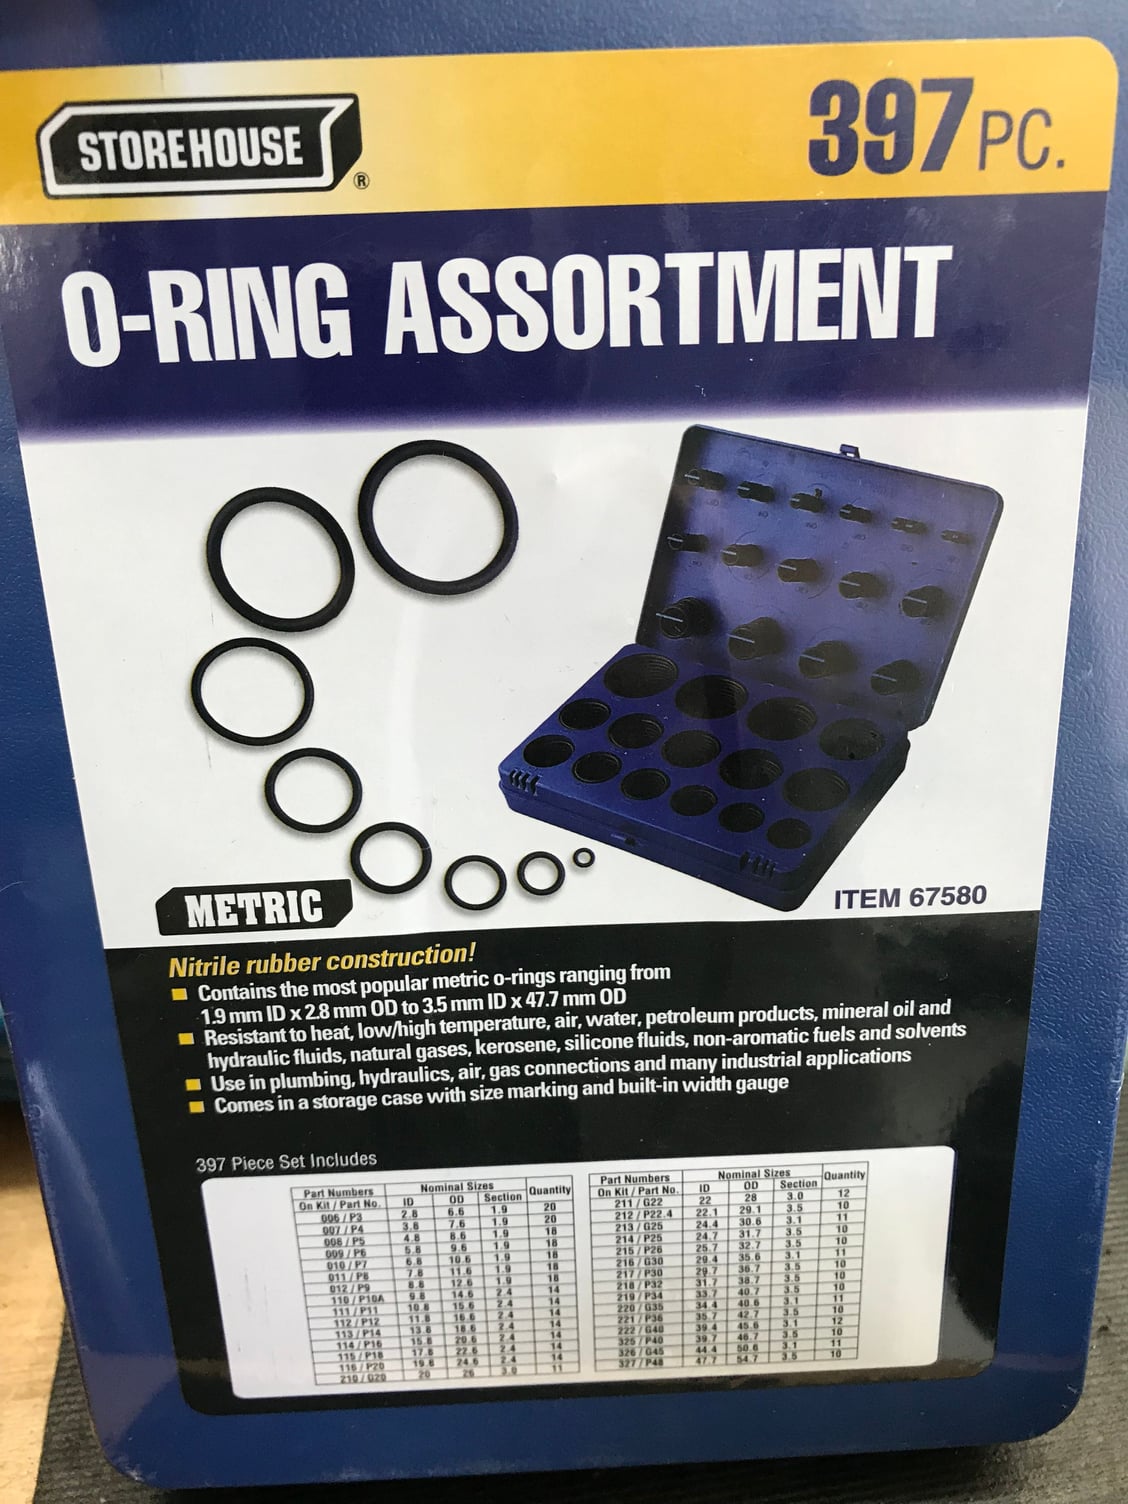
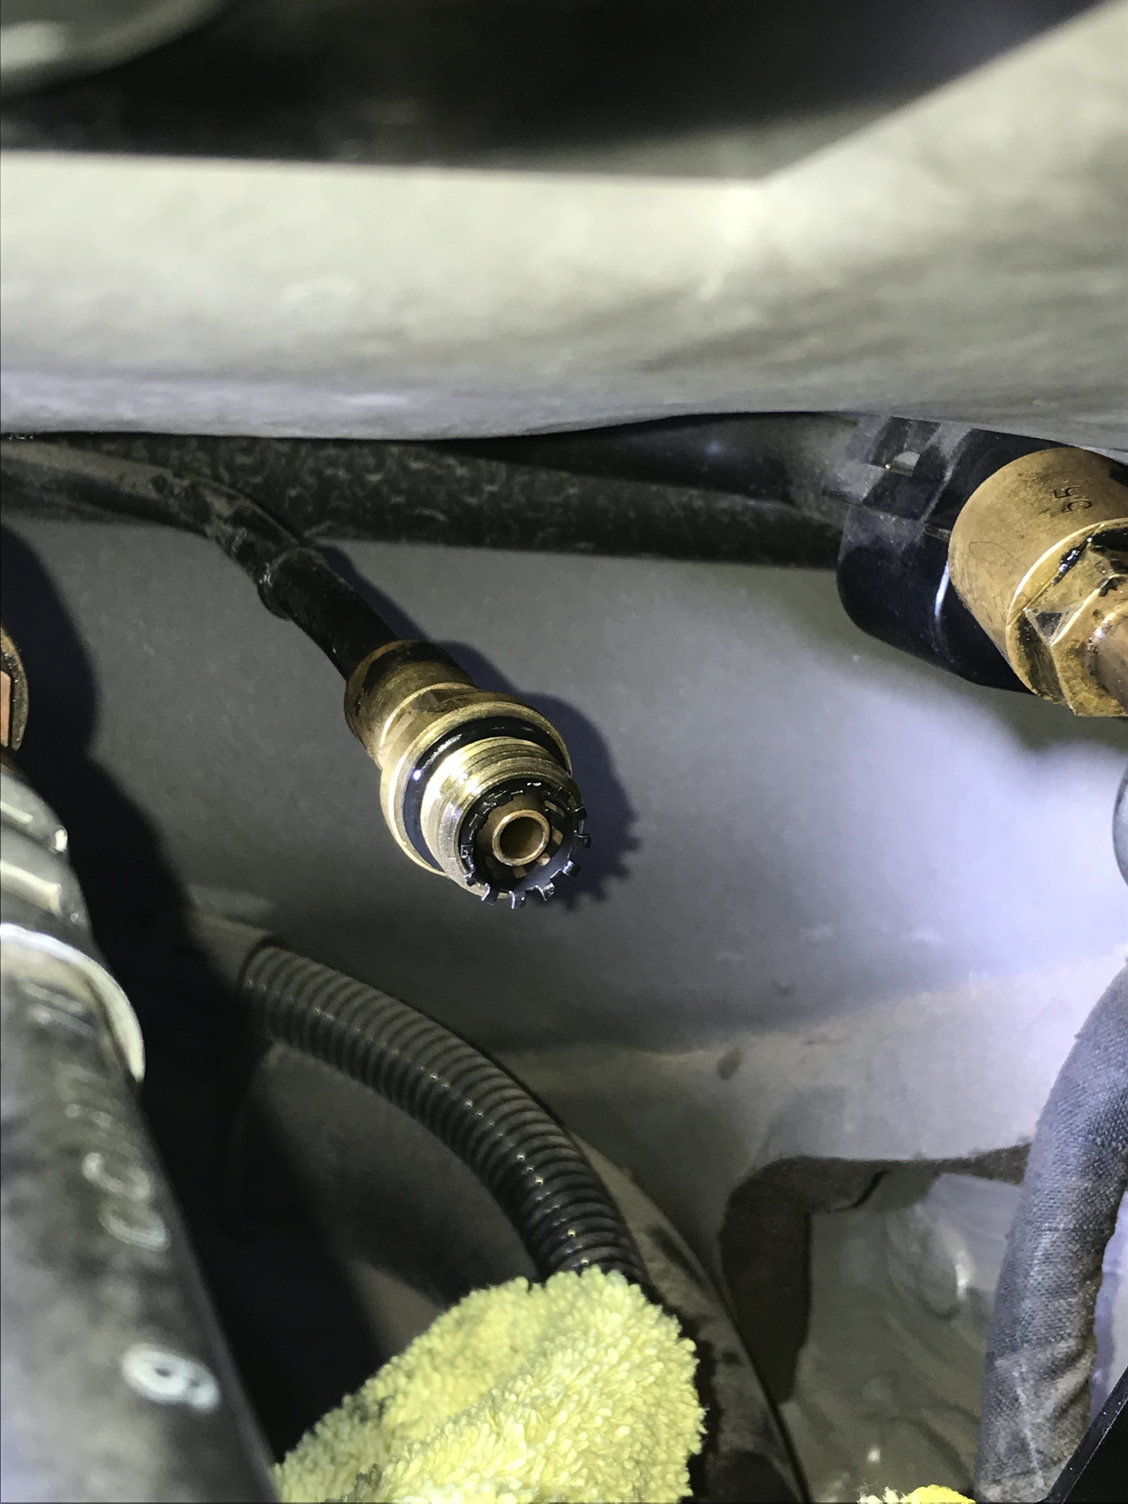
My 1999 C2 developed a small leak, which I could initially smell burning on the passenger exhaust. It quickly turned into a big drip, which led me here. I took out the airbox, and after evaluating as much as possible for hose issues, felt that the leaf was a coupling between forward running line, and flex line down to pump, on HP side. So, prior to going thru a hose replacement, I wanted to try to figure out why coupling/joint was leaking. I have attached pictures to help. I couldn't find any orings at normal discount auto supply places. Chanced upon the big box at Harbor Freight! $7.99! I guessed that there might be a close fit in one of these. I was using calipers to evaluate. And, didn't want to wait for shipping option of correct ones. Which came later after some research, online.
So, using 2 sets of crow foot sockets, from Harbor Freight($11.99 ea set), and 2 people, the fitting came apart fairly easily. Once apart, you can see from pictures, oring replacement. Be careful removing small plastic basket, but it just pops off. One oring internal- (do not remove white teflon spacer.), one external. Clean it all up, reverse process.
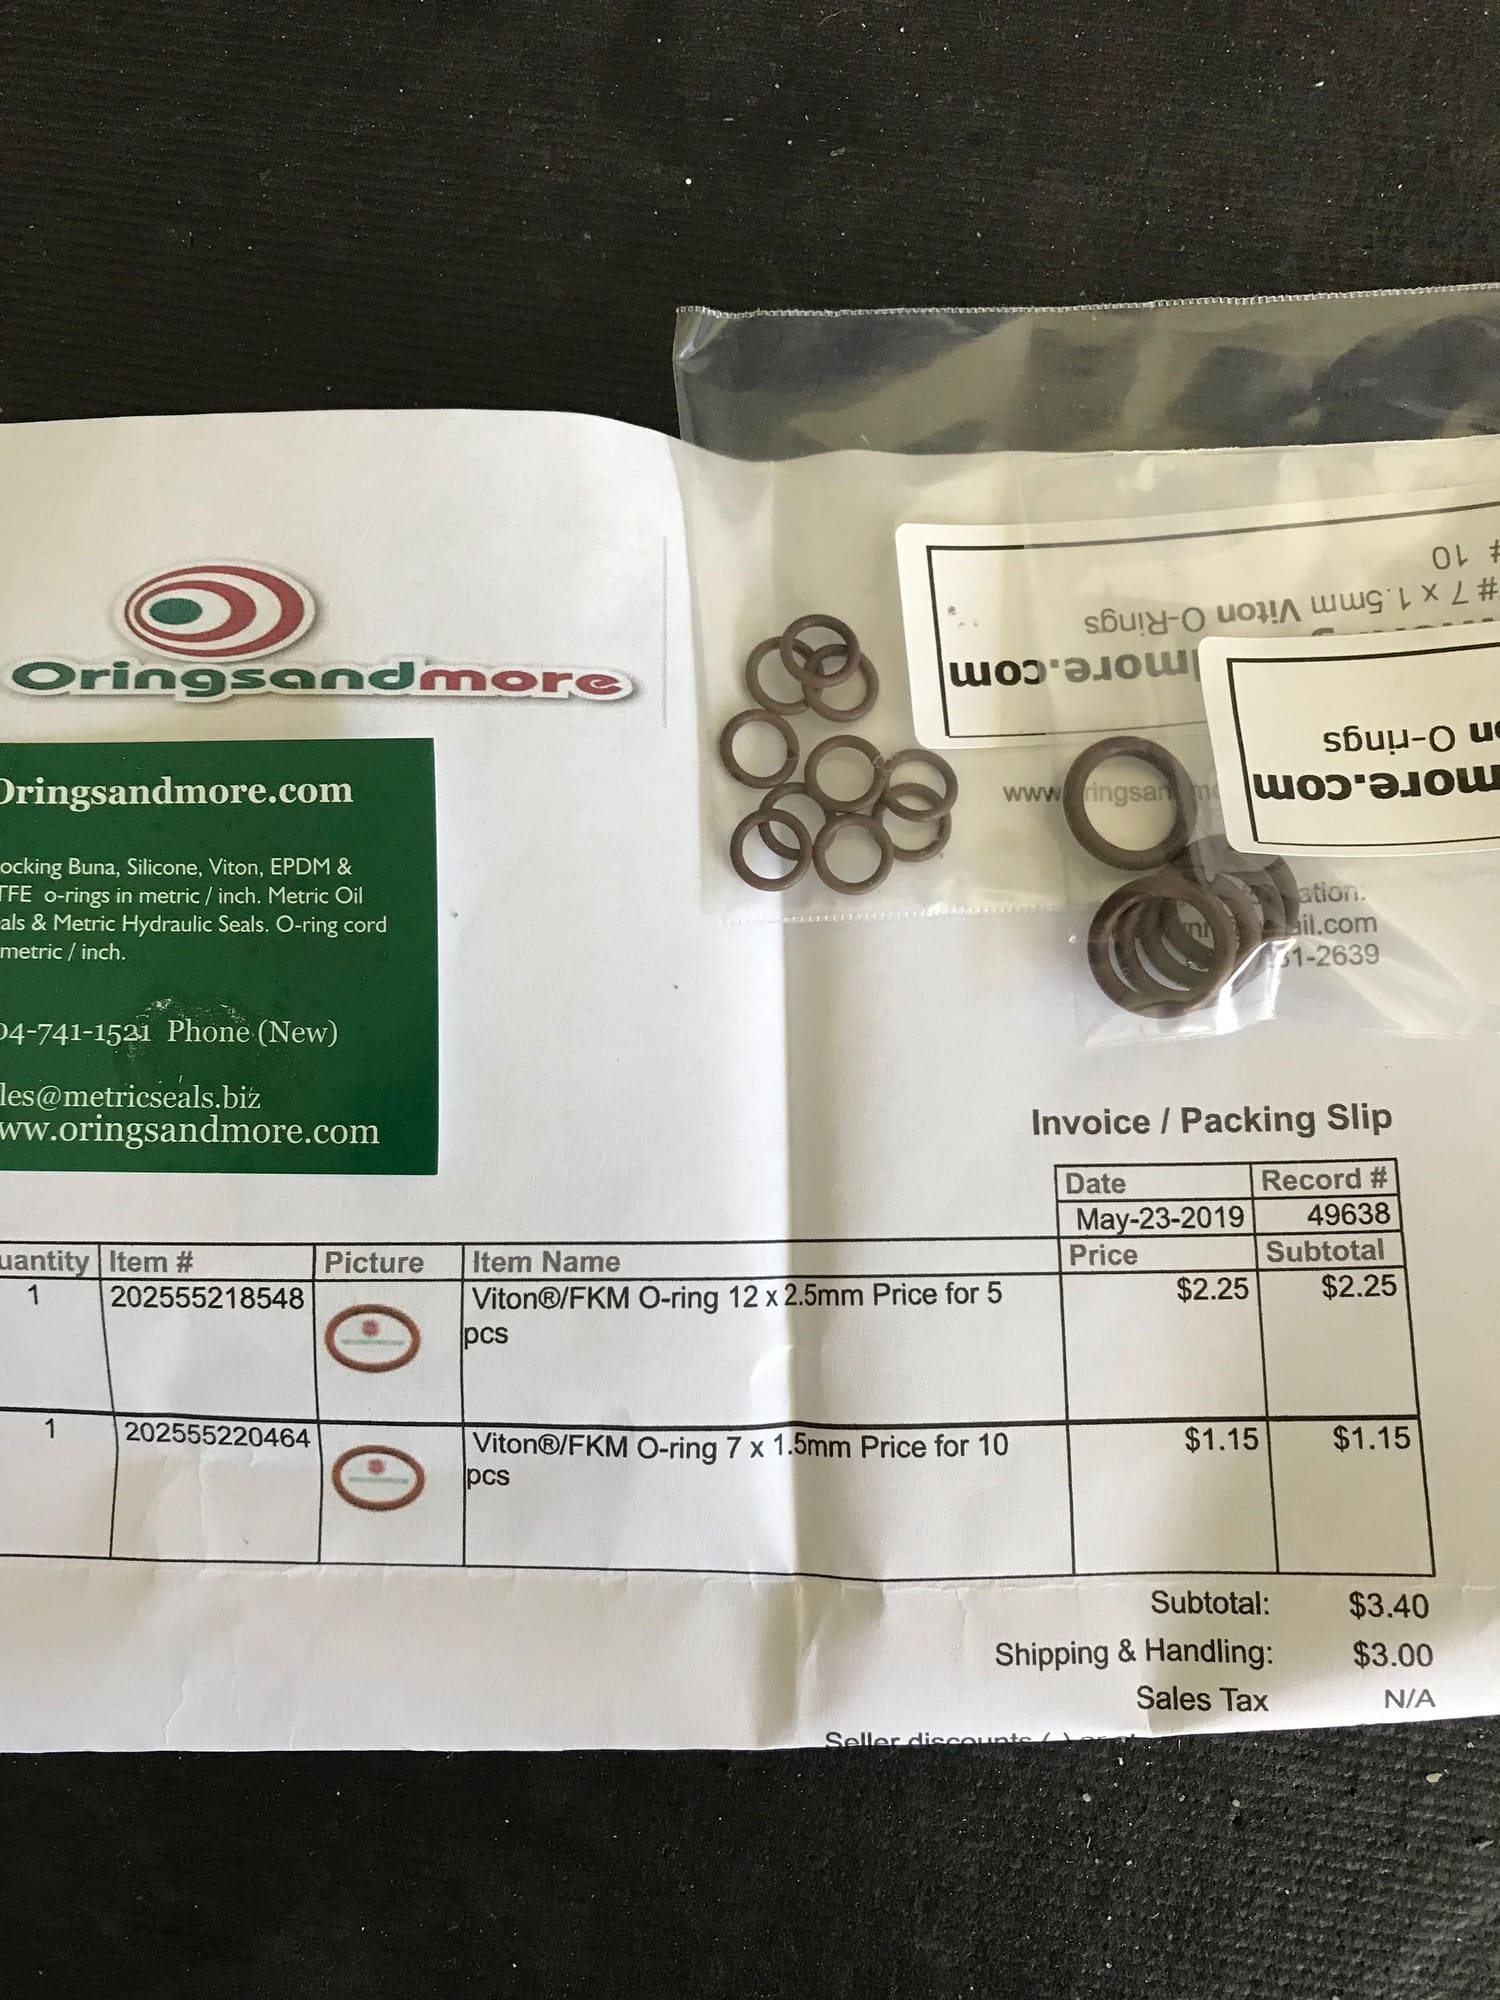
Some research online shows that Pentosin is very corrosive to rubber parts, and the rubber hose bracket that holds both lines up under package tray area, was nearly dissolved. The orings themselves were falling apart. The Harbor Freight ORings are Viton, but some research shows that the VitonFKM from Oringsand more, is made with a different formulation, which may be better in this application.
Metric Viton�/FKM O-rings are high heat and chemical resistance. Commonly used in fuel and petroleum oil applications. FKM or Fluorocarbon elastomers have excellent resistance to high temperature and low compression. They resistant to ozone, high temperatures, oxygen, mineral oil, synthetic hydraulic fluids, fuels, aromatics and many organic solvents over a temperature range of -25�F to +400�F.
Hopefully, this works, and saves you a lot of time and money, as the hoses are expensive!
with bracket bracket uncliped/removes use wrenches, and 2 people HP flex line Crow foot line wrench sockets remove small basket carefully, fitting slides off Oring is hiding just below teflon seal, carefully remove oring with pick, leave teflon in place oring falling apart from pick Harbor freight- Amazing deal Ready to reassempble The good stuff
Thank you for the brilliant description and photos - this worked for me.
Originally Posted by AZ996TT
My 1999 C2 developed a small leak, which I could initially smell burning on the passenger exhaust. It quickly turned into a big drip, which led me here. I took out the airbox, and after evaluating as much as possible for hose issues, felt that the leaf was a coupling between forward running line, and flex line down to pump, on HP side. So, prior to going thru a hose replacement, I wanted to try to figure out why coupling/joint was leaking. I have attached pictures to help. I couldn't find any orings at normal discount auto supply places. Chanced upon the big box at Harbor Freight! $7.99! I guessed that there might be a close fit in one of these. I was using calipers to evaluate. And, didn't want to wait for shipping option of correct ones. Which came later after some research, online.
So, using 2 sets of crow foot sockets, from Harbor Freight($11.99 ea set), and 2 people, the fitting came apart fairly easily. Once apart, you can see from pictures, oring replacement. Be careful removing small plastic basket, but it just pops off. One oring internal- (do not remove white teflon spacer.), one external. Clean it all up, reverse process.
Some research online shows that Pentosin is very corrosive to rubber parts, and the rubber hose bracket that holds both lines up under package tray area, was nearly dissolved. The orings themselves were falling apart. The Harbor Freight ORings are Viton, but some research shows that the VitonFKM from Oringsand more, is made with a different formulation, which may be better in this application.
Metric Viton�/FKM O-rings are high heat and chemical resistance. Commonly used in fuel and petroleum oil applications. FKM or Fluorocarbon elastomers have excellent resistance to high temperature and low compression. They resistant to ozone, high temperatures, oxygen, mineral oil, synthetic hydraulic fluids, fuels, aromatics and many organic solvents over a temperature range of -25�F to +400�F.
Hopefully, this works, and saves you a lot of time and money, as the hoses are expensive!
with bracket bracket uncliped/removes use wrenches, and 2 people HP flex line Crow foot line wrench sockets remove small basket carefully, fitting slides off Oring is hiding just below teflon seal, carefully remove oring with pick, leave teflon in place oring falling apart from pick Harbor freight- Amazing deal Ready to reassempble The good stuff
 09-04-2012, 11:29 PM


 Handy tip #1 - The magic size needed to remove the PS pulley, and AC compressor is an E12, so get one before you start.