When you click on links to various merchants on this site and make a purchase, this can result in this site earning a commission. Affiliate programs and affiliations include, but are not limited to, the eBay Partner Network.
I finally got a hard top for my '02 Cab but now I need to figure out how to store it when i am not using it and i'm tempted by the hoist systems. Anybody have any recommendations or have one that they don't use anymore and want to sell?
This is the top hoist that I made for less than $150 to allow me to mount\remove my top by myself.
1. 52" x 3/4 DIA steel pipe
2. Two 45 Deg fittings
3. Two 4" nipples
4. Two 3/4" caps
5. Two 1/4" eye bolts
6. 1 length ea of 3/4" and 1/2"pipe insulation
7. 10' of lightweight welded link chain
8. 6 pcs threaded chain joining links mine are ~5/16"dia (it was a 6 pack card)
9. Two 2 1/2" x 5/16 welded chrome rings
10. if you don't have any buy some 10-12" plastic wire ties while you are there
11. Two sets of bike rack straps - fabric straps with flat vinyl hooks for trunk lid (sears & local bike store) $15
12. Harbor Freight 440 lb. electric winch ($89 on sale in store) http://www.harborfreight.com/110-vol...rol-40765.html
Sears http://www.sears.com/shc/s/p_10153_1...u=SPM237857509
Strapworks.com http://www.strapworks.com/Flat_Hook_Straps_p/fhs1h.htm
1-10 Cost less than $35 total at Home Depot
1. Screw the pipe bits together to form a "\______/"
2. Drill holes in the pipe cap for the eye bolts. put them together and mount the caps.
3. Cover the pipe assy with the 3/4" foam pipe insulation all of the way to 1/2" past each end. Use wire ties to hold it together.
4. Figure the right length of chain to reach from the center of the top to the eye bolt on one side cut two pieces(leave it a couple links long (or buy another card of *8 above). there will be some left over
5. Using #8 hook the chains to the ring slide the 1/2" pipe foam over the chains put another #8 on the ends
6. Run the straps through one end of a 10" length of chain and tie them off. (Mine had adjustable buckles) put a #8 through the other end to tie to the 2nd ring, cover the chain with 1/2" foam
7. Hang your HF winch; I doubled the lift wire with the extra sheave to slow the lift speed
8. Hook your lifting rings with the straps, chain and padded pipe attached to the winch
9. Put the car under your lift unhook one end of the padded pipe, pass it through the car under the top hook it up and up up and away….
Now you have an electric hoist that allows you to easily mount and remove your top by yourself for about $140
Note: I had some open cell roll bar foam that I used for extra padding under the top edges. Also this year I shortened my chain and added short “training” leashes for 200+ pound dogs. The hooks make it easier to attach to the eyebolts. That is why I have the nylon strap through as a backup.
Attached Images
This is the top hoist that I made for less than $150 to allow me to mount\remove my top by myself.
1. 52" x 3/4 DIA steel pipe
2. Two 45 Deg fittings
3. Two 4" nipples
4. Two 3/4" caps
5. Two 1/4" eye bolts
6. 1 length ea of 3/4" and 1/2"pipe insulation
7. 10' of lightweight welded link chain
8. 6 pcs threaded chain joining links mine are ~5/16"dia (it was a 6 pack card)
9. Two 2 1/2" x 5/16 welded chrome rings
10. if you don't have any buy some 10-12" plastic wire ties while you are there
11. Two sets of bike rack straps - fabric straps with flat vinyl hooks for trunk lid (local bike store) $15
12. Harbor Freight 440 lb. electric winch ($89 on sale in store) http://www.harborfreight.com/110-vol...rol-40765.html
1-10 Cost less than $35 total at Home Depot
1. Screw the pipe bits together to form a "\______/"
2. Drill holes in the pipe cap for the eye bolts. put them together and mount the caps.
3. Cover the pipe assy with the 3/4" foam pipe insulation all of the way to 1/2" past each end. Use wire ties to hold it together.
4. Figure the right length of chain to reach from the center of the top to the eye bolt on one side cut two pieces(leave it a couple links long (or buy another card of *8 above). there will be some left over
5. Using #8 hook the chains to the ring slide the 1/2" pipe foam over the chains put another #8 on the ends
6. Run the straps through one end of a 10" length of chain and tie them off. (Mine had adjustable buckles) put a #8 through the other end to tie to the 2nd ring, cover the chain with 1/2" foam
7. Hang your HF winch; I doubled the lift wire with the extra sheave to slow the lift speed
8. Hook your lifting rings with the straps, chain and padded pipe attached to the winch
9. Put the car under your lift unhook one end of the padded pipe, pass it through the car under the top hook it up and up up and away�.
Now you have an electric hoist that allows you to easily mount and remove your top by yourself for about $140
Note: I had some open cell roll bar foam that I used for extra padding under the top edges. Also this year I shortened my chain and added short �training� leashes for 200+ pound dogs. The hooks make it easier to attach to the eyebolts. That is why I have the nylon strap through as a backup.
Attached Images
Wow, now that is being handy! Thanks for posting all of that as it has now give me alot to think about.
Quaylon,
Good inexpensive hoist. The top weighs 74lbs so you have plenty of margin. Can you use the manual setup to mount the top also? I had a manual setup for awhile but I am too uncoordinated to use it by myself. The electric one made it so that I could do it by myself.
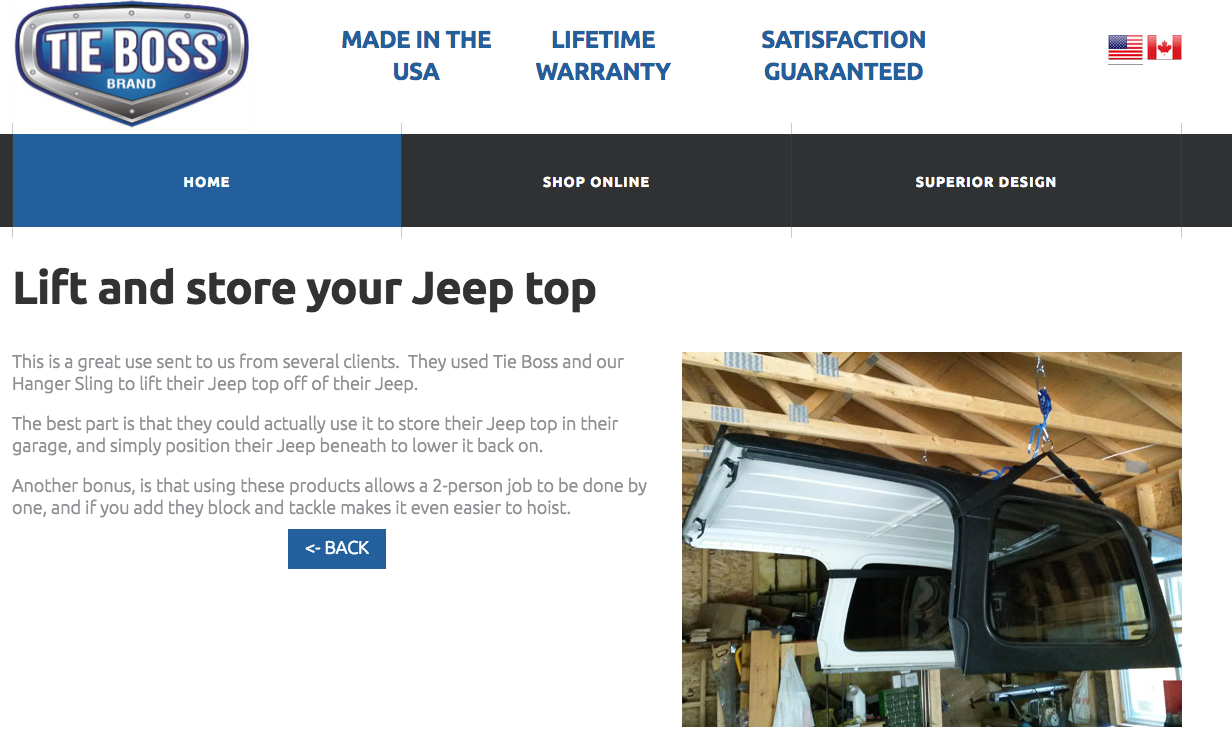
fpb111: Yes I can use the kayak hoist to mount the top on the car. I purposely installed it directly above where I park the car. It's nice that the garage ceiling is 13 feet up. All I need to do is let the top down slowly. The hoist has auto locking like venetian blinds so I stop at about 1 inch over the car, remove the rear hoist connection and ease the top into place, then let the front down.
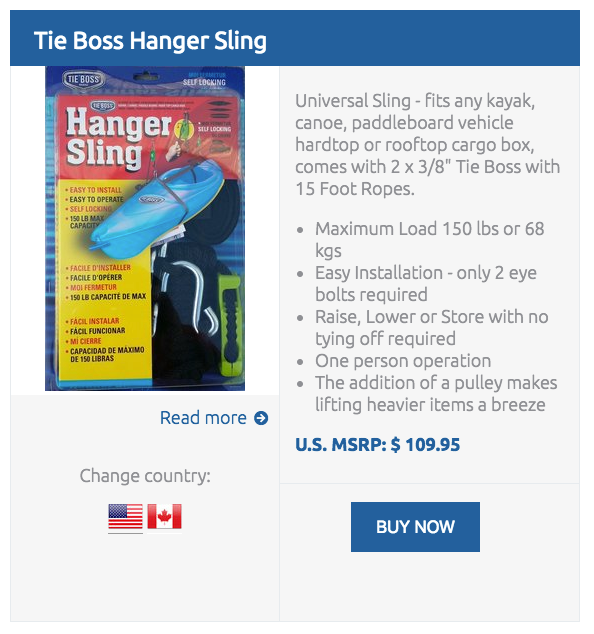
Here is a less expensive option that I have seen in person. They have a super slick self locking cleat to anchor the rope. I would have gone this way, except I wanted to use the electric winch.
I have a hardtop cover in case you're interested. Also have a stand in case you want to go that route.
I�m curious as to your asking price for each of them. Not sure yet ln the stand, i really need to use that motfor a hoist. I�ll proyhsve to build one. Thanks. Dave
 01-15-2012, 03:24 PM