
Bilstein PSS10 993 coilovers Install help
 06-03-2014, 03:50 PM
#31
Rennlist Member
Thread Starter

 06-16-2014, 05:30 PM
#33
Rennlist Member
+1 on triple checking the right rear droplink mount for the first few weeks after installation. I had to resort to a large rubber mallet, and some serious determination, to finally persuade mine from twisting when cornering, during spirited driving.
Otherwise it could get loose, rotate forward, apply pressure to the inner shaft of the spinning drive axle (rear passenger side.) The outer CV joint would then get instantly damaged, causing the wheel to spin unevenly, the tire would start to wear prematurely on the inside, causing the whole rear of the car to start shaking at high speed.
One could eventually end up replacing the whole drive shaft, wheel bearing, hub, brake rotor, and the expression "F%^K my life," would definitely become part of his vocabulary...
05-28-2015, 08:31 PM
#34
I'm preparing to do the PSS10 install this weekend. Does someone have this complete install guide still?
Johnny
05-28-2015, 09:02 PM
#35
Addict
Lifetime Rennlist
Member
Lifetime Rennlist
Member
Hey Johnny,
Doing the upgrade, eh? Like I said above, the complexity of this job is blown out of proportion - I know lots of people like the step-by-step nut-by-nut guide, but if you just look at how it's put together, it's quite simple - just use common sense and a few simple data sources. The factory manual is only good for the torque specs. The only guidance I would say is use a good quality hex socket to hold the shock shaft in place while you tighten the top nut - if its a crappy tool, it can round out in the socket and basically make it really difficult to torque the shock onto its tower.
Mind you, having done several of these, I have forgotten "my first time".
Cheers,
Mike
05-28-2015, 11:17 PM
#36
Thanks Mike,
I think of it this way, I'm not upgrading, I'm preserving an 18 year old sub 20K OEM suspension. A bit of a historian. Besides the car is out of warranty.
Last year at 993FEST (missed you by-the-way) I had handling issues at speed that Gave me the pucker factor. So I figured I would lower the car to Euro-spec replaced engine motor mounts and will be replacing the bushings in the lower control arms. I have a slight vibration in the wheel at about 70mph. Don't feel it in my hand just see it when I let go of the wheel. So in a nutshell just doing my custodial duties to the car.
Anyhow back on subject.
I didnt think it was too difficult, but I was originally under the impression that the top nut (front 21mm, rear 19mm) was removed with the car on the ground and then lift the car to remove the load on the springs. Easy peazy but then I read this thread about removing the entire top hat / bearing. Then remove assembly as a whole and disassemble on the bench. To tell you the truth I'm a bit scared of sprung springs. I understand the force associated. Sounds like these are not very much preloaded. I borrowed some spring compressors to be on the safe side and will be milling a 22mm (front) and 19mm socket (rear) tomorrow. I ordered all the plastic bits and I am planning on cutting a little channel in the brake line bracket so I can take my time learning to bleed the brakes at a later date.
Now my question if you remove the 4 bolts to remove the top hat there is a rubber gasket it seems between it and the body, will I need to replace that with a new gasket?
I'm hoping to be able to do this in a day and have all the parts ready so I can be done with it.
Then on to an alignment and corner balance.
I'm looking forward to the change.
Johnny
05-29-2015, 12:38 AM
#37
Rennlist Member
Join Date: Nov 2010
Location: Central California
Posts: 3,484
Likes: 0
Received 13 Likes
on
12 Posts
As long as the rubber gasket is intact, it should not need to be replaced. If it does need replacing, you won't need it when you eventually install rear monoball camber plates :-)
05-29-2015, 01:17 AM
#38
Monoball camber plates, that's called the slippery slope right? Funny.
Reading the Repair Manual, it looks like I need new spring strut nuts (must be lock nuts) so 16 in all. The local Dealership should have those in stock. I got all three plastic bits for the two front struts and the PSS10 Kit.
Anything else that I may be missing?
I can't wait to finish this up and get the alignment. Pretty excited. Then to find my BBS LM in gold.
Johnny
05-29-2015, 01:52 AM
#39
Addict
Lifetime Rennlist
Member
Lifetime Rennlist
Member
Check the bearing in the top hats at the front - those can wear or get crunchy if they get debris in them. That could delay you since you would need to replace the entire part.
I have spring compressors but have never used them - I can squeeze the new springs down by hand, especially if the perch is threaded to the bottom. Yes, cut a channel for the brake line, that works well.
I use an impact gun to remove the top nut on the old shocks - the shocks will be junk anyways, even at your mileage.
Cheers,
Mike
05-29-2015, 12:51 PM
#40
Drifting
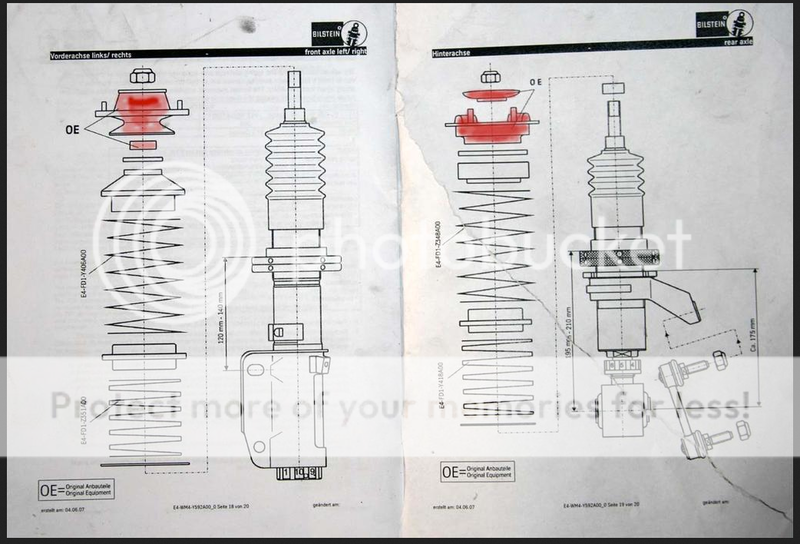
Also remember to retain the OE metal bushes on the front coilover assemblies, so they seat properly in the perch. Here is a pic that someone posted that illustrates what you need to keep...(Very easy to omit, if you're not following a specific guide)...

05-29-2015, 01:31 PM
#42
Drifting
")
 05-29-2015, 06:43 PM
#43
Rennlist Member
 06-03-2015, 12:31 AM
#45
Well I got the new iPhone app (Garage Talk) and am trying to see if I can upload pictures again straight from the phone.
The PSS10's are in and the ride height as dropped substantially from the SUV height I had.
Since we all like pictures I thought I would post one. The Camber adjustment on the rears seems to have shifted but I'm not worrying about it as an alignment is next. I am replacing my bushings in the front A-Arms. Taking out the bushings on the first arm took a little over an hour, the second only took 20-25 min. Amazing what a little of experience provides.
Ride height is a bit high but will be set at ROW sport when I have it aligned and corner balanced.