When you click on links to various merchants on this site and make a purchase, this can result in this site earning a commission. Affiliate programs and affiliations include, but are not limited to, the eBay Partner Network.
Is it possible to replace spark plug wires on a 95 without intake removal?
Hi,
Is it possible to replace the right side plug wires on a 95 (non-varioram) without removing the intake? There appears to be 1 single screw in a plug wire holder wedged between the intake and the fan shroud.
It's the plug wire holder closer to the driver side on the fan shroud. It looks like there would be enough clearance to remove the screws on the holder of the side closest to the passenger.
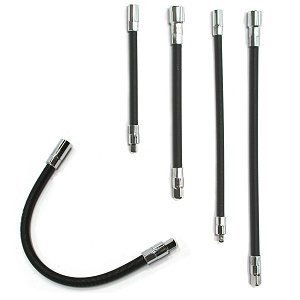
With all of the crap I've done to my car, I've found the need to buy tool that I previously never thought of. Now, I wonder how I got by without some of them for so long. Get a set or individual flexible 1/4" & 3/8" extensions. The 1/4" on a nut driver with the 8mm socket. It'll manuever down in there and make life bearable.
Overboosted,
Where did you source yours?
I see snap-on, as well as most other major tool suppliers carry the flexible extensions. Snap-on states; not for initial loostening, or final tightening, but I cant imagine the 8mm bolt in question, being that tight.
On reinsertion, I'd probably use 1 drop of blue lok-tite.
p.s. Nice SSR GT3's...I have a set sitting in the garage...
Thanks 4 the compliment. I can see a pretty tight bolt being difficult because the flex of the ext. But the hard to get to things are usually the smaller bolts/nuts so they work well for those.
Those tools won't work in this situation. The 3 inch Phillips screw is flush against the intake. It's a 95 non-varioram engine.
Taking the intake off a 95 is a piece of cake? I'll have to search for a DIY. So far, every job I tackle results in skin being torn off my hands and fingers!
Did this without removal. I used a craftsman tool that came with my screwdriver set. Has a phillips on one end, straight on other. Look like 2 L's connected. Loosened about 2/3, then used a long screwdriver to reach inside and pop screw and insert out together. Pm for other tips if needed.
Is it possible to replace the right side plug wires on a 95 (non-varioram) without removing the intake?
Its not the method I used but some have loosened the clamps at the intake manifold rubber seals and tilted the manifold upwards. You might have to remove items such as the ISV to give you more room on top.
You also need one of those ratcheting handles that will take 1/4" hex bits, in this case a Philips bit.
if removing the manifold (I just raise it and work underneath - I lower the engine on its mounts as well, that gives more room too), be careful on making sure the clips for the throttle and cruise control are well seated. On a 95 is pretty easy, on a 96+, be prepared to swear lots.
Porsches were meant to be worked on by miniature people with Herculean finger strength! Said in jest, but as many have noted, working on these cars sometimes gives one lots of time to think of new profanities.
I have two serious comments though. First, removing the intake manifold, whether it be on your 95 pre-Varioram OR on a Varioram car is more intimidating in appearance than in reality. Simply loosen the upper clamps on the 6 runners of the intake that seat into the rubber connectors, and you can remove the manifold. You may have to take a small blade and carefully work it around the joint between manifold and rubber to break the rubber free of each manifold runner. You may need to remove a few other items......such as the ISV on the 95. On Varioram cars, the ISV is wedged under the rear bulkhead, but, in this case, my second point is that you can just lower the engine about 2-3 inches without any issues. This will give you access above and around the top of the engine.
Lowering the engine does not mean that you have to do the work needed to remove the engine. Place a floor jack under the engine to support its weight, raise the jack just enough to feel the engine beginning to move. And, then remove the single large nut that secures each of the rear engine mounts to the engine carrier. You may have to pop out the two small circular sheet metal cover plates from below, if your car still has them in place.
Then, slowly lower the jack for the 2-3 inches needed to get access to the back side of the motor. Pay attention to hoses and wires that may get snagged. It is truly easier than it sounds.
Having taken several engines out of various 911's, I quickly became aware that factory assembly of our engines did not include proper positioning of items to make easy their removal once the engine was installed int the car. It seems that many (if not most) of the clamps, brackets, bolts and capture nuts are installed in a fashion that make it very difficult to remove the part. So, spend some time identifying these issues and correct them when you are calm and sane.....cleaning up the area as you go. Rotate clamps for ease of access. Reverse the installation of bolts and their capture nuts for the same reason. This reverse engineering makes it a little bit easier and less profane to work on the engine in the future.
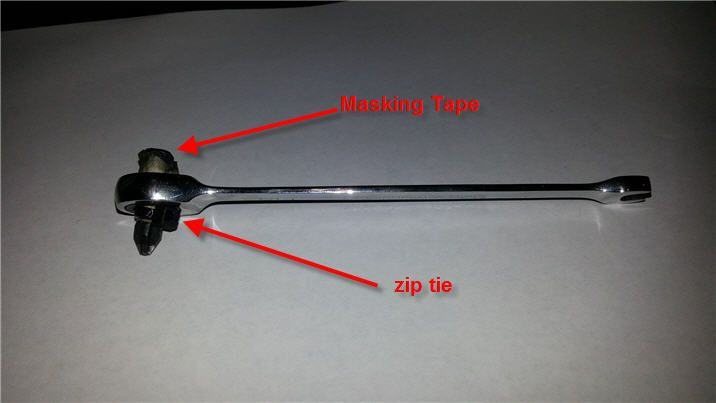
I just did this yesterday, and the only really bad fasteners were the 2 Phillips screws under the intake, mounted on the fan shroud. I made a tool based on this post on p-car.com http://p-car.com/diy/sparkplugwire/, the only difference is I used a 1/4" ratcheting box wrench. To keep the drill bit in the wrench, I used to masking tape to give it some bulk, and a small zip tie around the indentation of the drill bit to keep it from getting pushed through.
Alex (IXLR8) has a great post on DIY wires in the DIY section. https://rennlist.com/forums/diy-subm...ion-leads.html. There are charts showing all the details, saving me tons of headache trying to measure the distances between the brackets. Use a non-black marker to mark the wires when clipping them into the brackets so you can get the curves and bends just right.

 11-02-2014, 11:25 AM

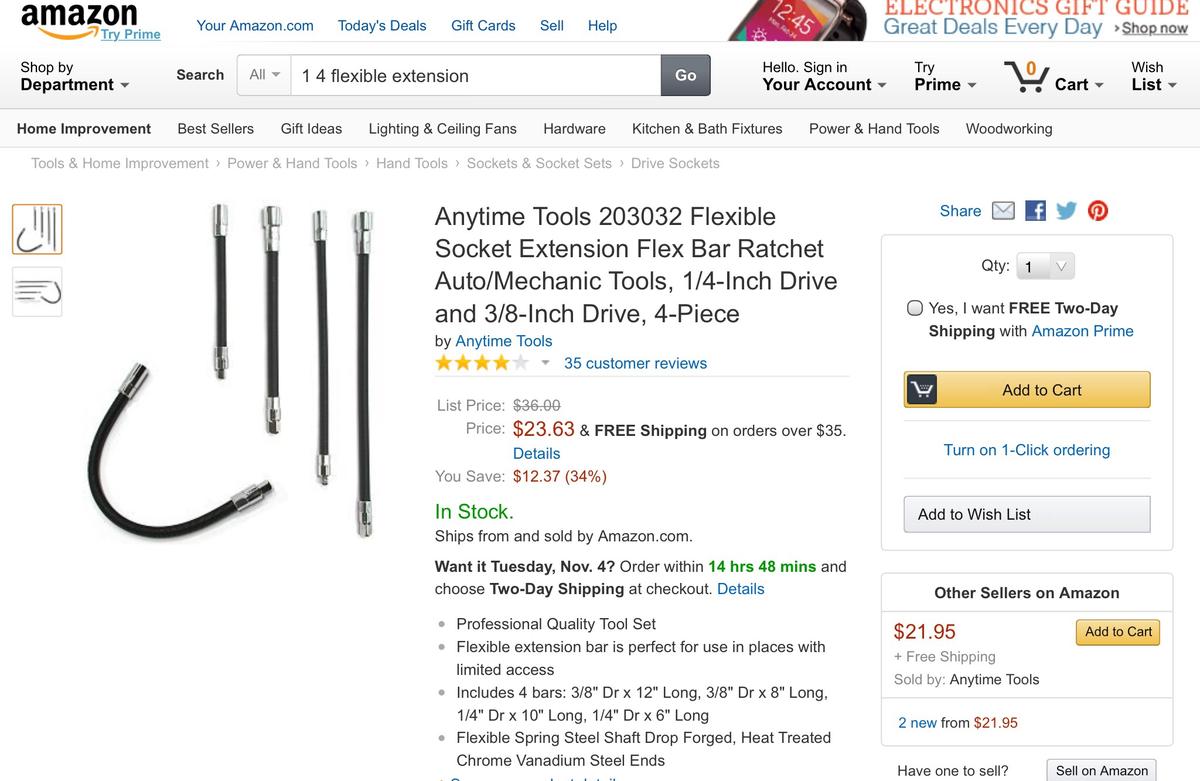
 . This is what I bought.