instruction how to install carbon package at 993
 04-20-2012, 12:15 PM
#1
Instructor
Thread Starter
As promised, here comes, step by step, the installation instructions for the carbon package in the 993. This also should be compatible in most details for the 964 as well.
The 993 could be ordered from the Exclusive-department with a wood-package, or with the carbon features. This consisted of the following parts:
1. mask around the instruments
2. key-bar / airbag-bar (5 items)
3. center console (4 items)
4. door panels (4 items)
5. controls (steering wheel / shift **** / hand brake lever)
In this tutorial I am going first to the carbon components of the positions up to position four. There are three reasons for this limitation, the first four positions are only decorative elements and therefore, not "crash-relevant", second, the controls could be ordered only directly from Porsche Tequipment and third, I personally don't like "smooth" control-elements, they need to have grip.
There are also some more additional carbon-items, that can upgrade the 993 carbon-package, but they never were available as original. Some of them will have a place here in the instruction. These include for example the hard shells of the turbo sport seats and covers to the seat adjusters. Also interesting are the door-sills, the defroster panel on the dashboard, front and rear cover of the car, the exterior mirrors, the outer door handles and some more details.
All of these parts (except the controls) could be ordered at www.kunststofftechnik-buehler.de. Marcus B�hler is able to fulfill individual ideas as well. For example labels under the varnish, or carbon with a matte look, there is very much possible.
 04-20-2012, 12:33 PM
#2
Instructor
Thread Starter
The first step is certainly to know, what you would like to have in carbon. The possible range from factory was huge, even at Porsche Exclusive could be select or deselect some carbon fiber elements. So there is no typical 993 carbon-package, but a standard carbon package.
I personally love carbon fiber, because it exists a connection to my first company years ago. However, there is a limit where it is just too much. Where it is, everyone must decide for himself. In light colored interior carbon dominate more than in a black interior, this should also be noted as well.
But there are still some technical details on what to look for, before you make the order:
You should also remove some items and send it to Marcus, because will laminated the original parts with carbon. If you do not, this parts must be bought bey Marcus as new parts . All parts are not relevant to driving ability, and - if you know how - the removal takes about 1 hour. The following parts are laminated:
I personally love carbon fiber, because it exists a connection to my first company years ago. However, there is a limit where it is just too much. Where it is, everyone must decide for himself. In light colored interior carbon dominate more than in a black interior, this should also be noted as well.
But there are still some technical details on what to look for, before you make the order:
- If the car has a small light at the ignition-key, the instrument-mask has a corresponding hole.
- If the car still has a manual beam leveling, the panel must have left of the ignition lock its hole.
- The carbon fiber panels in the doors have been changed from model-year 1996 to 1997. Previously they were slightly narrower, from 1997 they go down to the door pockets.
- How many switches are in the two panels in front of the gear shift ****
You should also remove some items and send it to Marcus, because will laminated the original parts with carbon. If you do not, this parts must be bought bey Marcus as new parts . All parts are not relevant to driving ability, and - if you know how - the removal takes about 1 hour. The following parts are laminated:
- the panels on the door panels
- the interior door handles
- the two panels in front of the gear shift ****
- the tray under the handbrake
- the tray behind the handbrake
04-20-2012, 12:55 PM
#3
Instructor
Thread Starter
I start with the center console, as this is the easiest and you have a nice and quick success. The time required, is about 10 minutes.
Principle, these are two independent components, once the switch-panels in front of the shifter and then the two trays under and behind the handbrake.
The two panels with the switches in front of the gearshift are just stuck. They can be pulled out without any tool, at the sides are two metal clips which hold the panels in the center console. First, you fit out the lower panel and then the top. The switches have spring tabs on the back, if you squeeze them, you can press the switch into the backside of the panels. The cable can remain at the switches. Above the switches are illuminated symbol-bars, they are clipped and can be pulled out with some emotion as well. Later, when you assembling, it's logical that the correct switch should be back in the correct position again.
At the trays we start with the rear storage tray, it's such a small rubber-mat, which is only attached with double sided tape. Among them are two screws and it's out. The first tray has masked two more screws, which have to be released now. A third screw is located under the parking brake lever, if you pull it up maximum, you get to it as well. Then you can pull this tray across the hand-brake.
04-20-2012, 01:26 PM
#4
Instructor
Thread Starter
We continue with the door panels, two parts on each side, the door-opener-handels and the large plates. The approximated time is about 20 minutes per side, so even affordable.
First, we disconnect the opener. For this you have to pull the opener as wide as possible, then you can see on the back of a metal pole. This has a hook which just hung into the opener and can be pushed up.
After that the door pocket must be removed, it's fastened with 6 screws. One is located at the leading edge (towards the hinge), three on the bottom (sill direction), one at the back (towards the lock) and the last one when is located in the storage compartment in the direction of the door handle. If you have solved these 6 screws, you can simply remove the panel, the speakers, the lid of the compartment and the door handle remain at the door.
Now the door handle is the next step, this is secured by three Allen-screws. Two of them are in pretty deep holes behind the opener, the third is on the bottom of the front end of the door handle. Now you can pull the door handle of the lid of the storage compartment. Take care a bit, this lid is then only connected at the rear hinge and is relative sensitive. Now the door has to be separated from the opener, which is simple, there is only a bolt inserted, which could be pulled out with needle nosed pliers.
Now the large leather-panels can be removed. They are attached to the door with 10 cardboard retaining lugs and can be released by pulling is about 2cm toward the front of the vehicle. And - surprise, surprise - Porsche has plugged as pice of wood...
Alternative to the version shown here (sound system), it could be those with the open door pockets or even the RS-door-boards as well. At the end the work at the open door pockets is almost identical to this instruction. The RS-door boards have neither the opener nor the decorative panels, but Marcus can offer them in carbon as well.
04-20-2012, 09:18 PM
#7
Instructor
Thread Starter
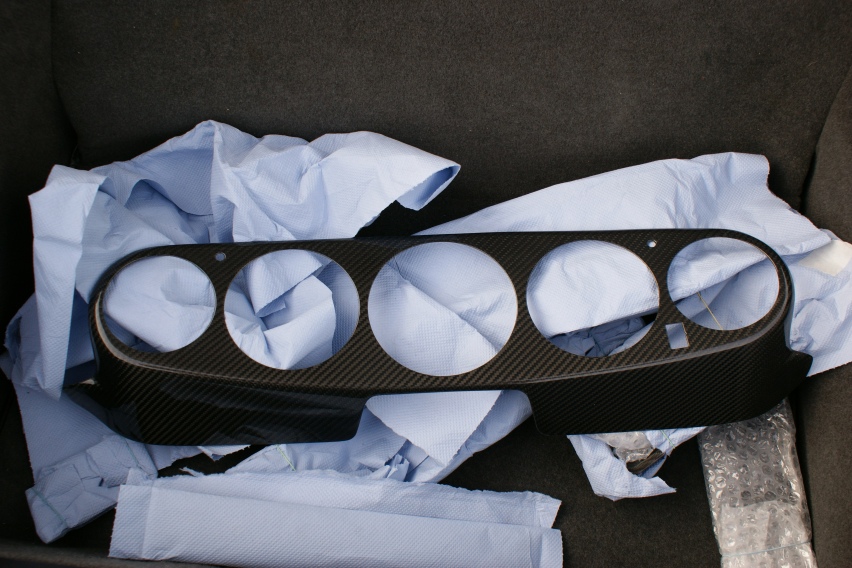
Now it's my favorite element of carbon, in my opinion it's just very noble, namely the mask around the instruments. This element is connected without any glue, but the time required is quite long. The upper dashboard, the steering wheel and all the instruments have to be out. The total time is about 2 hours, but it is not really difficult.
Let's start with the dashboard. First we have to release the defroster bar, right on the windshield (which could be ordered in carbon as well ), this is attached with 5 visible screws. Among them are then two more screws that holds the dashboard at the console. Please do not drop any bolt, they would roll into the AC...
At the lateral ends (next to the doors), the dashboard has two small plastic covers that are just stuck, and they'll have hounded carefully, behind them their is one more screw on each side.
Now the panel is only attached to one more screw. This is located invisible between the clock and the main air-outlet on the backside. It can be reached either by "pulling" out the clock or take out the air-outlet. In my experience after 15 years, the instruments sticks - if they never were drawn before - as tight in the rubber rings that they can only pulled out when you can also push from behind. That's the reason why I usually take out the main air-outlet. If you look from the bottom you will see two small openings in the top, behind those are two metal springs. This can be pressed down with a screwdriver to unlock the central vent. Then fold out the top end a little bit, after that you can raise it over the plastic tabs at the bottom of the frame. Now you can feel the nut between the air-outlet and clock, the release of the nut is a bit fiddly job. I use a key ring with built-in ratchet, which is fine. Now you can take off the dashboard easily.
It continues with the steering wheel. Who is afraid of the work at the airbag, should take professional help to do this work, with a little technical skill but it is not a big problem. First, the car-battery has to disconnected, now the airbag has no ignition energy anymore. Next step is to place the steering wheel 100% straight, to have not a bevel steering wheel at installation later. On the back of the steering wheel are two holes, including an Allen-screw. To release them is pretty simple, the installation later is a bit more tricky and takes time. Now the airbag is already released and can be taken out. Located on the back is a connector to the airbag, that's it. Now even the remaining cable from the steering must be disconnected and already you can open the 27mm nut remove the steering wheel. During assembly, you must still pay attention to the correct position of the in german so-called "clock spring", which is a flat part between the steering wheel and steering-column. This must be positioned correctly before you put the wheel back on it. The installation-instruction is on the clock spring quite clearly described, so no problem.
Finally you can push out the instruments easily, because you have plenty of space (no steering wheel anymore) and without the dash you have the chance to push them from the backside, that is quite simple. The instruments can stick to the rubber-rings sometimes really strong. Pull off all plugs at the instruments so that they can removed. Now there remain only the three switches / ***** for adjusting of the clock, the instrument lighting, and for the intermittent windshield wiper. The switch for the adjustment of the clock can simply push out from back to front. The two ***** you pull first from the adjuster. Below them is a flat nut, if you have them removed, you can press the **** out to the rear.
Now comes the beautiful pure carbon mask. This just sticks in the thin slot to the key-bar left and right from the steering-wheel and is held back by the plugged instruments. Now everything can be assembled again.
Let's start with the dashboard. First we have to release the defroster bar, right on the windshield (which could be ordered in carbon as well
), this is attached with 5 visible screws. Among them are then two more screws that holds the dashboard at the console. Please do not drop any bolt, they would roll into the AC...At the lateral ends (next to the doors), the dashboard has two small plastic covers that are just stuck, and they'll have hounded carefully, behind them their is one more screw on each side.
Now the panel is only attached to one more screw. This is located invisible between the clock and the main air-outlet on the backside. It can be reached either by "pulling" out the clock or take out the air-outlet. In my experience after 15 years, the instruments sticks - if they never were drawn before - as tight in the rubber rings that they can only pulled out when you can also push from behind. That's the reason why I usually take out the main air-outlet. If you look from the bottom you will see two small openings in the top, behind those are two metal springs. This can be pressed down with a screwdriver to unlock the central vent. Then fold out the top end a little bit, after that you can raise it over the plastic tabs at the bottom of the frame. Now you can feel the nut between the air-outlet and clock, the release of the nut is a bit fiddly job. I use a key ring with built-in ratchet, which is fine. Now you can take off the dashboard easily.
It continues with the steering wheel. Who is afraid of the work at the airbag, should take professional help to do this work, with a little technical skill but it is not a big problem. First, the car-battery has to disconnected, now the airbag has no ignition energy anymore. Next step is to place the steering wheel 100% straight, to have not a bevel steering wheel at installation later. On the back of the steering wheel are two holes, including an Allen-screw. To release them is pretty simple, the installation later is a bit more tricky and takes time. Now the airbag is already released and can be taken out. Located on the back is a connector to the airbag, that's it. Now even the remaining cable from the steering must be disconnected and already you can open the 27mm nut remove the steering wheel. During assembly, you must still pay attention to the correct position of the in german so-called "clock spring", which is a flat part between the steering wheel and steering-column. This must be positioned correctly before you put the wheel back on it. The installation-instruction is on the clock spring quite clearly described, so no problem.
Finally you can push out the instruments easily, because you have plenty of space (no steering wheel anymore) and without the dash you have the chance to push them from the backside, that is quite simple. The instruments can stick to the rubber-rings sometimes really strong. Pull off all plugs at the instruments so that they can removed. Now there remain only the three switches / ***** for adjusting of the clock, the instrument lighting, and for the intermittent windshield wiper. The switch for the adjustment of the clock can simply push out from back to front. The two ***** you pull first from the adjuster. Below them is a flat nut, if you have them removed, you can press the **** out to the rear.
Now comes the beautiful pure carbon mask. This just sticks in the thin slot to the key-bar left and right from the steering-wheel and is held back by the plugged instruments. Now everything can be assembled again.
The following users liked this post:
YellowDieselGolf (10-31-2020)
Trending Topics
04-21-2012, 12:17 AM
#8
Nordschleife Master
Well done!
04-21-2012, 01:07 AM
#10
Nordschleife Master
You don't need to remove the speaker cover, or door pocket to install the handles & door inserts, just loosen up the screws & slide the insert behind it.
It's even easier with the older smaller insert.
It's even easier with the older smaller insert.
04-21-2012, 02:54 AM
#11
Instructor
Thread Starter
No reason, to do that.
997 or 991 are good cars, but they didn't touch my soul at all. Maybe I would use and "burn up" such a car as daily driver, if I would not need four seats and space for my 60kg-dog.
My speaker cover is placed so tight to the door handles, that I don't have the chance to remove the third in bus-screw at the upper position. So I have to remove the cover.
04-21-2012, 04:08 AM
#12
Instructor
Thread Starter
Now we are going to the seats, when I'm writing here about "seats", I always think about the turbo sport-seats with the hard shell on the back. They could be ordered as an option in all other 993.
On the subject of originality, there are two things to say. First, the bezel around the seat adjustment also can be cover with carbon, which never could be ordered at factory. This panel has to be send to Marcus, so he can relate it. It is still relevant, whether the seats have a seat heating or not, with the heating the bezel is much larger. The exchange is very easy, 4 screws per side and you're done. The new panel with carbon is thicker and is therefore very tightly into the socket, but it works.
The carbon-hard shell of the sport seats were never officially at Porsche available, but there are definitely a few 993, that were delivered from factory with this option. The expansion of the back shell lasts about 30 minutes per side.
First step is to loosens the piping that biases the leather over the foam and is then pressed into the groove on the back of the seats in the hard shell. For this we start at the bottom outside, a flat screwdriver inserted into the groove and levers out of the piping, piece by piece, until you arrive at the other end. Sometimes, Porsche has reinforced the plastic tabs with metal brackets, so they sit better in the groove. This is normal, here it may be worth to to lever it out a bit harder.
Now pull out the middle cap-part of the back, this is just fixed in the upper range with hook and loop tape to the hard shell, is fairly simple. If the seats are heated you have to release the plug now. Finally, the middle part is still attached with two metal clips at the bottom end, those can be "lift off" with a screwdriver. Then you can put the center seat-cap to the side.
At the bottom you can see now two plastic plugs which fix the hard shell. These anchors consist of two parts, which actually plug and spreader. If you pull out the spreader, you can pull out in second step, the dowel.
Now located in the shoulder area behind the foam (which is now loose) you will find two screws, they have to be released, so that the back shell is now virtually free to 95%.
"95%" because the toggle, which unlocked the seat to go to the back-seats blocks it still. Those are a bit difficult, they have inside a metal clip, which locks them. It is difficult to solve the **** so that you can use it again. In this respect, you should be mentally prepared to buy them new. At installation I don't use those metal clips any longer, I fix the toggles with hot-glue, which has the advantage that they can be released later again without destroying them.