When you click on links to various merchants on this site and make a purchase, this can result in this site earning a commission. Affiliate programs and affiliations include, but are not limited to, the eBay Partner Network.
Having put this off for 3 years, this thread has convinced me to finally do it, especially because it has gotten worse.
Anyone know if I can buy the master cylinder rubber boot? It doesn't appear on the parts diagram. Mine is cut and I suspect dirt gets in.
Thanks.
I recommend just getting a new master cylinder. Should be roughly $125 last time I checked. You might as well replace it, especially if the torn boot may have allowed dirt to get in there.
I recommend just getting a new master cylinder. Should be roughly $125 last time I checked. You might as well replace it, especially if the torn boot may have allowed dirt to get in there.
I know that's a good idea. 3 reasons I was trying to avoid it:
1. I'm cheap (I know, I shouldn't have a Porsche then...)
2. It was changed by the previous owner a couple years ago (OK, 5 years ago)
3. I was hoping to leave it in the car to simplify the work like Mike recommended.
Maybe I'll wait until I have everything out to make the call. I was kind of hoping I could just change the boot.
Just finished, very rewarding. Thanks for all the tips. I will add mine:
By pulling clutch attachment clip and pin, you can unbolt the master cylinder, and with a little patience, pull the cluster and leave the master cylinder connected. Strike that, a lot of patience. The PO replaced, and I have recently bled the system, so I chose not to open the line.
Bruce points out the clutch and brake, upon reassembly, should be the same height. If you leave the master attached to the car, you will not be able to verify this until you reinstall the cluster.
There was deposit from the old bushings on the 2 shafts. I used 2000 grit wet sandpaper to polish it off. Just use a little oil/WD40, and wipe clean when finished.
These tips based on the work done on my '95, not sure if later models have differences in the assembly.
Sweet! I just did this rebuild myself a few weekends ago. Lots of great tips and instructions on RL on the subject! Thank you to everyone who has contributed to these notes!! My days of a hanging clutch are over!
One tip that I found particularly helpful, was in regards to removing the kinematic lever off the clutch pedal shaft. I think it was member IXLR8 who suggests in another thread that backing out the M10 hex nut a few turns with a socket on an extension and then tapping the end of the extension with a hammer will move the shaft incrementally until the lever is able to pop off. Mine came out so easily this way without much effort or any worry of hitting too hard and letting the shaft come out of the bearing tube ~ since the hex nut holds everything together up until you're ready to pull the lever off.
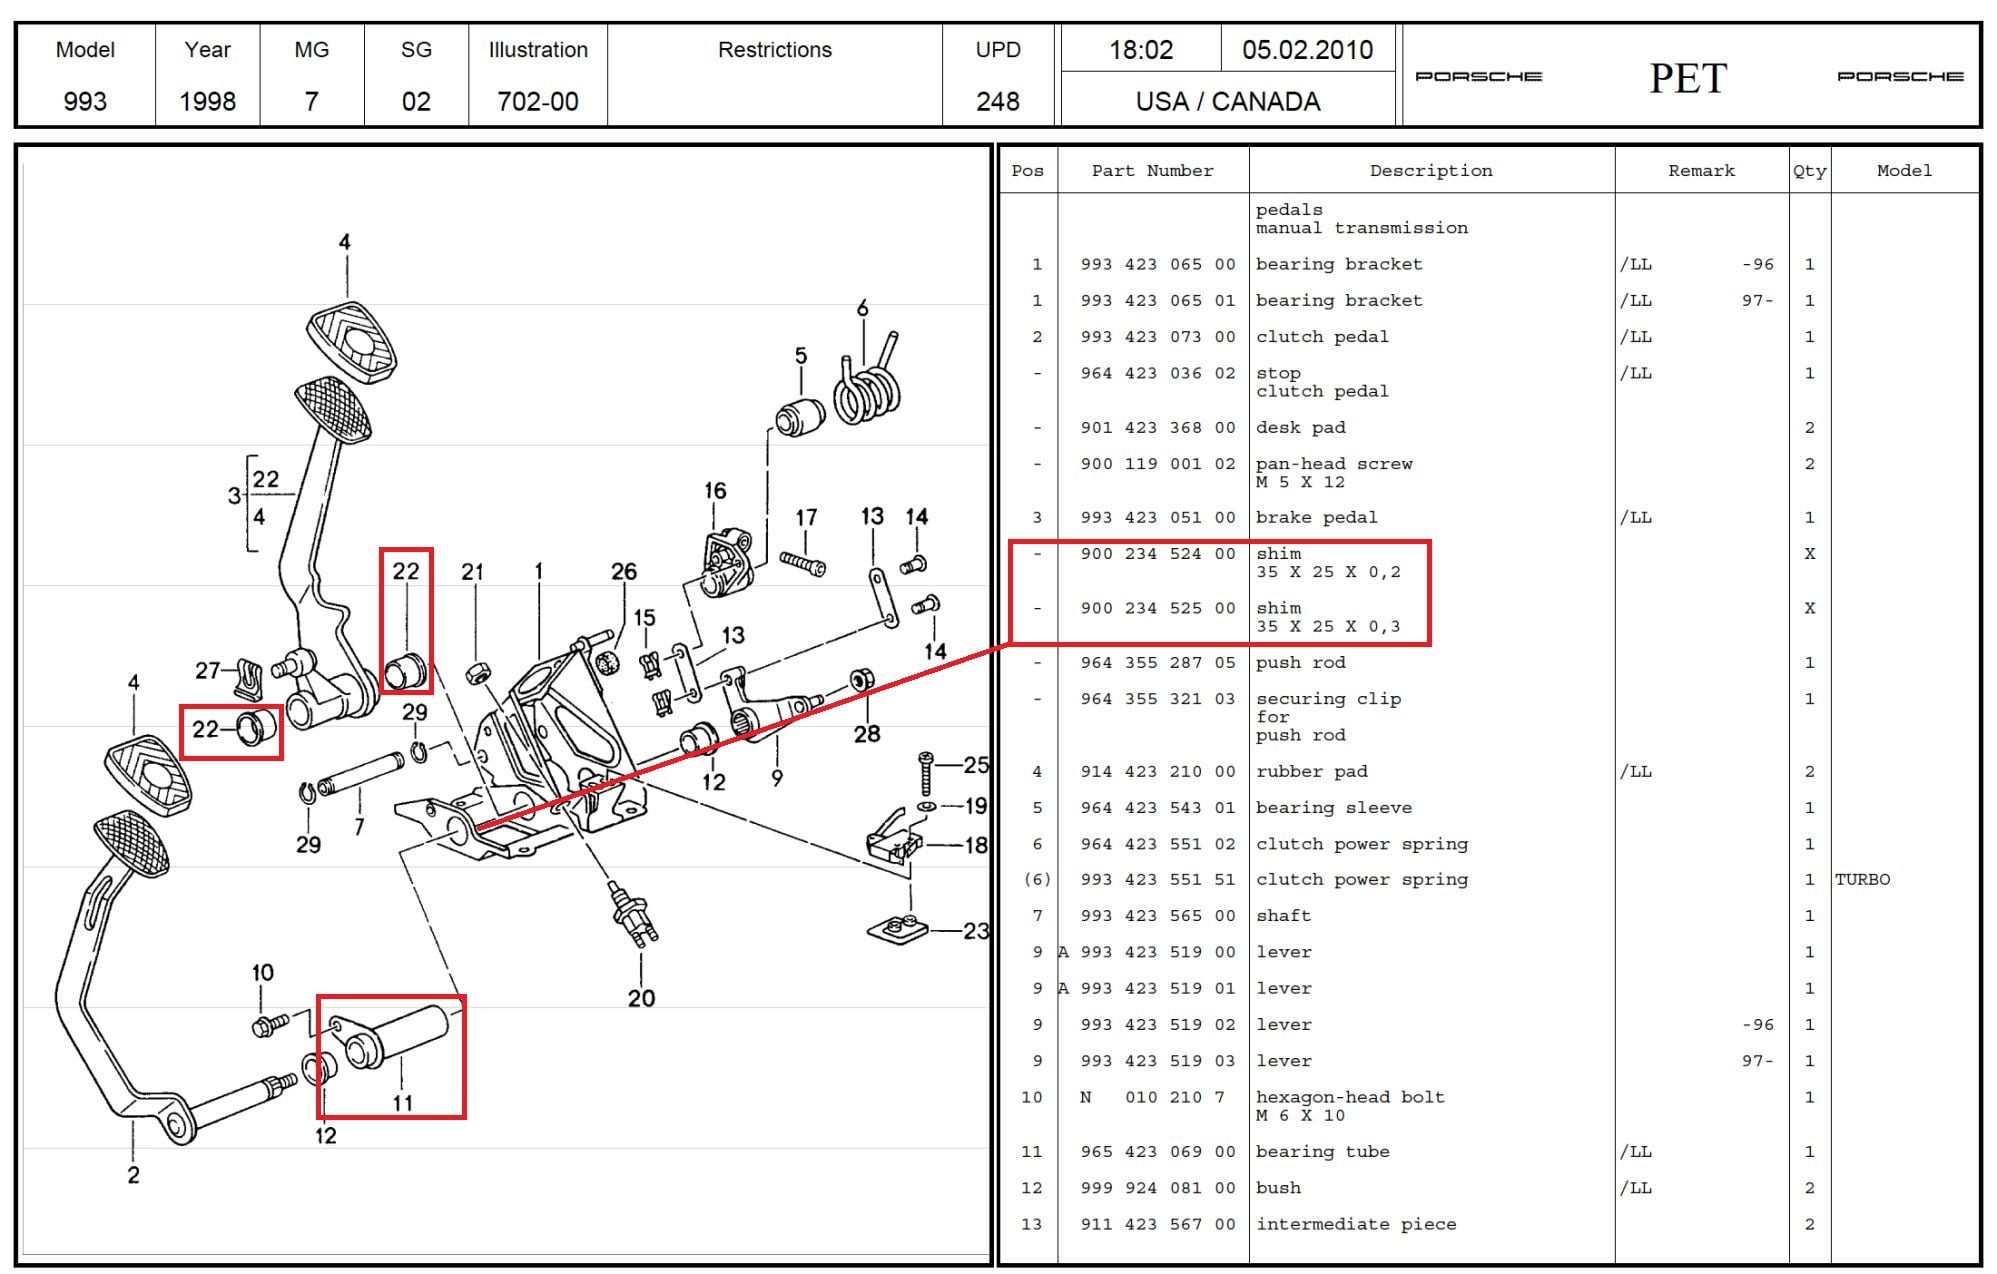
Note there are shims available that are not shown in the diagram but are under #3 indicated with a dash, these shims go over part #11 between the sidewall of the main mount and bushings #22. They are to eliminate lateral slop in the brake pedal due to wear and I found them useful.
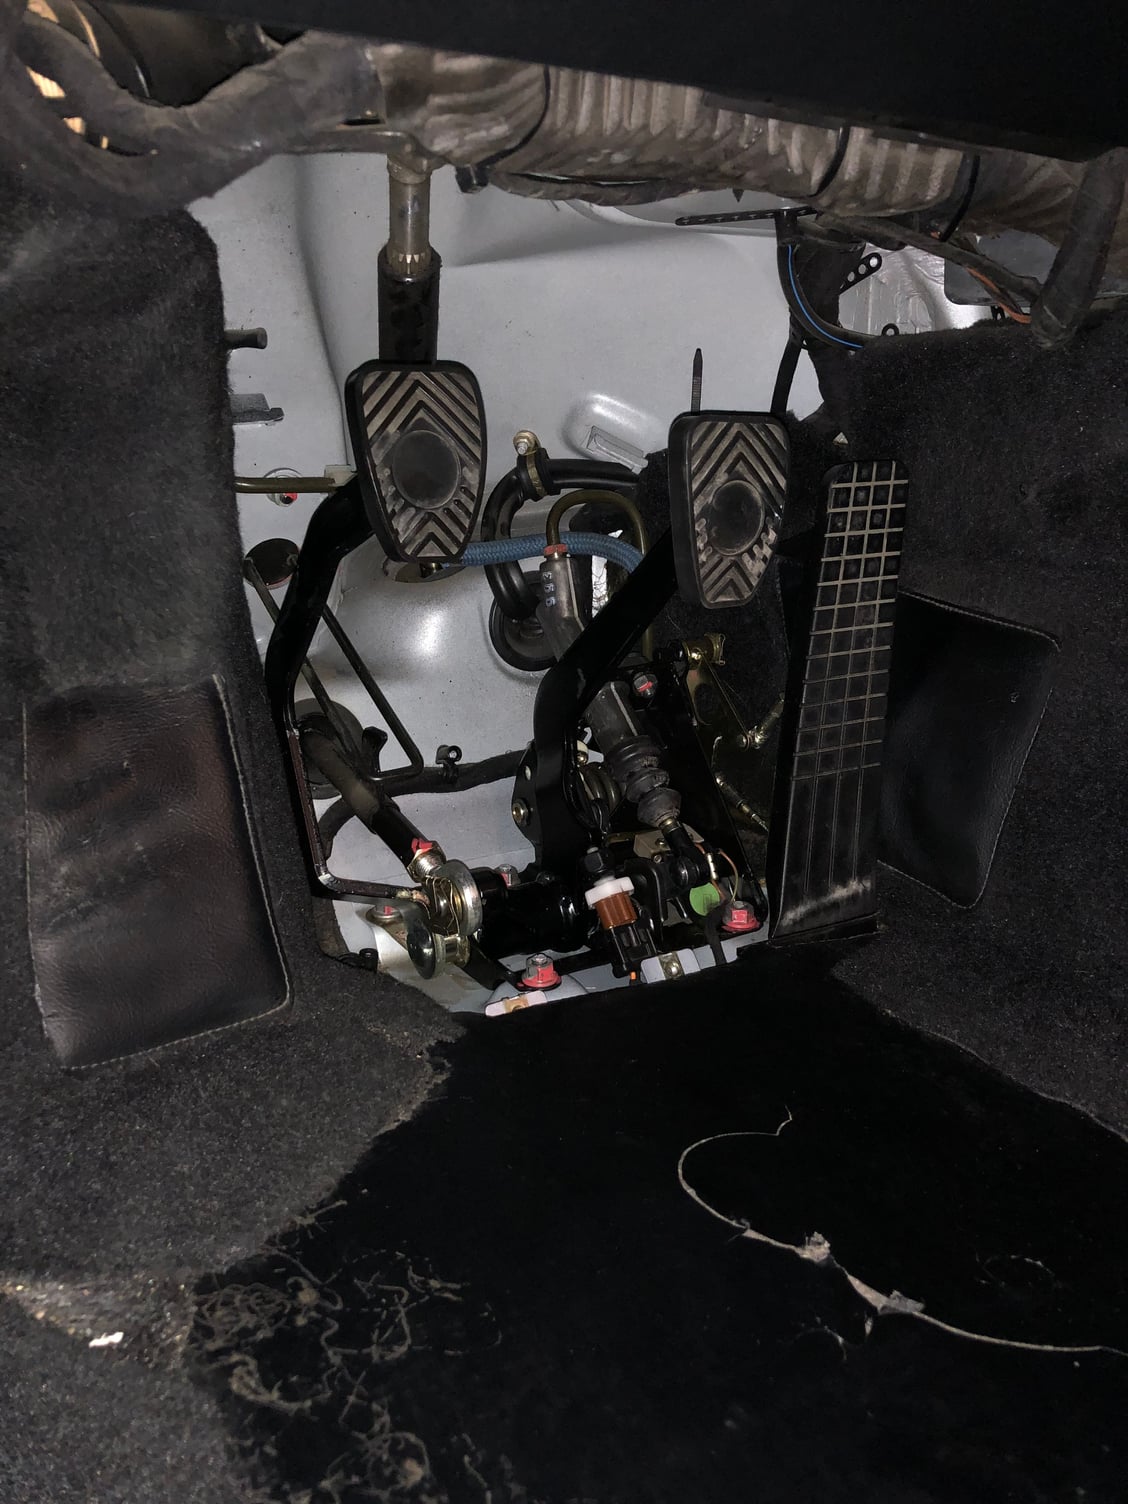
I dug this thread up as I completed the clutch kinematic lever update today... when I reinstalled the pedal box, I noticed that the clutch pedal was higher than the brake pedal (see pic). This issue is mentioned near the beginning of this thread, and says it�s due to a faulty clutch lever. My question is, will leaving this as is cause any issues other than driving me crazy because of my OCD? I really, really don�t want to have to do this again...
Try adjusting screw to the over center spring stop #17 in illustration above.
I was hoping your suggestion would be an easy fix, but the clutch pedal didn�t move; It�s still depressed about 2� past the brake pedal. I�ve pretty much accepted that I�m going to have to remove the entire thing and do it again. On a positive note, 5150 Motorsport is sending me a new part along with a return shipping label for the faulty lever, no questions asked. At least that part is easy.
One thing I will say that is curious, the reports that others made in this and other threads about the issue of the clutch pedal being misaligned is that they all report the pedal being lower in relation to the brake pedal. But in my case, it�s higher (depressed) than the brake pedal.
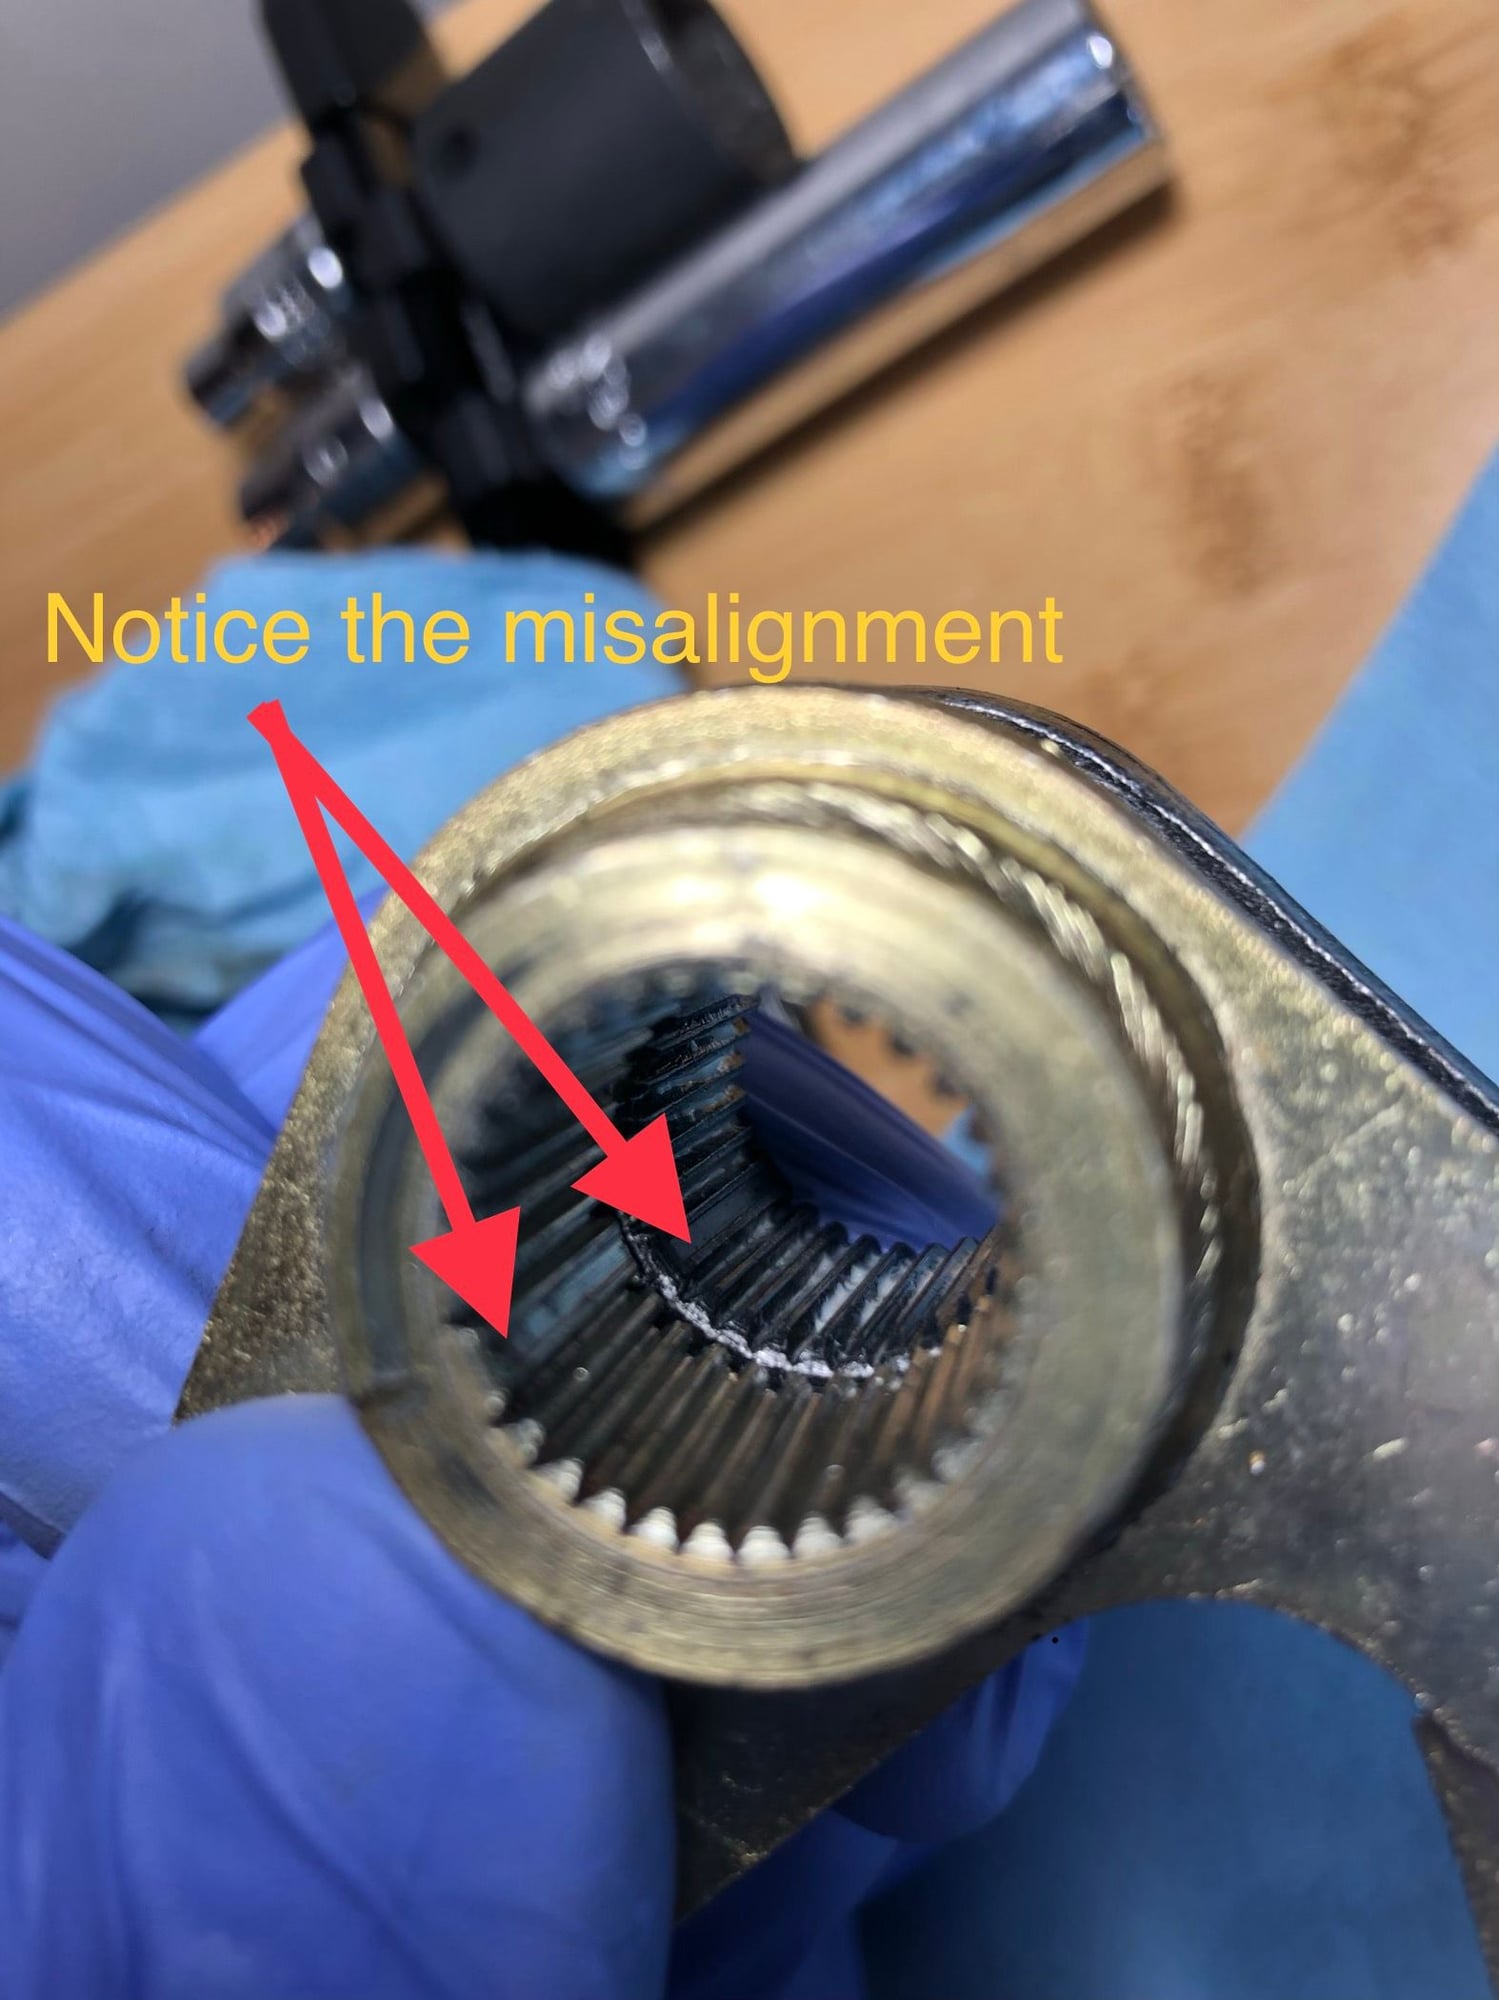
I got the pedal box removed and taken apart again... just waiting for the (2nd) new clutch lever to get everything installed. I was able to get a picture of how the notched areas of the original lever and new lever are mismatched... causing the issue with the pedals not lining up after install.
The slave cylinder removal and install was much easier than I expected. A couple things I found helpful:
- definitely remove the heater tube - it allows for a lot more articulation of your right arm
- remove the two small brackets that hold the hard line (throttle cable?) against the transmission - you can then move the line up or down depending on which nut you�re loosening/tightening to the slave studs
- use your pinky finger to help guide the slave cylinder push rod into the clutch release lever
- I was able to squeeze both of my hands up into the working area, which allowed me to hold the slave cylinder in place over the studs and compress it at the same time with my left hand while I used my right hand to finger tighten the nuts down onto the studs.
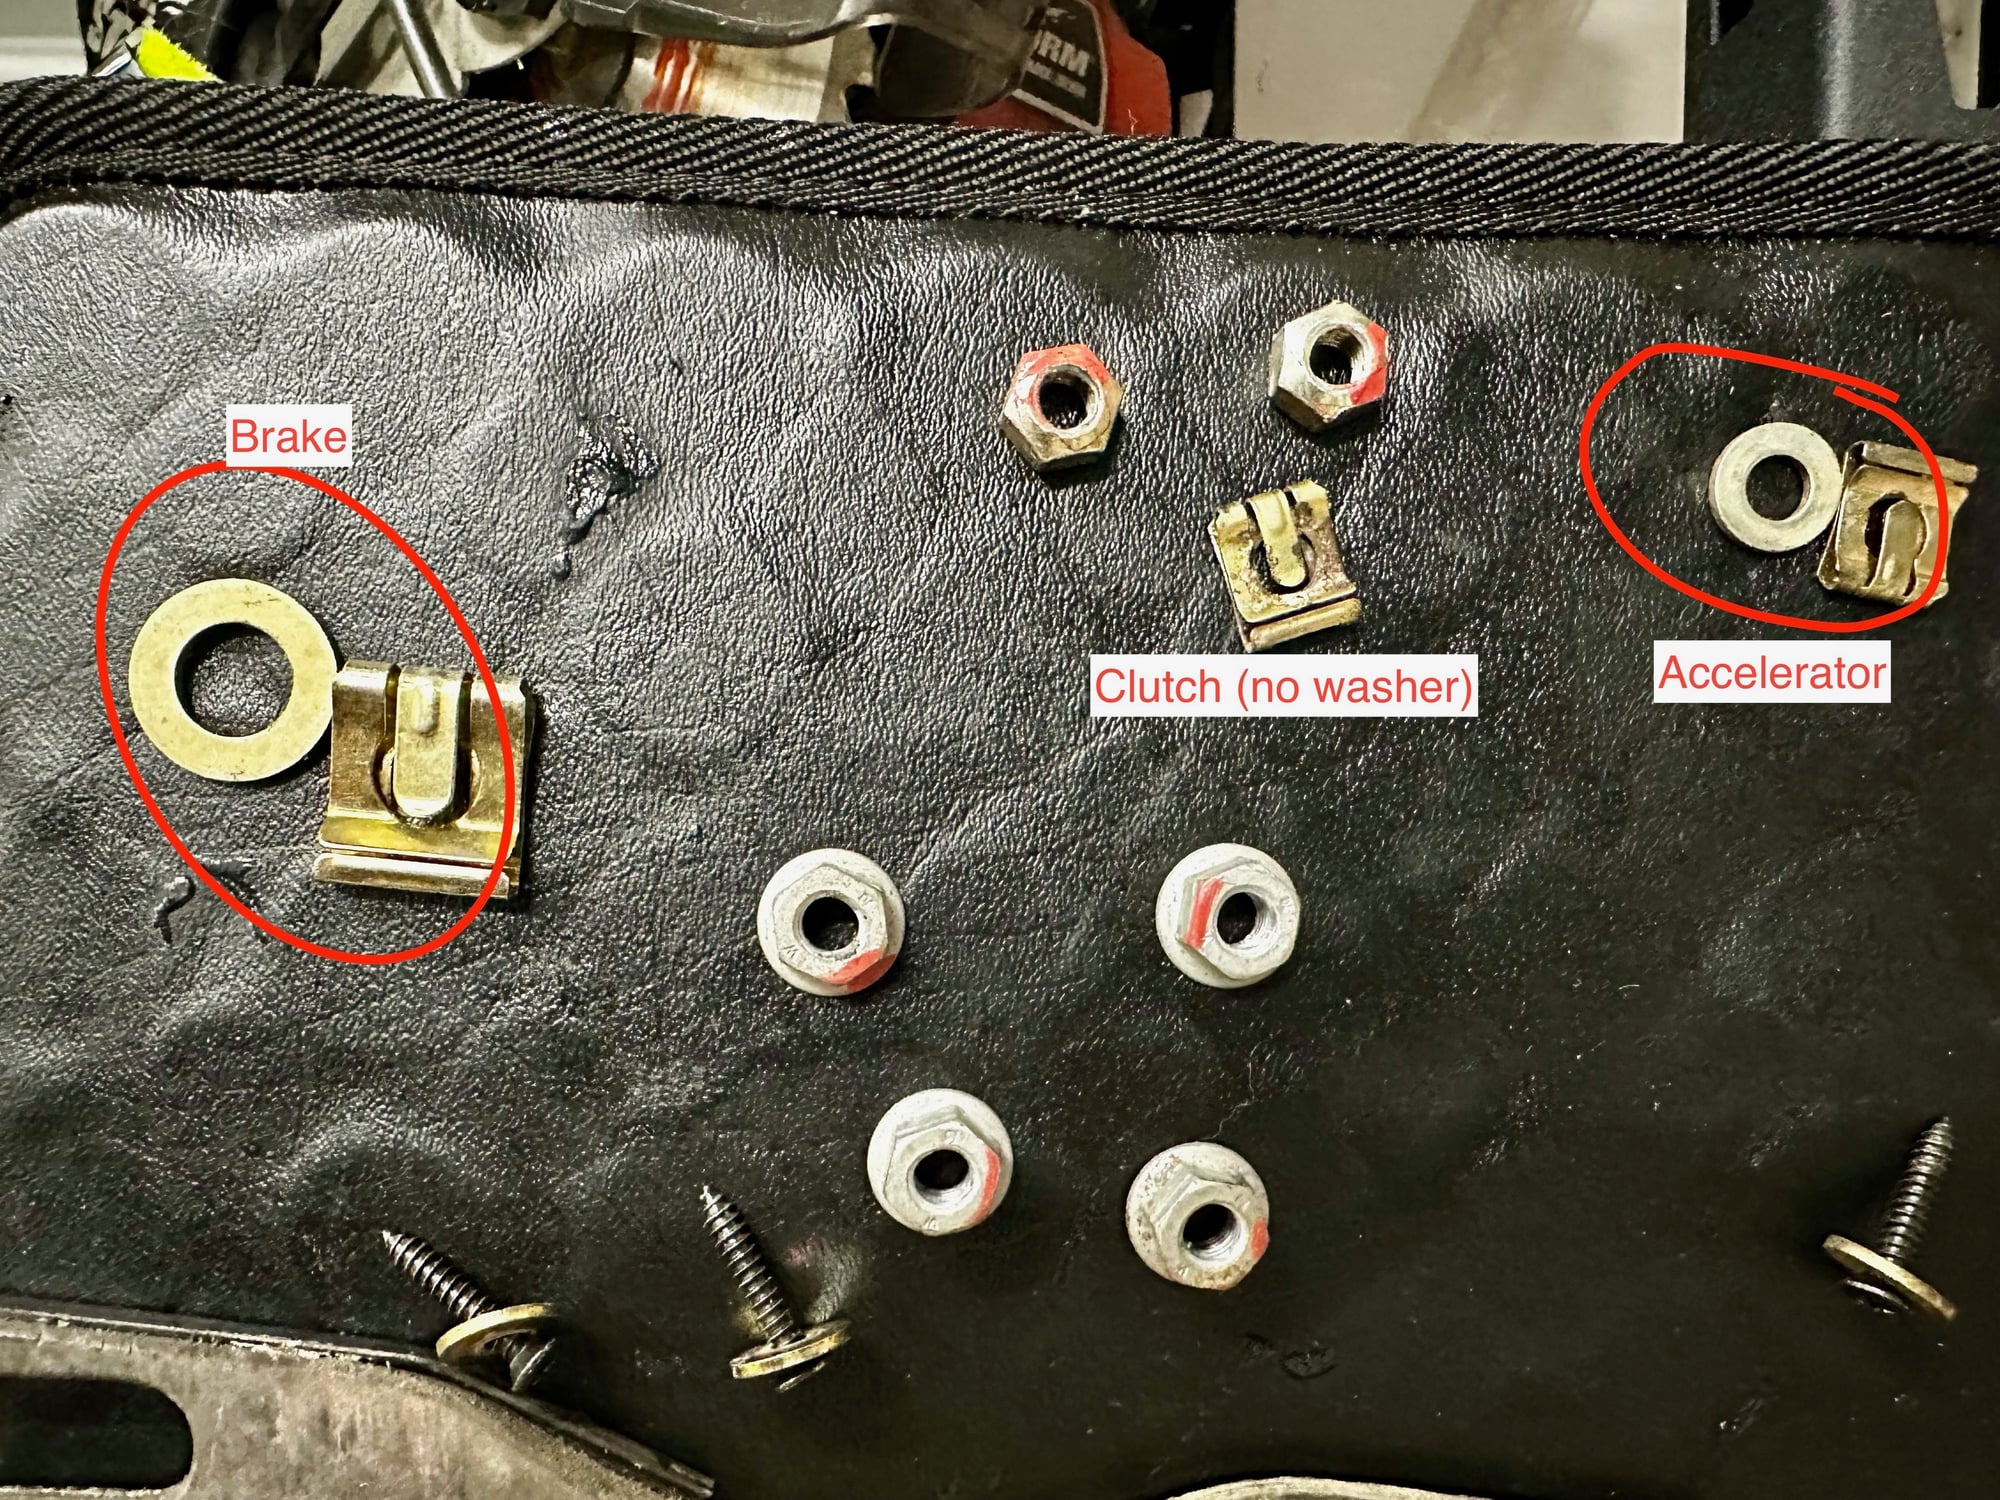
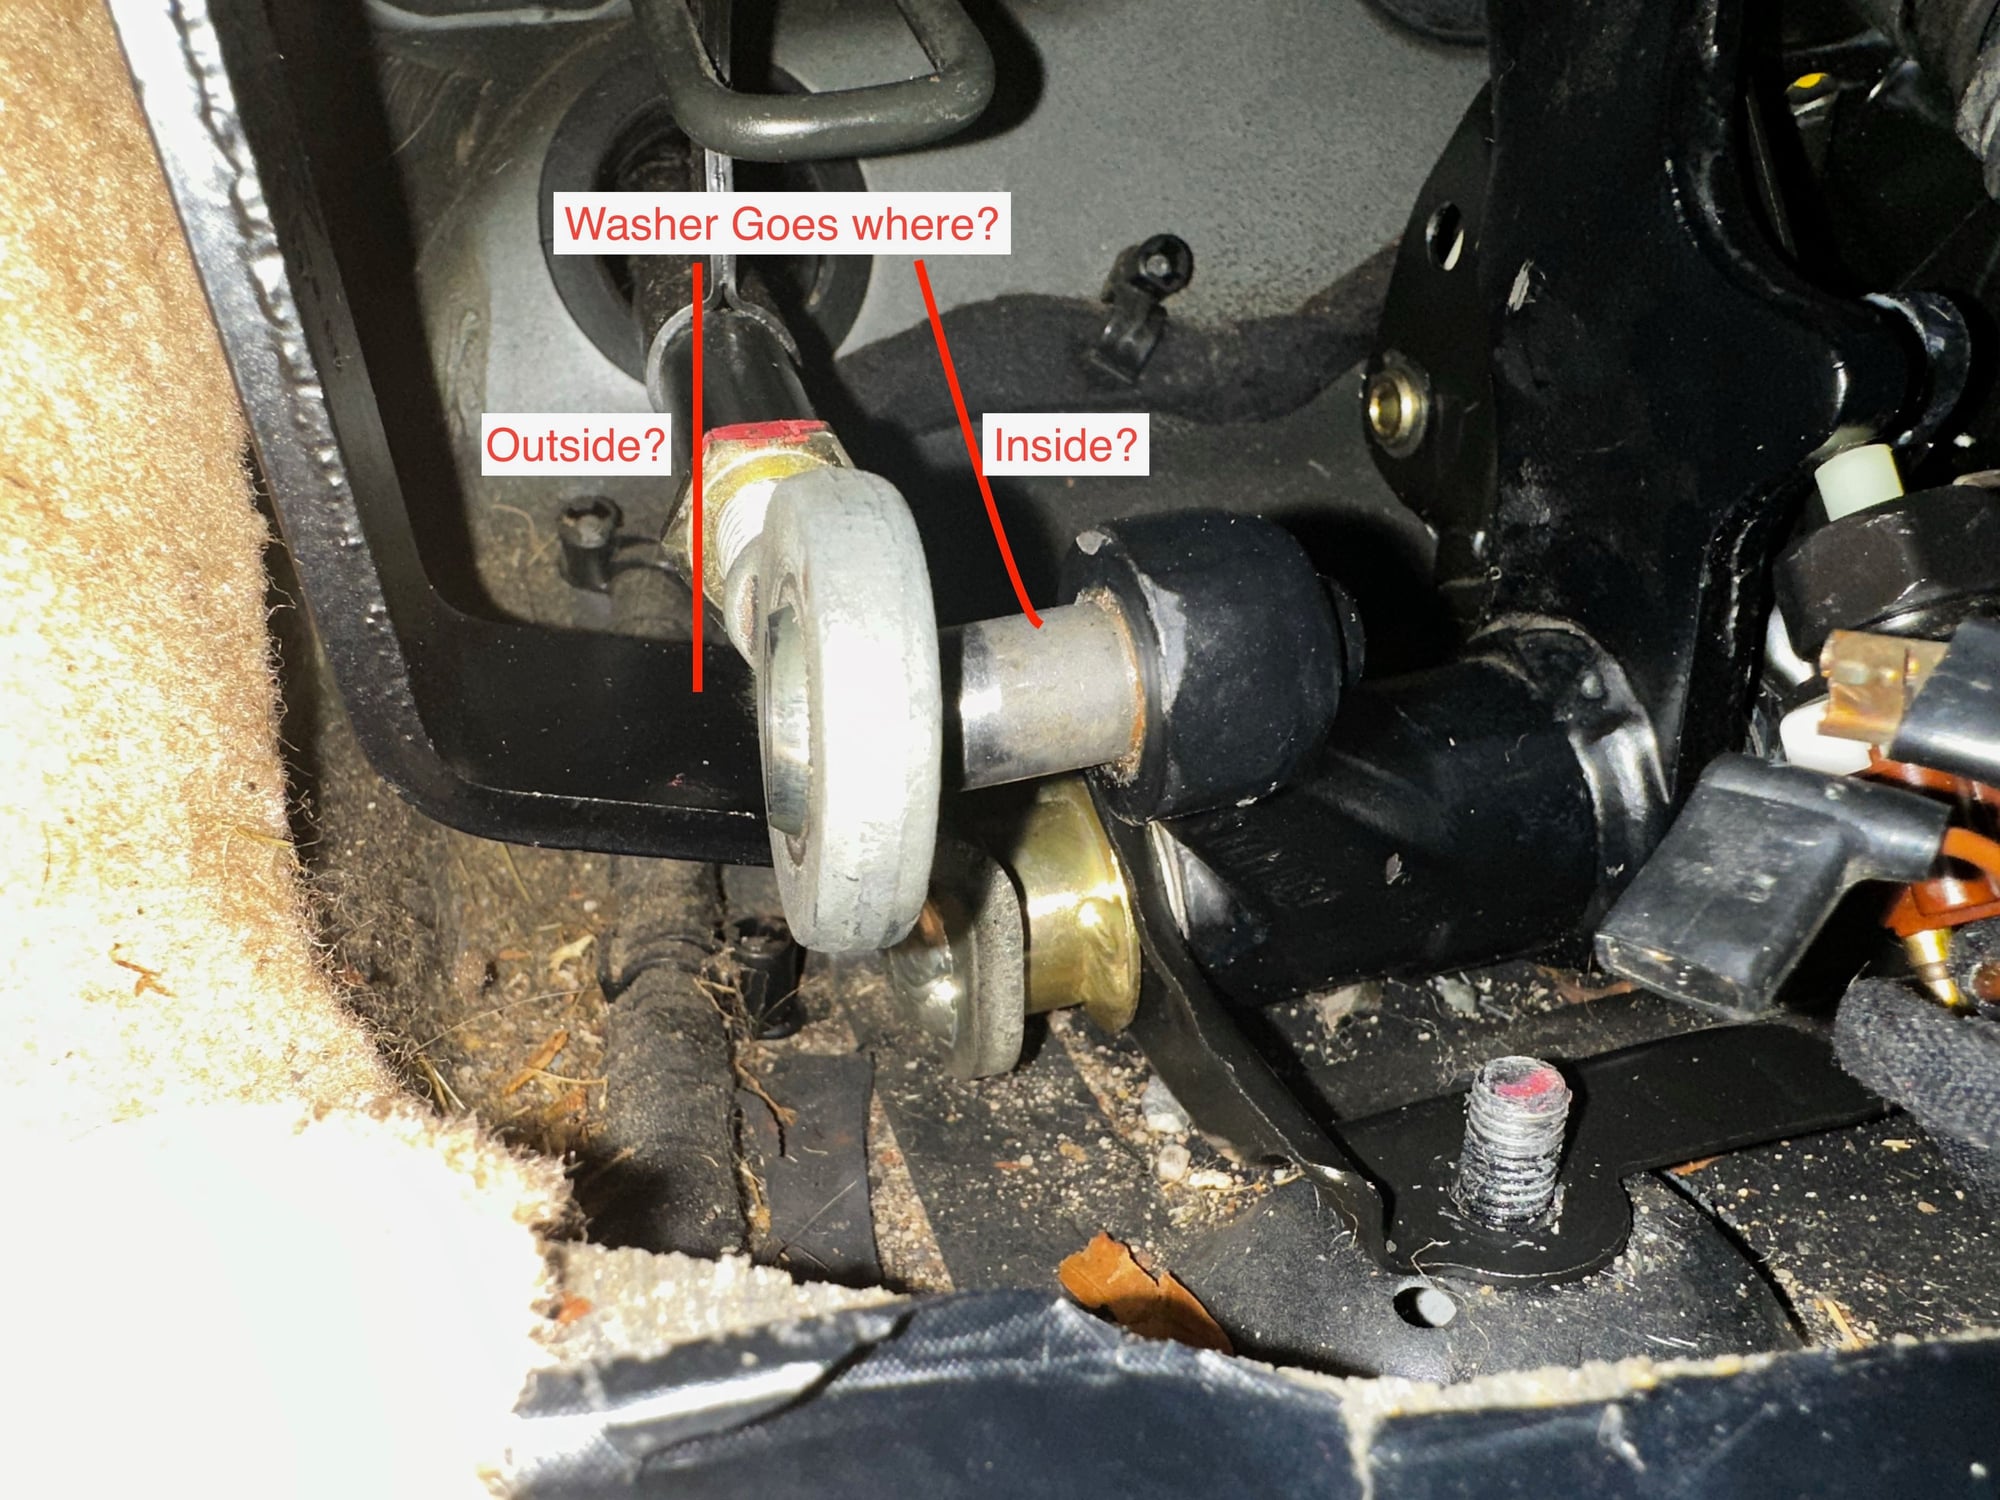
I am reinstalling my pedal assembly and have washers paired with the brake heim joint and the accelerator connector that I don't recall if they go between (for example) the brake heim joint and the pedal assembly or between the clip and the heim joint (same for accelerator).
I cannot see these washers on the PET diagrams unless I'm missing something and my pictures prior to disassembly don't help either.
So my question is do the washers go "inside" the connector or "outside" the connector and next to the clip? I'm thinking outside.


 04-29-2015, 12:41 PM