When you click on links to various merchants on this site and make a purchase, this can result in this site earning a commission. Affiliate programs and affiliations include, but are not limited to, the eBay Partner Network.
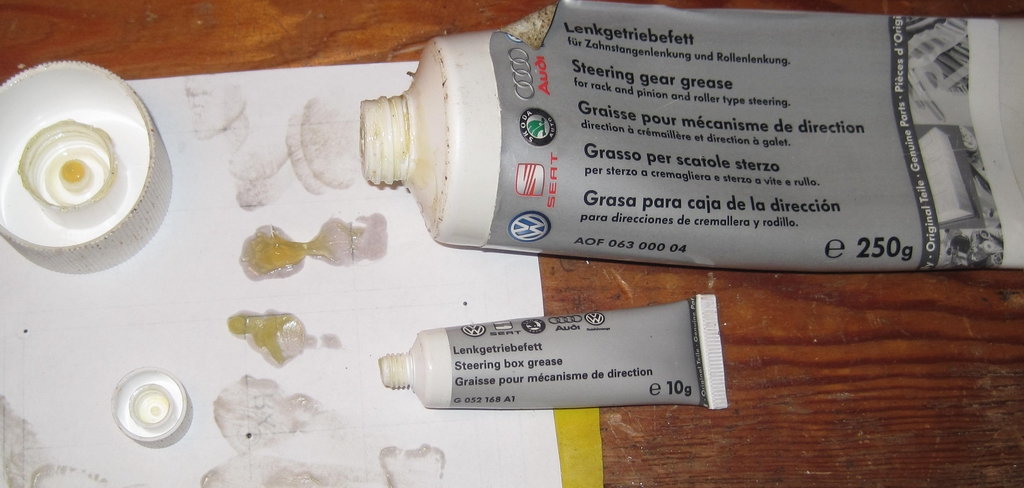
My understanding is that you must use VW part number AOF 063 000 04 steering rack grease and avoid contaminating the with other greases to prolong the service life of the seals.
That P/N is now obsolete. VW sold me a 10g tube of 0 G-052-168-A1 for $25 instead. Hope one tube is enough.
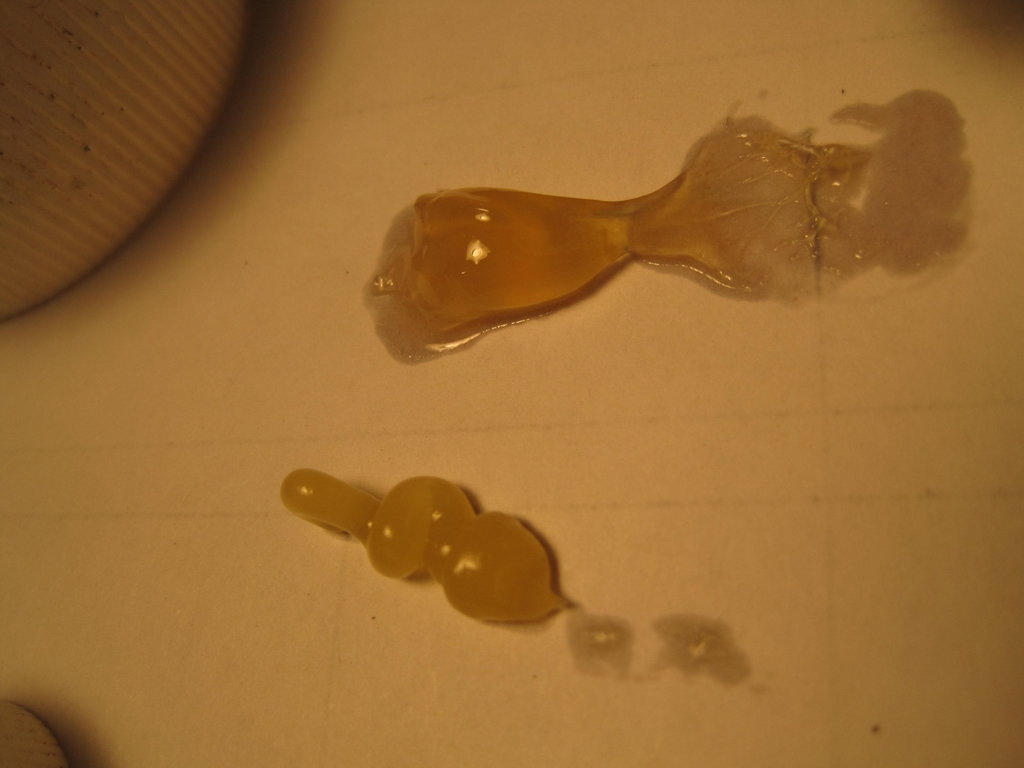
Fellow Rennlister pp000830 sent me an original tube of AOF 063 000 04 (Thanks Andy!) so here's a comparison of date code June 2014 original vs date code November 2016. The original is darker and more translucent and feels less viscous between thumb & finger.
old vs new
not the same
Suspect new formula has eliminated some toxic compounds that are good at protecting metal parts but they both seem to share basic property to stay put.
One trick that worked well for me was to wrap the input shaft with thin plastic sheet, 5 thou at least, and use that to slide the lubed outer plastic rings into place. Didn't catch a single edge. Just put the ring over the slot and pull the sheet out from under.
Hands covered in steering fluid so no pics, sorry.
Likely this is of no use since its way old, but I thought I would mention I had the same binding issue and the cause was the washer (race) with the tapered edge was upside-down on my first reassembly: See STEP 2 - BOTTOM Left image - Tapered Race! http://www.webbnet.com/911/images/99...rack_STEP2.jpg. If you get this race upside-down (reversed) then I believe this causes the input shaft to sit too high - up to 1mm causing binding when the cap is screwed on. If assembled correctly you should be able to turn the input shaft by hand but still with reasonable smooth resistance.
Originally Posted by Elonash
I didn't had a hard time to take the threaded cap off, but damn it was a hell to put it back!!
And yes, I did put a lot of grease on the pinion/gear and oil everywhere else...
Thiking more about it, I remember now that the rack has started to be hard to move by hand when I reassemble the pinion shaft (so before adding the pre load)... Need to check that...
But today I'm not sure I feel brave enough to go back under the car to take off the rack, quite a small place actually !!!!
PLEASE NOTE: This is a right hand drive rack however the procedure will be almost identical for a LHD rack apart from the O-ring sizes.
This was relativity simple and straightforward with no special tools required:
I welcome any feedback and corrections and thanks to jon928se for his initial advise on dis-assembly techniques.
It turns out the US kit (LHD) is slightly different to my RHD rack. They were very helpful and promptly sent me 4 square ring seals that were about 10mm bigger diameter to fit my input shaft at no extra cost! (nice guys!)
I have broken these DIY instructions into steps (each with its own large image that I am linking to to save huge images in this thread):
Apologies for the spelling and minor typos in the instructions,
ON Step 1 - TIP (f) is referring to (e)
ON Step 3 - CAUTION - Should read Please wear SAFETY GLASSES)
Removing this C clip will be the death of me. I have spent about 3 hours trying to remove it. I have broken 2 screw drivers and not moving. It's getting to the point where I am nicking the inside wall of where the clip is located. Any suggestions are welcomed. Thanks!!!
I also have some inexpensive rubber seal pullers that might work to hook the C clip and pull it out as well.
Originally Posted by 993Godspeed
Removing this C clip will be the death of me. I have spent about 3 hours trying to remove it. I have broken 2 screw drivers and not moving. It's getting to the point where I am nicking the inside wall of where the clip is located. Any suggestions are welcomed. Thanks!!!
I also have some inexpensive rubber seal pullers that might work to hook the C clip and pull it out as well.
Hahah!! Beautiful. I went out last night to autozone and bought a set. Worked like a charm!! Got it out! Just make sure the ones you buy are not the cheap ones. I bent one or two then went and bought a steel tip one. Worked like a charm. Thanks!!!
It appears there is a big difference for my input shaft (95 LHD) in that it does not have a plate to take off. I'm thinking I'll be forced to take the flare nuts off the hydraulic lines so I can remove the entire input assembly.
It appears there is a big difference for my input shaft (95 LHD) in that it does not have a plate to take off. I'm thinking I'll be forced to take the flare nuts off the hydraulic lines so I can remove the entire input assembly.
Any ideas?
That is different, yes looks like you need to remove both lines first.
I'm thinking I'll be forced to take the flare nuts off the hydraulic lines so I can remove the entire input assembly.
Any ideas?
My rack was just like yours. Yes, you will have to take off the hydraulic lines. Seemed easiest to me to take the hydraulic lines completely off the rack.
You will find some differences between your rack and the instructions on the KLA website.
You may want to look at this thread https://rennlist.com/forums/993-forum/900255-993-steering-rack-repair-document.html for additional resources (ZF document) that targets your rack specifically.
I have a small dribble off the left (drivers) side end on a perfectly working rack - just enough of a dribble to be a nuisance. I was thinking I could replace just the left end seals. Or should I rebuild the entire rack?
I am only bothering because the front struts are being replaced so now is the best time.
Thanks in advance for all the great info in this thread!
If you are going to take the effort to get the rack out, you should rebuild the entire rack, or have someone rebuild it for you.
Check the lines going into and out of the rack. Make sure that you don't have anything leaking there either. One of mine was leaking for sure. I replaced them both as long as I was in there.
Originally Posted by dsetty
I have a small dribble off the left (drivers) side end on a perfectly working rack - just enough of a dribble to be a nuisance. I was thinking I could replace just the left end seals. Or should I rebuild the entire rack?
I am only bothering because the front struts are being replaced so now is the best time.
Thanks in advance for all the great info in this thread!
That's kind of my plan, but I was also hoping to replace the left outer seals while the rack was still installed. I can't tell from the instructions or exploded views if they can be replaced without complete disassembly of the rack. I was hoping it would be like replacing a seal on a transmission output shaft or engine crack shaft.


 02-05-2015, 10:13 PM