

Hood cylinder replacement revisited
 02-25-2009, 03:26 PM
#1
Rennlist Member
Thread Starter
I know this has been covered before (https://rennlist.com/forums/showthre...ferrerid=12273) but I'm wondering if anyone can expound a bit more on getting the lower ball joint free...
I've read Bill Noble's article in P-Car, but the hood struts in my car don't have any clip that I can see to release (the rod end is spherical and smooth to the touch so I think I'm right about this). So I'd think I could just apply some pressure with an 18 inch screw-driver per Craig's comment. But try as I might with a screw-driver I can't seem to come up with the right combination of leverage and twist to get it loose. I gotta laugh at the descriptions I've read, going into length about tying string to clips and practicing with clips, but the simple "apply force towards the centerline of the car and the ball socket will pop free" is where I'm getting stuck.
Can anyone shed some light on this?
 02-25-2009, 09:00 PM
#2
Advanced

Join Date: Mar 2004
Location: Greer, SC
Posts: 98
Likes: 0
Received 0 Likes
on
0 Posts
Dunno but I'd say the clips are on there. They are black, small and when in place fit in grooves in the sperical end such they would be hard to see or feel. Try a better light. The trick is to pull them out just enough to release the rod end w/o them popping off and flying away. Otherwise you just need to unload the shock rod and pry the end off. Ken
02-26-2009, 11:29 AM
#4
Addict
Rennlist Member
Rennlist Member
If you have the clip released and no weight on the strut, you need very little force to remove the socket end.
Note: we assume that everyone is using the OEM part or equivalent - other attachment methods exist but they are a very rare application for our cars.
Note: we assume that everyone is using the OEM part or equivalent - other attachment methods exist but they are a very rare application for our cars.
03-06-2009, 01:14 PM
#5
Rennlist Member
Thread Starter
OK, here's an update on what I found, hopefully it might be of use to someone in the future...
The hood struts on my car (the ones that needed replacing) had a 964 part number (964.511.331.00). My car has a build date of 1/95 so maybe the earlier cars have this 964 strut. The rod end on this strut does NOT look like that on the strut in Bill Noble's article on P-car (http://p-car.com/diy/hoodshock/) which is a 993 part number (993.511.331.00) and shown here for convenience...

These 993 struts were what I had purchased as replacement parts. The rod end appearance of these 993 struts was what I was expecting to find already installed on my car, hence the confusion when what I found was completely different.
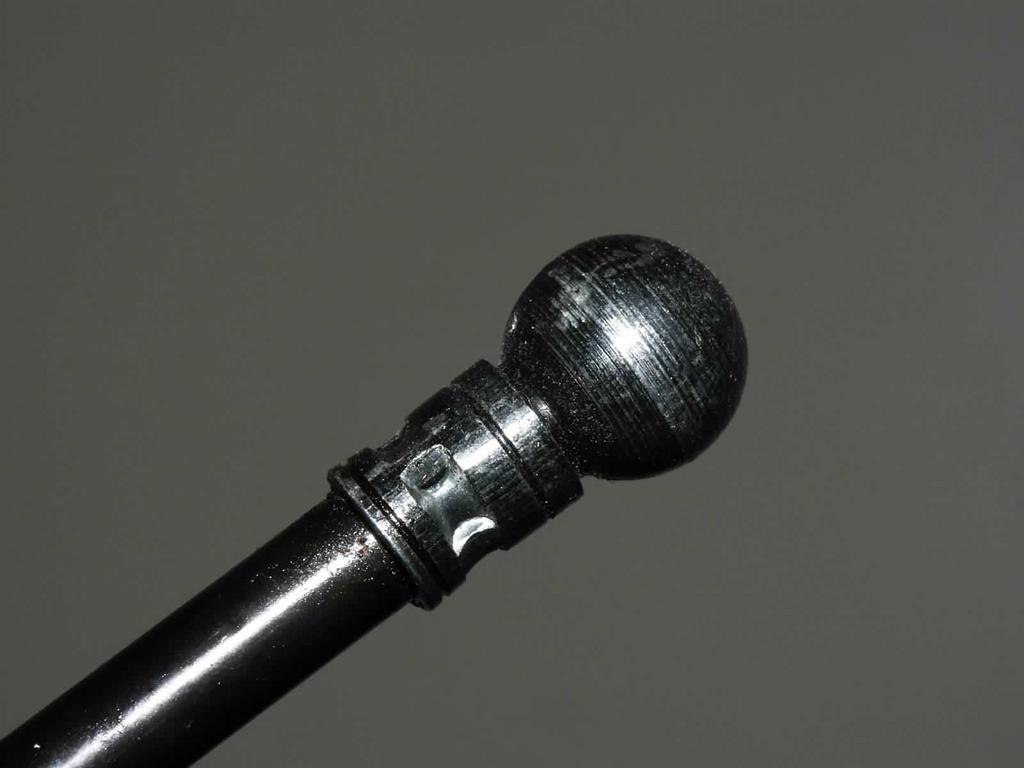
The 964 strut has a rod end that is perfectly smooth and has no apparent clip...
There actually is a "clip" of sorts, a thin wire maybe 1/4 of a millimeter in diameter and of a silver-gold color, that goes into holes in the rod end, shown here...
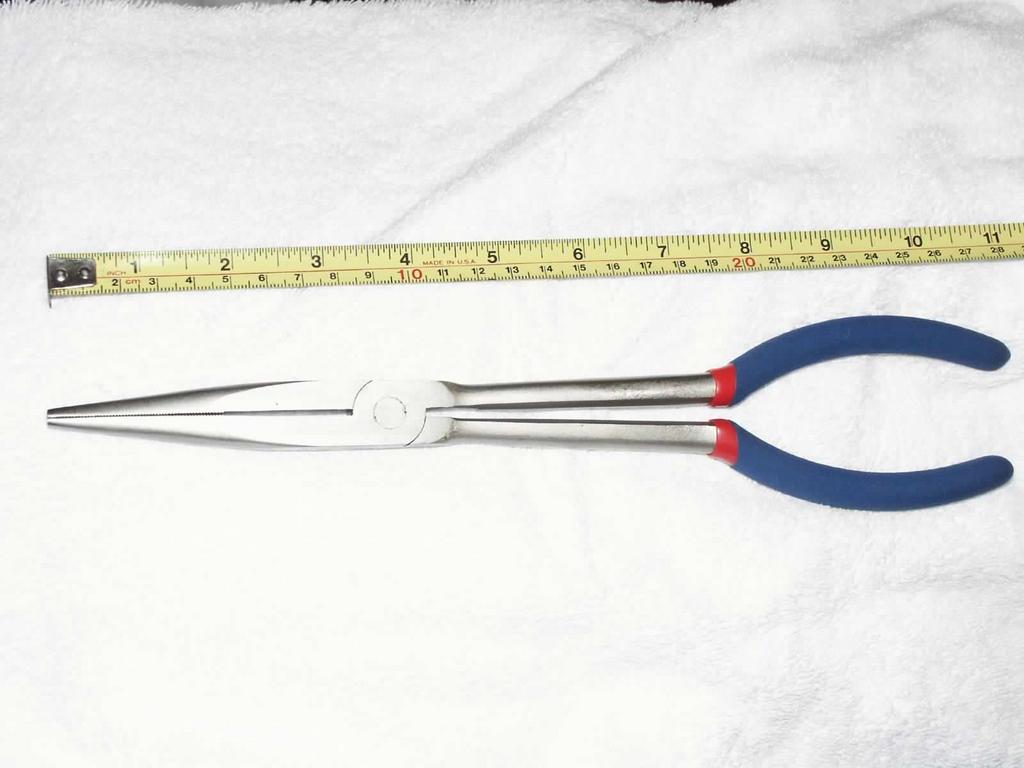
This "clip", being so small, is hard to see and impossible to feel if you don't know it's there. Being really just a thin wire, I ended up destroying mine to get it out, by grabbing the end nearest the strut rod and pulling it up along the axis of the strut, using the mother of all needle-nose pliers...
If I had known what these wires looked like beforehand, and where to find them, they would have been easy to remove I think.
After removing these wires the struts came off with no problem.
So that's the end of my saga, hopefully it will help someone in the future with their car...
The hood struts on my car (the ones that needed replacing) had a 964 part number (964.511.331.00). My car has a build date of 1/95 so maybe the earlier cars have this 964 strut. The rod end on this strut does NOT look like that on the strut in Bill Noble's article on P-car (http://p-car.com/diy/hoodshock/) which is a 993 part number (993.511.331.00) and shown here for convenience...
These 993 struts were what I had purchased as replacement parts. The rod end appearance of these 993 struts was what I was expecting to find already installed on my car, hence the confusion when what I found was completely different.
The 964 strut has a rod end that is perfectly smooth and has no apparent clip...
There actually is a "clip" of sorts, a thin wire maybe 1/4 of a millimeter in diameter and of a silver-gold color, that goes into holes in the rod end, shown here...
This "clip", being so small, is hard to see and impossible to feel if you don't know it's there. Being really just a thin wire, I ended up destroying mine to get it out, by grabbing the end nearest the strut rod and pulling it up along the axis of the strut, using the mother of all needle-nose pliers...
If I had known what these wires looked like beforehand, and where to find them, they would have been easy to remove I think.
After removing these wires the struts came off with no problem.
So that's the end of my saga, hopefully it will help someone in the future with their car...
03-06-2009, 05:04 PM
#6
Addict
Rennlist Member
Rennlist Member
Damon, thanks a whole bunch!! It will help me greatly, as I have a 4/94 build and am sure that there are 964 struts in there.
Is there a way to use anything else other than these special needle nose pliers?
Is there a way to use anything else other than these special needle nose pliers?
03-06-2009, 07:27 PM
#7
Rennlist Member
Thread Starter
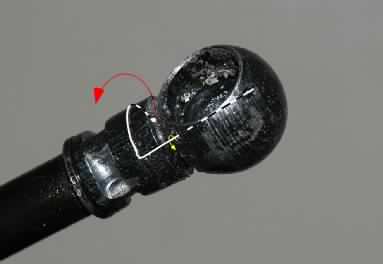
Mike, Unfortunately I'm not sure about the answer to your question because I did it the brute-force way, destroying the "clip" or wire pin in the process.
But I believe how it is supposed to work is as follows:
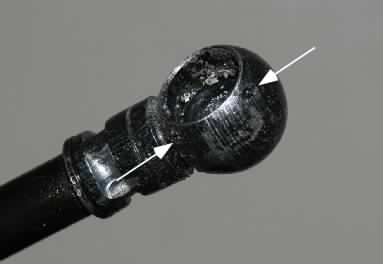
The wire pin runs through the two holes shown by the white arrows. It's this wire that keeps the ball from pulling out of the rod-end's socket.
At the upper end of the rod-end is a groove indicated by the red arrow. The wire pin is curved coming out of the top hole, and wraps around in this groove to keep the pin clipped in place.
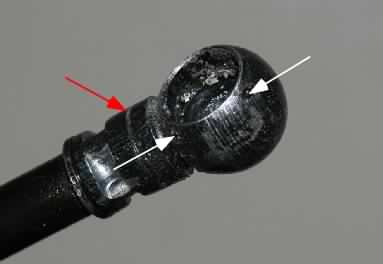
At the end of this wire clip, the end wrapped around the groove, is a small ring, which you might be able to see when looking down at the rod-end. If you can't see it, maybe unclipping the strut's top mount first will allow you more freedom to move the strut to see the bottom rod-end more clearly, and maybe you can also then see this little ring.
You should be able to tug on this ring, and release the wire clip, pulling the clip out of the groove and away from the rod-end, basically as if it was hinged and rotating about the axis of the white arrows.
I think if you do this, you don't need to actually remove the wire pin. Just rotating it as described will then allow you to free the ball from the rod end.
If this idea is correct, you'll at least need a long thin screw-driver or pin-punch or awl to manipulate that ringed-end end of the wire pin out of that groove. You'll also need a small flashlight to get light in there so you can see (I used a mini-maglight).
I THINK that's how it's supposed to work, but I really don't know, since that's not how I did it. Since you won't be using these struts again it doesn't really matter if you, as I did, destroy the pins.
Of course, doing it my way means you won't have any pics of how the pin is supposed to work, to post here and help provide an even better guide to how to do this job!
So I hope when you do this job, you can preserve the wire pins in place and then post more pics here, and let us see for sure how they are supposed to work!
Good luck!
-Damon
But I believe how it is supposed to work is as follows:
The wire pin runs through the two holes shown by the white arrows. It's this wire that keeps the ball from pulling out of the rod-end's socket.
At the upper end of the rod-end is a groove indicated by the red arrow. The wire pin is curved coming out of the top hole, and wraps around in this groove to keep the pin clipped in place.
At the end of this wire clip, the end wrapped around the groove, is a small ring, which you might be able to see when looking down at the rod-end. If you can't see it, maybe unclipping the strut's top mount first will allow you more freedom to move the strut to see the bottom rod-end more clearly, and maybe you can also then see this little ring.
You should be able to tug on this ring, and release the wire clip, pulling the clip out of the groove and away from the rod-end, basically as if it was hinged and rotating about the axis of the white arrows.
I think if you do this, you don't need to actually remove the wire pin. Just rotating it as described will then allow you to free the ball from the rod end.
If this idea is correct, you'll at least need a long thin screw-driver or pin-punch or awl to manipulate that ringed-end end of the wire pin out of that groove. You'll also need a small flashlight to get light in there so you can see (I used a mini-maglight).
I THINK that's how it's supposed to work, but I really don't know, since that's not how I did it. Since you won't be using these struts again it doesn't really matter if you, as I did, destroy the pins.
Of course, doing it my way means you won't have any pics of how the pin is supposed to work, to post here and help provide an even better guide to how to do this job!
So I hope when you do this job, you can preserve the wire pins in place and then post more pics here, and let us see for sure how they are supposed to work!
Good luck!
-Damon
Trending Topics
03-06-2009, 07:38 PM
#9
Rennlist Member
Damon,
I have a mid-year MY96 and I encountered the same problem following the p-car instructions. My shock was identical to the one you removed from your car. Had a very thin metal wire clip. Attached photo shows(hopefully) how the wire clip threads through 2 small holes, although in the photo you see a yellow/red paper clip. Took me about 2 hours to figure things out, only after taking a high-mag photo. I used a dental pick taped to dowel to pry the clip out.
Nile: if you need help, PM me. I live in Newton.
Jeffrey
03-06-2009, 08:15 PM
#10
Addict
Rennlist Member
Rennlist Member
Colt, if we ever get the snow off the roads, I'll start getting to some of my small projects. It'd be great to have some encouragement from someone who's done this before.
Thanks to both of you, guys!
Thanks to both of you, guys!
03-06-2009, 08:53 PM
#12
Addict
Rennlist Member
Rennlist Member
Just thinking out loud... is this clip designed to be turned by 90 degrees in the groove and then pulled down? Am I understanding this design correctly? If so, does it stick out of the groove enough to turn it with a long screwdriver?
03-06-2009, 09:21 PM
#13
Rennlist Member
Thread Starter
As installed, when looking down on the rod-end, all you should see is that little loop or ring at the end of the wire clip. The clip itself is so small that it disappears in the groove. You should be able to pull that ring (using something with a point on it, like a small long punch, or a dental pick taped to a dowel, or just prying t it with a long thin screwdriver) and the whole clip rotates by maybe 90 degrees, around the axis of the wire threaded through those two holes shown in Jeffrey's photo, or the white arrows shown in my photo. If I'm correct, that's all you need to do. You don't need to pull that clip up and out like I did. Just pulling on that loop at the end of the wire clip and rotating it should allow you to pull the rod-end toward the center of the car and release the lower mount.
The reason I think that is: When originally installing these, I can't imagine threading that wire through those holes with the lower mount already in place in that deep dark narrow cavity where it's located. So I image that assembly just meant, with the wire clip already threaded through those holes, pushing the rod-end over the ball, and rotating that clip 90 degrees (or whatever it is) until it clipped around in that groove, snapping tight. Seems pretty simple.
But I may be wrong
03-06-2009, 09:55 PM
#14
Rennlist Member
Thread Starter
To put a picture to the words:
Grab the loop at the end of the wire pin clip (shown here hidden on the other side of the rod-end) with something (dental pick, pin-punch, long thin screwdriver, whatever) and pull it away from the groove (red arrow), unclipping it from the groove, thereby rotating (the tiny yellow arrow) the wire pin clip on the axis through the holes in the rod-end, rotating it as far as it will go (90 to 180 degrees?) and that should be enough to let you pull the rod-end off the ball mount.
Grab the loop at the end of the wire pin clip (shown here hidden on the other side of the rod-end) with something (dental pick, pin-punch, long thin screwdriver, whatever) and pull it away from the groove (red arrow), unclipping it from the groove, thereby rotating (the tiny yellow arrow) the wire pin clip on the axis through the holes in the rod-end, rotating it as far as it will go (90 to 180 degrees?) and that should be enough to let you pull the rod-end off the ball mount.
03-06-2009, 10:28 PM
#15
Addict
Rennlist Member
Rennlist Member
Damon, you've confirmed what I thought this removal should look like. Thanks again! I'll probably try first to turn and pull the damn thing with a long screwdriver.