

SAI check valve tool
 09-25-2005, 09:11 PM
#1
Race Car
Thread Starter
Join Date: Jul 2005
Location: San Jose Kalifornia Demokratische Republik
Posts: 3,916
Likes: 0
Received 1 Like
on
1 Post
Anyone in the bay area have a wrench already modified to remove the SAI Check valve? I don't have any way of bending the wrench to the required angles. I'd be very grateful to anyone who has one I can borrow. I tried using the vice grips and 14mm socket trick -- all I succeeded in doing is twisting the top brass part of the valve.
TIA
Dan
TIA
Dan
 09-25-2005, 09:56 PM
#2
Addict
Lifetime Rennlist
Member
Lifetime Rennlist
Member
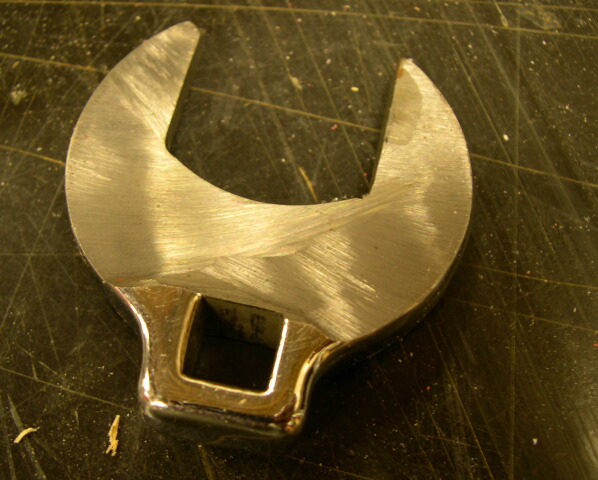
A preferred to crows foot wrench technique...it was cheap since I went down and bought a cheap 1 1/8 (I think) and started to grind..notice the nice grind marks...
I would loan it and mail it to you but I am in Vancouver and the shipping would be more than I paid for the tool...I think it was $6..
Cheers,
Mike
I would loan it and mail it to you but I am in Vancouver and the shipping would be more than I paid for the tool...I think it was $6..
Cheers,
Mike
09-26-2005, 07:36 PM
#5
Race Car
Thread Starter
Join Date: Jul 2005
Location: San Jose Kalifornia Demokratische Republik
Posts: 3,916
Likes: 0
Received 1 Like
on
1 Post
@Mike: thanks for the pic!
@ppressle: thanks! I left u VM.
@nelson: I actually have the aircleaner out right now, and hope to have it back on soon - tonite or tomorrow. This time I'm only replacing the SAI valve and fuel filter. not doing the flush this time because I don't have an aircompressor or gaskets for heat exchangers & cats. I don't want to do any major wrenching at this time because mine's still under extended warranty. If you're ready to do the flush now, your welcome to use my garage and tools and 2 hands
09-27-2005, 01:55 AM
#6
Pro
Join Date: Sep 2004
Location: Marietta, Georgia
Posts: 521
Likes: 0
Received 0 Likes
on
0 Posts
Does anybody know for sure if the crowsfoot is indeed a 1 and 1/8th. I was planning on picking one up tomorrow. Also is there a complete parts list for the SAI flush available?
Trending Topics
09-27-2005, 12:31 PM
#8
Rennlist Member

As a means of payback for the great things that the Rennlist community has done for me, I'll loan anyone the set of tools that I created for SAI cleanout. I live in south Florida so shipping will take a few days. Let me know if you want to borrow them.
Scott
Scott
09-27-2005, 04:57 PM
#9
Race Car
Thread Starter
Join Date: Jul 2005
Location: San Jose Kalifornia Demokratische Republik
Posts: 3,916
Likes: 0
Received 1 Like
on
1 Post
Well, I got a beautifully crafted crow foot socket on loan from Pete. That, plus my own 3/8 - 1/2 adapter, ext., and 10" breaker bar --and-- check valve still won't turn. It occurs to me that I've never put so much effort into something and had nothing to show for it. That's OK tho -- it's only a matter of time -- even if I have to grind that ****** out millimeter by millimeter...
09-27-2005, 05:03 PM
#10
Rennlist Member
Hi Dan,
One thing to watch for is interference on the crowsfoot on the engine plumbing. I believe I had a very small amount of rotation before it stopped when it ran into an obstacle. It is pretty tough to see what is going on back there, a mirror helped me figure it out.
If all is clear, try a longer breaker bar! I used an 18" bar and it was pretty well in there. Watch for where the bar goes when it breaks free though!
Pete
One thing to watch for is interference on the crowsfoot on the engine plumbing. I believe I had a very small amount of rotation before it stopped when it ran into an obstacle. It is pretty tough to see what is going on back there, a mirror helped me figure it out.
If all is clear, try a longer breaker bar!
I used an 18" bar and it was pretty well in there. Watch for where the bar goes when it breaks free though! Pete
09-27-2005, 05:13 PM
#11
Rennlist Member
Join Date: Aug 2005
Location: Huntington Beach, CA
Posts: 1,353
Likes: 0
Received 2 Likes
on
2 Posts
Sometimes you can apply force to tighten to break the seal. Then, untighten. That's what I needed to do.
A shot of Liquid Wrench through the straw might help as well.
A shot of Liquid Wrench through the straw might help as well.
09-27-2005, 05:16 PM
#12
Race Car
Thread Starter
Join Date: Jul 2005
Location: San Jose Kalifornia Demokratische Republik
Posts: 3,916
Likes: 0
Received 1 Like
on
1 Post
Pete, before I forget, I'd like to buy you lunch some day! I work right up the road from you: Hillsdale@92! BTW, did you connect the crow-foot from the right or left? I've been going from the right, but just found a DIY with pic showing the opposite. Great tips about protecting car from bar breaking free -- hope I remember it whenever I get to that point
09-27-2005, 06:14 PM
#13
Rennlist Member
Yea, I think I saw the same picture. I didn't want to take that much apart. I did it from the passenger side. On the right if you are facing the engine from the rear, on the corner near you.
I could only move one facet a time before it bound, but it became hand loose pretty quickly.
I love to meet for lunch some time.
I could only move one facet a time before it bound, but it became hand loose pretty quickly.
I love to meet for lunch some time.
09-27-2005, 06:38 PM
#14
Instructor
Join Date: Jul 2003
Location: Powder Springs Georgia
Posts: 201
Likes: 0
Received 0 Likes
on
0 Posts
I just made a tool... it takes a 1 1/16 th crowsfoot, I could not find one locally so I bought a 1 inch and did a little grinding. It works like a champ. The valve was very very tight but I just got mine out.. QUESTION: If the check valve is not acting as a check valve (air flowing in both directions) will this set the CEL with the SAI Code?
mark
mark
09-27-2005, 07:03 PM
#15
Rennlist Member
Join Date: Aug 2005
Location: Huntington Beach, CA
Posts: 1,353
Likes: 0
Received 2 Likes
on
2 Posts
I'm not sure the air does flow both ways. I think the check valve is to prevent exhaust backflow. Upstream of the check valve is a shutoff valve which regulates the airflow downstream and into the ports.