When you click on links to various merchants on this site and make a purchase, this can result in this site earning a commission. Affiliate programs and affiliations include, but are not limited to, the eBay Partner Network.
If people just specced there cars a bit better we wouldn�t have need to go through all this trouble. Of course some people hate yellow. But don�t order a yellow car then
Huh? I didn't see OPs instrument cluster but I'd bet he has a yellow tach or is planning to DIY that in the future. They just saved themselves $350 and gets to say he DIYed something.
My bad sorry. I was just speaking in general where I notice a lot of cars are not up there. So I always feel the need to change minor things like this to make it perfect. The chrono dial is one of the few that can be retro-fitted by the dealer. They don�t like the job though. I like it when people DIY but it�s not a very costly option on the car is it?
My bad sorry. I was just speaking in general where I notice a lot of cars are not up there. So I always feel the need to change minor things like this to make it perfect. The chrono dial is one of the few that can be retro-fitted by the dealer. They don�t like the job though. I like it when people DIY but it�s not a very costly option on the car is it?
$350. It's crazy how quickly I can decide to fork over $150k plus, but agonize about a $420 option.
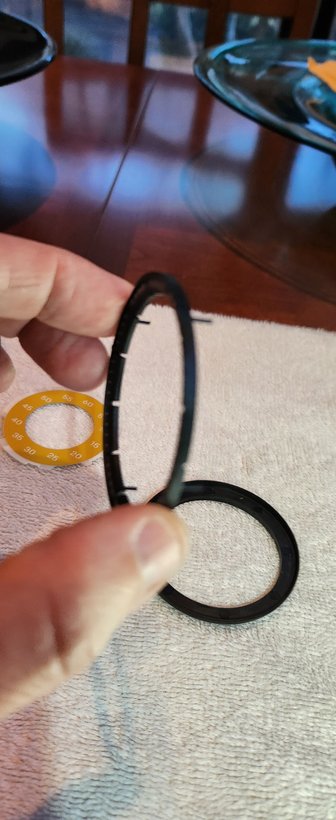
I just did this and had a few things to add. First, go into the car menu and in Settings/go into Addition instrument" and disable the clock. That will make the hand go to 12:00 and make it easier to re-align later. To get my clock out after popping up the dash trim, I used a 17mm socket to get the clock out but after several attempts to turn counter clockwise as mentioned above, mine was definitely clockwise to remove. The wire attachment is very easy to remove once the clock is out. Once out of the dash, to separate the clock halves, remove the rubber gasket, then insert a small screwdriver or something flat to pry around the area with the indentations noted by the red circle. I think there are 3 of these indentations. Keep working your way around. When the halves come apart, just pay attention to the orientation of things. It will seem logical when going back together since there really is only one way to reassemble. The hand came off easy for me with the spoon method. The most stressful part is getting the new plastic face on. It must be "snapped" around the inner ring. As mentioned, it will fight you and you don't want to crease it. you will see the alignment holes and you can rotate the new face to line up. Look at how the posts of the black outer ring align with the aluminum marker ring below and piece together. Put the hand back on at the 12 position. I used compressed air and MF cloth to clean the dial and the back glass and reassemble. Hope this helps a bit!!
I just did this and had a few things to add. First, go into the car menu and in Settings/go into Addition instrument" and disable the clock. That will make the hand go to 12:00 and make it easier to re-align later. To get my clock out after popping up the dash trim, I used a 17mm socket to get the clock out but after several attempts to turn counter clockwise as mentioned above, mine was definitely clockwise to remove. The wire attachment is very easy to remove once the clock is out. Once out of the dash, to separate the clock halves, remove the rubber gasket, then insert a small screwdriver or something flat to pry around the area with the indentations noted by the red circle. I think there are 3 of these indentations. Keep working your way around. When the halves come apart, just pay attention to the orientation of things. It will seem logical when going back together since there really is only one way to reassemble. The hand came off easy for me with the spoon method. The most stressful part is getting the new plastic face on. It must be "snapped" around the inner ring. As mentioned, it will fight you and you don't want to crease it. you will see the alignment holes and you can rotate the new face to line up. Look at how the posts of the black outer ring align with the aluminum marker ring below and piece together. Put the hand back on at the 12 position. I used compressed air and MF cloth to clean the dial and the back glass and reassemble. Hope this helps a bit!!
Thanks. Which way do you turn the wrench when looking at the rear end of the clock where the socket is for the allen wrench? Also, did you change the guage face for the tach?
Thanks. Which way do you turn the wrench when looking at the rear end of the clock where the socket is for the allen wrench? Also, did you change the guage face for the tach?
Looking at the back of the clock, you go clockwise to release, and counter to tighten. Also, its a socket wrench. No Allen wrench needed here. And I just did the chrono clock. Not sure I am brave enough to tackle the gauge face.
Huh? I didn't see OPs instrument cluster but I'd bet he has a yellow tach or is planning to DIY that in the future. They just saved themselves $350 and gets to say he DIYed something.
Saved $350 if you successfully complete the task without breaking something.
Theon Goes Full Carbon Fiber With Stunning New Build
Slideshow: Built around a carbon-bodied 964 and a naturally aspirated 4.0-liter flat-six, this bespoke commission highlights how far the restomod formula has evolved.
Tuner Is Converting Porsche 911s Into Shooting Brakes
Slideshow: A Polish Porsche specialist is moving ahead with one of the most unusual 911 conversions in recent memory: a shooting brake version of the 991-generation sports car.
This Coachbuilt Creation Is A Modern Take on the Legendary Porsche 917
Slideshow: A Porsche Carrera GT has been transformed into a one-off coachbuilt machine that blends analog supercar engineering with styling inspired by the legendary 917 race cars.
Is This Convertible Cayenne A Steal, Or A Returnless Investment?
Slideshow: A heavily modified Porsche Cayenne convertible with faux wood trim and a long list of flaws recently sold at auction for surprisingly little money.
Porsche's Top 5 Most Questionable Naming Decisions
Slideshow: For a company obsessed with engineering precision, Porsche has occasionally named its cars in ways that left even loyal enthusiasts scratching their heads.
Pogea Racing's 964 Porsche 911 Reimagination Stands Out in a Crowded Field
Slideshow: Pogea Racing's latest Porsche 964 project blends carbon-fiber construction, modern chassis upgrades, and up to 500 horsepower while keeping the air-cooled 911 experience firmly analog.