DIY: AWE Switchpath install (GTS)
#31
Rennlist Member
Thread Starter
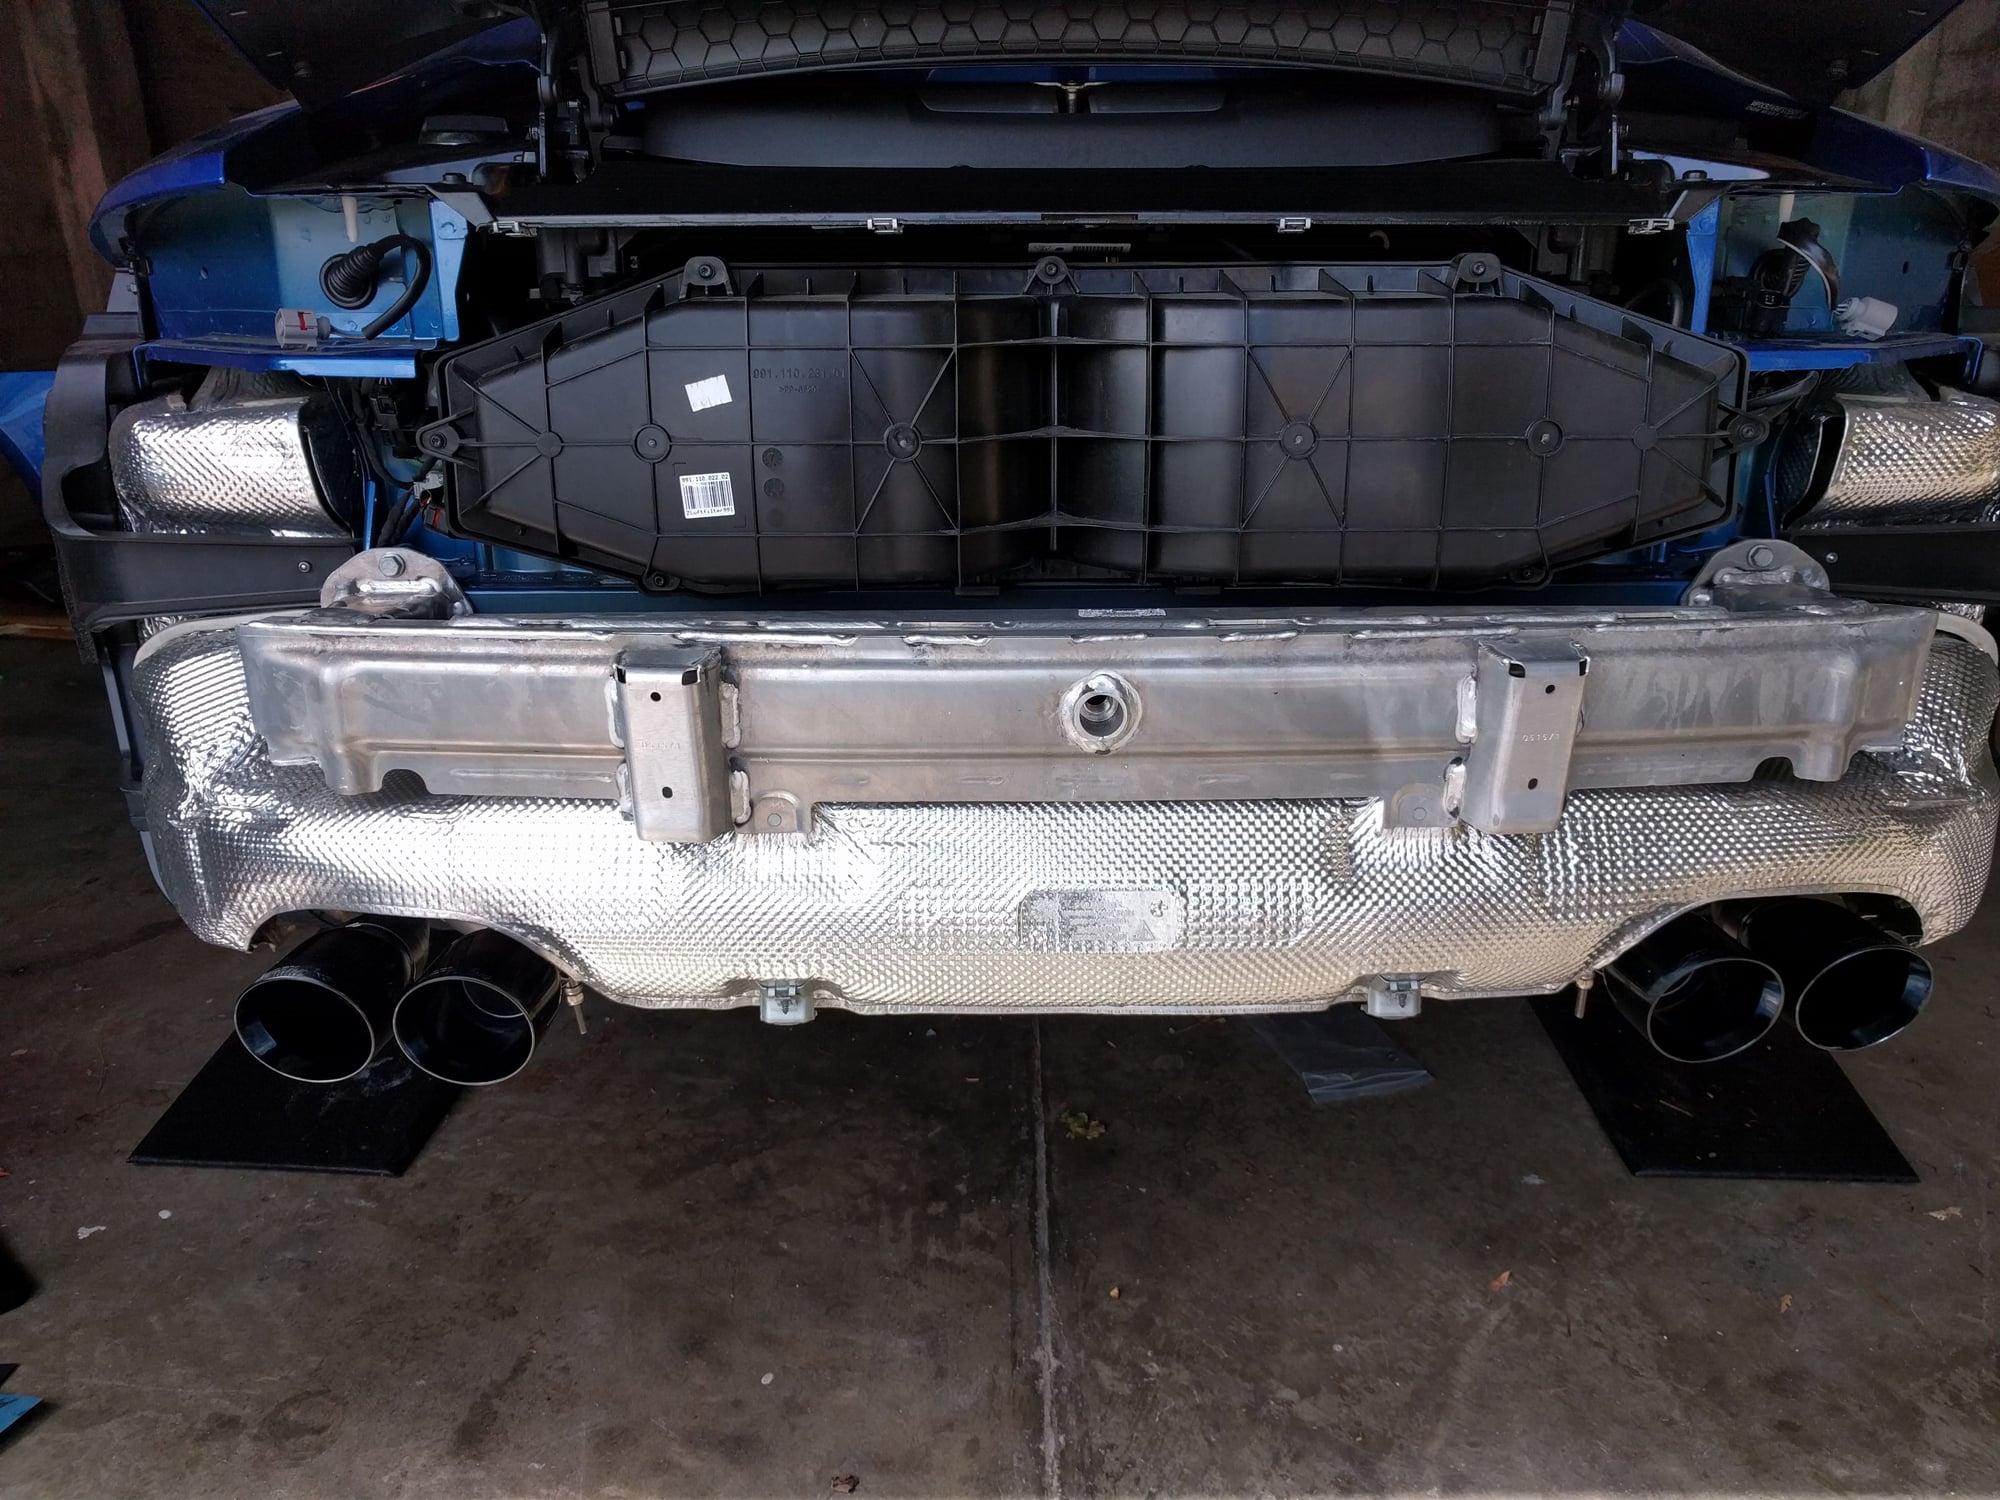
Finally the bumper is ready to remove! "gently" pry each side of the bumper away from the bodywork at the edge of the rear wheel arches, this will just pull out.
Then pull the bumper backwards and up slightly to free it from the back of the car. TAKE CARE not to scratch the bodywork as you remove the bumper.
have a soft surface ready, out of the way of the work area to place the bumper cover
#32
Rennlist Member
Thread Starter
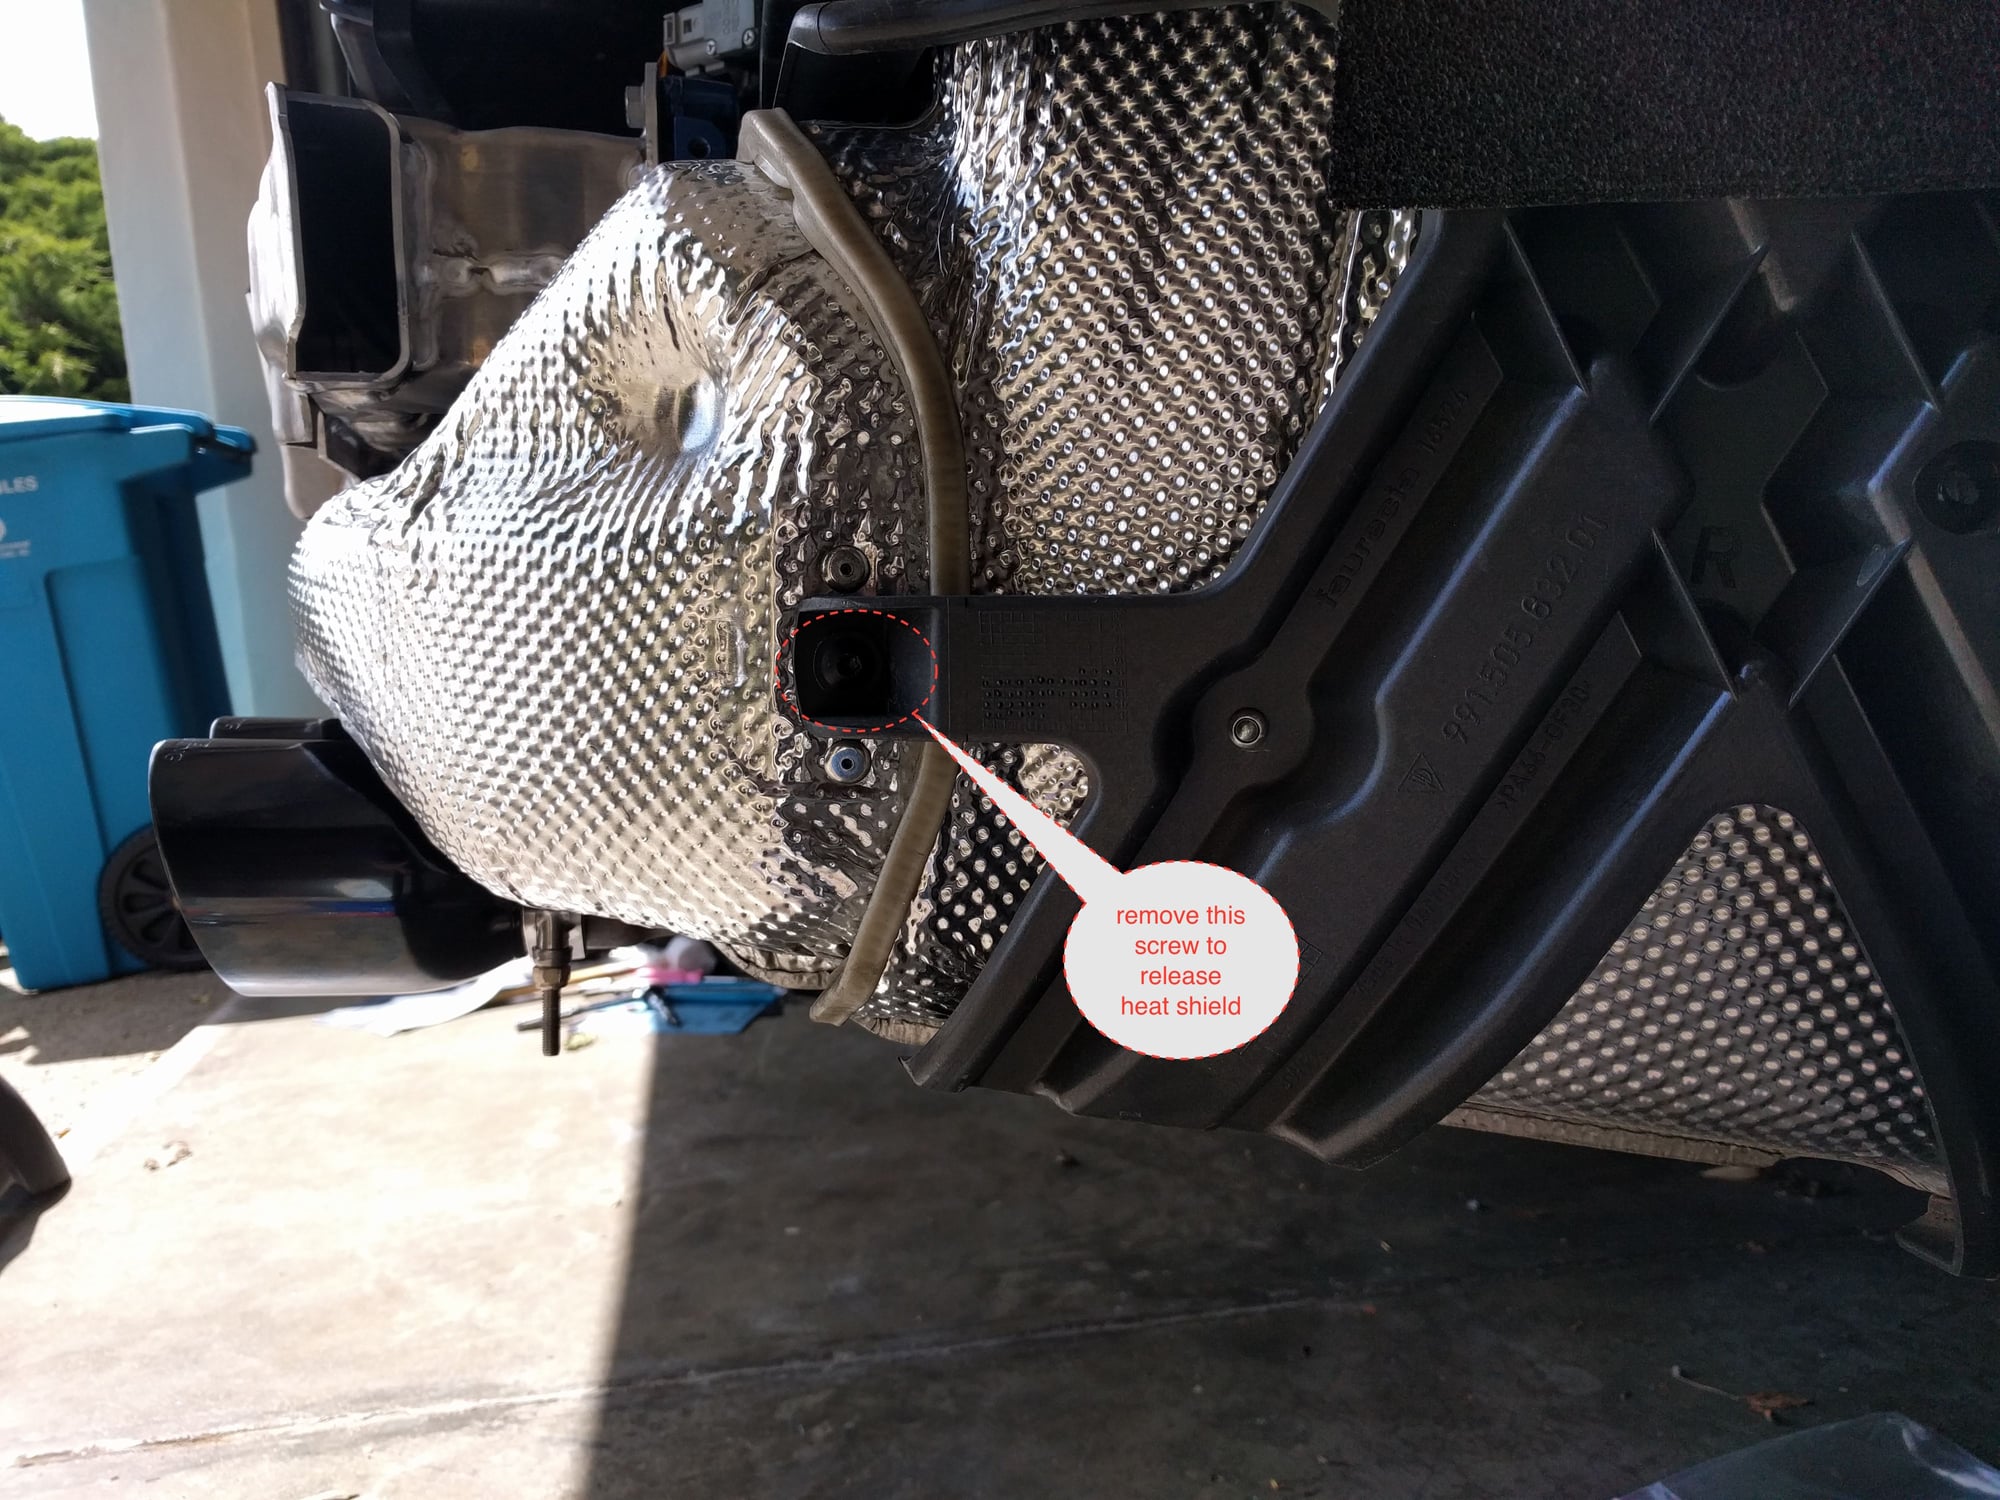
remove the T25 screw on either side of the car's heat shield
#33
Rennlist Member
Thread Starter
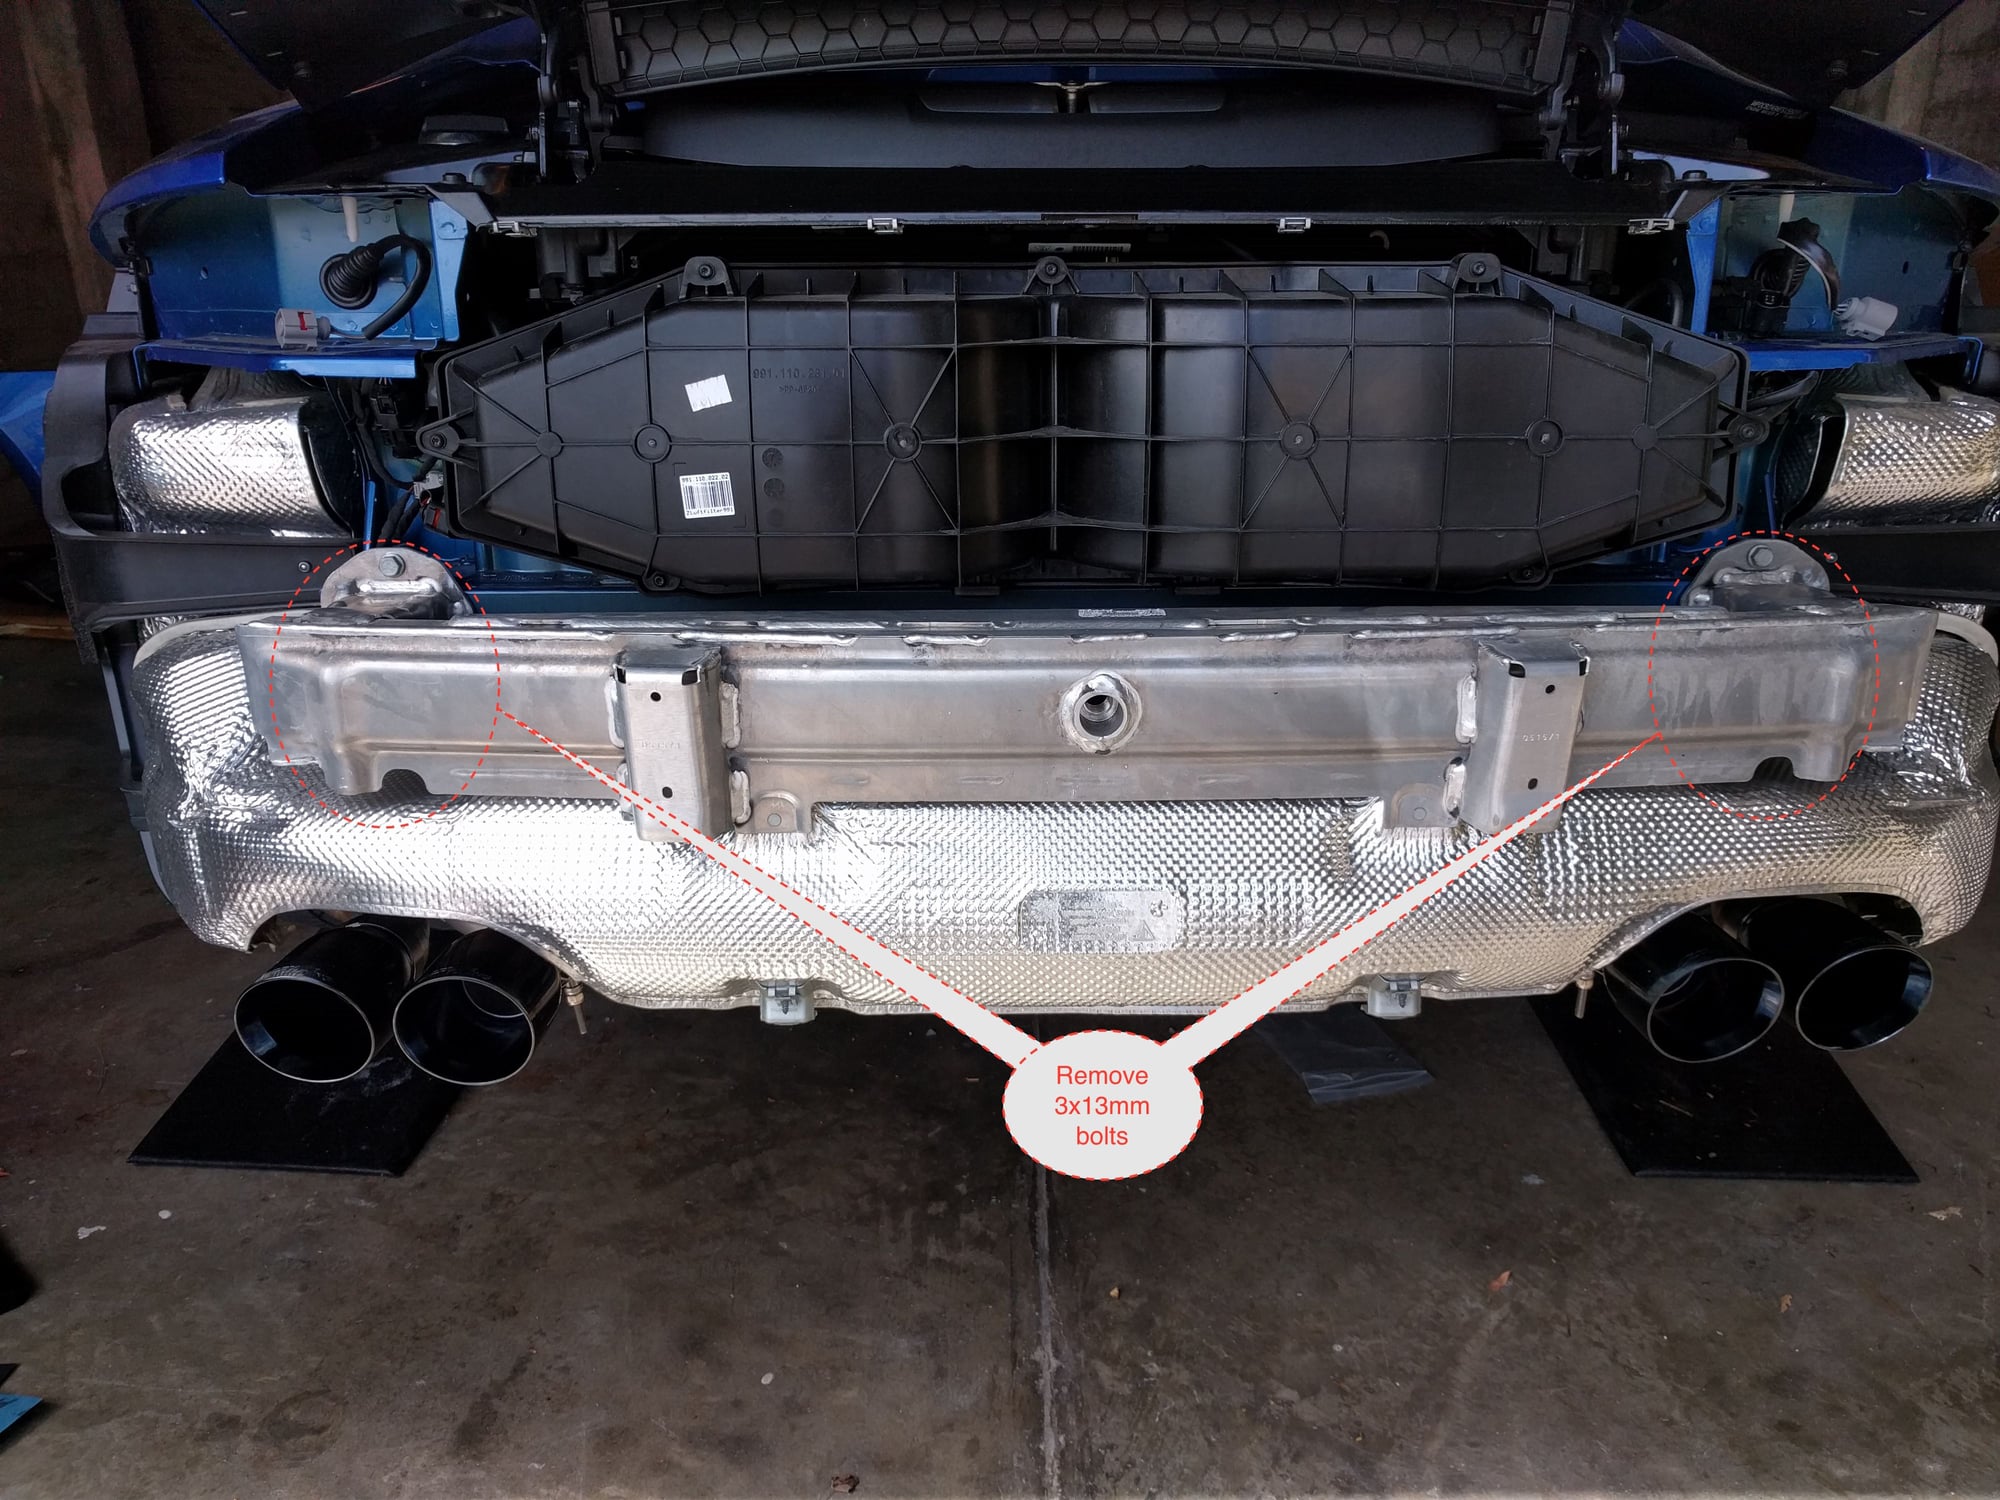
remove the 3x13mm(?) bolts on either side of the crash protection bar, at this point it is free to remove. tilt slightly upwards and pull back, WARNING ITS HEAVY!
#34
Rennlist Member
Thread Starter
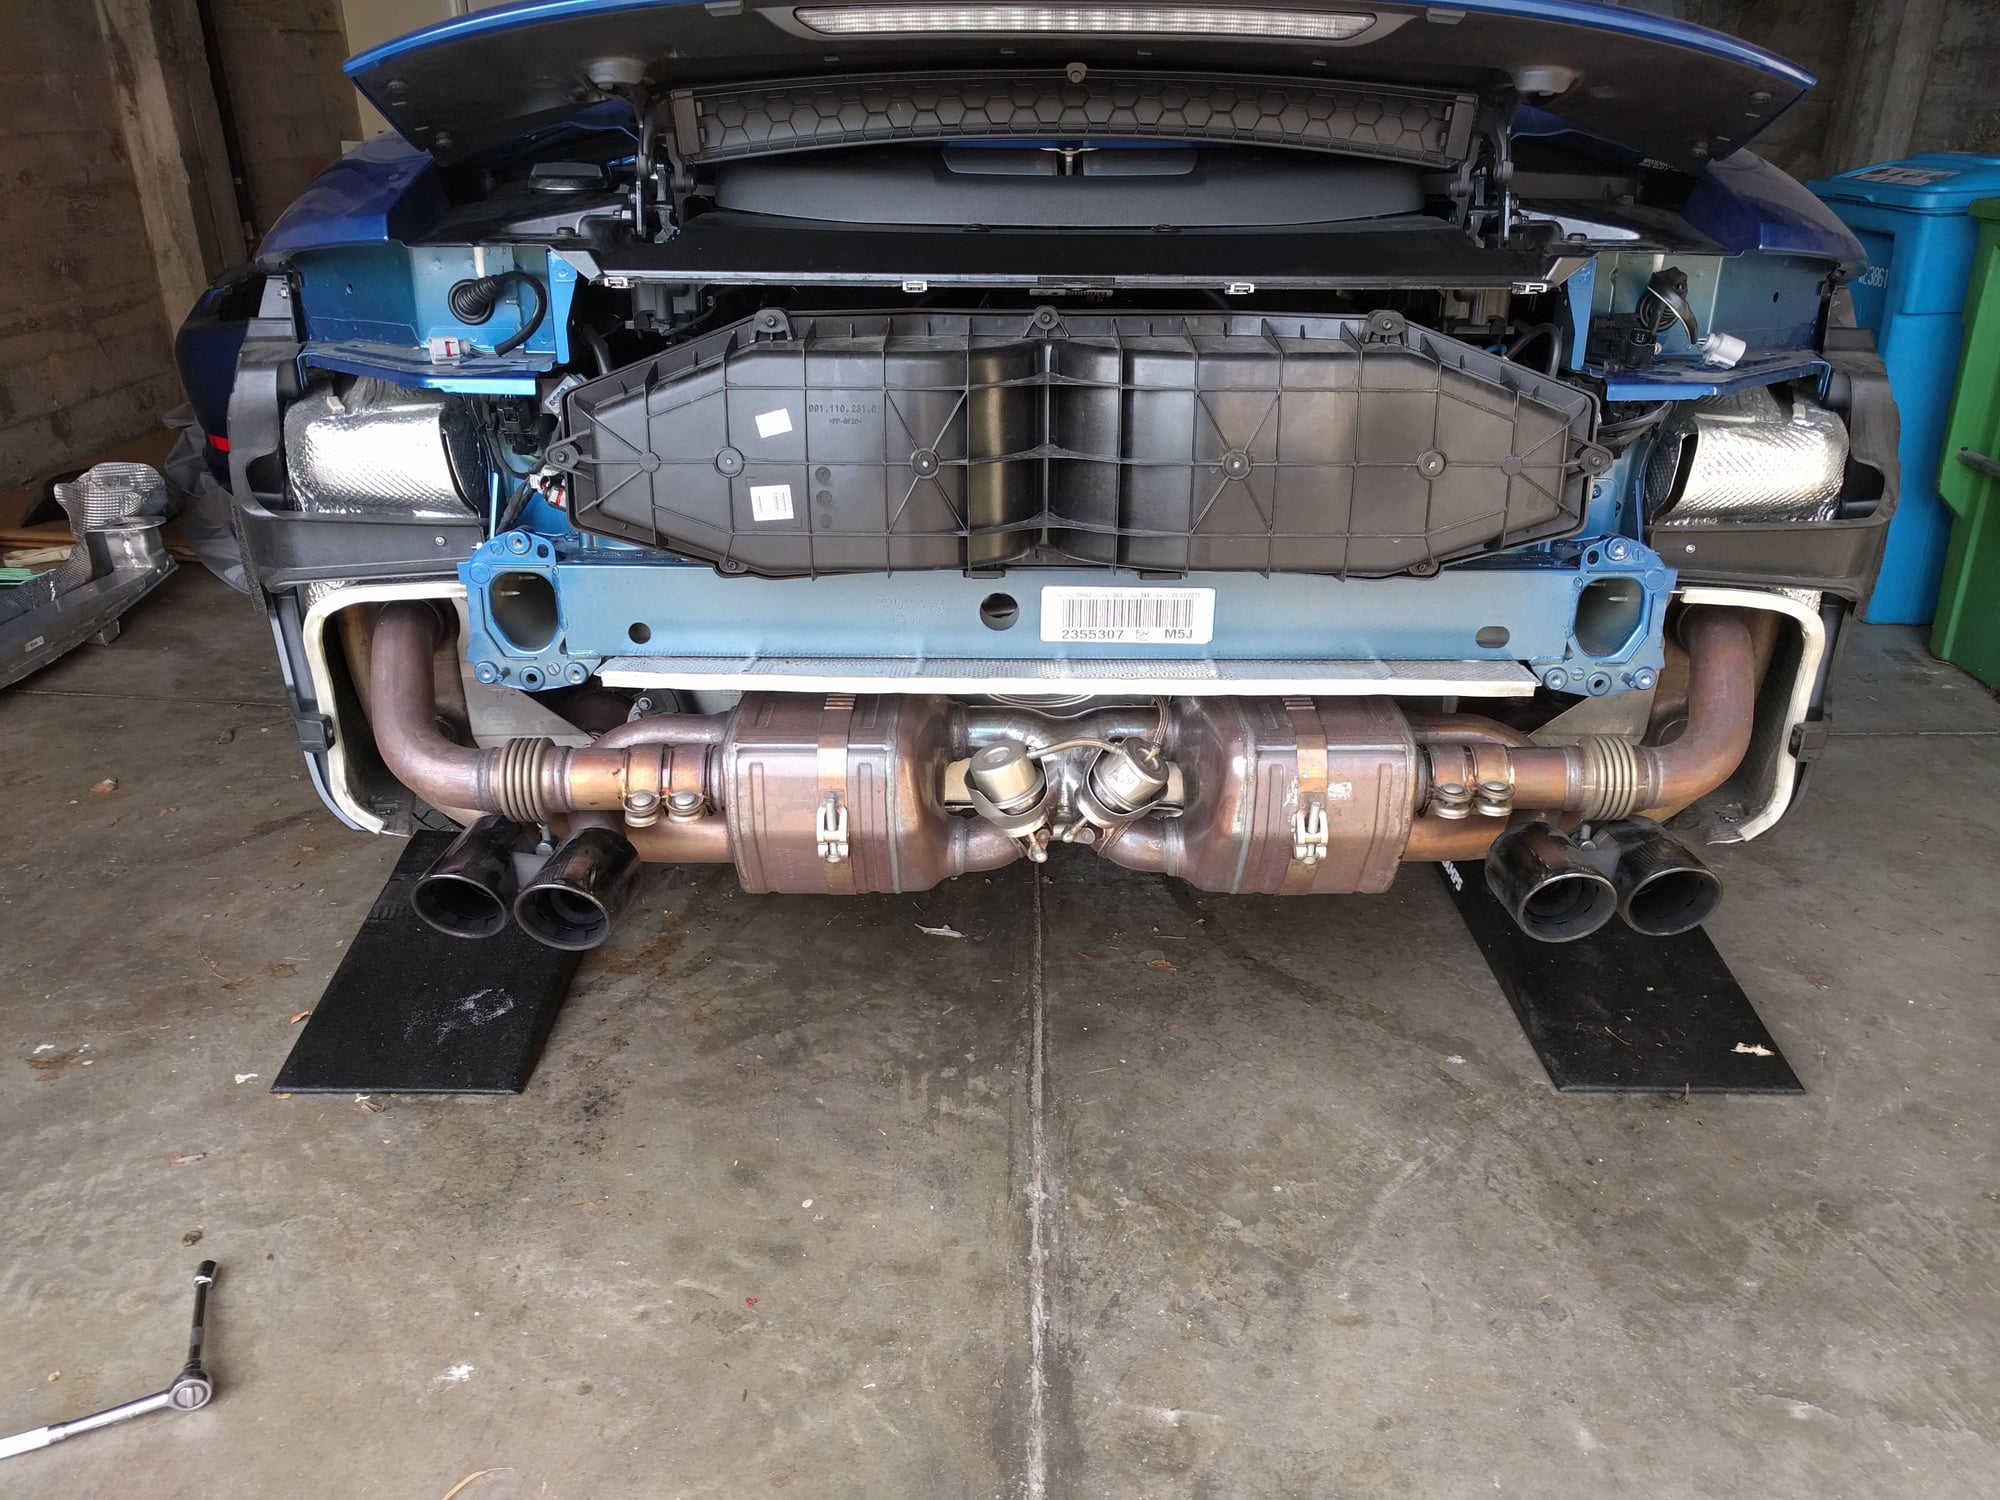
Perhaps now is a good time to install some BMC air filters?

#35
Rennlist Member
Thread Starter
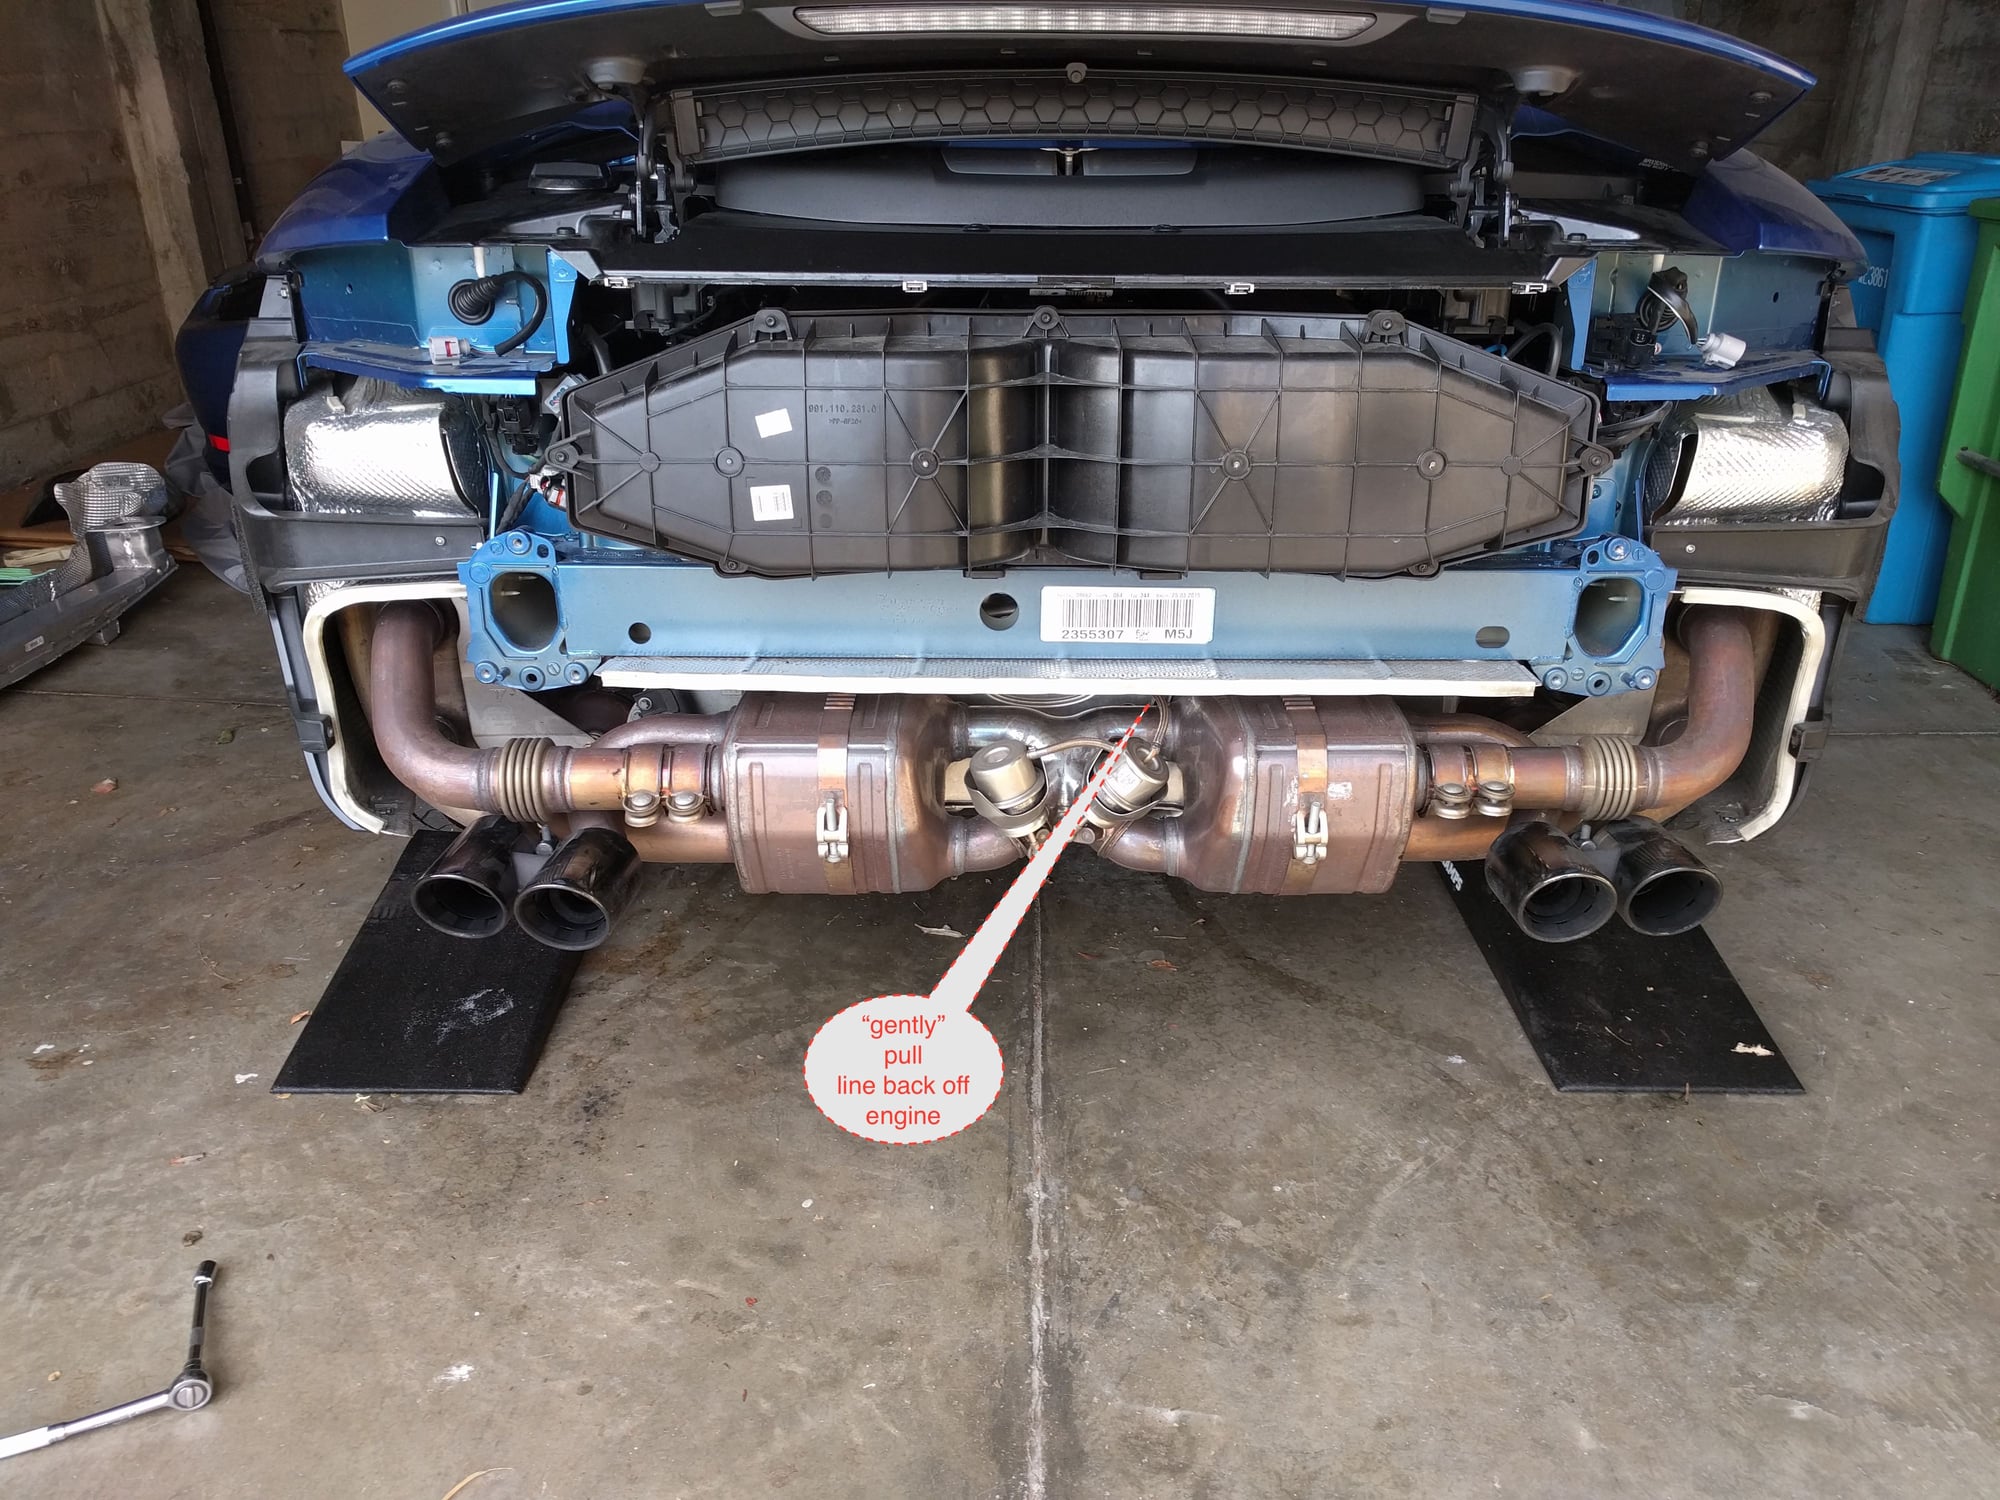
gently pull the vacuum line connecting the valve actuators from the engine...
#36
Rennlist Member
Thread Starter
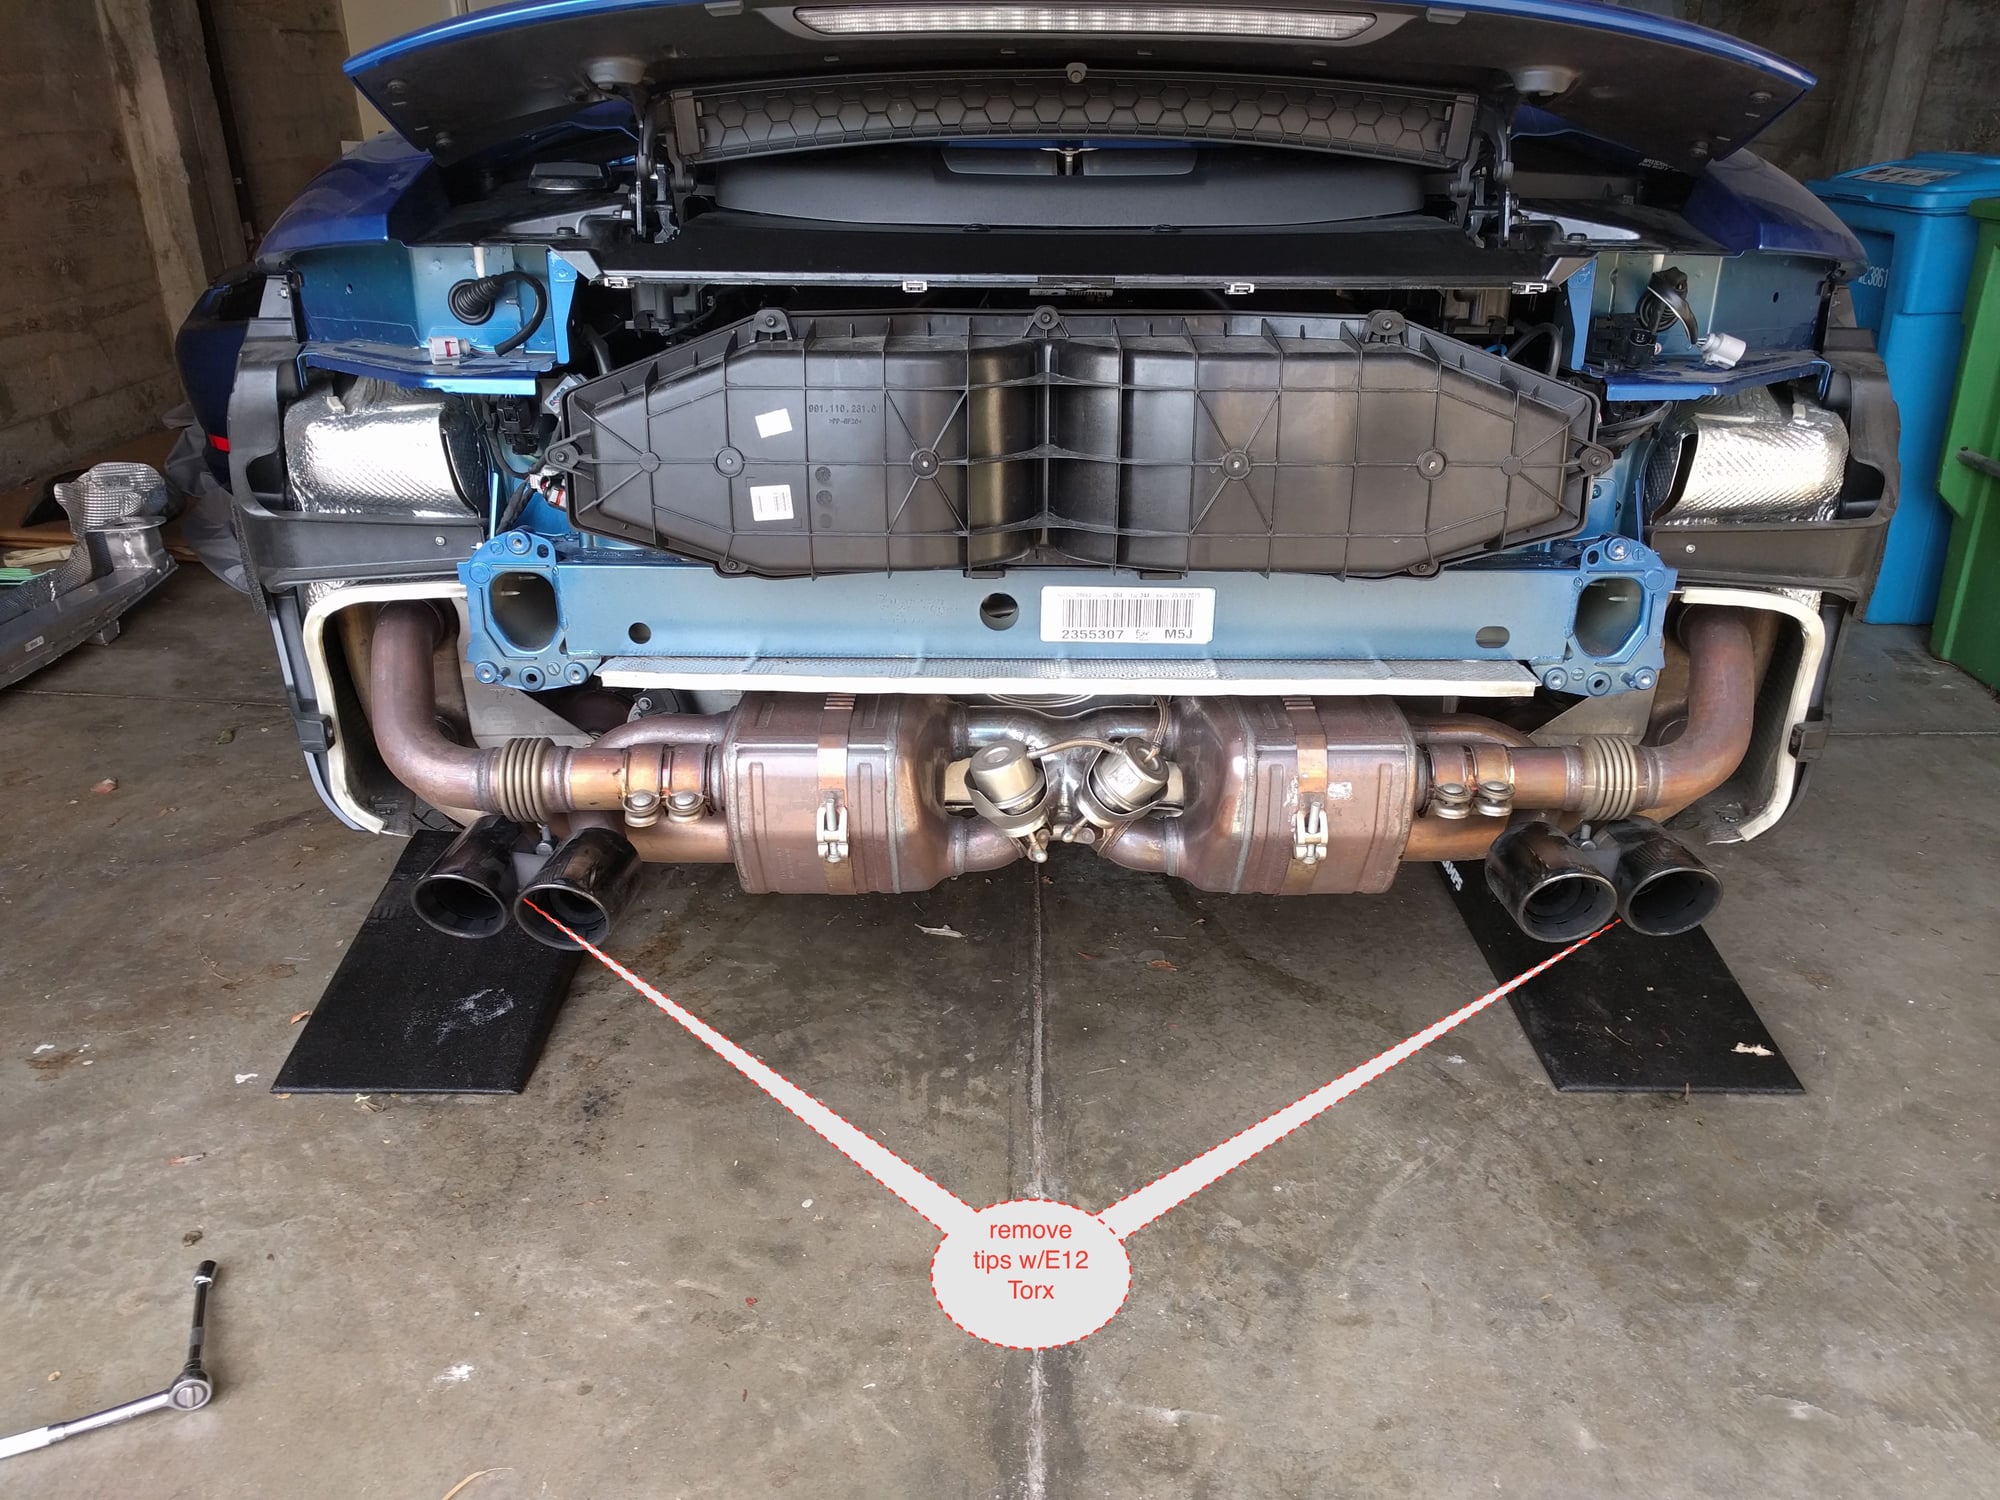
using a female E12 torx remove both OEM exhaust tips
#37
Rennlist Member
Thread Starter

using an M6 hex head, loosen the band clamps retaining the PSE exhaust, soon you will slide these outwards immediately prior to removing the exhaust
#38
Rennlist Member
Thread Starter

release the collars by loosening the 12mm bolts, and slide them to the outside releasing the center section
#39
Rennlist Member
Thread Starter
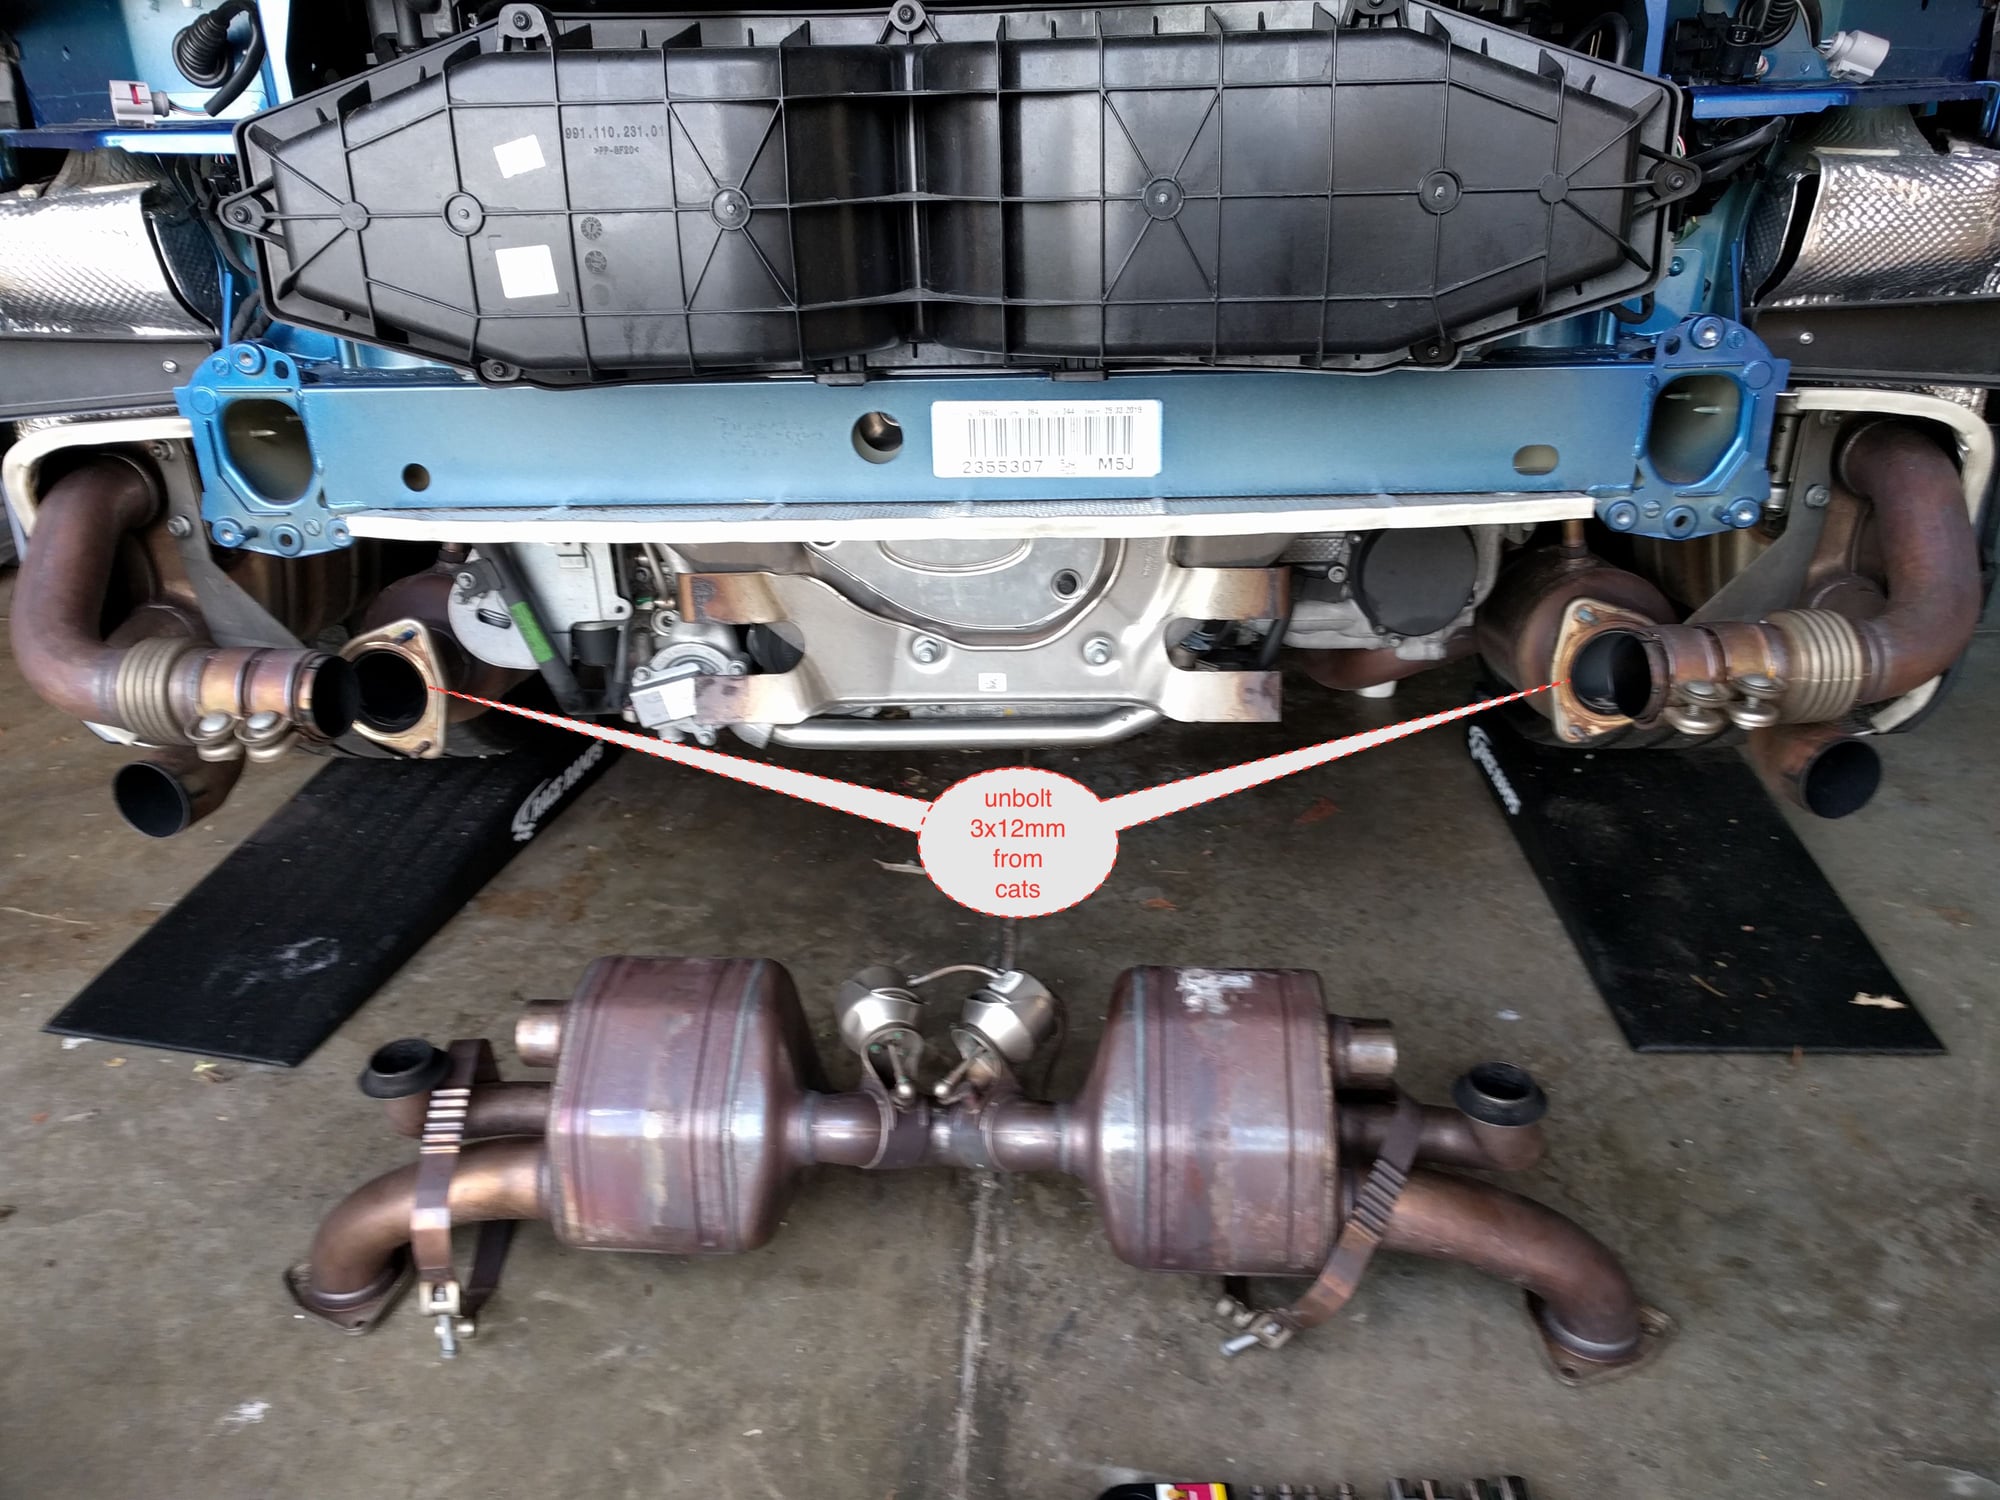
almost ready to remove the PSE; but you have to unbolt the 3x12mm bolts connecting the exhaust to the cats... (using this photo to better illustrate the location of the nuts in question)
Note: you may need 12mm "deep" socket or an "offset" wrench to remove nuts from the cat studs
BTW: when/if you ever restore the OEM exhaust you may find it difficult to re-seat it on the studs attached to the cats -
I actually had to use a rachet-ing cargo strap to slightly "pull" the cats together in order to get the OEM exhaust back onto the car.
Also, replace the OEM "crush" gaskets between the cats and the exhaust when doing that...
Last edited by Larry Cable; 12-19-2020 at 04:22 PM.
#40
Rennlist Member
Thread Starter
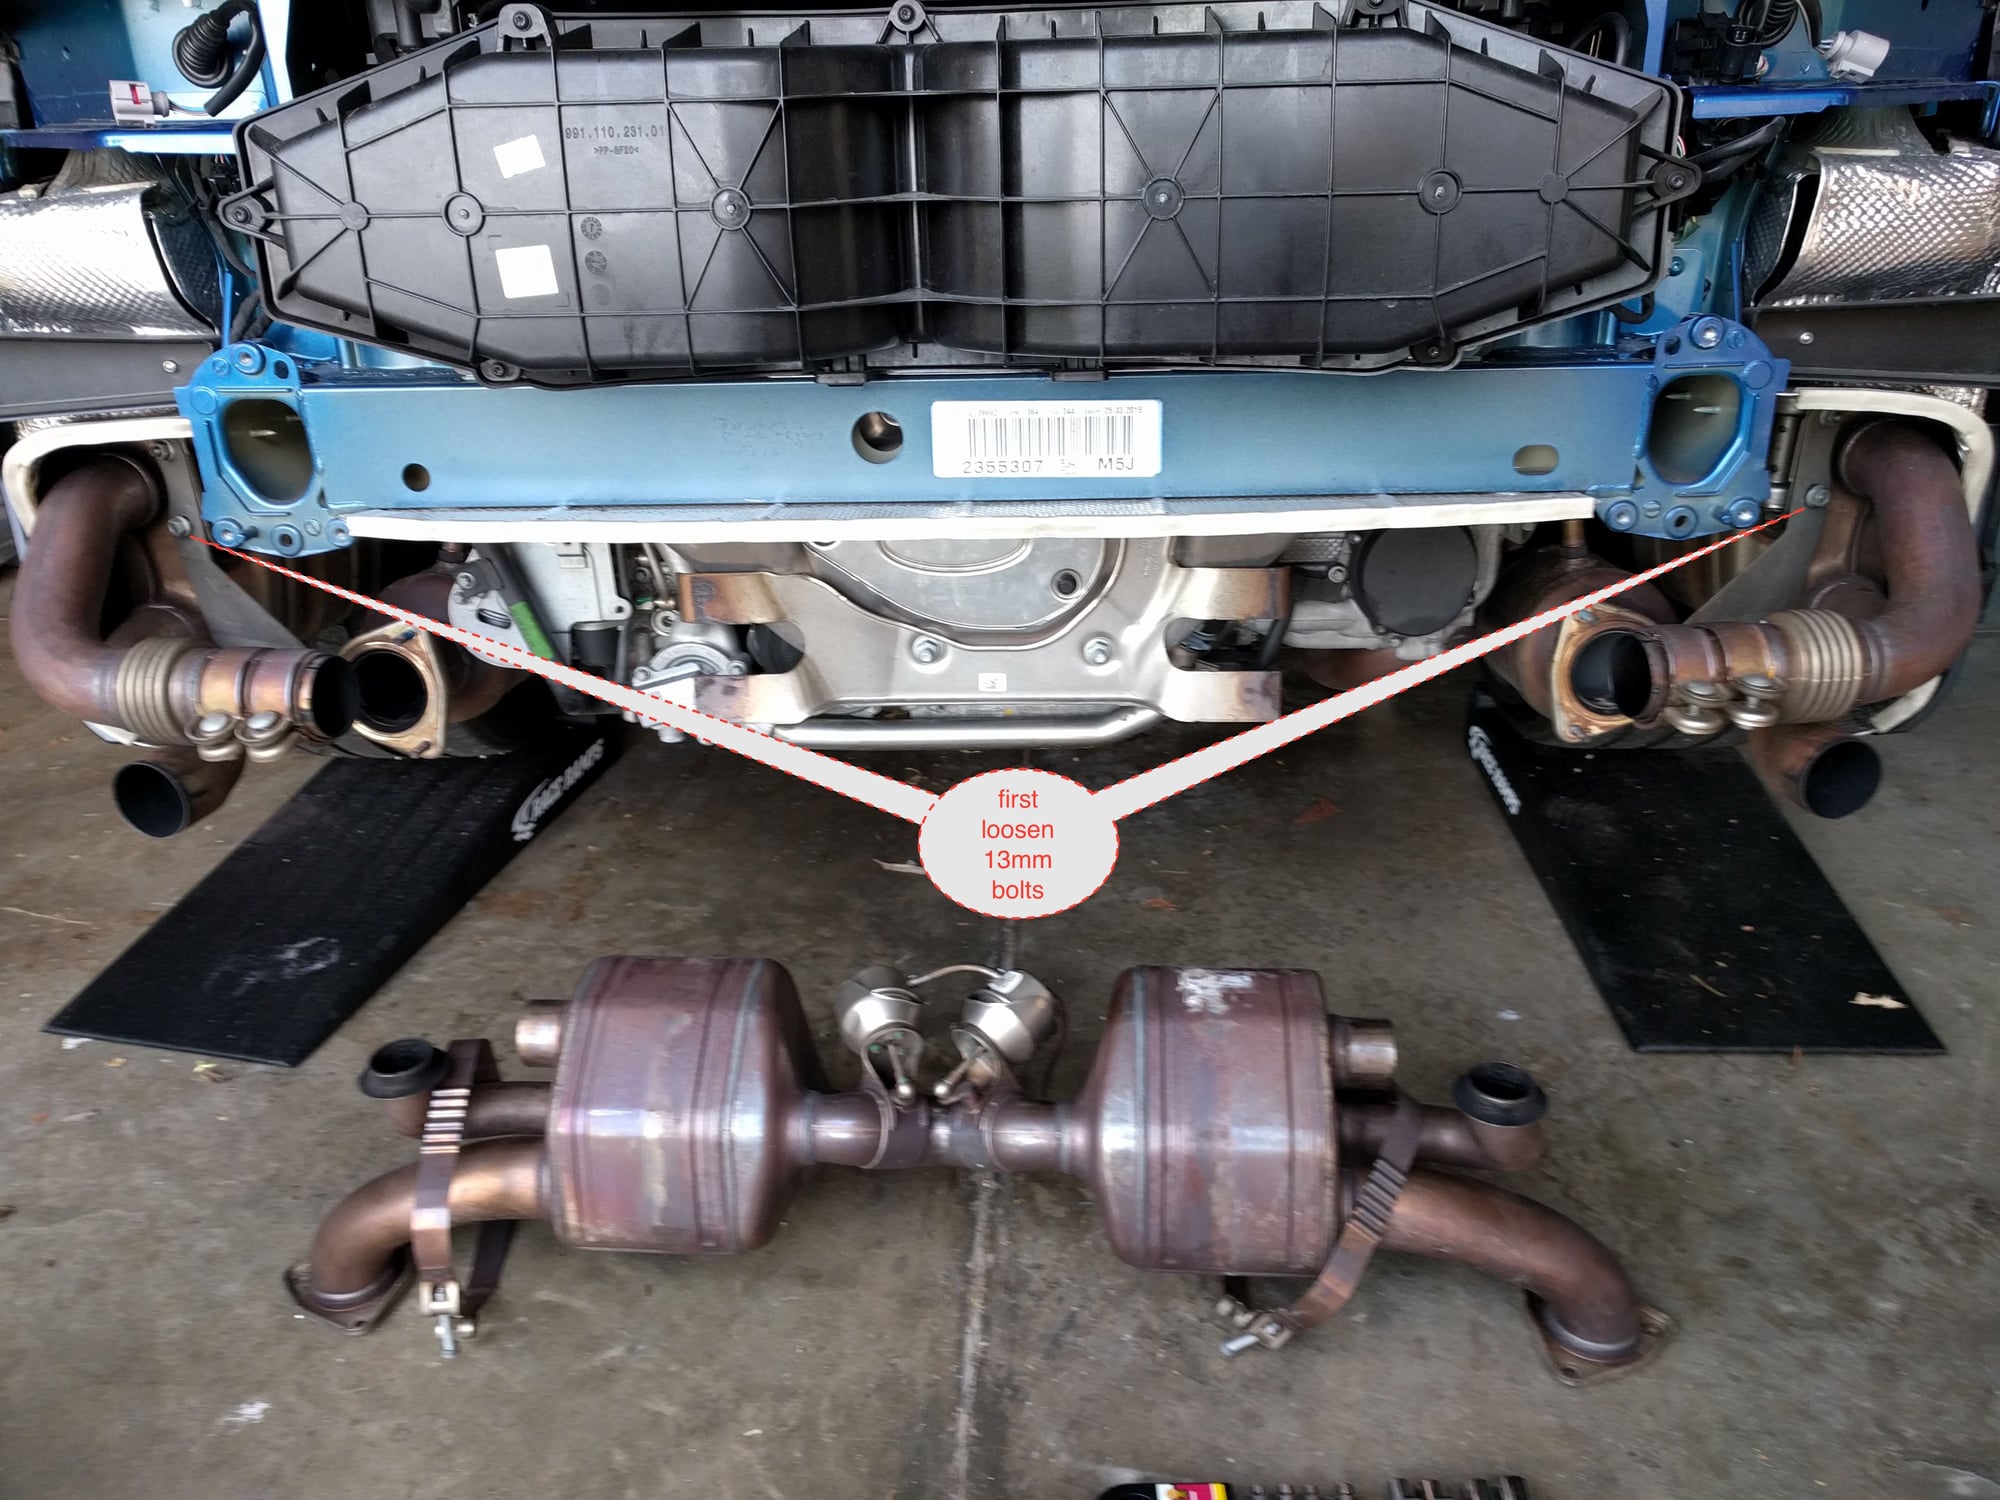
In order to fold back the side exhausts, it helps to loosen the bolts on the brackets here...
#41
Rennlist Member
Thread Starter
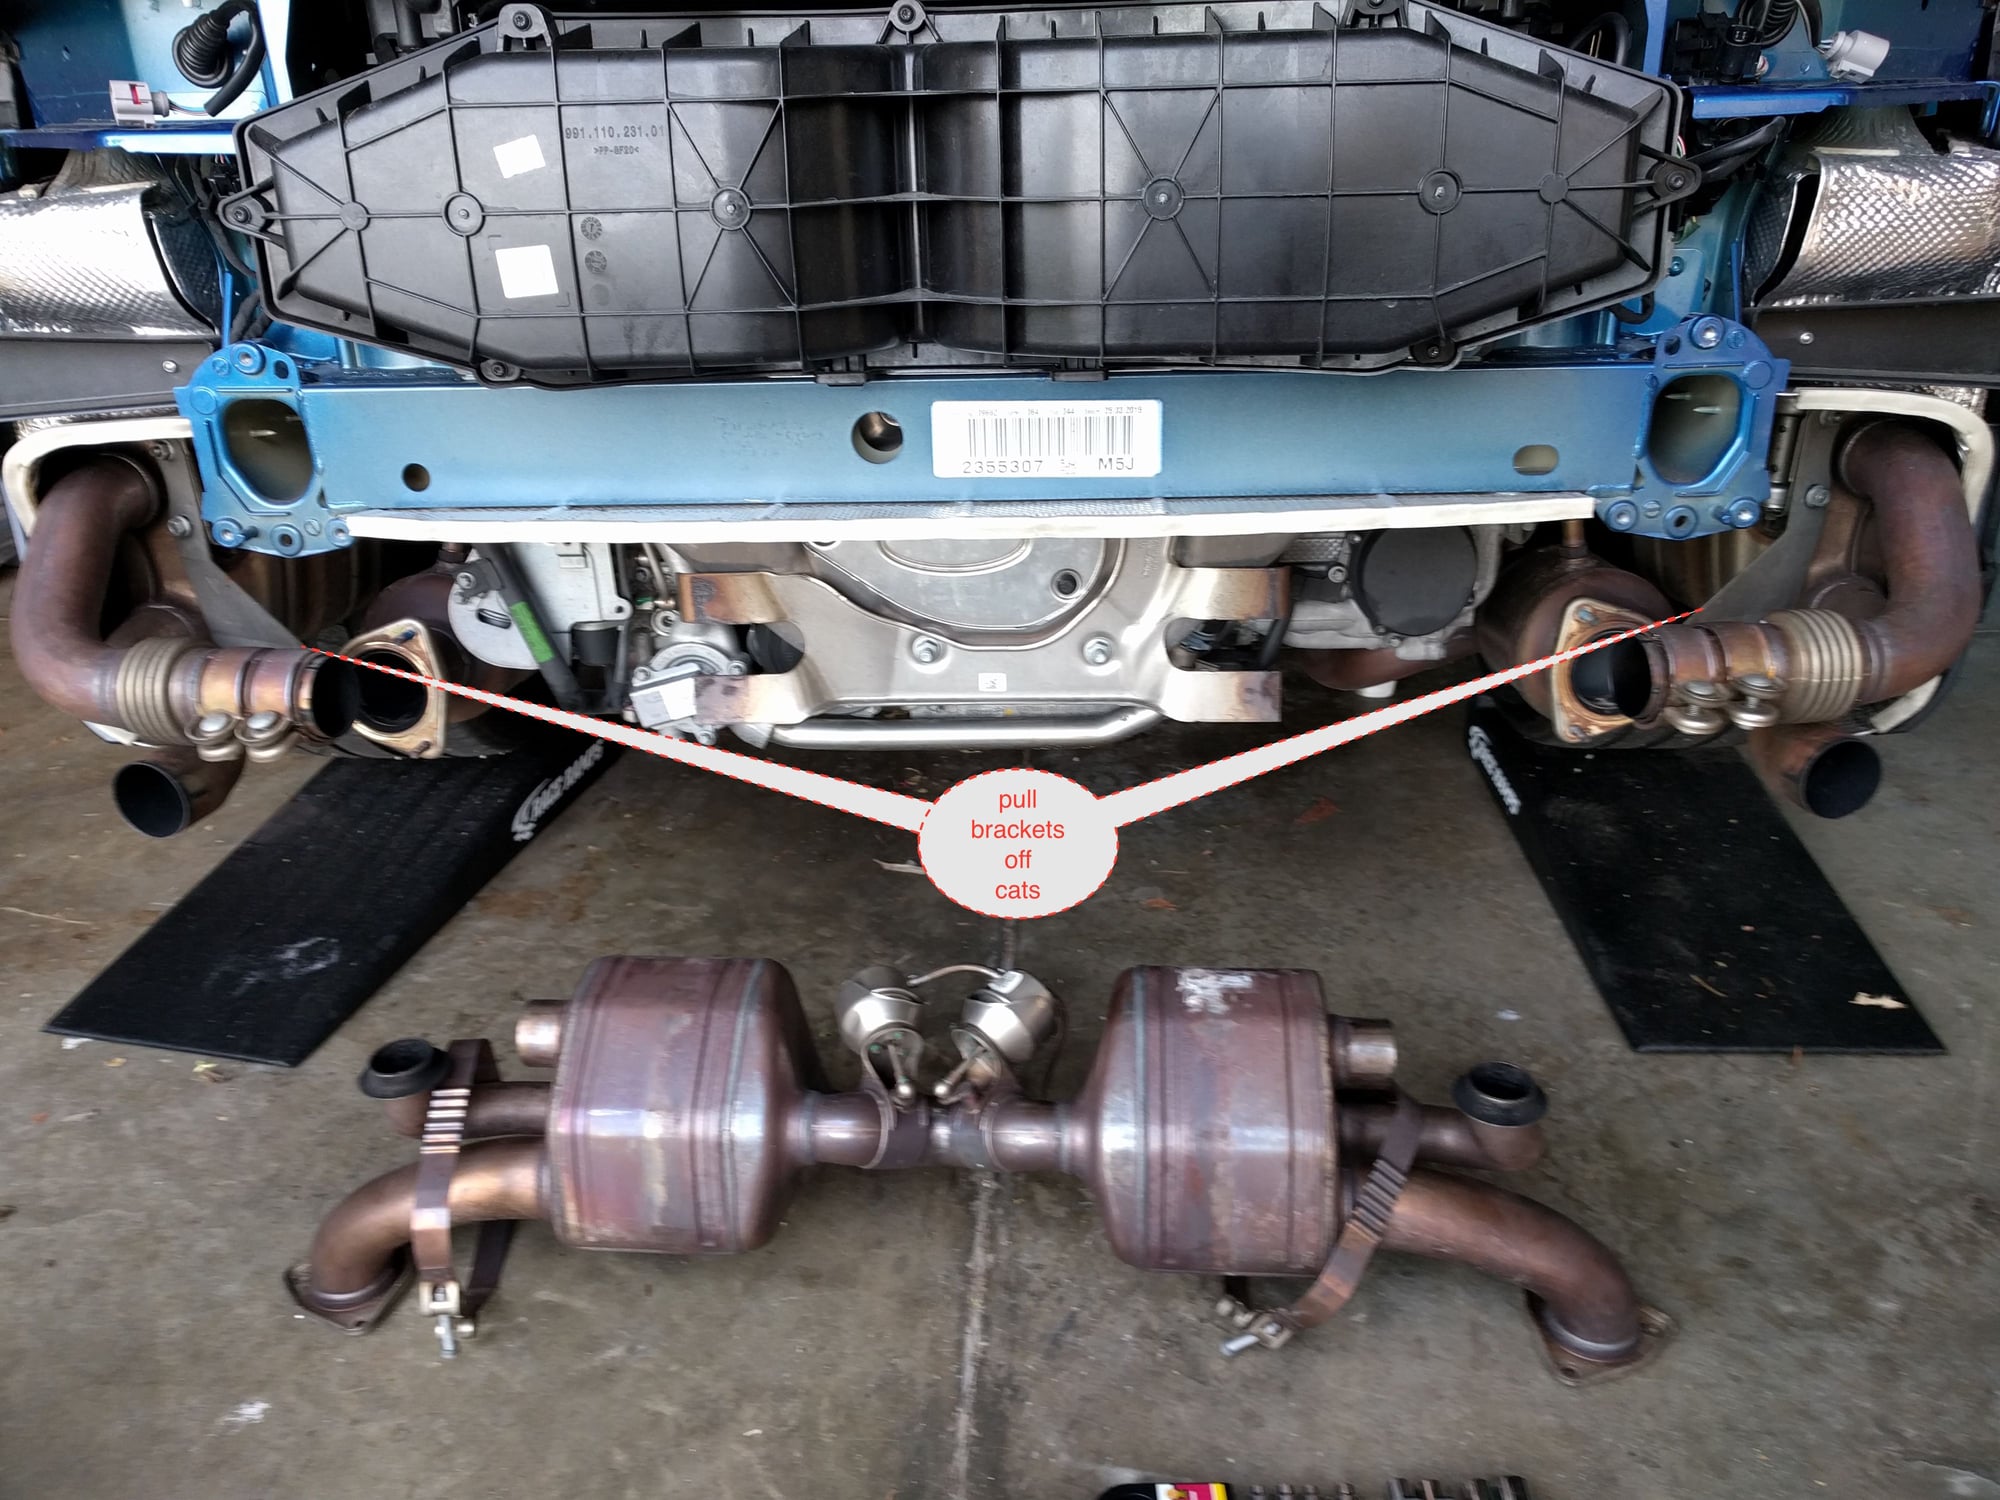
pull the brackets supporting the side exhausts off of the cats, then swing the side exhausts out to the sides... <br/><br/>YOU CAN NOW PULL THE BAND CLAMPS OFF AND REMOVE THE PSE
#42
Rennlist Member
Thread Starter
At this point, you are now ready to install the SwitchPath exhaust, the AWE
instructions here: http://www.awe-tuning.com/media/pdf/...th_exhaust.pdf are very good so I wont "step-by-step" it much if at all now.
instructions here: http://www.awe-tuning.com/media/pdf/...th_exhaust.pdf are very good so I wont "step-by-step" it much if at all now.
#43
Rennlist Member
Thread Starter
Note: the GTS requires a 17" drivers-side vacuum line, which is 2" longer than the std 991S 15" line described in the installation notes.
AWE have been made aware of this by FastDiablo and I, they *should* be providing longer hoses w/GTS kits, so check with your dealer!!!
Update: the AWE installation instructions have been updated, as has the length of supplied hose to accommodate the 17-18" GTS drivers side hose - FAST WORK AWE
Even with the back off of the car, once you install the SwitchPath there is not a great deal of room to work,
this most impacts the ease of the task installing the vacuum lines.
My recommendation is as follows:
1) pre-assemble the drivers & passenger side lines with the T-connector, and crimp the connections to the T-connector *and* the valve actuators on either side of the SwitchPath *before* you mount the exhaust section on the car
2) attach and crimp the 1.5" hose section to the engine vacuum connector *before* you mount the SwitchPath on the car
3) place a crimp ring on the 1.5" hose prior to mounting the exhaust
4) once the exhaust is mounted, then connect and crimp the T-connector to the 1.5" hose previously connected to the engine.
Note: you can either use the special tool, here: http://smile.amazon.com/Oetiker-1410.../dp/B008L489P0
But... something like this will also work: http://smile.amazon.com/Klein-Tools-.../dp/B0002RI9NQ
AWE have been made aware of this by FastDiablo and I, they *should* be providing longer hoses w/GTS kits, so check with your dealer!!!
Update: the AWE installation instructions have been updated, as has the length of supplied hose to accommodate the 17-18" GTS drivers side hose - FAST WORK AWE

Even with the back off of the car, once you install the SwitchPath there is not a great deal of room to work,
this most impacts the ease of the task installing the vacuum lines.
My recommendation is as follows:
1) pre-assemble the drivers & passenger side lines with the T-connector, and crimp the connections to the T-connector *and* the valve actuators on either side of the SwitchPath *before* you mount the exhaust section on the car
2) attach and crimp the 1.5" hose section to the engine vacuum connector *before* you mount the SwitchPath on the car
3) place a crimp ring on the 1.5" hose prior to mounting the exhaust
4) once the exhaust is mounted, then connect and crimp the T-connector to the 1.5" hose previously connected to the engine.
Note: you can either use the special tool, here: http://smile.amazon.com/Oetiker-1410.../dp/B008L489P0
But... something like this will also work: http://smile.amazon.com/Klein-Tools-.../dp/B0002RI9NQ
#44
Wow! You are like a master pathologist with that dissection of a Porsche rear end Larry. Great pictures. If I drive up to the Bay Area will you do mine for me?
Jim

Jim
#45
Rennlist Member
Thread Starter


