When you click on links to various merchants on this site and make a purchase, this can result in this site earning a commission. Affiliate programs and affiliations include, but are not limited to, the eBay Partner Network.
Hella great job bro and wow that looked like an undertaking! I would have never been able to have them look that good.
Originally Posted by Tpup
Amazing job!
Thank you both!
Originally Posted by TXGerman
Just curious, since you planned to remove the pistons/seals for a rebuild, wouldn't it have been easier (better?) to remove them all prior to paint? Your results look great BTW.
Thanks. I left them in because I figured it would reduce the chance of paint overspray, which conceivably could have clogged things up. Also the boot for the rears are back ordered 5 weeks so I had no choice there. Super easy to get out though if you have a compressor.
[QUOTE=Wujohn;17899900]My calipers were turning an odd shade of purple after a few years of track abuse so I decided to repaint them. I didn't want to paint them to pretend they were "big reds" and given that my car is silver and my wheels are black, no other color made sense to me so I painted them black. Below is my process and a bunch of pics. Upfront I made a few mistakes that just really irritated me and caused delays.
5. My dust boots (see pic) were absolutely toast. I replaced the fronts but the rears are on back order for 5 weeks (sigh covid).
Had to used compressor here to get pistons out so I could replace the boots. Be careful, a few may shoot out like a rocket.
Toasted boots. They have done their duty.
When you replaced the caliper piston dust seals did you completely remove the pistons? If so, how did the high pressure seals look? Did you replace the high pressure seals and dust seals or just the dust shields? On my old track car with StopTech calipers I rebuilt the calipers when I saw the dust seals falling apart. But when I got the pistons out of the caliper the pistons looked brand new and so did the high pressure seals. This was after several years of track time. I already have the dust seals but I'm debating replacing the pressure seals too. Great work on the rebuild along with the write up. Thanks.
My calipers were turning an odd shade of purple after a few years of track abuse so I decided to repaint them. I didn't want to paint them to pretend they were "big reds" and given that my car is silver and my wheels are black, no other color made sense to me so I painted them black. Below is my process and a bunch of pics. Upfront I made a few mistakes that just really irritated me and caused delays.
5. My dust boots (see pic) were absolutely toast. I replaced the fronts but the rears are on back order for 5 weeks (sigh covid).
Had to used compressor here to get pistons out so I could replace the boots. Be careful, a few may shoot out like a rocket.
Toasted boots. They have done their duty.
When you replaced the caliper piston dust seals did you completely remove the pistons? If so, how did the high pressure seals look? Did you replace the high pressure seals and dust seals or just the dust shields? On my old track car with StopTech calipers I rebuilt the calipers when I saw the dust seals falling apart. But when I got the pistons out of the caliper the pistons looked brand new and so did the high pressure seals. This was after several years of track time. I already have the dust seals but I'm debating replacing the pressure seals too. Great work on the rebuild along with the write up. Thanks.
Thanks! The pistons came all the way out when I used the compressor and frankly, it was much easier to pull the boots off this way. Seals looked good to me so I am not replacing. I may do a full rebuild with race-specific parts after this season but all is good for now.
BTW, the rear dust boots were on back order for 5 weeks but I magically got them today after only waiting a week. Unusually good news for once.
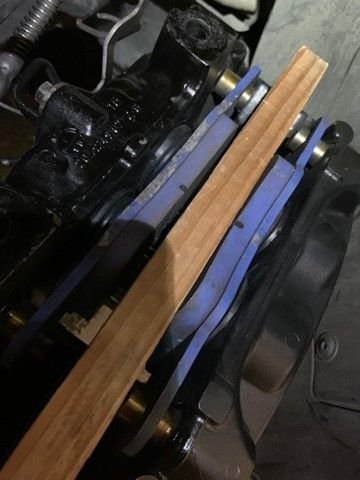
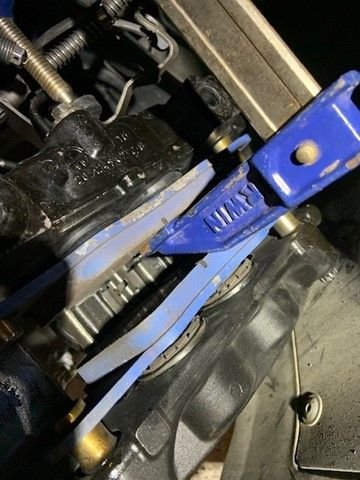
Just a quick follow up - did my rear boot change today while the brakes were on the car. I used a piece of wood and then a C Clamp to keep the pistons from shooting out when I press on the brake. A bit harder than if the calipers were off but each side took roughly 10 minutes each.
A note on removing the old boot: I recommend using a small flathead screw driver and pressing down firmly on the side of the boot and the using a twisting (slight turn of the screw driver) and prying motion. It will take a handful of tries but it will come loose. From there, very easy to remove the boot and replace with new ones!
As you can see in the pics below, I already deposited some nice dust on the new paint. Can't wait to cover them in dust and rubber this weekend on the track!

 01-13-2022, 07:06 PM