When you click on links to various merchants on this site and make a purchase, this can result in this site earning a commission. Affiliate programs and affiliations include, but are not limited to, the eBay Partner Network.
Tips for Installing NM Automotive CarPlay/Android Retrofit
I just finished installing the NM Automotive CarPlay/Android Retrofit Kit in my 2013 911S (991) Cabriolet. Here are some tips that I thought I would pass along.
First, I want to complement NM Automotive on the excellent step-by-step instructions that they provide. They clearly explain how to remove the PCM (and the necessary trim pieces) and install the Sub-Board in the PCM with clear photos and instructions. And, Nick Marquis of NM Automotive was very responsive and helpful to my email inquiries. His tech support could not have been better.
Overall, as long as you work slowly and carefully, the work that you do inside of the PCM is not difficult and though it takes a while the rest of the job is similar to installing a new radio or sound sound system.
Here are a few tips (beyond the included step-by-step instructions):
Make sure you have the necessary tools as listed in the instructions. You'll need down to a #8 Torx screwdriver or bit for the work inside the PCM. I also recommend cloth wire harness tape for wrapping connectors so they don't loosen up or rattle.
You will need to connect the red power lead on the unit's camera connecting cable to the extension cable coming from your camera. You might want to solder some kind of connector to each of these so that you can easily unplug and plug in this power wire. Do this before you connect the camera cable to the external unit.
The aerial connectors in my car were a bit different than shown in the instructions. Rather than white locking tabs that pull out, I had tabs that you push down on as you gently pull out on cable connector.
During the Sub-Board installatoin, when you are connecting the ribbon cables be sure that the cable is squarely and fully inserted. Also, make sure the locking tabs are fully seated. As you push one side down, the other side tends to pop up. So, make sure both sides are fully seated.
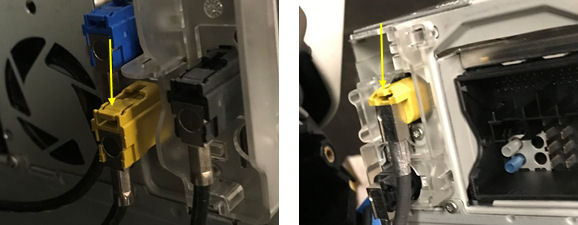
My DAB/Sirius XM cable connector was different than shown in the instructions. The metal portion was encased in a yellow plastic frame. You will need to remove this plastic frame before you try to thread the cable out of the slot in the aluminum case. To remove this yellow plastic frame you need to slide the red catch out as shown in the photo. You can then gently snap the metal connector out from the yellow plastic frame. You can snap the plastic frame back on after you have re-threaded it and the LVDS harness back through the slot in the aluminum case. (Yes, its a tight fit, but the XM connector will fit through the slot after you have pulled the LVDS connector through.)
After you have the PCM unit back together and begin Step 1 of the Unit Installation, you will need to decide where to locate the CarPlay/Android Auto Unit (I'll call this the external unit). Three suggestions are offered in the instructions:
1) Behind or above the cold air bulkhead cover/carpet on the passenger side.
2) Behind or above the glove-box. Remove the glove-box to install.
3) Behind air conditioning controls/under the PCM. Remove the air conditioning control and center console trim to fit the unit behind.
Option 1 - while maybe the easiest, seemed like it wouldn't really be concealed and might be bumped by passenger's feet.
Option 2 - reading about how to remove the glove box seemed like a chore and I already knew that removing the air conditioning control and center console were pretty straight forward.
Option 3 - knowing how to remove the air conditioning control and center console, I decided to try this option. It might not be the best, but it worked out pretty well (and I can't speak to the other options).
Here are some tips for Option 3. Start this with the PCM still removed and before you move on to Step 2 of the Unit Installation.
Remove the air conditioning control by gently pulling it straight up. If you need to you can carefully pry upwards with a plastic trim tool. You will then have to disconnect three connectors. For the long connector, squeeze the ends and pull it out. For the center connector there is a small tab that you squeeze as you pull it out. For the last connector, you push in on a small tab and then rotate the grey lever. (Sorry, I didn't get a photo of this.)
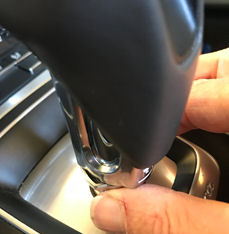
To remove the center console, first remove the gear-shift ****. You do this be turning the very bottom section of the **** counter clockwise about 45 degrees. I was able to do this by hand, but if you need to, you can wrap this with something like electrician's tape to protect it and then carefully use a small crescent wrench. Lightly pushing down on the gearshift **** might also help. Then you can just pull straight up to remove the ****.
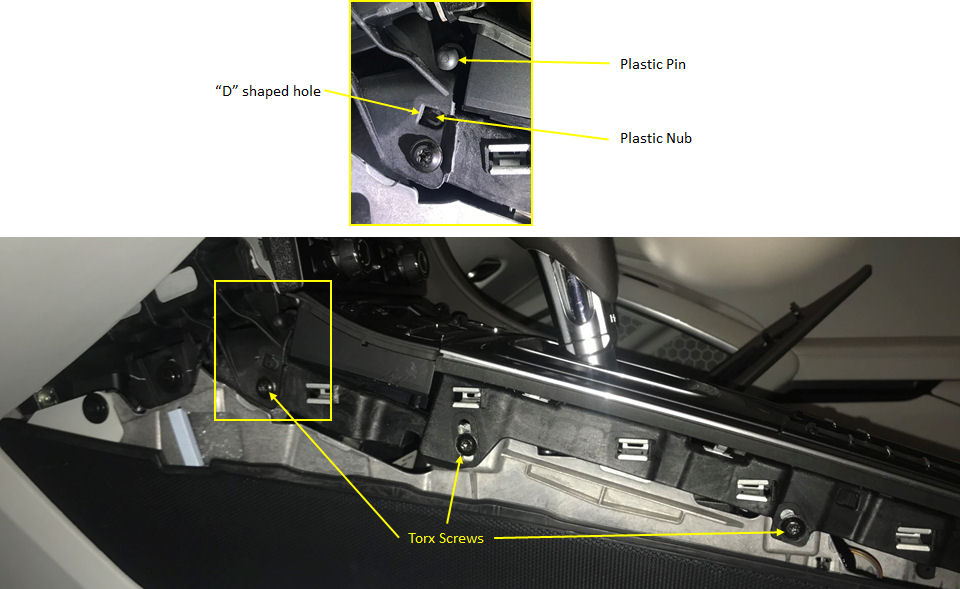
Next, remove the 3 torx screws that you will find on either side of the console. Gently pull up on the rear portion of the console until it comes partially free (only lift it up a few inches). At the front end of the console, there are two horizontal, outward facing 1/4" rubber-capped "plastic pins" that fit into curved depressions in the frame. Below these curved depressions you will see a "D" shaped hole in the frame that serves to catch a plastic nub that protrudes outward from the console. If you push the rear of the console to one side while gently prying the frame outward in the area below the "D" shaped hole (I used a 1" putty knife), one side of the consul will come free. You then repeat on the other side, to free up the console.
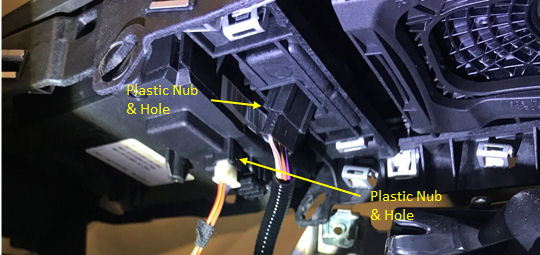
Lift the console over the gear-shift stick and then remove the two electrical connectors. Both of these are held in by nubs that protrude into small holes. I used a small jeweler's screw driver inserted at the nub, between the connector and the plastic surround, gently prying the surround outward as I pulled out the connectors.
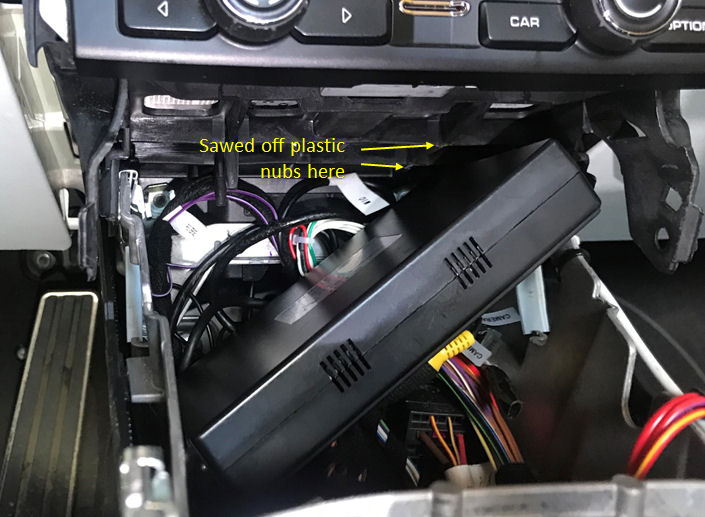
Now comes the fun part. At first I convinced myself that there was just no way the external unit was going to fit in the space under the PCM, until I noticed that there were four plastic "pins" hanging down and taking up space that didn't really seem to serve a purpose (probably just remnants of the injection molding). By removing the two pins on the right-hand side and orienting the external unit at an angle, it fit in with just enough space. To remove the pins, I used a hacksaw blade with one end wrapped in a paper towel. The end result is shown in the photo below. (Sorry, I didn't take this photo until after the external unit was in place.) You can now move on to Step 2 and beyond in the instructions.
When you position the external unit in the area under the PCM, it is very important to position the unit upside down, so that the aerial connectors fit in the space under the aluminum frame on the left-hand side. (See above photo.) Also, it is a good idea to pull the camera-cable connections (power and video) through to the other side of the aluminum frame near the driver's side. This way if you later need to remove or swap out the camera, you just pull off the left-side trim and you don't have to again remove the PCM and console.
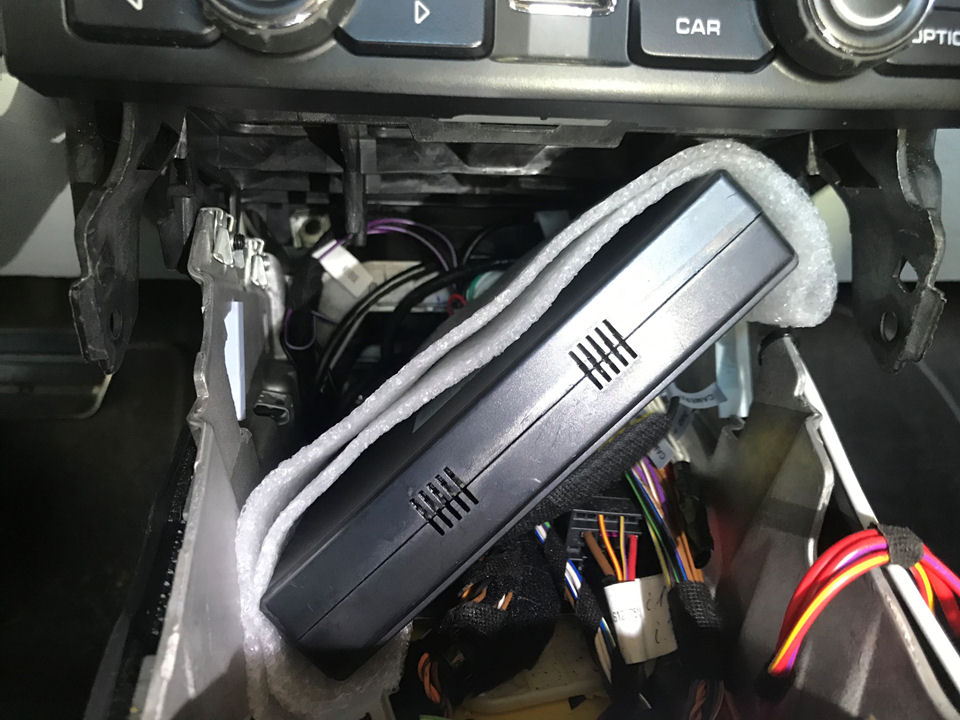
Once you have tested everything out and before you start putting everything back together, you should slide the external unit out enough to wrap some foam around it to keep it from rattling. As you push it back in, it should fit tight enough that no other means of securing the unit is necessary. When you do this, be sure not to cover the ventilation slots on the external unit. This is why in the photo the foam does not cover the top (now on the bottom) side of the unit.
OK. I think that's about it. Good luck with your installation and please add any further tips you might have as comments to this thread.
P.S. If you happen to have a Cabriolet, you might want to take a peek at my thread "Rear Camera Cable Install in 991 Cabriolet" in this same forum.
Last edited by CraigSS; 02-05-2020 at 07:38 PM.
Reason: Wrong size Torx driver
I�m so glad I googled before I started. Excellent post. I�m about to start the install today. I will be installing a numeric shifter (I have a manual cab c4s) at the same time. Under the controls the external unit goes! Thanks so much for the informative post. I bought the rear camera as well but no desire to remove the bumper today.
I just did this install with a rear camera this past weekend. I did the camera/bumper on Saturday and the rest on Sunday.
The bumper is actually really easy to remove. There's one screw in each tire well that was difficult for me to remove due to my car being lowered, but I was able to reach it with a low profile wrench.
The back of my radio and one of the connecters were different than the instructions, just like OP...and I really wish they took pictures a little further away from the PCM because it was hard to tell exactly what you were looking at sometimes. All in all, everything went well at Nick at NM is awesome.
I did have to disconnect everything and bring it back into the house to check my ribbons..the PCM booted and there was no video. Sure enough, I didn't push the connector down far enough on one of the display ribbons.
UH2 - saw your post and am working on my install this weekend. Looks like you did this in a Coupe (vs Cab) and I was curious about what path you ran the camera cable? I'm struggling w/ this as the RCA's are quite big and finding adequate path into the cabin has been tough. Any advice would be much appreciated.
TIA
Sam
Originally Posted by UH2
I just did this install with a rear camera this past weekend. I did the camera/bumper on Saturday and the rest on Sunday.
The bumper is actually really easy to remove. There's one screw in each tire well that was difficult for me to remove due to my car being lowered, but I was able to reach it with a low profile wrench.
The back of my radio and one of the connecters were different than the instructions, just like OP...and I really wish they took pictures a little further away from the PCM because it was hard to tell exactly what you were looking at sometimes. All in all, everything went well at Nick at NM is awesome.
I did have to disconnect everything and bring it back into the house to check my ribbons..the PCM booted and there was no video. Sure enough, I didn't push the connector down far enough on one of the display ribbons.
Sam, I did have to cut off the RCA connector and then solder an RCA connector back on. You can also see my post showing how I ran the cable on my 991 Cabriolet (search on "Rear Camera Cable Install in 991 Cabriolet").
UH2 - saw your post and am working on my install this weekend. Looks like you did this in a Coupe (vs Cab) and I was curious about what path you ran the camera cable? I'm struggling w/ this as the RCA's are quite big and finding adequate path into the cabin has been tough. Any advice would be much appreciated.
TIA
Sam
Originally Posted by CraigSS
Sam, I did have to cut off the RCA connector and then solder an RCA connector back on. You can also see my post showing how I ran the cable on my 991 Cabriolet (search on "Rear Camera Cable Install in 991 Cabriolet").
Craig
I don't remember the exact route, but I took the rear bumper off and ran it down the passenger side floor trim, up to the passenger footwell.
I have a Cab, not a coupe. I also didn't have to cut the RCA cables. I'll look and see if I took any pics of the install.

 02-04-2020, 05:52 PM