When you click on links to various merchants on this site and make a purchase, this can result in this site earning a commission. Affiliate programs and affiliations include, but are not limited to, the eBay Partner Network.
How I Installed 991 Euro Spec Folding Sport Bucket Seats (P03) in a US Car
!!! WARNING and Disclaimer !!! This is not a guide, it�s just documentation of what I did, and I am NOT recommending you follow suit. Much of what is detailed below is tricking the car�s air bag system into thinking these seats are compliant. Any tampering with the car�s air bag system will put yourself and your passengers at risk. I do not take any responsibility for what you do with the information detailed in this post/thread, this information is offered for you to use or not use at your sole discretion and understanding of the serious risks involved.
When I installed these seats I quickly found out that neither seat is plug-n-play, and that I got an airbag light on my dash after installing the seats.
These are the options I had:
Live with the airbag light always on (and potential risks associated with that).
Have my car coded to remove/fix the airbag light. (A few places, like BGB Motorsports, have been able to do this)
Remove parts from my original US seats and retrofit them to the Sport bucket seats. (Least expensive solution)
Buy the necessary parts and install them on my new Sport bucket seats.
The details below show how I went about option #4 to eliminate the airbag light by "satisfying" all the car�s requirements (i.e. tricking), as well as how I retained the seat heating functionality on the Sport bucket seats.
Error Codes
These are the error codes I got when I installed the Sport bucket seats without any modifications.
Driver�s Side:
002804 - Seat position sensor driver 5%, open circuit
Passenger Side:
002B04 - Seat position sensor passenger 5%, open circuit
002104 - Front passenger buckle, open circuit
00611F - Seat occupancy detection, open circuit
Parts
Here are all the parts I bought to solve these error codes. I tried not to remove anything from my original seats (except one thing because I wasn�t sure if a new part would work without coding).
Ordered from the Dealer:
(1) 991.622.784.01 - Passenger Seat Wiring Harness. This is the simplest harness I could find with all the connections I needed for the passenger side. It�s from a 991.2 GT3 with 4WSS+ w/ seat heating. However, I did need to modify this harness to use the correct connector for the seating heating on the sport bucket seat.
(1) 991.803.184.07 - Passenger Seat Belt Buckle.
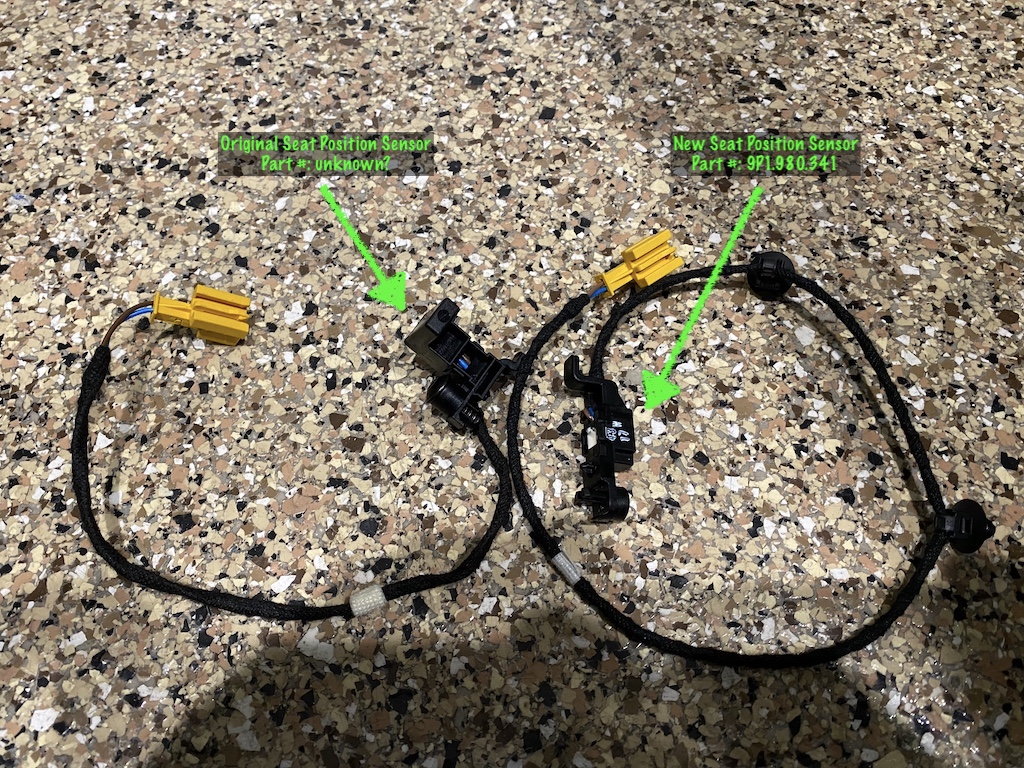
(2) 9P1.980.341 - Seat position sensor. Need one for each side (driver seat and passenger seat). This actually isn�t the correct part number for a 991, because the dealer was having trouble figuring out the right part number. It�s for some other car in Porsche�s lineup (Cayenne?), but it worked well enough (even though it looks very different).
(1) 9P1.971.391.C - Driver Seat Wiring Harness. This was a sacrificial part for me. I used it to pull some pin/wires from to make my seat position connection on the driver�s side sport bucket seat. And I used it to pull a seat heating connector off of, so I could splice it on to the passenger side harness I bought (which had the wrong type of seat heating connector).
Found on eBay:
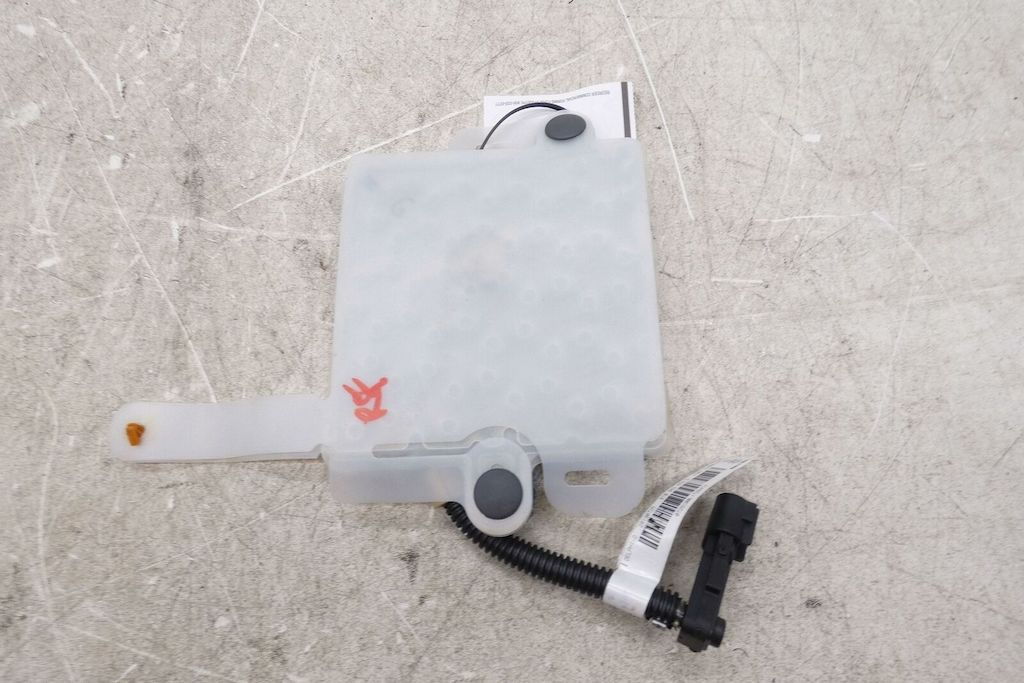
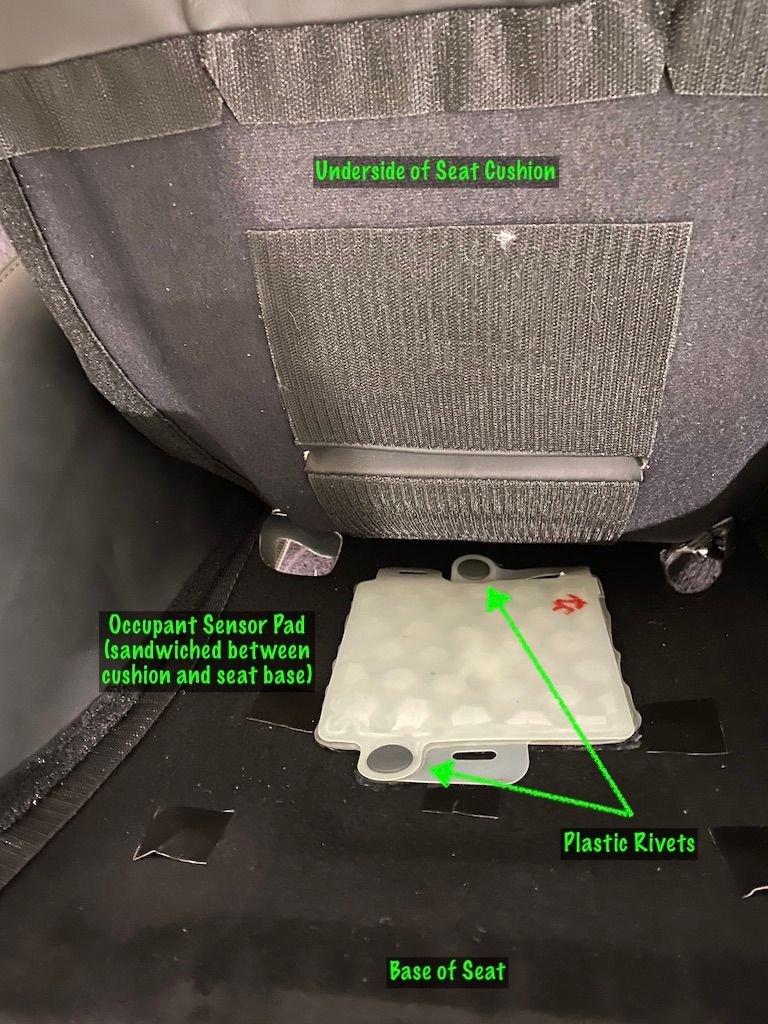
(1) Passenger Occupant Sensor Pad. There isn�t a good way to buy just this part from the dealer. It�s sold as a matched set with the sensor module, sensor pad, and seat cushion, which are all calibrated together (see service manual warning below). Also, this matched set is very expensive (I�ve heard something like $2500?). When searching eBay, any Porsche/Audi/VW pad ~should~ work as long as it has the right connector (typically from around 2012 to 2017 model year vehicles)
(1) Male Seat Belt Buckle Clasp. Bought this to leave permanently installed in my new Passenger Seat Belt Buckle.
Reused from Original Passenger Seat:
(1) 970.618.245.03 - Passenger Occupant Sensor Module. I�ve heard this part is coded to the car, and I couldn�t find one on eBay for cheap enough to test out that theory, so I just removed it from my original passenger seat (which was very easy to do).
Here's a warning from the Service Manual about replacing the Occupant Sensor.
Here's one example of an Occupant Sensor Pad that can be found on eBay. They can be found in several different shapes. This particular one from a Porsche Cayenne ended up fitting very well.
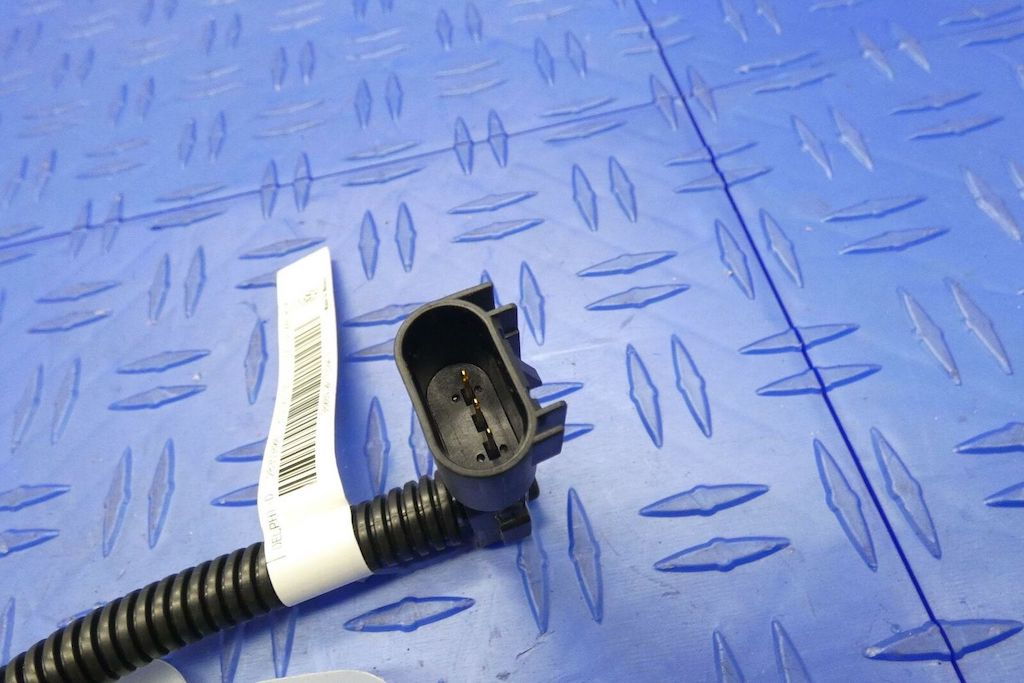
Most important thing to pay attention to when I was shopping for one of these Occupant Sensor Pads on eBay is that the black connector (pictured above) has a 3-pin layout (pictured below).
Here's a picture that shows the difference between the original 991 Seat Position Sensor, which I couldn't find the part number for, and the Seat Position Sensor I ended up purchasing for this project (which ended up working out fine).
Solving the Airbag Light on the Driver Side Sport Bucket Seat
Overview of Steps:
Add Pins for Seat Position Sensor to the main connector of the existing bucket harness
Connect Seat Position Sensor
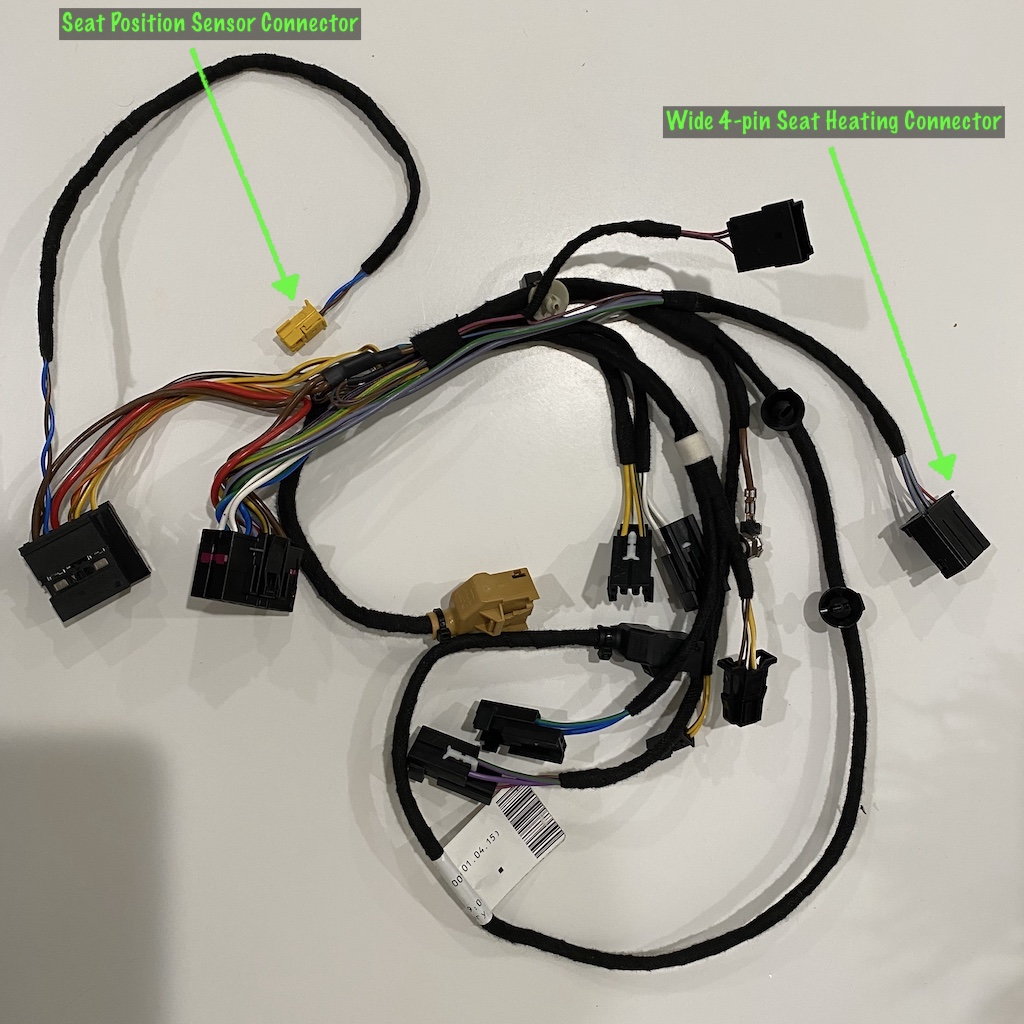
First I started out by un-taping part of the new Driver Seat Wiring Harness I purchased. I wanted to harvest two things from this harness. The Seat Position Sensor Connector and pins, and the Wide 4-pin Seat Heating Connector (to be used later...)
This was relatively easy to un-tape. I also think I could have removed the Seat Position Sensor Connector and pins from my original driver's seat harness (if I didn't want to buy this extra harness), without being destructive to the harness.
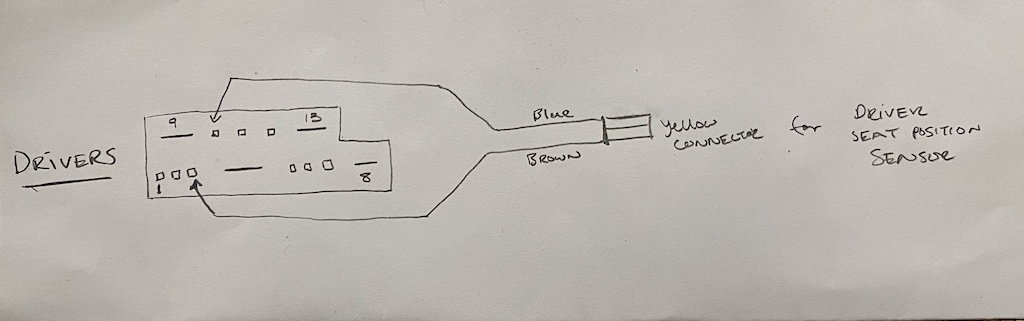
Here's what the Seat Position Sensor Connector and pins looks like once removed from the main harness connector.
Then I simply wired that connector I just removed to the Driver's Seat Harness that comes with the Bucket Seat. Here's the pin layout:
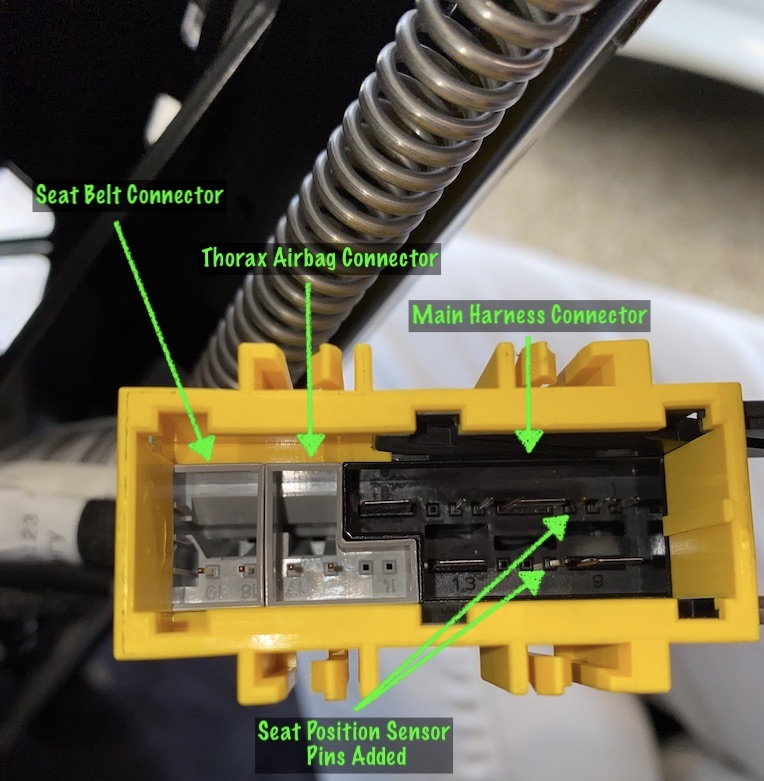
Here's what the main harness connector will looked like once I was done. Also note that each of those pin blocks within the yellow connector (the grey, grey, and black pin blocks) easily slide out; the yellow plastic is just a shell holding all those blocks together.
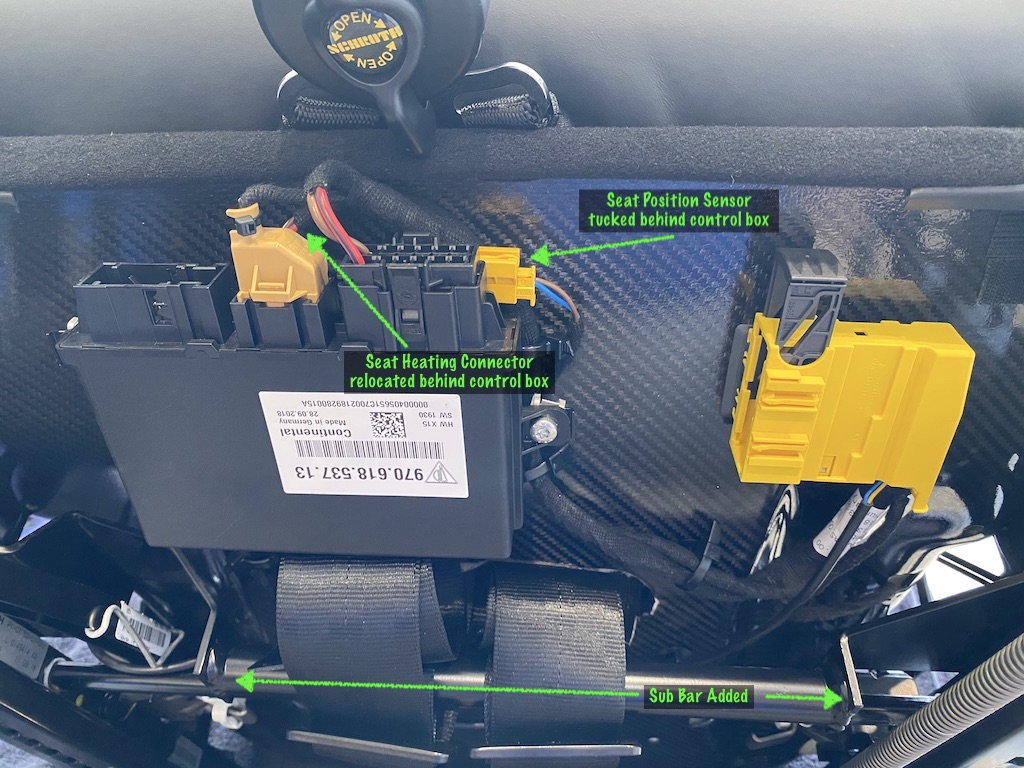
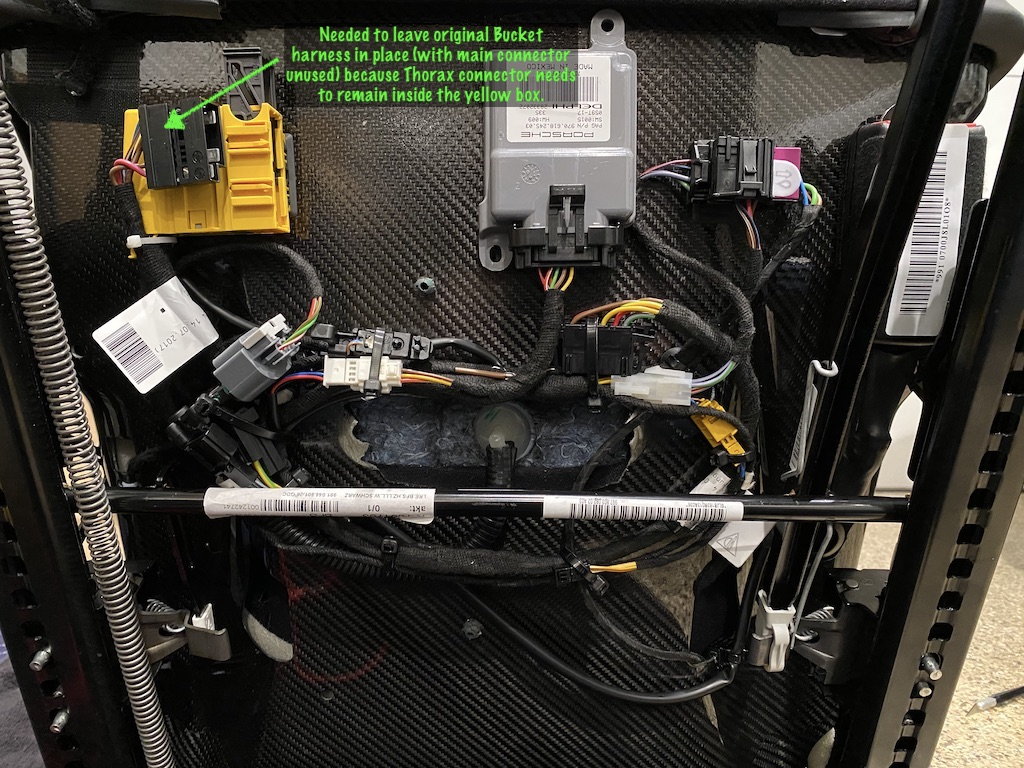
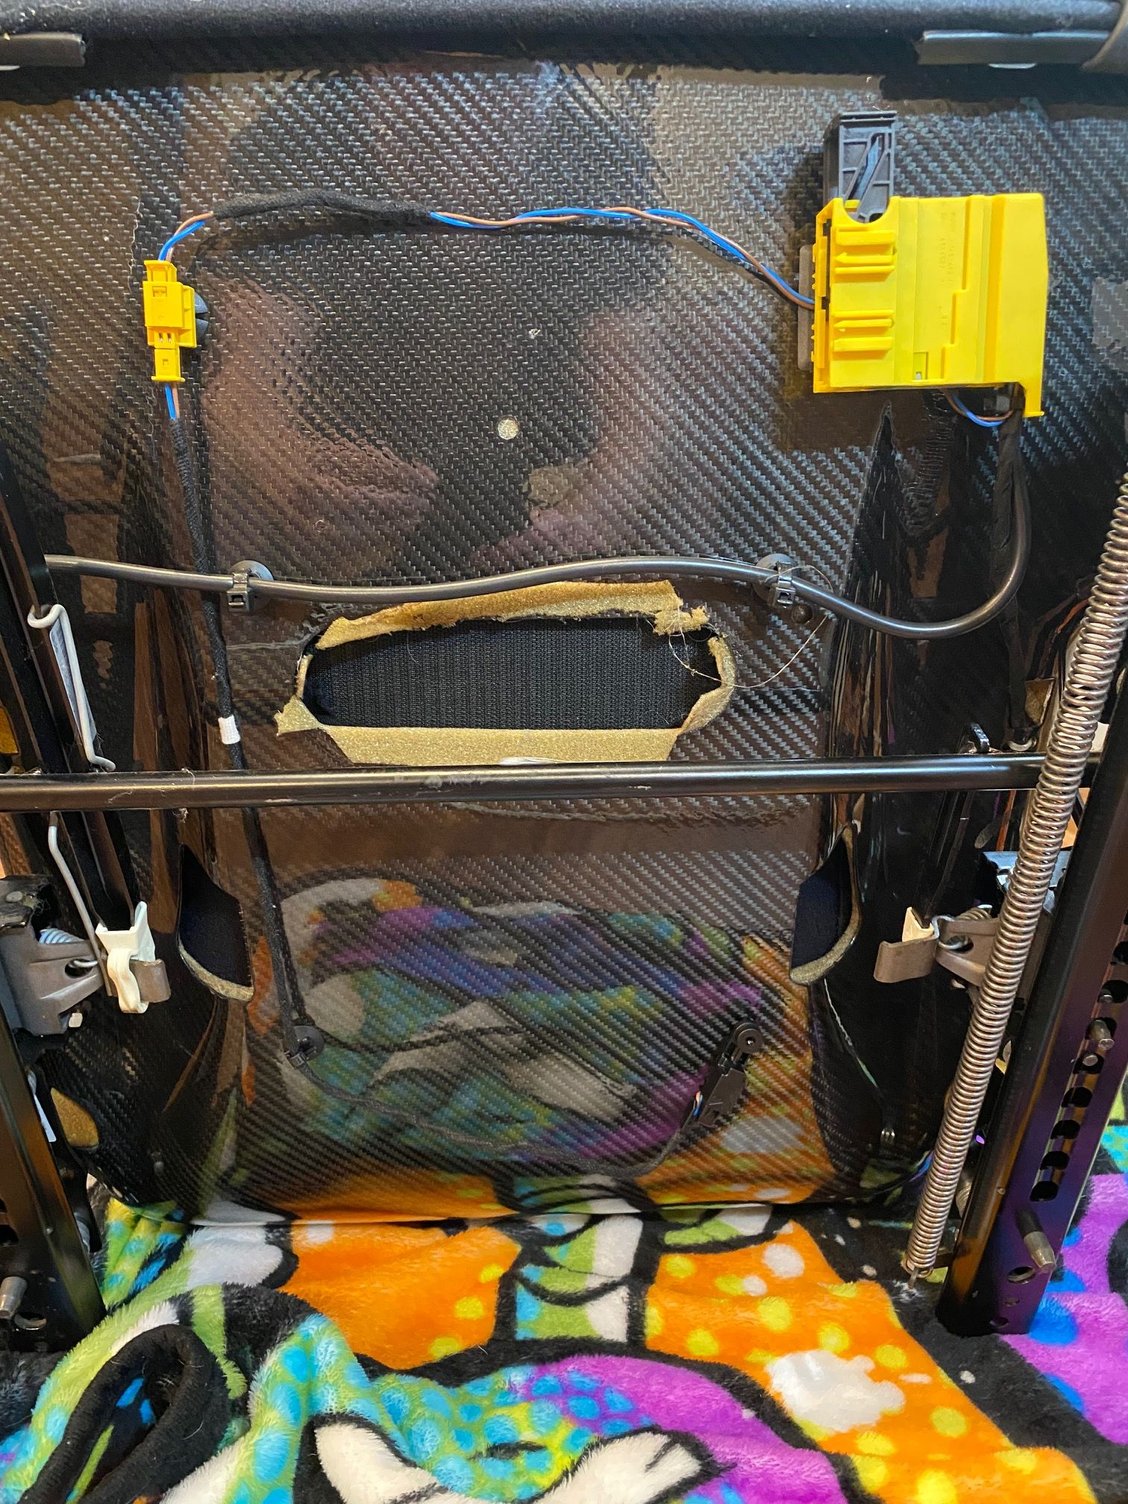
Here's the completed underside of the Driver's Side Bucket
Solving the Airbag Light on the Passenger Side Sport Bucket Seat
Overview of Steps:
Install new Passenger Seat Wiring Harness
Reuse Thorax connector from existing bucket harness
Install and Connect the new Seat Belt Buckle
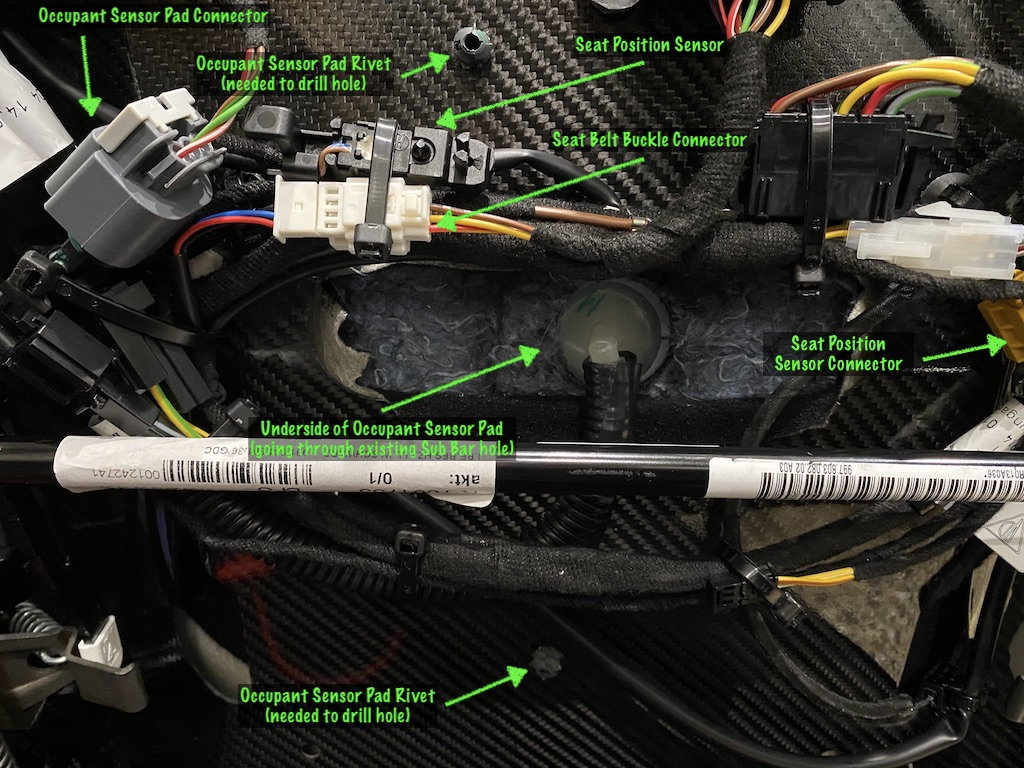
Connect Seat Position Sensor
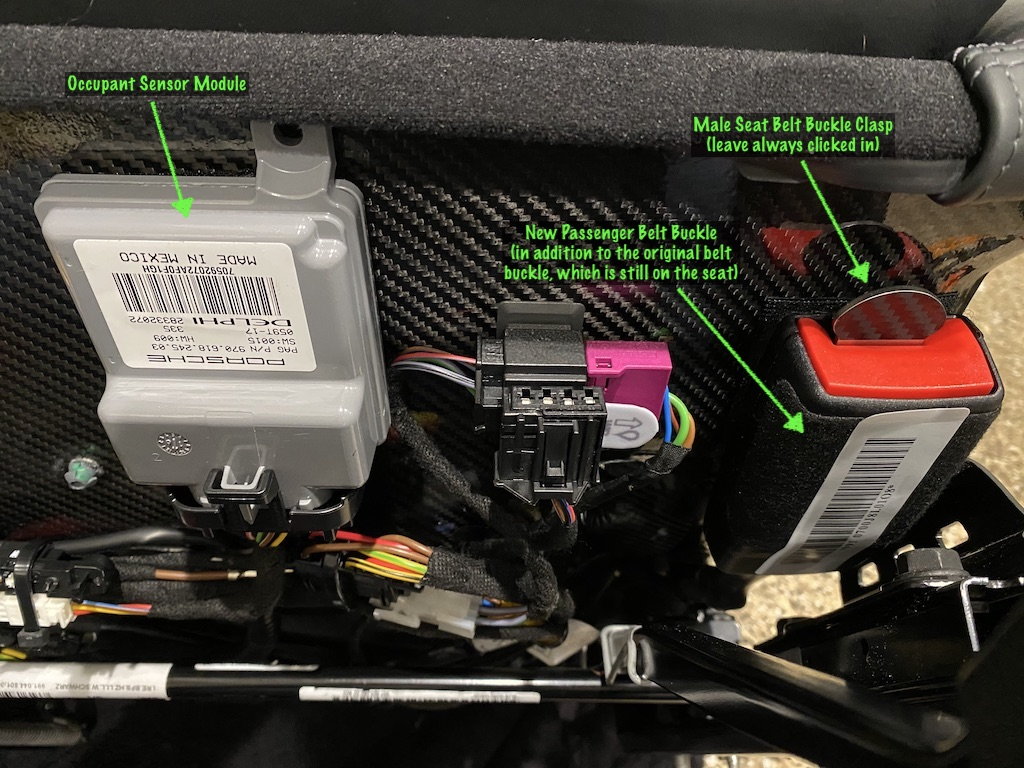
Connect Passenger Occupant Sensor Module
Connect Passenger Occupant Sensor Mat
Once I did all these steps, this is what the completed underside of the Passenger Side Bucket looked like:
Fixing the Seat Heating on the Passenger Side Sport Bucket Seat
Overview of Steps:
Splice the seat heating connector from new Passenger Seat Wiring Harness to correct seat heating connector needed by existing bucket harness
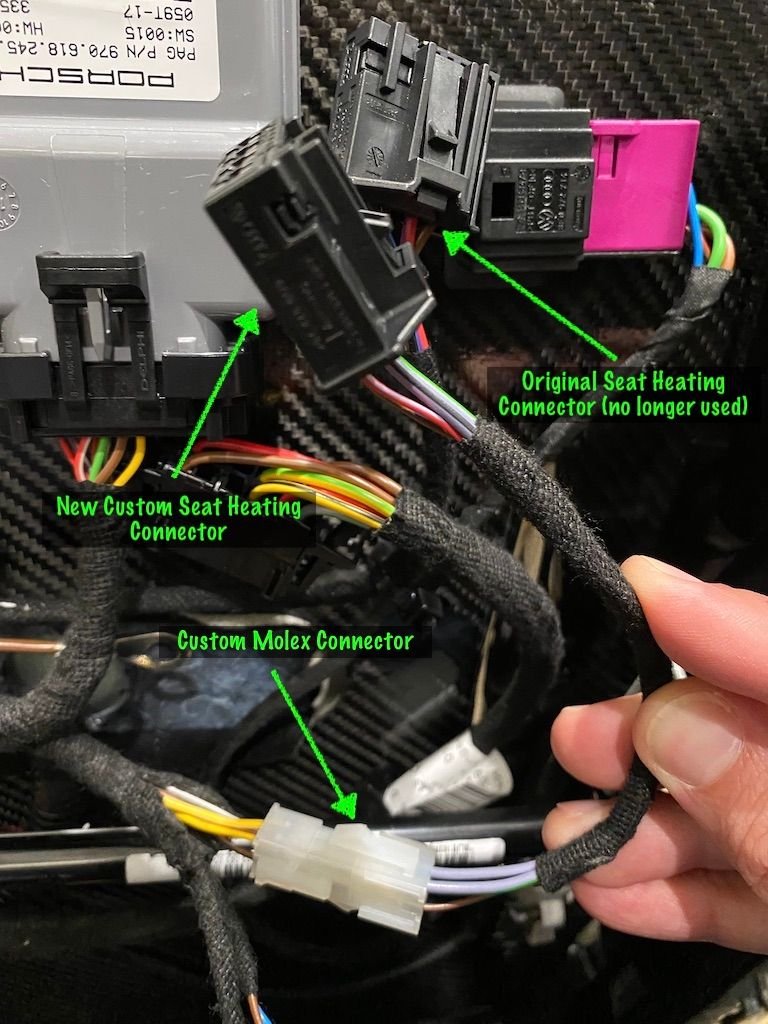
The new Passenger Seat Wiring Harness that I bought doesn't have the right 4-pin Seat Heating Connector needed by the Passenger Side Bucket Seat. It does have all the seat heating pins and wires, but they are just going to the wrong type of connector. So I spliced those wires onto a connector that I harvested from the Drivers Seat Wiring Harness. I created a custom Molex connector to join the two halves.
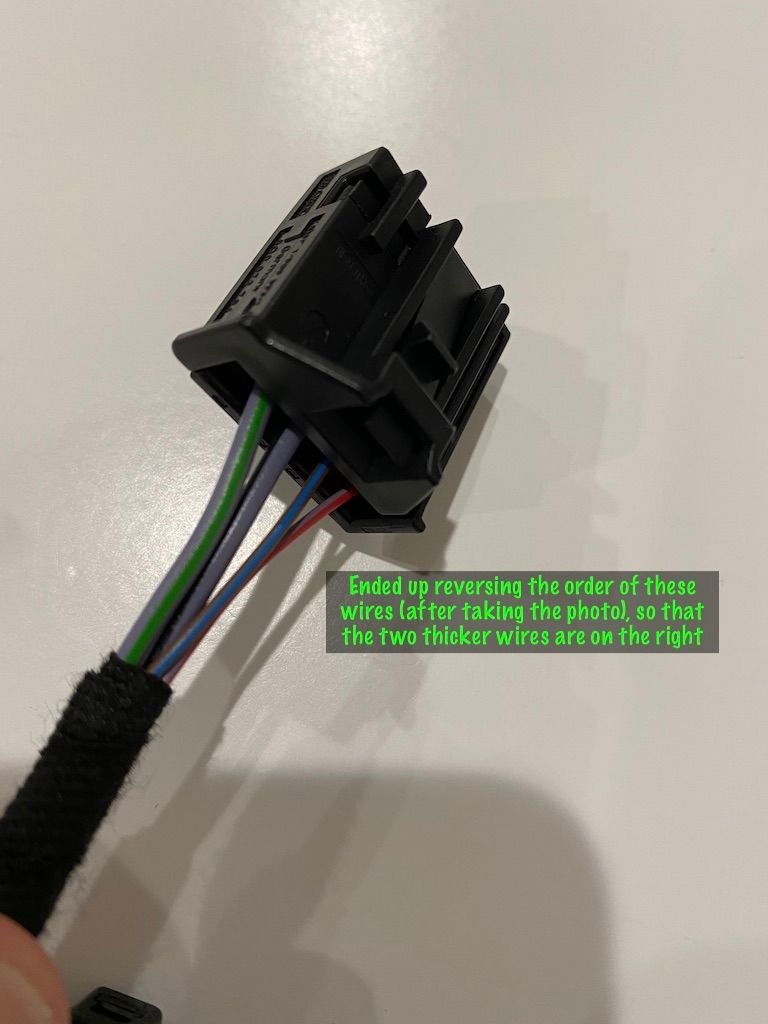
The Passenger Seat Wiring Harness that I bought has this connector:
But I need a connector that looks like this, so I clipped this connector from the Drivers Seat Harness that I bought.
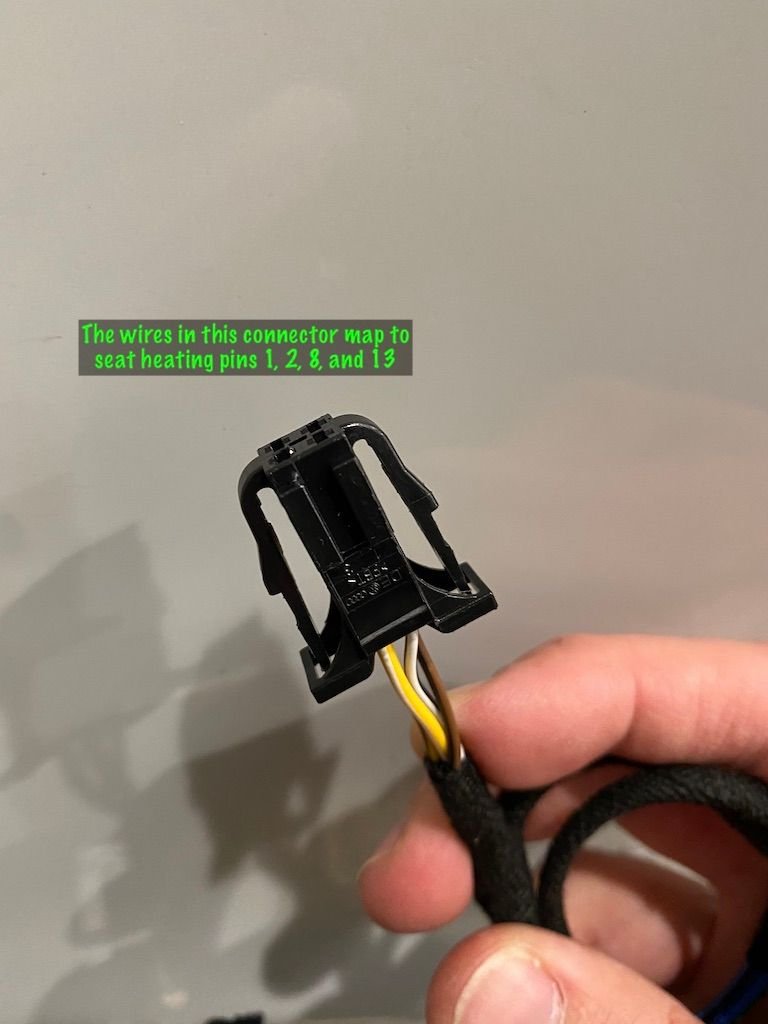
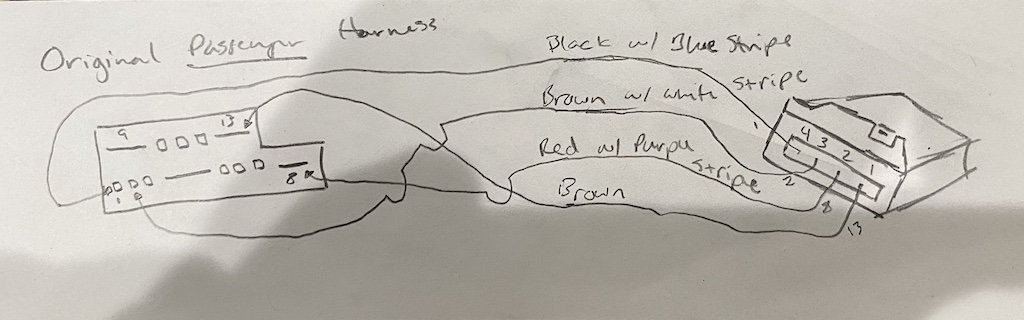
Then I followed this pin layout from the original Passenger Side Bucket's harness seat heating connector:
And created this custom seat heating adapter/connector:
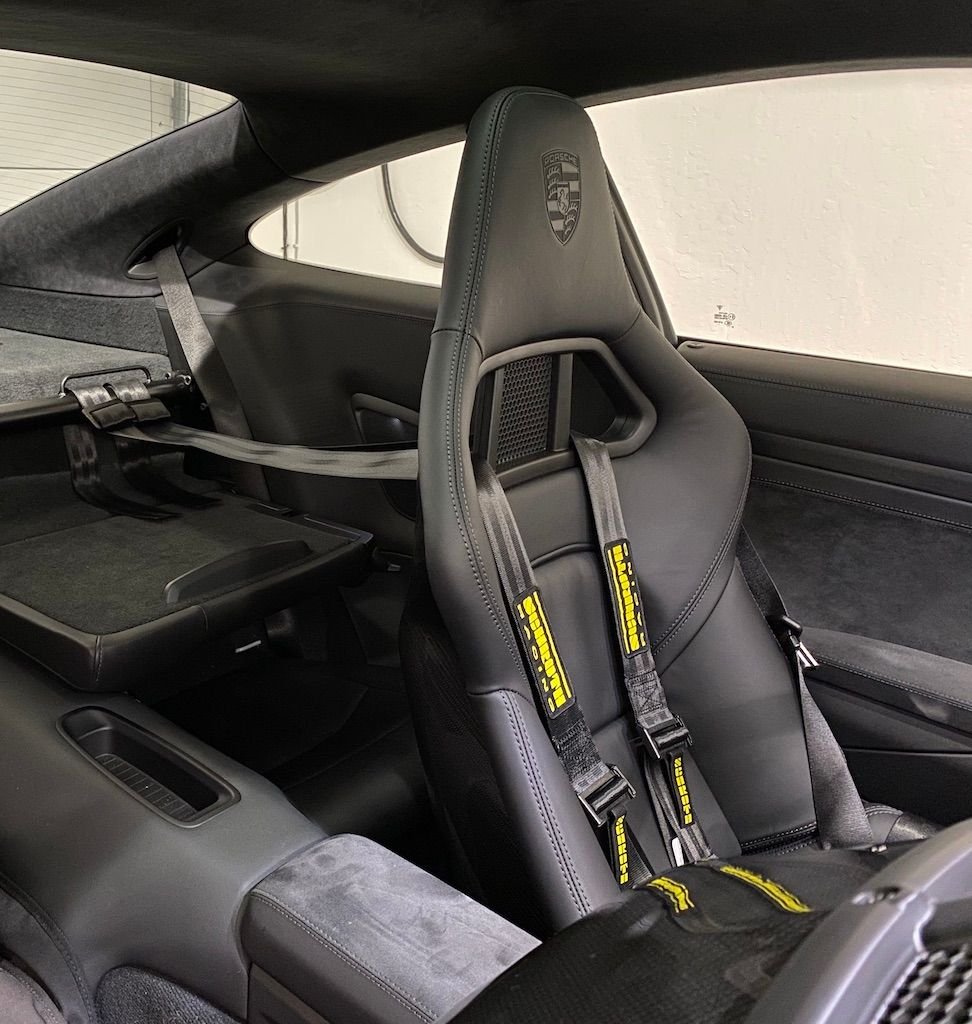
Result
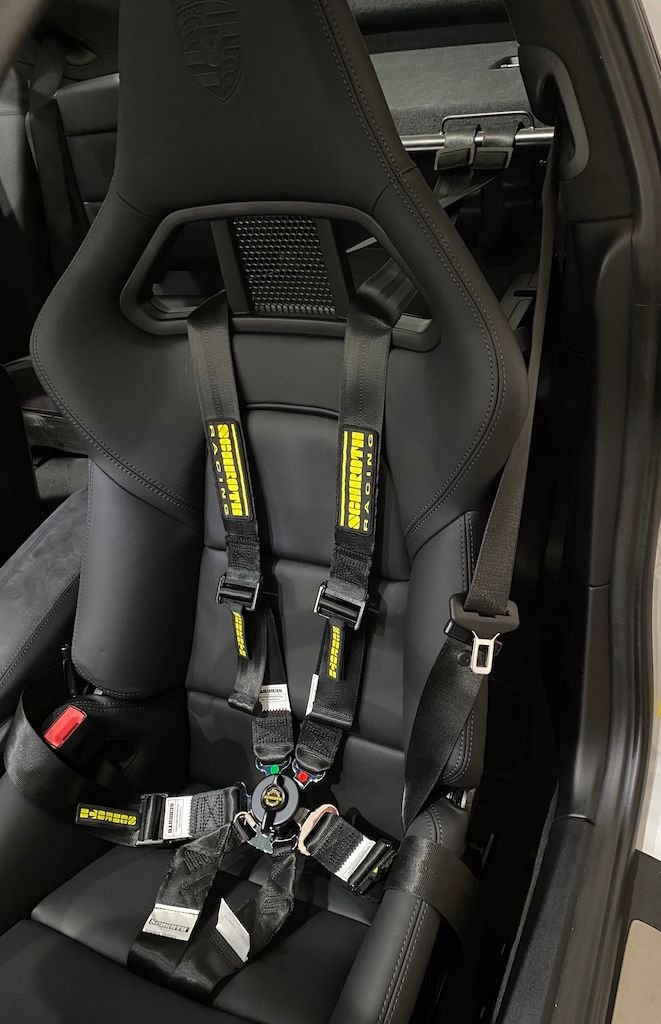
The seats look great, and no airbag light!
Bonus Parts
Plastic Trim Pieces. These go on the front of the slide rails. If I already had manual fore/aft adjusting seats, then I could have just reused all my existing trim. But with the fully electric seats, I could only reuse 2 of 4 of these trim pieces (plus I broke 2 of them, so I just bought a whole new set).
!!! WARNING and Disclaimer !!! I repeat, this is not a guide, it�s just documentation of what I did, and I am NOT recommending you follow suit. Much of what is detailed above is tricking the car�s air bag system into thinking these seats are compliant. Any tampering with the car�s air bag system will put yourself and your passengers at risk. I do not take any responsibility for what you do with the information detailed in this post/thread, this information is offered for you to use or not use at your sole discretion and understanding of the serious risks involved.
Great work and very clean! I luckily enough have these from factory in my 991.2 GTS. Am just researching harnesses now and wanted to know what solution you went for mounting your lap straps and sub straps?
Was hoping the the same GT3 mounts were pre-drilled in the floor pan, tunnel and pillar to install eye bolts but it seems that this isn't the case.
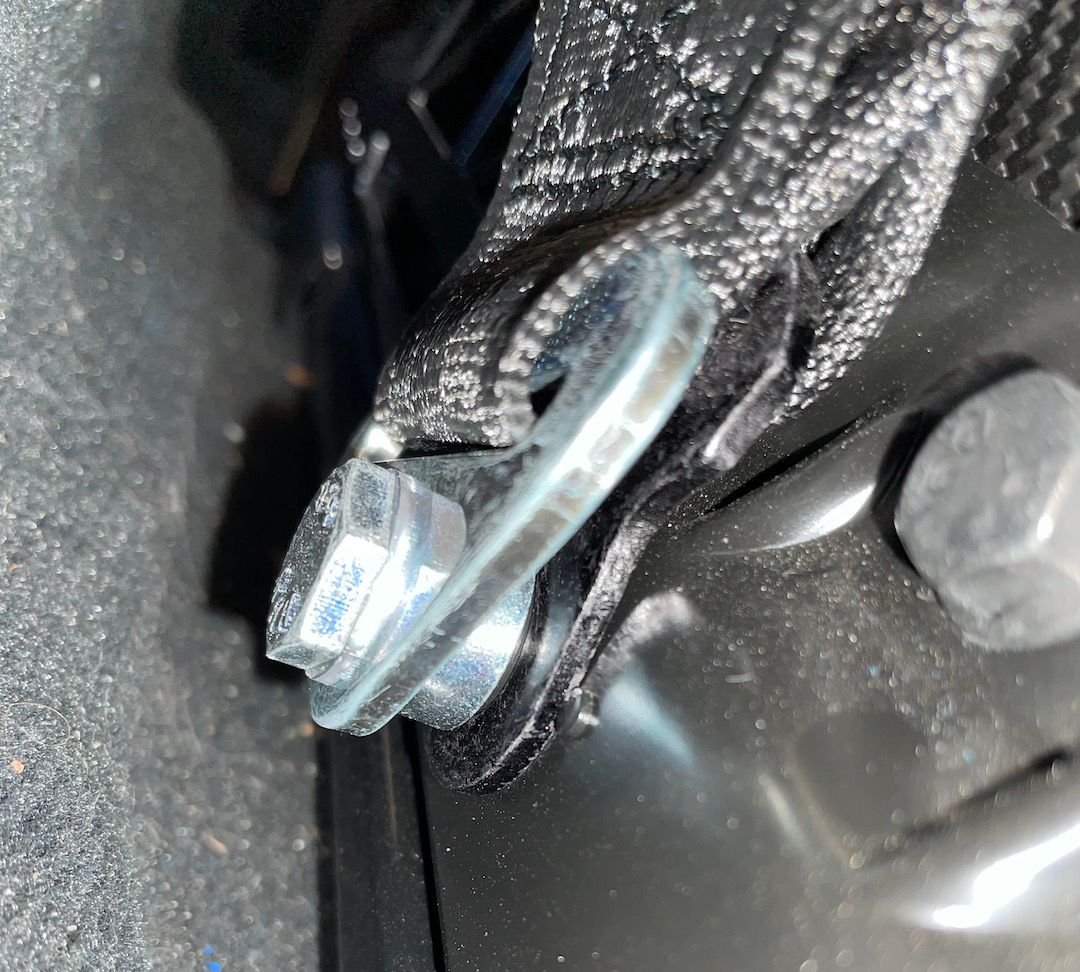
For the lap belts. I'm just using the mounting holes that are already on the seat.
Here's a couple pictures of the driver's side, where I've got both the 3-point belt and 6-point belt mounted to the same point. I'm just using a spacer to separate them.
I am taking on this project myself as well. Replacing the 18 way seat in my 991.1 with US sport buckets from a 997 GT2. Only doing the the drivers side for now since I run solo with PCA. My driver side seat is a little different on the bottom than what has been pictured above since the seat doesn't have seat heating. I have installed the seat position sensor as described above and will put the Cantrell sub mount bar on next and then install into the car. Does anyone think I will run into airbag issues? Was also wondering if I should just leave the 3 point belt anchored to the pillar behind the seat or anchor it to the seat itself?
Its an entry level DIY in my opinion. 3-4 hour job max including the setup of the wiring, extra parts, etc.
No offense to Luca84 or anyone else who would be overwhelmed doing this, but I have a next-door neighbor who literally needs help changing a lightbulb!
For many of us, it would just be a matter of following the instructions and it's pretty easy. For others, their mind just doesn't work the way our do.
I would LOVE this mod, however, I'm not sure the wife would enjoy the ride. Yes, I take my wife and daughter (and her friends) in my car all the time. It's part of the reason I got a 911 - usability.
Thanks for this thread. Maybe in the future I'll be able to go with this upgrade. I know I'd love it!
I only did the driver side, the driver side is much easier. My seat was used from a US 997 and did not have heated seats. In that configuration I only needed to wire in the seat position sensor to the seat connector, just 2 wires. That is it. I ordered the donor wiring harness and sensor from Pelican using the part numbers above. In all, maybe 2-3 hours. Get a friends help that is handy and a DIY'er and you can knock it out in an afternoon after all the parts arrive.
I needed to keep the sofa on the passenger side for my wife and her bad back. Someday maybe I will get around to installing it. It's not the best look but it allows me to have a proper harness for DE days which was my sole purpose for the mod. I went with the Cantrell roll bar and sub mounts. Now for the roll bar, I took that to a shop as I felt that was step to far for my DIY abilities , I have a real fear of removing interior body panels, never can get them to go back in again with out breaking something or it being loose.
Wow @LWG , red stitching and alcantara centers! Seats look perfect in your car!
After reading @jbaker136 's post #191 (above). I also think you don't need to buy, 9P1.971.391.C - Driver Seat Wiring Harness.
I think what I would do now is remove these 5 pins (7, 11, 12, 3, and 10) from the newly purchased Passenger Seat Wiring Harness. Then re-pin those (into the same slots) onto the main passenger side harness that comes with the passenger bucket seat. Now this seat will be done (and seat heating will work) with no soldering or needing to crimp wires together. That'll make the passenger side super easy.
So then, what to do about the driver's side bucket? Well it only needs 2-pins to be added to connect the seat position sensor. So I'd remove pins 1 and 2 (which haven't been harvested yet) from the newly purchased Passenger Seat Wiring Harness, and put those into the main drivers side harness under the drivers bucket seat, but put them in positions 3 and 10. Then take those 2 wires that were just added (into position 3 and 10) and solder or crimp them onto the 2 wires of the newly purchased seat position sensor. And now the driver's side is done, and only 1 purchased seat harness is used to harvest wires from.
First, this thread is amazing, thanks to the OP and everyone else for adding all this info!! Second, I'm in the process of attempting this install and discovered that you can depin the 2-pins in the seat position sensor from its connector and simply put them in positions 3 and 10 thereby requiring no soldering or crimping at all. I also found that a SIM removal tool to be very helpful in depinning. Just my $.02.


 12-02-2020 | 06:02 PM


 , I have a real fear of removing interior body panels, never can get them to go back in again with out breaking something or it being loose.
